25 Transformative Basement Ideas for 2025: Your Ultimate Guide to Underground Renovation
According to a recent National Association of Home Builders survey, basement renovations increased by 27% in 2023, with homeowners seeking to maximize their living space. I’ve spent years helping clients transform their underutilized basements into functional spaces. Whether you’re looking to create an entertainment zone, practical living area, or creative studio, this comprehensive guide covers everything you need to know about basement renovation in 2025.
Basement renovations typically yield a 70-75% return on investment when done properly, making them one of the more financially sound home improvement projects. For most homeowners, this translates to thousands of dollars in added home value while creating usable living space your family can enjoy immediately.
The average basement renovation costs between $20,000-$50,000 depending on square footage, existing conditions, and chosen finishes. This price range reflects the complexity of below-grade spaces, which often require specialized moisture management and structural considerations beyond typical room remodels.
Planning Your Basement Transformation
Before diving into specific design ideas, you need to evaluate several key factors that will impact your basement project. Understanding your space’s purpose, budget constraints, and structural limitations will help you create a realistic renovation plan. Addressing moisture issues, ceiling height, natural light, and building code requirements early in the process prevents costly mistakes later. When planning your basement transformation, be sure to check out our guide on how to efficiently handle any existing clutter with a professional basement cleanout service to prepare your space for renovation.
Building codes typically require minimum ceiling heights of 7 feet for habitable basement spaces, with some jurisdictions allowing 6’8″ in areas with beams or ductwork. This requirement often becomes the first major hurdle for basement conversions, especially in older homes with lower foundations. If your ceiling height falls short, you’ll need to explore options like digging down or creative beam solutions before proceeding with aesthetic improvements.
Professional waterproofing systems for basements range from $2,000-$10,000 depending on square footage and severity of moisture issues. This investment might seem steep initially, but water damage from inadequate moisture control can quickly exceed these costs while creating health hazards from mold growth. I always recommend addressing water issues completely before installing any finished surfaces.
|
Basement Assessment Checklist |
What to Look For |
Potential Solutions |
|---|---|---|
|
Moisture Level |
Water stains, musty odor, efflorescence |
Waterproofing, dehumidifier, sump pump |
|
Ceiling Height |
Minimum 7′ required for habitable space |
Dig down, raise house, beam solutions |
|
Natural Light |
Window quantity and size |
Egress windows, light wells, solar tubes |
|
HVAC Access |
Ductwork, utilities placement |
Zone systems, mini-splits, soffits |
|
Structural Elements |
Support columns, load-bearing walls |
Engineered beams, strategic layout design |
|
Electrical Capacity |
Service panel capacity |
Panel upgrade, dedicated circuits |
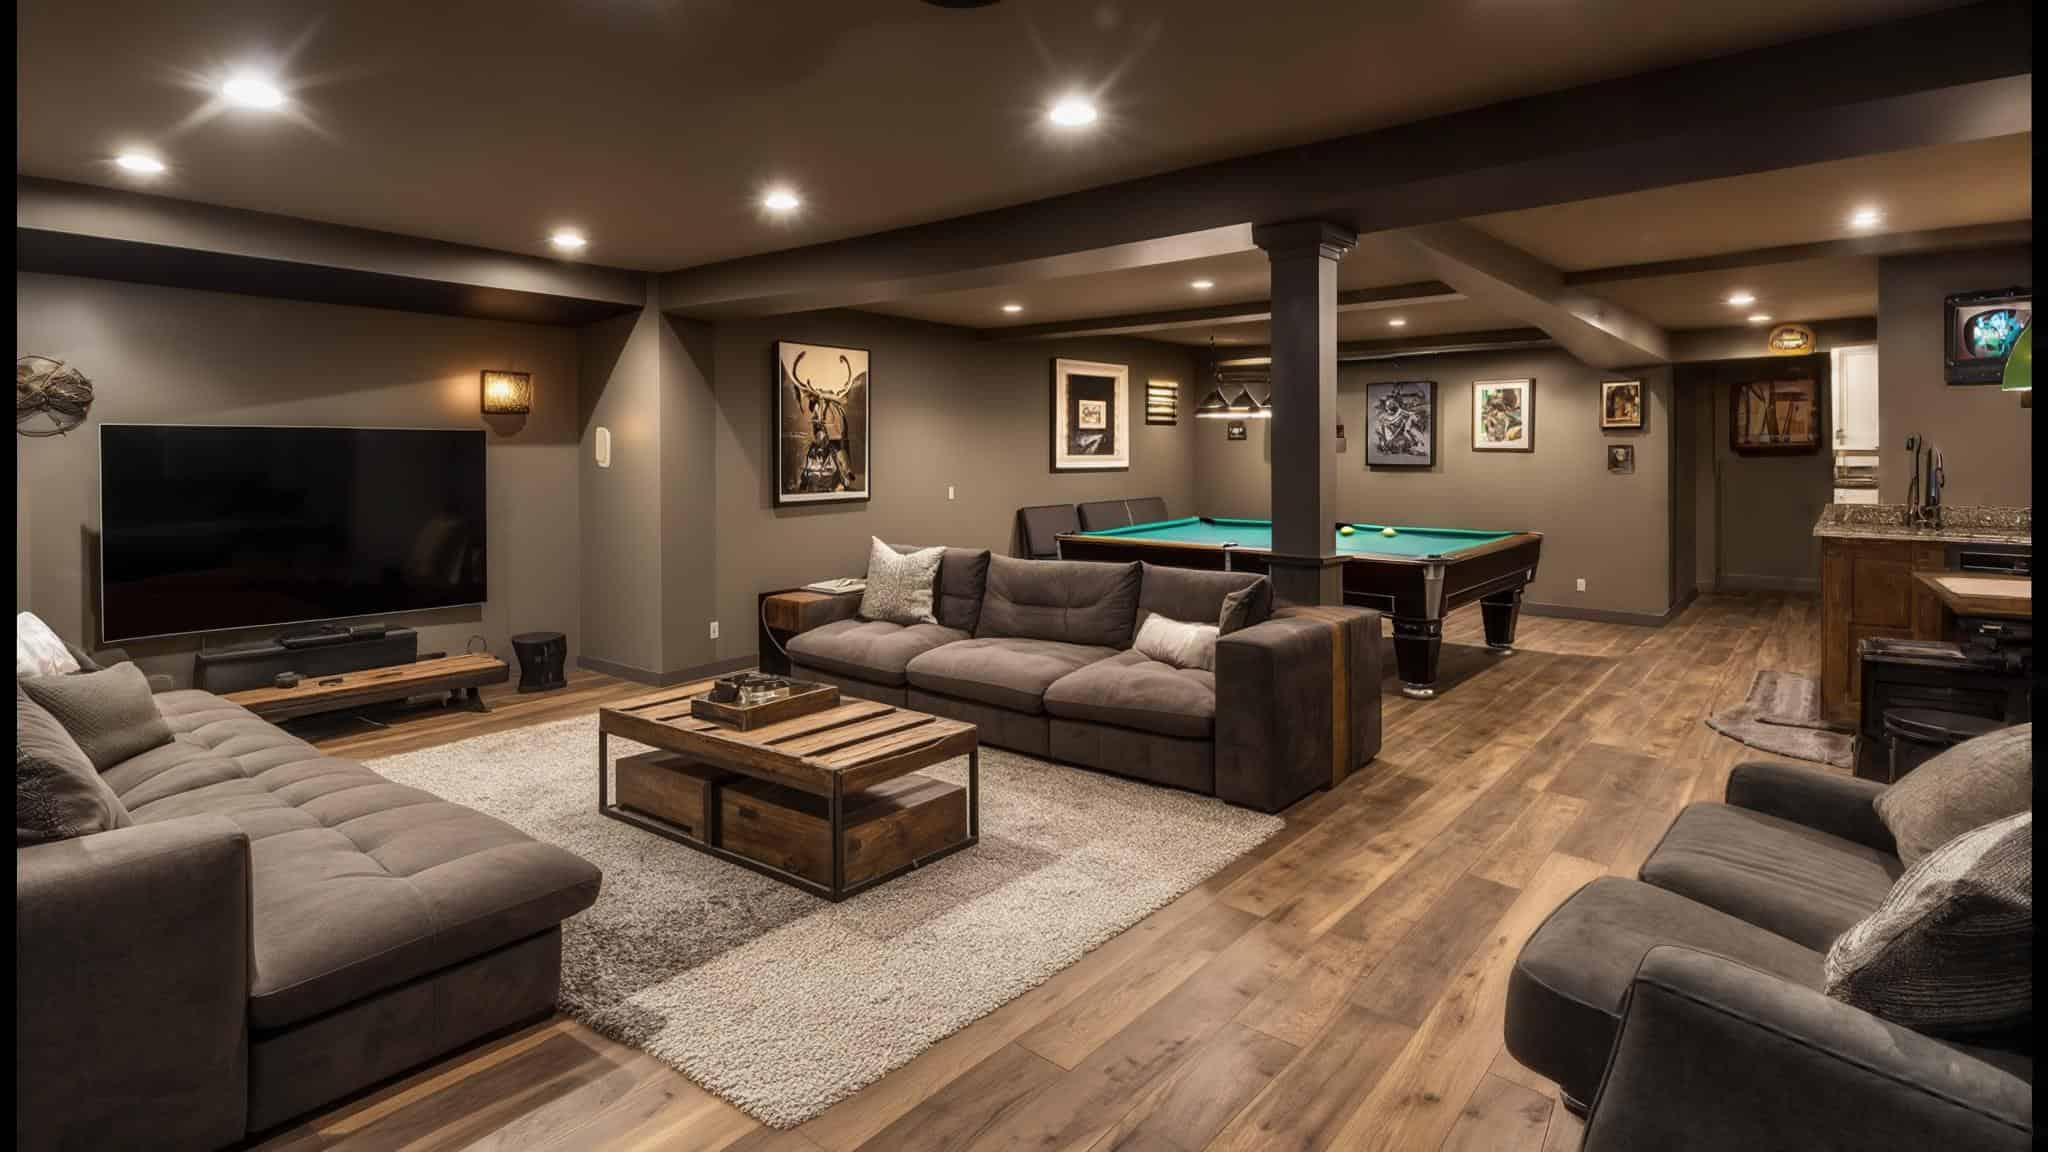
Entertainment and Recreation Spaces
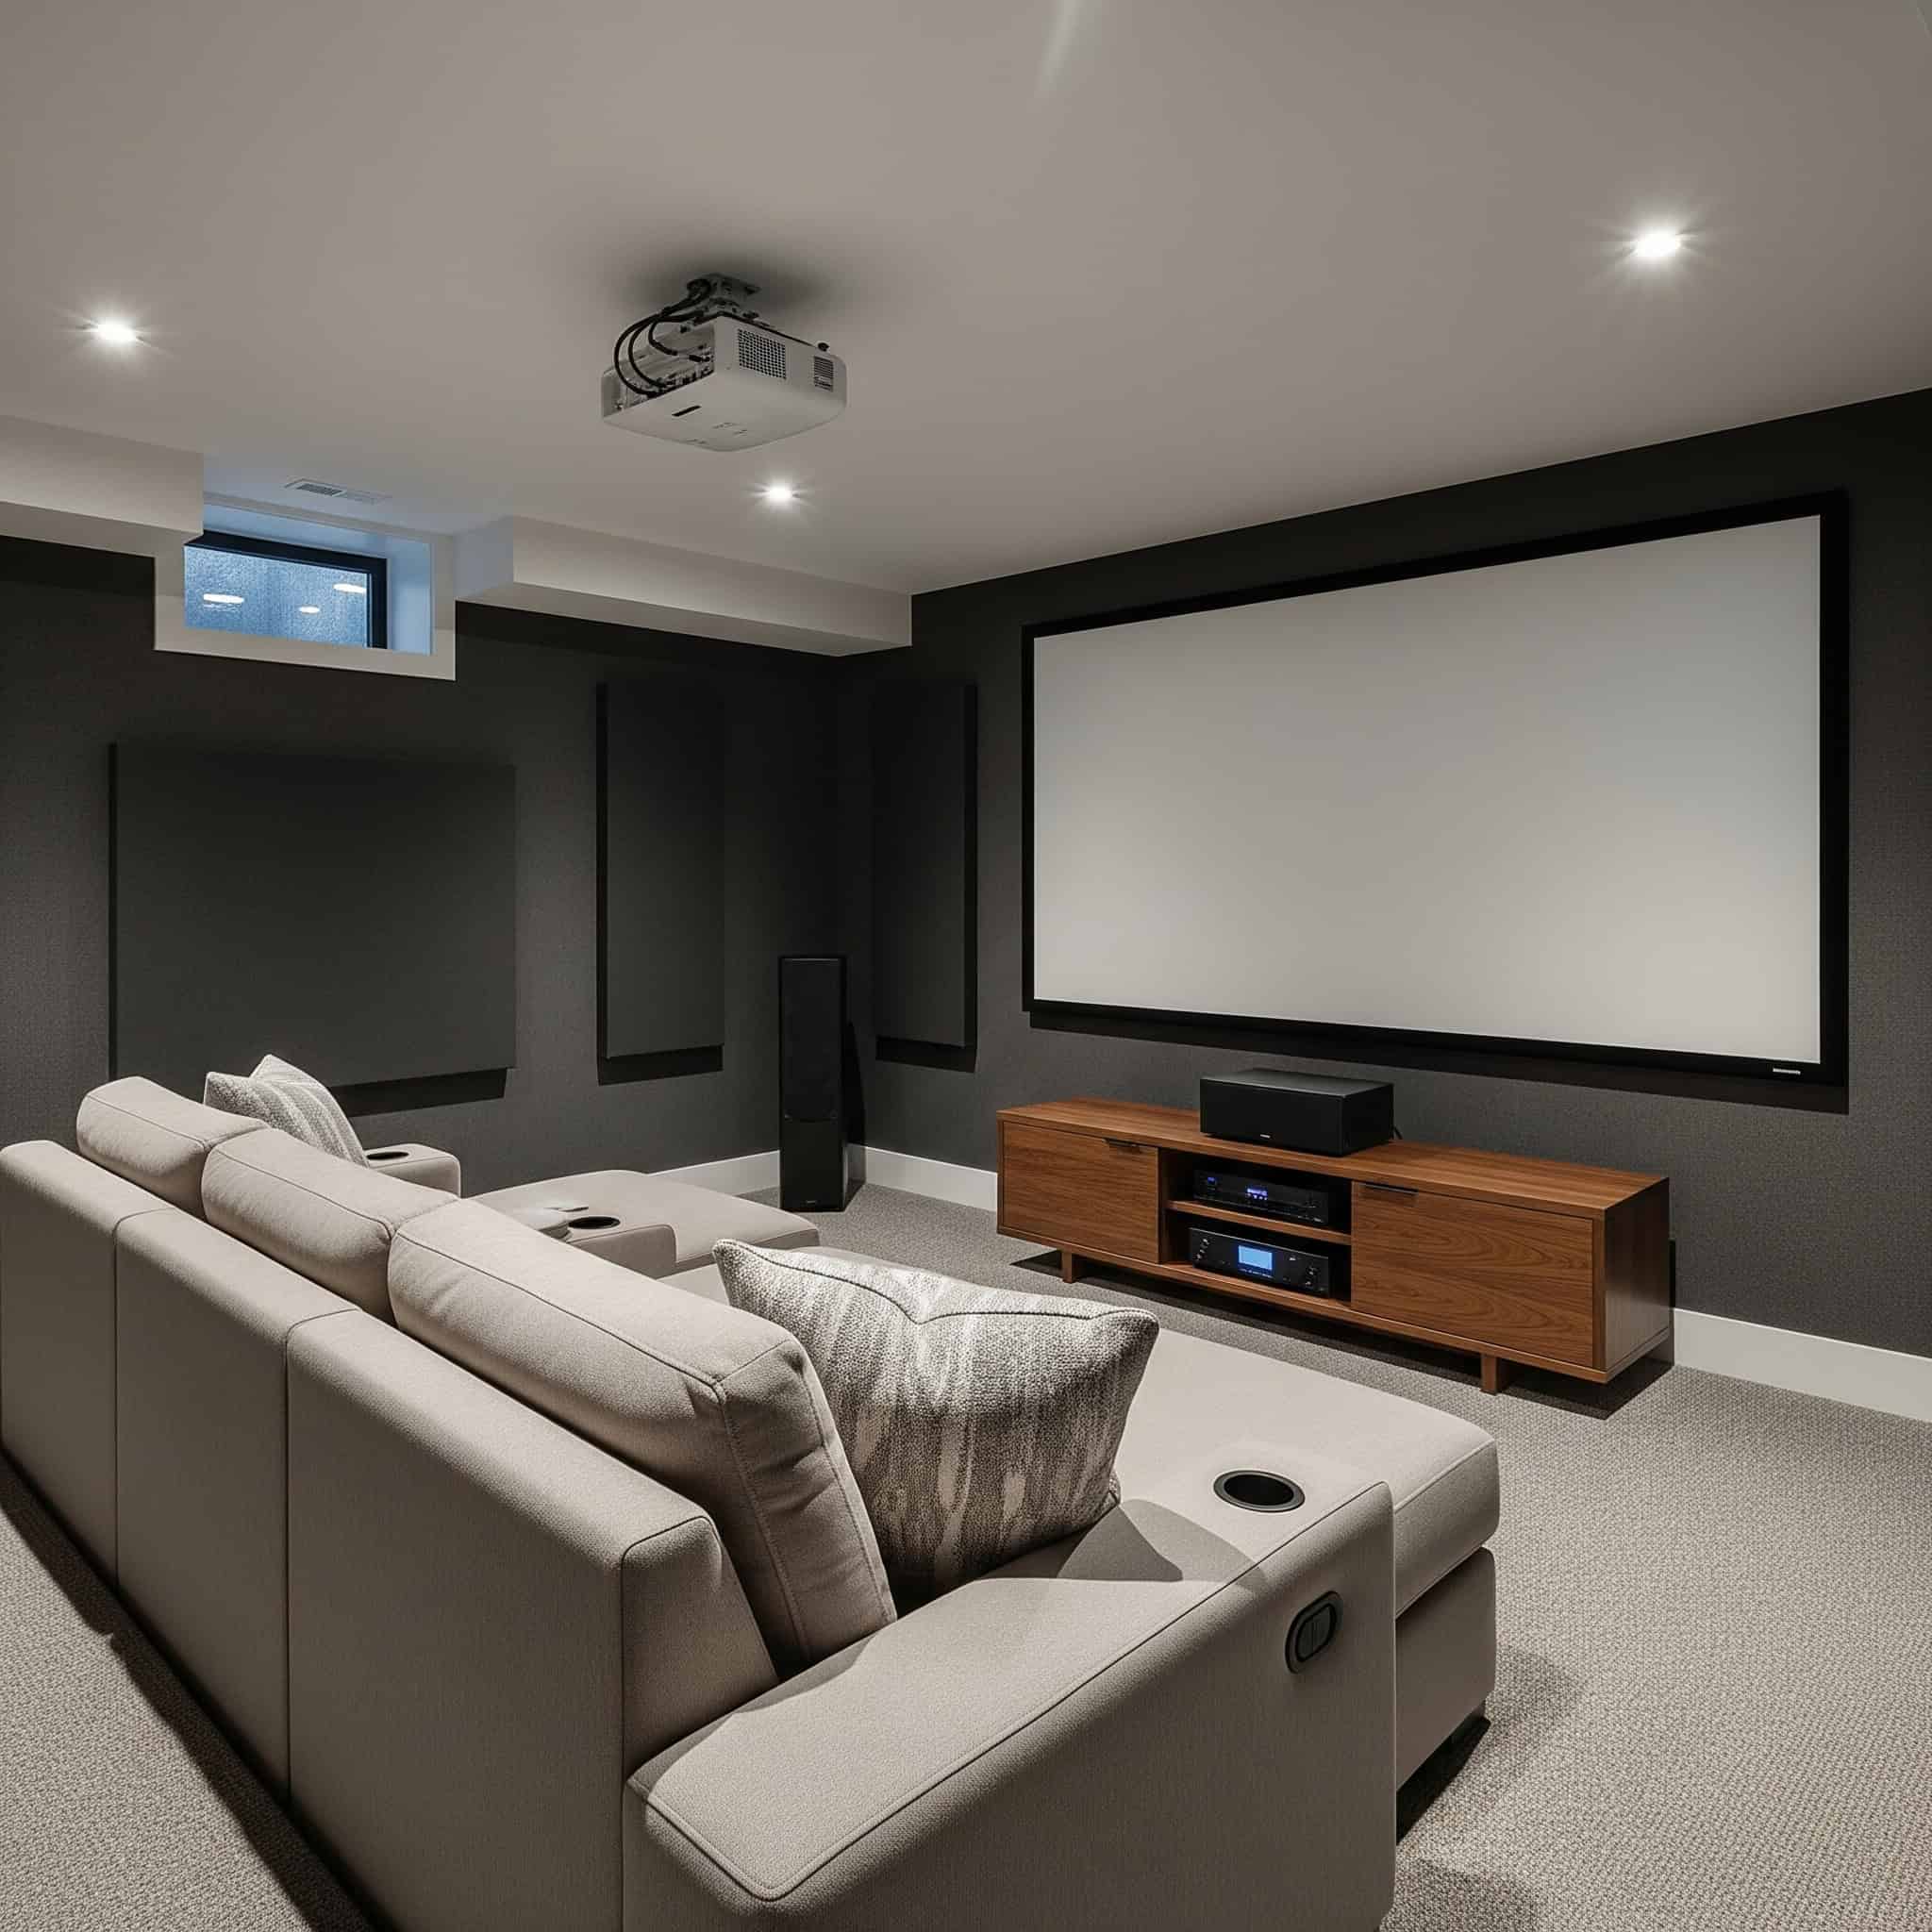
1. Home Theater Setup
A dedicated home theater transforms your basement into a premium entertainment destination. The underground location naturally provides the darkness needed for optimal viewing. Focus on tiered seating with 4-6 reclining chairs, a 4K projector with 100″+ screen, and surround sound speakers. Include acoustic panels for sound quality and a small concession area with a mini-fridge for the complete movie experience.
Proper acoustic treatment requires a combination of absorption panels (to reduce echo) and diffusion panels (to distribute sound evenly), with coverage on approximately 20-30% of wall and ceiling surfaces. This balanced approach creates the ideal listening environment without making the space feel overly dampened or “dead.” I recommend starting with corner bass traps, which address the most problematic low-frequency issues.
Home theater electrical requirements typically include dedicated 20-amp circuits for projectors and audio equipment, plus additional circuits for lighting and accessories. This separation prevents power fluctuations that can damage sensitive electronics or cause picture/sound degradation during peak usage. Working with an electrician familiar with home theater installations can save headaches down the road.
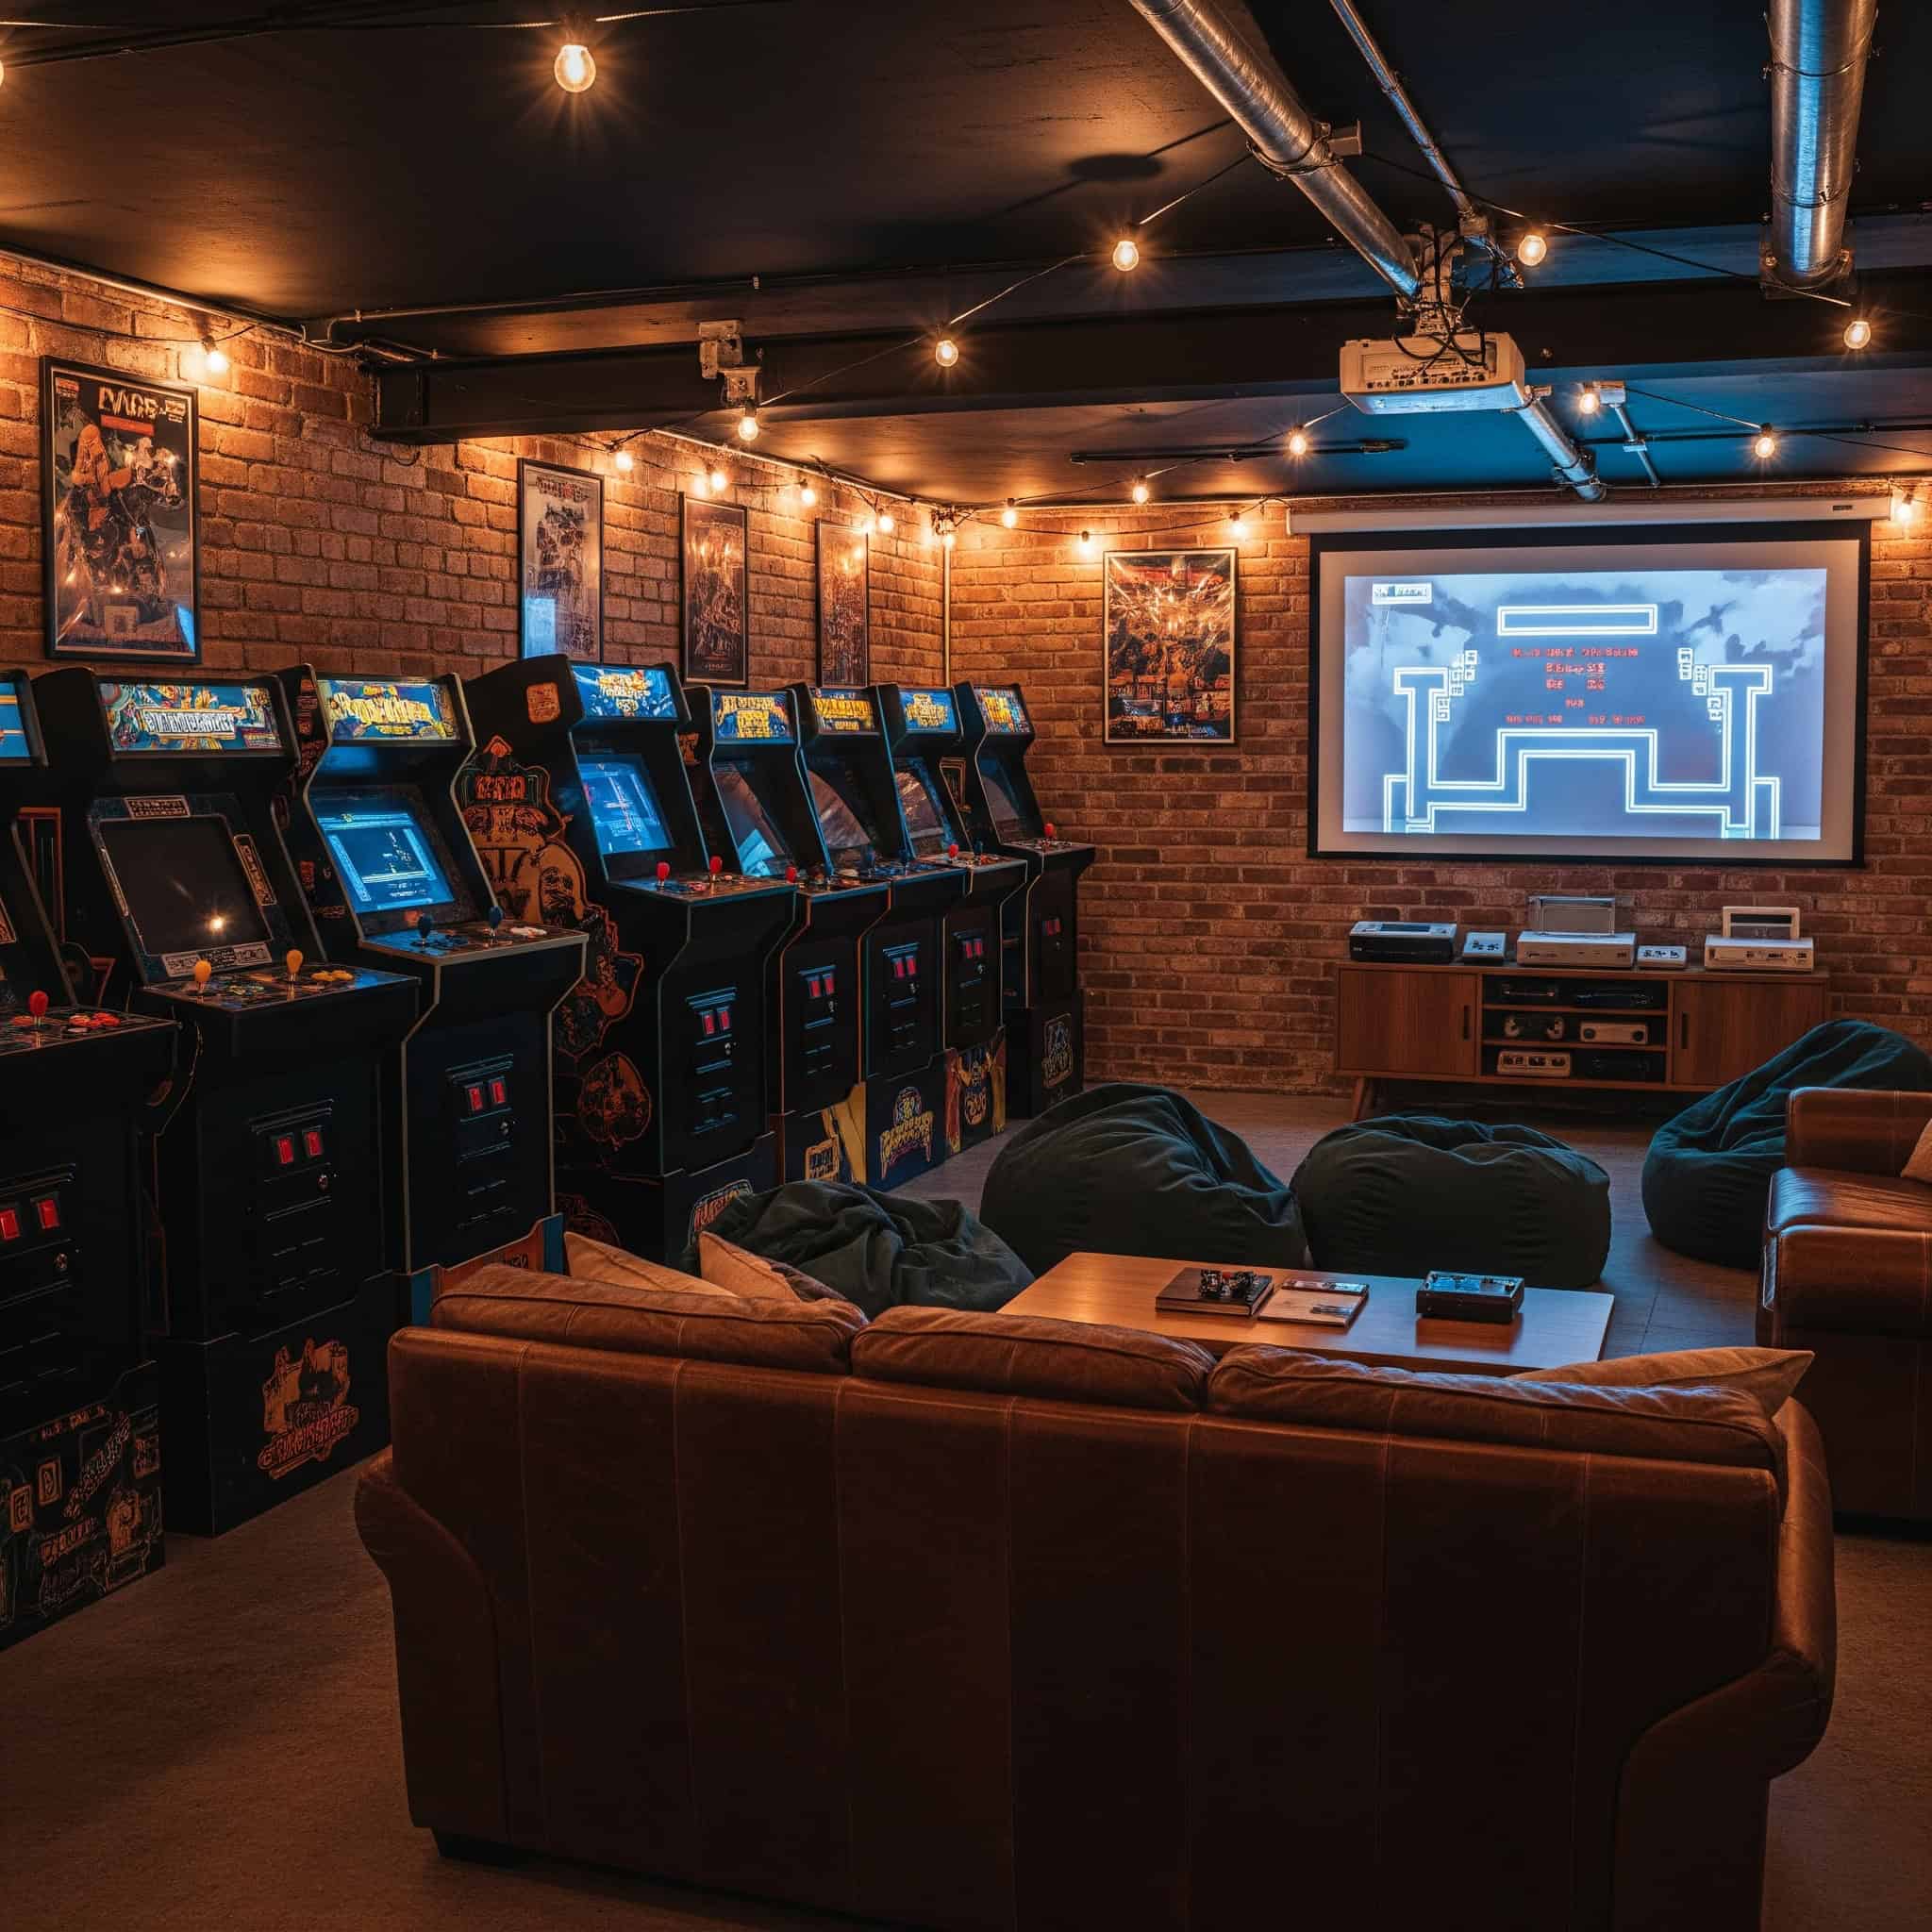
2. Gaming Lounge
Create the ultimate gaming headquarters with multiple gaming stations for both console and PC setups. Install comfortable seating, ambient LED lighting, and sound-absorbing panels to enhance the gaming experience. Built-in storage keeps games and accessories organized. This setup works particularly well in basements with limited natural light, as you can control the lighting environment completely. If you’re converting your basement into a gaming lounge, consider starting with a thorough junk removal service to clear out old items and create a clean slate for your new entertainment space.
Gaming setups require robust electrical systems—plan for 1.5-2 times more outlets than standard rooms, with surge protection and potentially dedicated circuits for high-end gaming PCs. Modern gaming rigs can draw significant power, especially when multiple systems run simultaneously. I’ve seen many gaming room projects require electrical panel upgrades to handle the increased demand safely.
Heat management becomes crucial in enclosed gaming spaces—each gaming PC can generate 300-500 watts of heat, requiring proper ventilation or supplemental cooling. Without adequate airflow, basement gaming rooms can quickly become uncomfortably warm, potentially damaging equipment and creating an unpleasant environment. Consider adding a dedicated mini-split air conditioning unit if your main HVAC system can’t keep up.
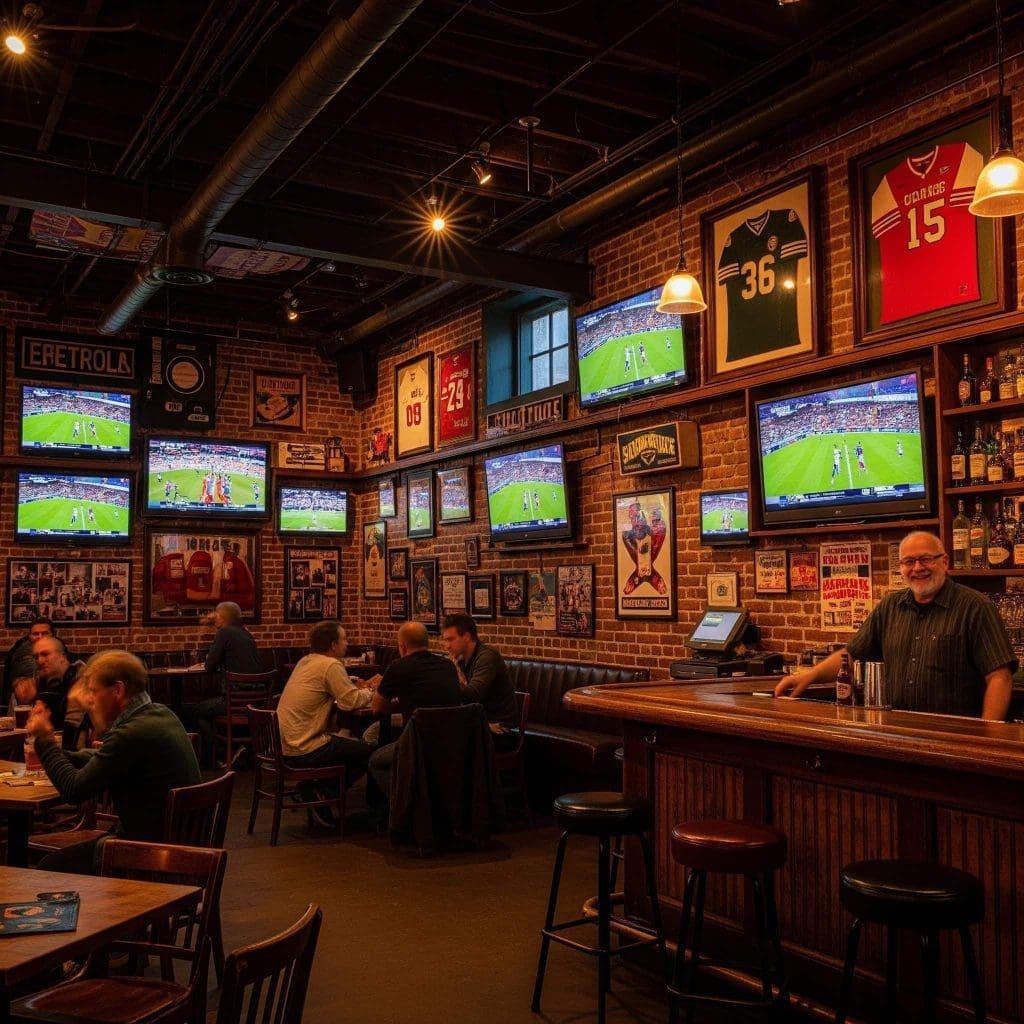
3. Sports Bar
Bring the sports bar experience home with a custom bar featuring 2-4 barstools, multiple wall-mounted TVs, and a beverage refrigerator. Install a tap system for beer and display shelving for glassware. Decorate with sports memorabilia to complete the atmosphere. The basement location creates the perfect environment for this adult entertainment space.
The Johnsons transformed their 400 sq ft basement corner into a sports bar that became the neighborhood gathering spot during game days. They installed a U-shaped bar with seating for six, three strategically placed 55″ TVs for optimal viewing from any angle, and a dual-tap kegerator system. Custom floating shelves display their collection of team glasses, while signed jerseys in LED-lit shadow boxes add authentic sports atmosphere. The project cost $12,500 and took 6 weeks to complete, with most of the time spent on custom cabinetry and proper electrical installation for the multiple TVs and refrigeration units.
Draft beer systems require specialized installation including food-grade CO2 lines, proper pressure regulation (typically 10-12 PSI), and glycol cooling systems for long-draw installations. These technical requirements ensure your beer pours perfectly every time without excessive foam or flat taste. I recommend working with a professional draft system installer who can customize the setup to your specific space and preferred beer styles.
Commercial-grade bar surfaces should be sealed with food-safe finishes that can withstand moisture and alcohol exposure—typically polyurethane or epoxy coatings with 3-5 coats. This level of protection prevents staining and damage from spilled drinks while ensuring easy cleanup after gatherings. The investment in quality finishes pays dividends in longevity and maintenance.
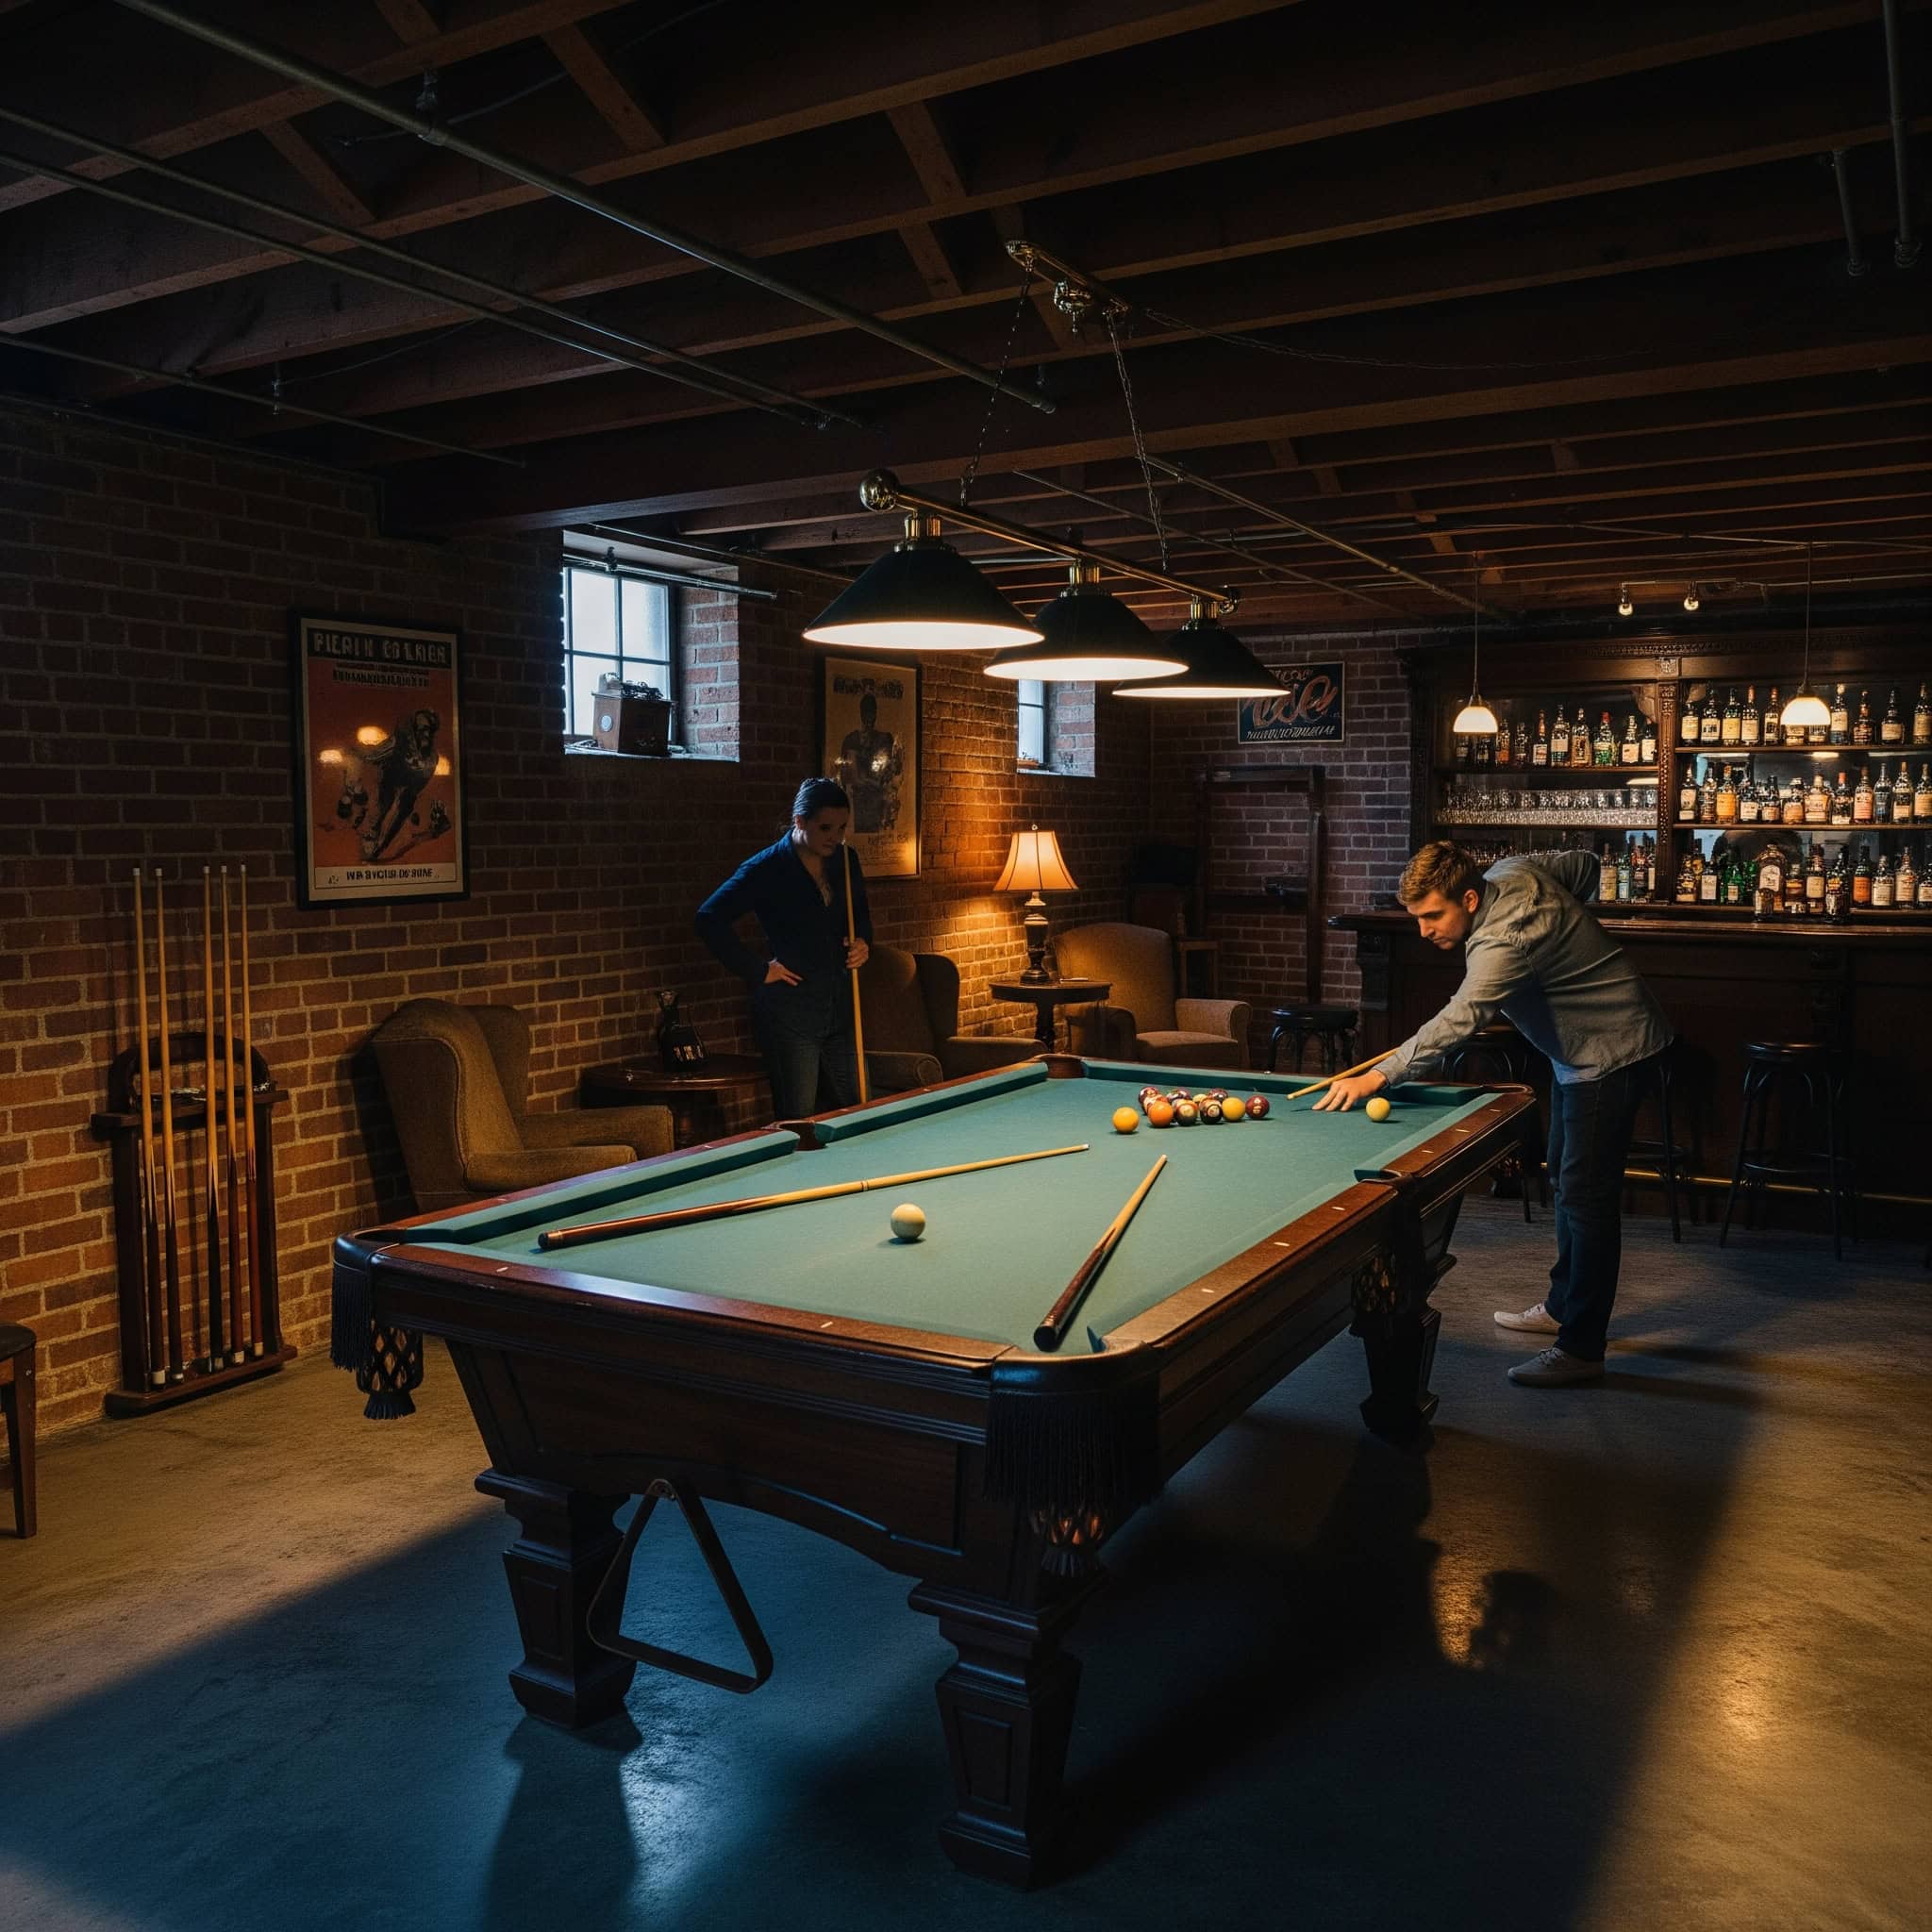
4. Billiards/Game Room
Center your game room around a pool table with proper clearance (minimum 5′ on all sides). Add other games like foosball, ping pong, or shuffleboard depending on available space. Include wall-mounted cue racks and ambient lighting above game areas. Consider how you’ll transport large game tables into the basement before purchasing them.
Standard pool tables weigh 700-1,000 pounds and require perfectly level flooring—professional installation includes shimming and leveling with precision tools to achieve less than 1/8″ variance across the playing surface. This precision ensures true ball roll and consistent play. I’ve seen many DIY installations fail because the floor wasn’t properly prepared to support this weight evenly.
Overhead lighting for pool tables should be positioned 30-36″ above the table surface with fixtures spanning approximately 2/3 the table length for optimal playing conditions. This specific lighting arrangement eliminates shadows across the playing surface while providing enough illumination to see ball details clearly. I recommend fixtures with dimming capabilities to adjust brightness based on the activity.
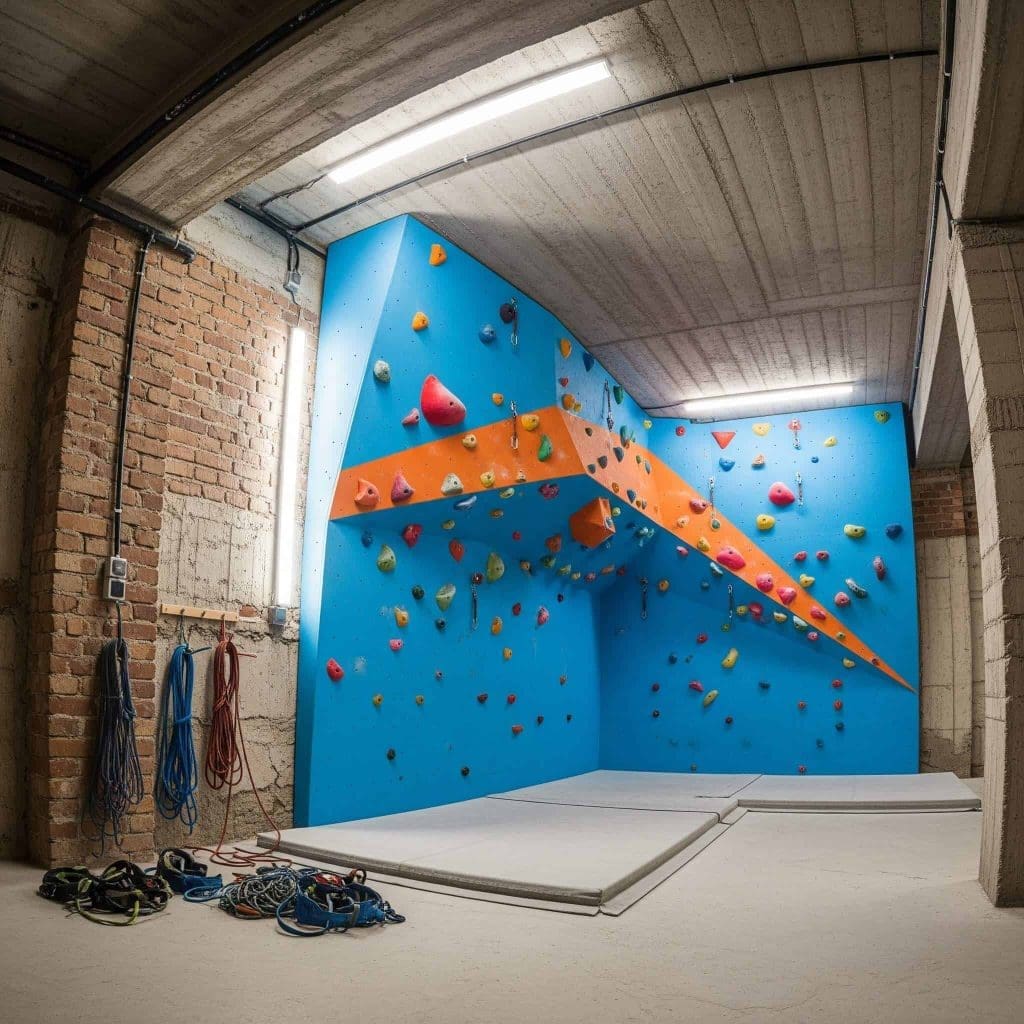
5. Indoor Climbing Wall
Install an 8-12′ climbing wall with various routes and difficulty levels to create an active recreation space. Place safety mats below and ensure proper anchoring to structural elements. This feature can be combined with a general home gym area for a complete fitness zone. Professional installation is essential for safety and structural integrity.
Residential climbing walls require structural anchoring into wall studs and floor joists, with each anchor point rated to support 2,000+ pounds of dynamic load. This significant strength requirement ensures safety during falls or dynamic movements. Working with a structural engineer is highly recommended to verify your basement walls can handle these forces.
T-nut placement density determines route-setting flexibility—professional installations typically use 40-50 T-nuts per 4’x8′ panel with staggered patterns for maximum route options. This density allows for frequent route changes to keep the climbing experience fresh and challenging. The initial investment in proper hardware installation dramatically increases the long-term enjoyment and versatility of your climbing wall.
Practical Living Spaces
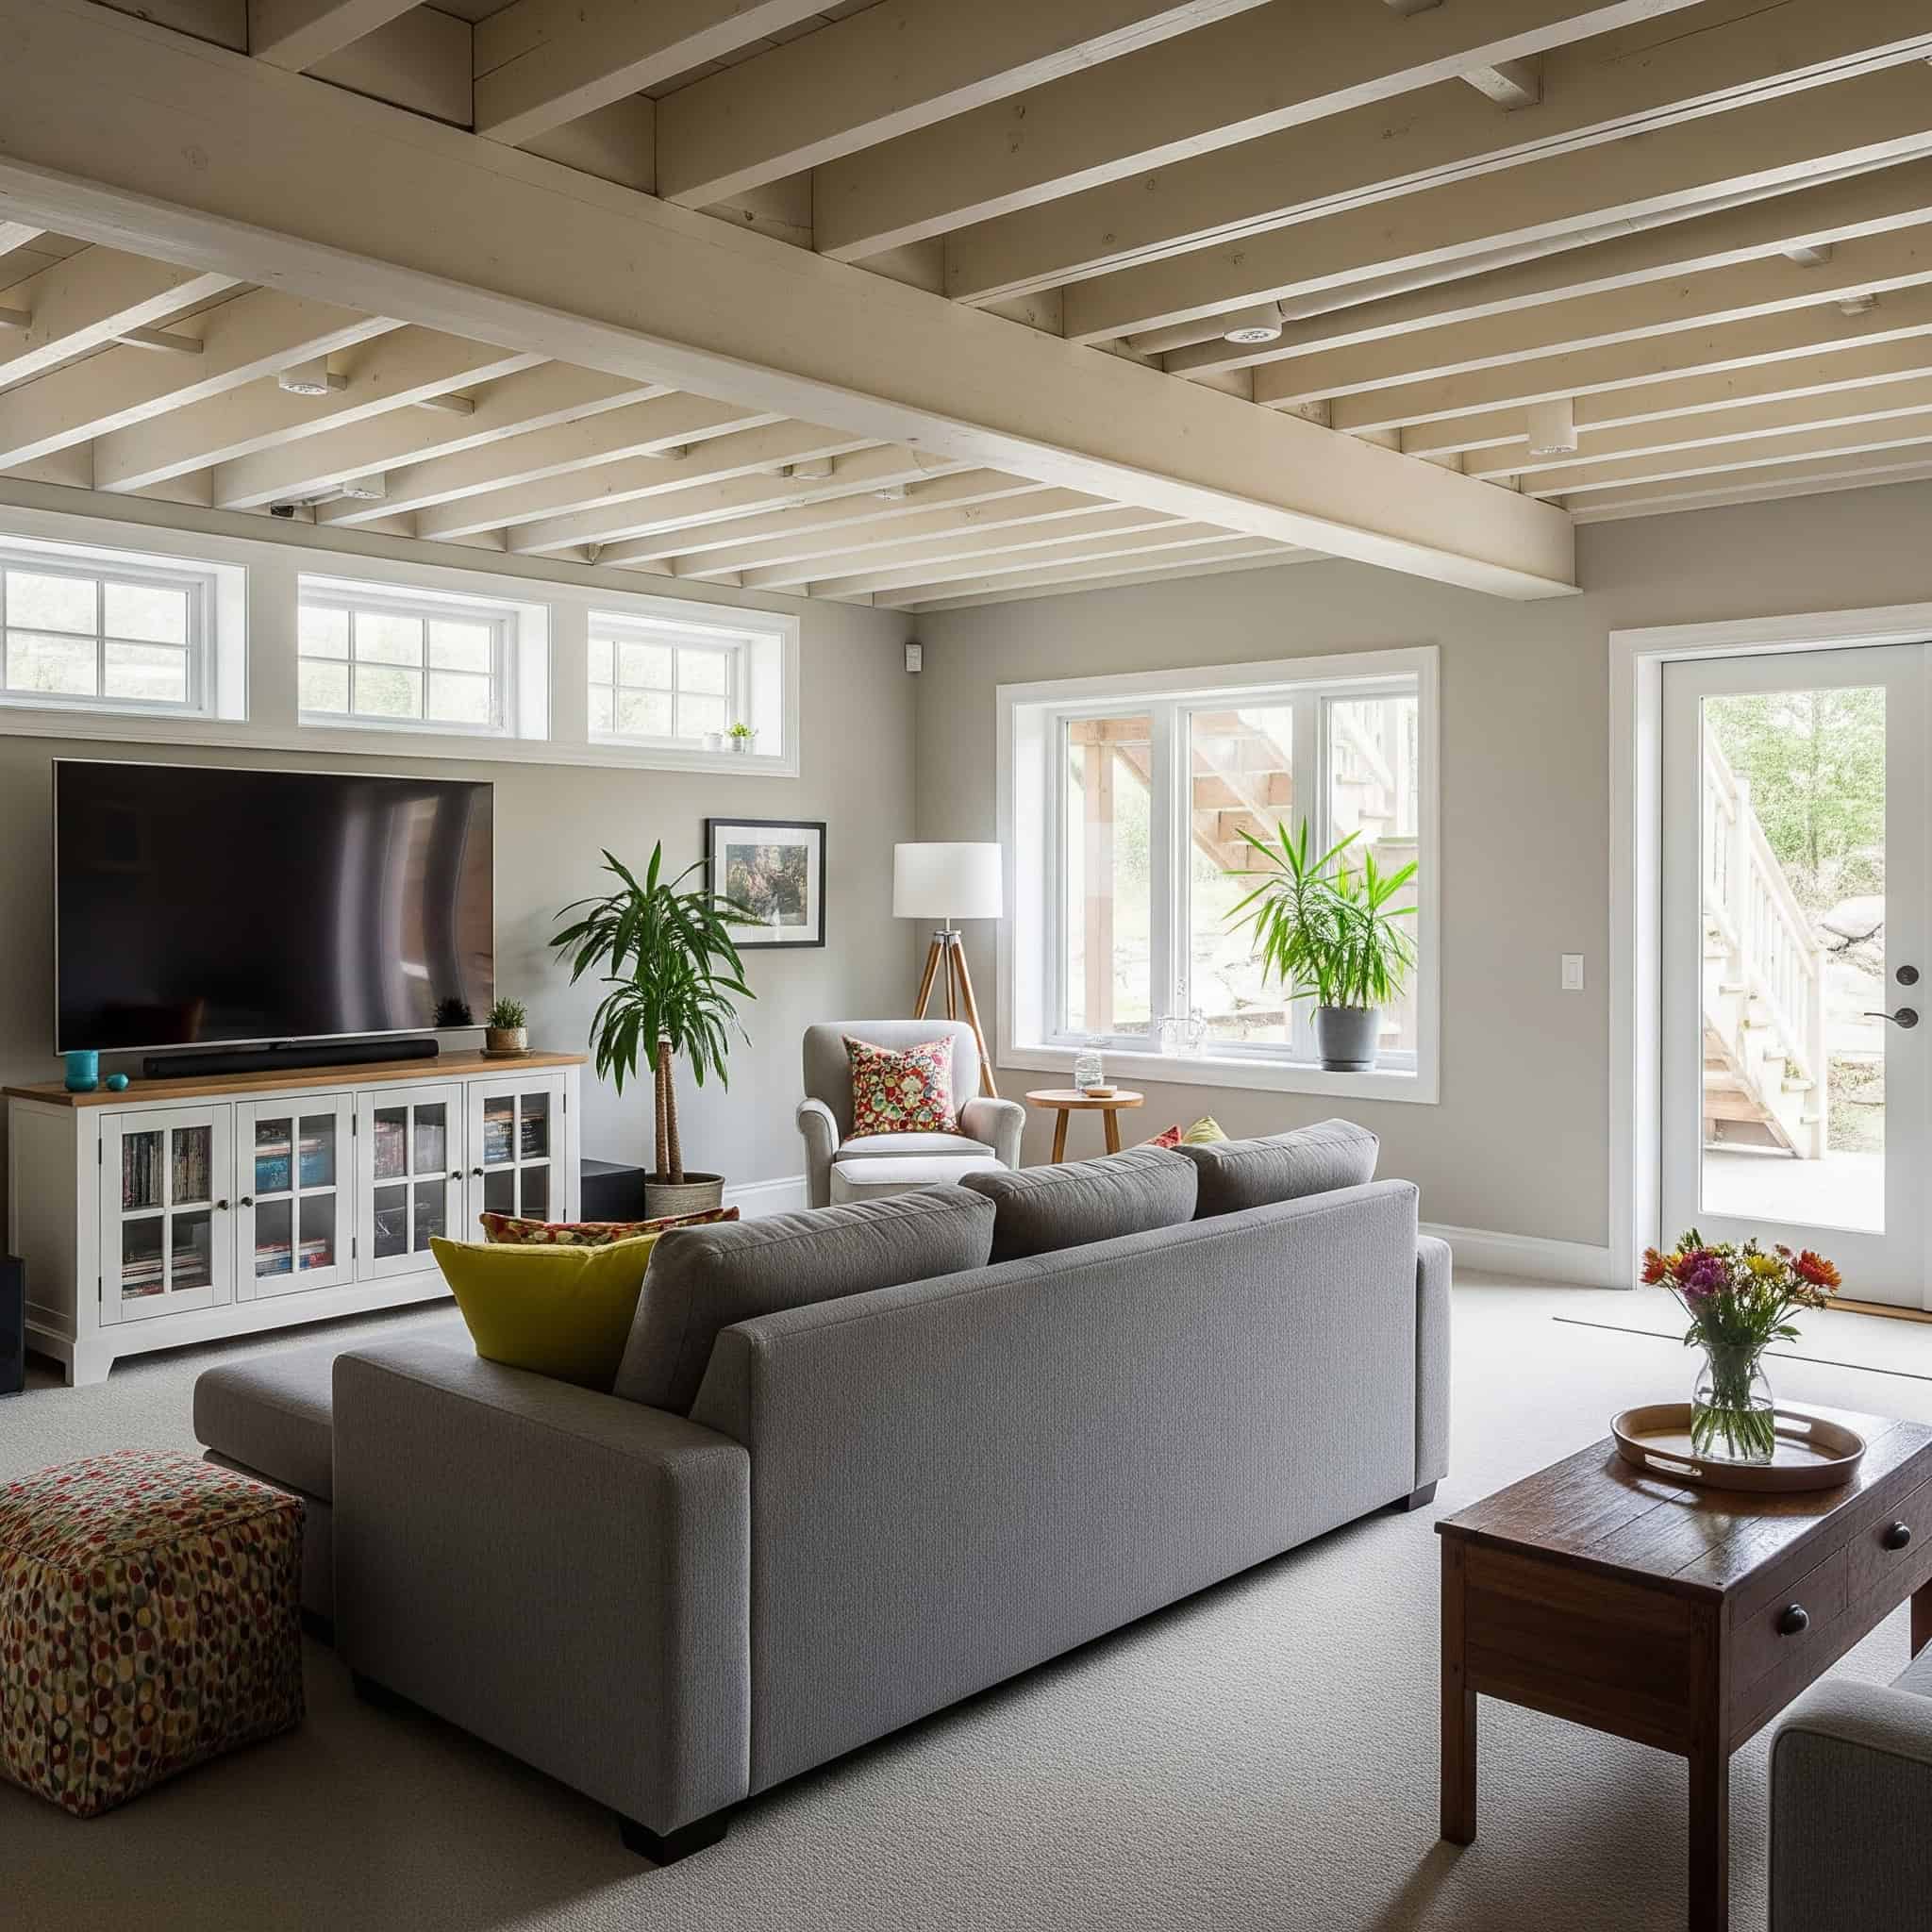
6. Secondary Living Room/Family Room
Create a cozy secondary living space with a sectional sofa, entertainment center, area rug, coffee table, and ambient lighting. Built-in shelving and storage maximize space efficiency. Focus on making the space feel warm and inviting despite being below-grade by using light colors, proper lighting, and comfortable furniture.
Below-grade living spaces benefit from layered lighting—aim for 20 lumens per square foot of ambient lighting plus task lighting in specific areas. This approach compensates for limited natural light while creating visual interest and depth. I recommend combining recessed ceiling fixtures, wall sconces, and table lamps to achieve this layered effect.
Moisture-resistant materials are essential—choose engineered hardwood or luxury vinyl plank flooring with vapor barriers and mold-resistant drywall (purple board) for walls and ceilings. These specialized materials provide protection against the higher humidity levels common in basement environments. The small premium for moisture-resistant products is insignificant compared to the cost of remediation if standard materials fail due to moisture exposure.
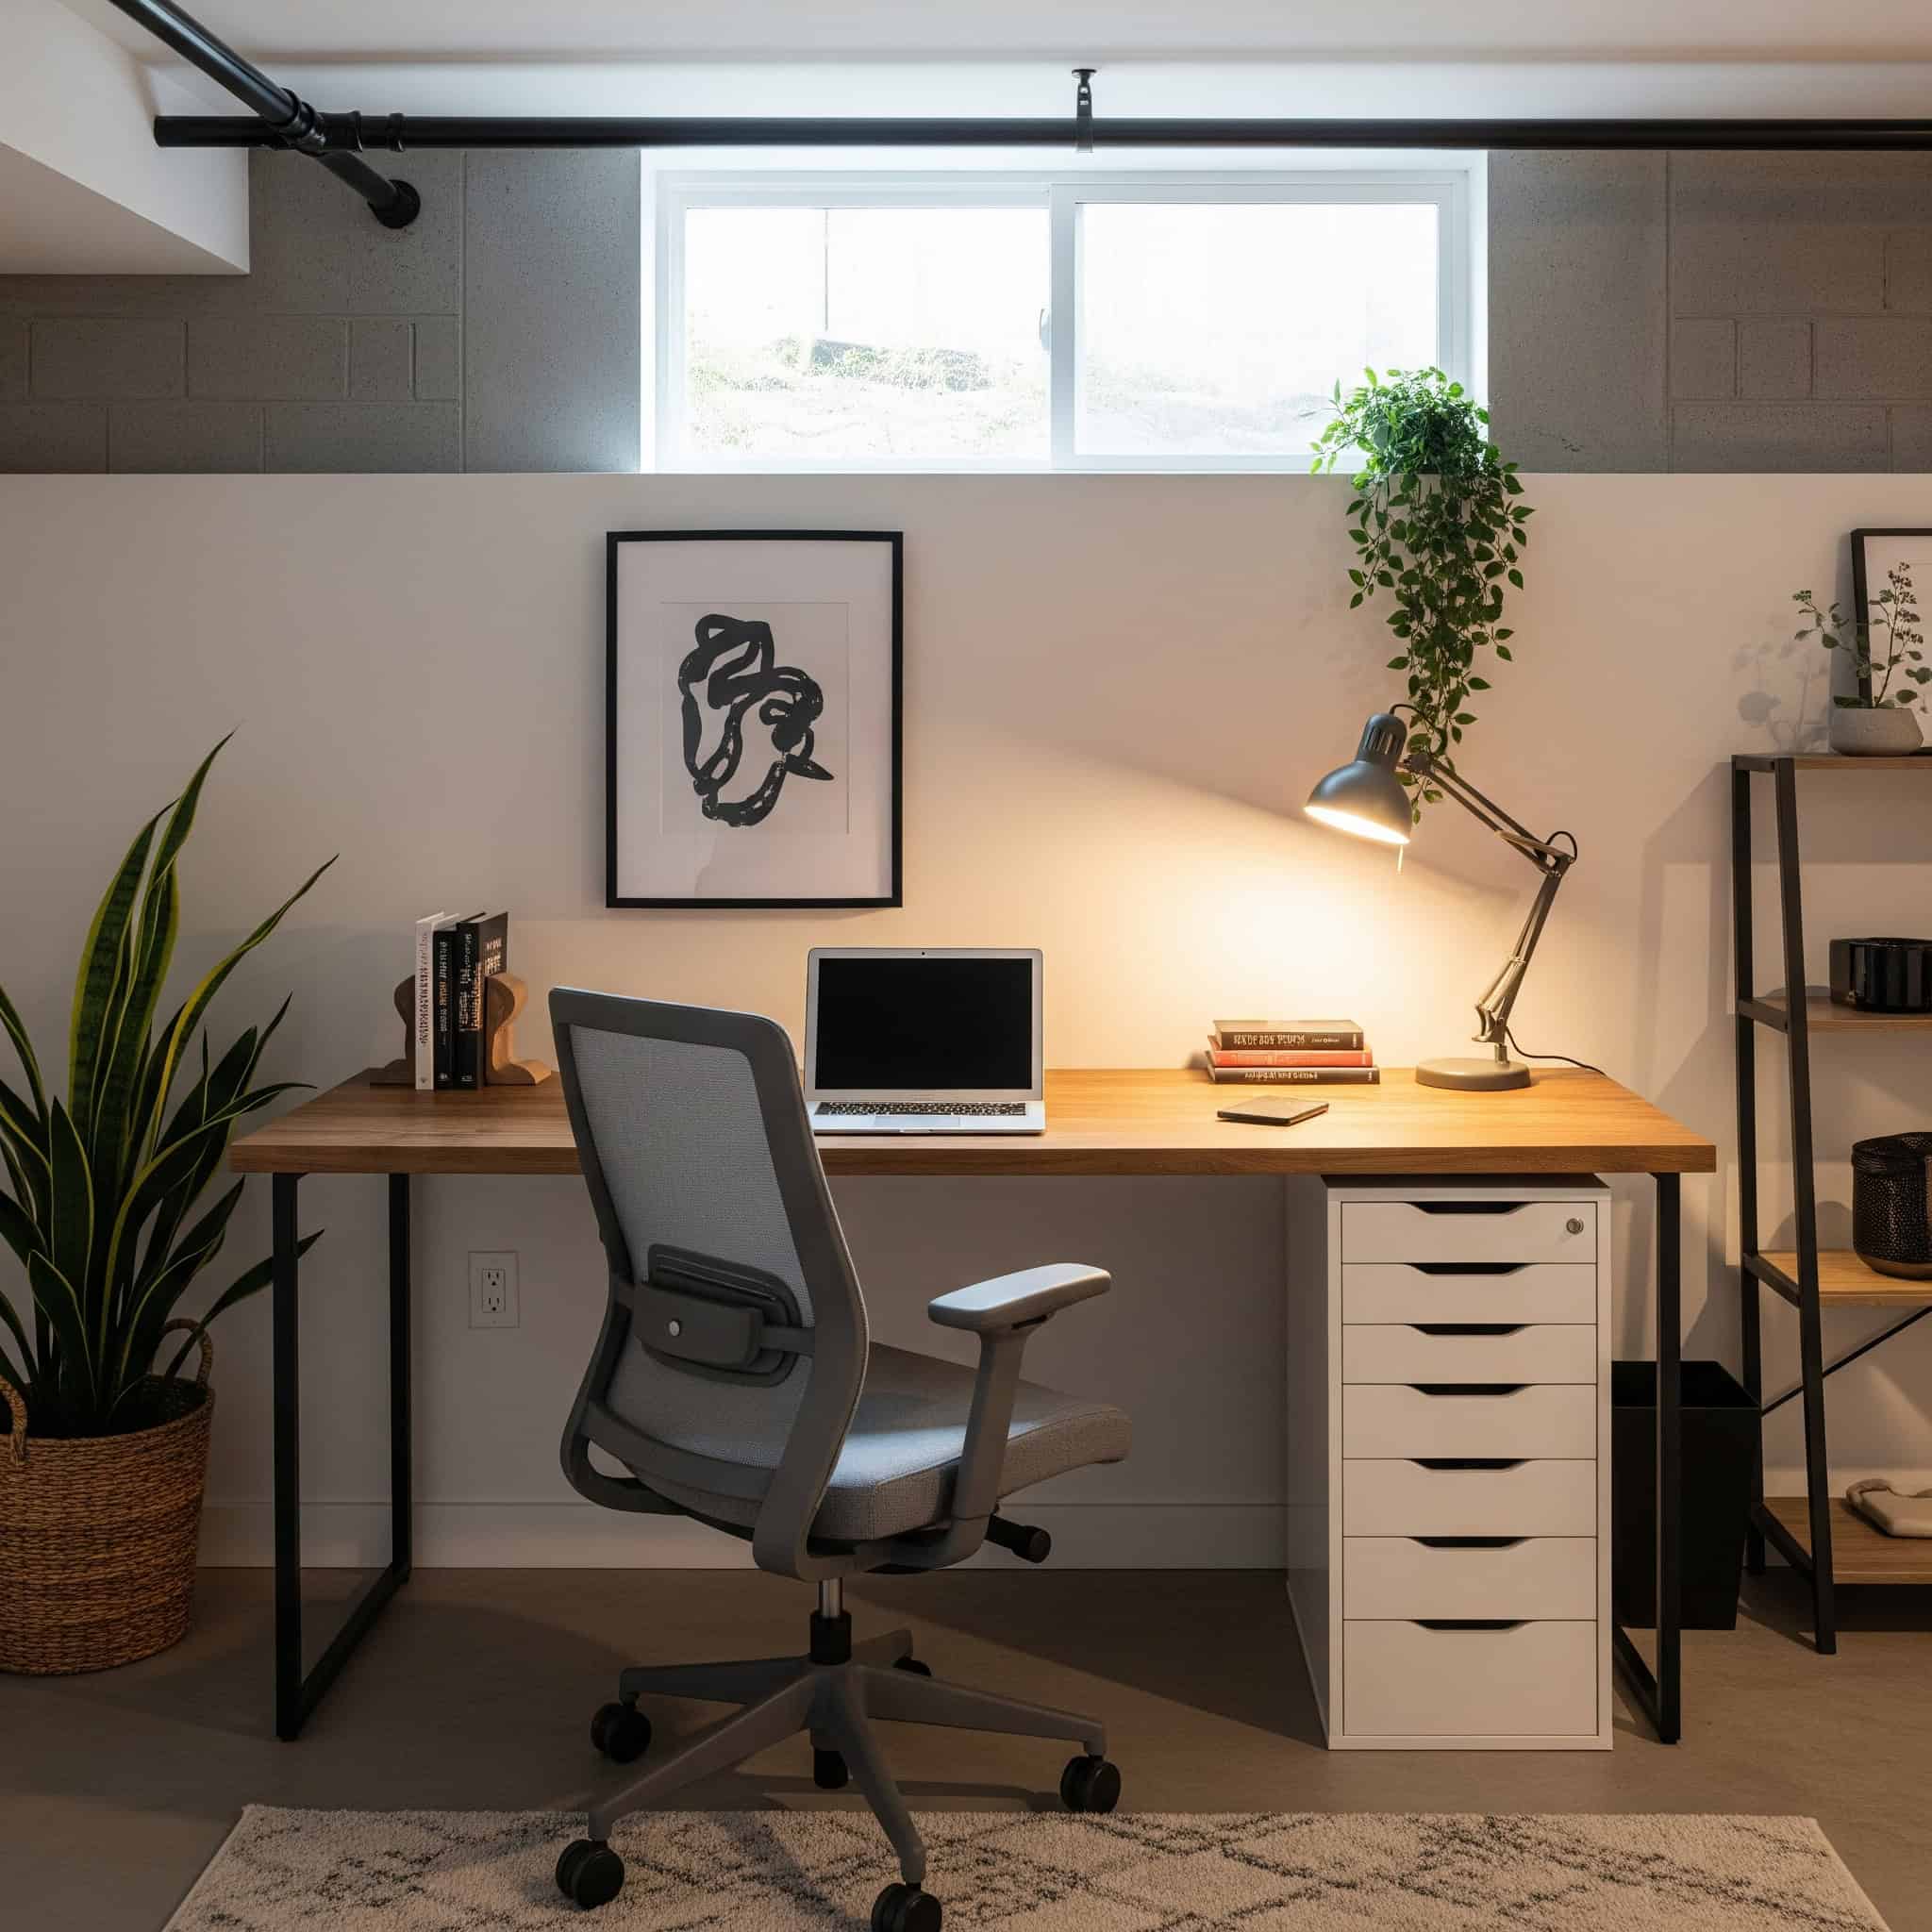
7. Home Office/Workspace
Design a productive workspace with a built-in desk, ergonomic chair, adequate task lighting, bookshelves, and filing cabinets. Include comprehensive technology infrastructure with multiple outlets and ethernet connections. Position the office near windows if possible to maximize natural light, which improves productivity and mood during work hours.
Home office electrical requirements should include dedicated circuits for computer equipment, with commercial-grade surge protection and potentially uninterruptible power supplies for critical equipment. This electrical isolation prevents interference from other household appliances and protects sensitive electronics from power fluctuations. I always recommend hardwired ethernet connections for reliable high-speed internet that doesn’t suffer from wireless interference.
Proper ergonomics require adjustable seating and work surfaces—desk heights between 28-30″ for standard typing positions with monitor positioning at eye level (top of screen) to prevent neck strain. These ergonomic considerations become even more important in basement offices where people tend to spend extended periods. Investing in quality adjustable furniture prevents long-term health issues from poor posture.
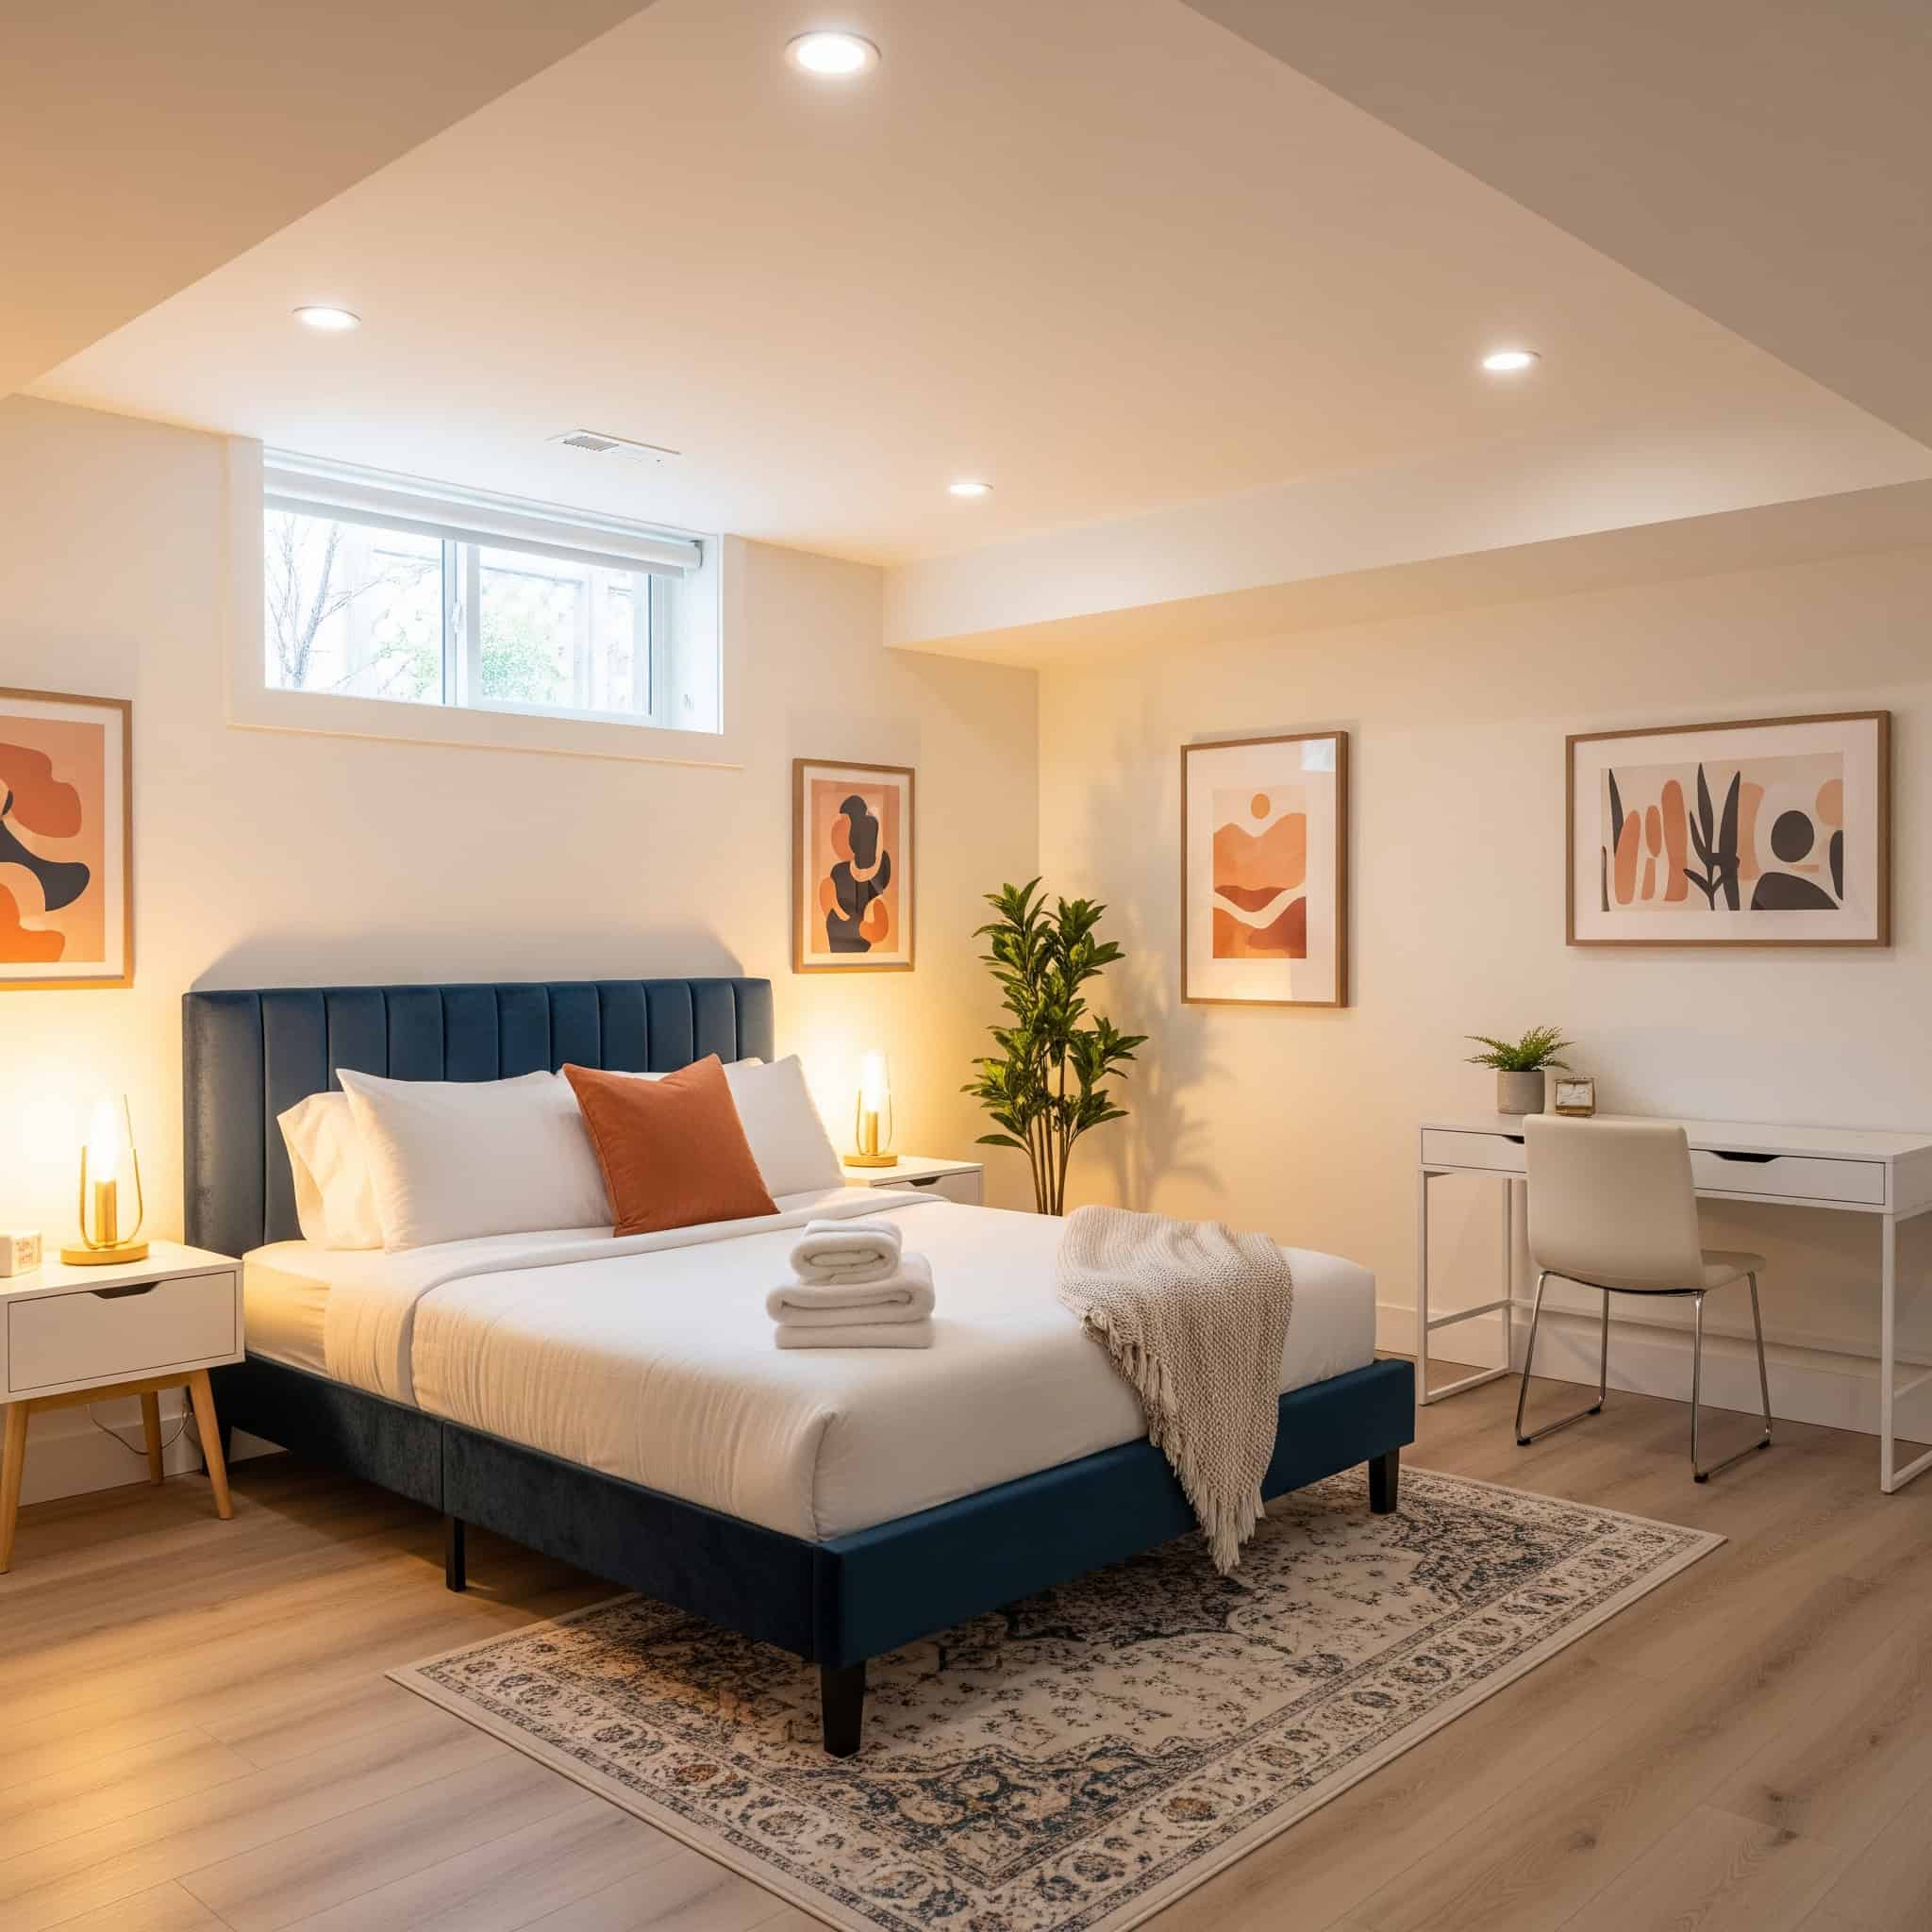
8. Guest Suite
Transform your basement into welcoming accommodations with a private bedroom area featuring a quality bed, nightstands, dresser, and closet space. Add an en-suite bathroom if possible, or ensure easy access to an existing basement bathroom. Building codes require egress windows in basement bedrooms for safety, so factor this into your planning.
Egress window requirements typically specify minimum dimensions of 20″ width, 24″ height, 5.7 square feet of openable area, and a maximum sill height of 44″ from the floor. These specific dimensions ensure occupants can escape quickly in emergencies and allow firefighters access if needed. The installation usually requires excavating a window well outside, which adds to the project cost but is non-negotiable for legal bedroom designation.
Basement guest suites require special attention to air quality—consider independent humidity control systems that maintain 40-50% relative humidity to prevent mold growth and ensure guest comfort. This controlled environment makes a significant difference in how welcoming the space feels to visitors. I recommend installing a humidity monitor so you can track conditions and address any issues before they become problems.
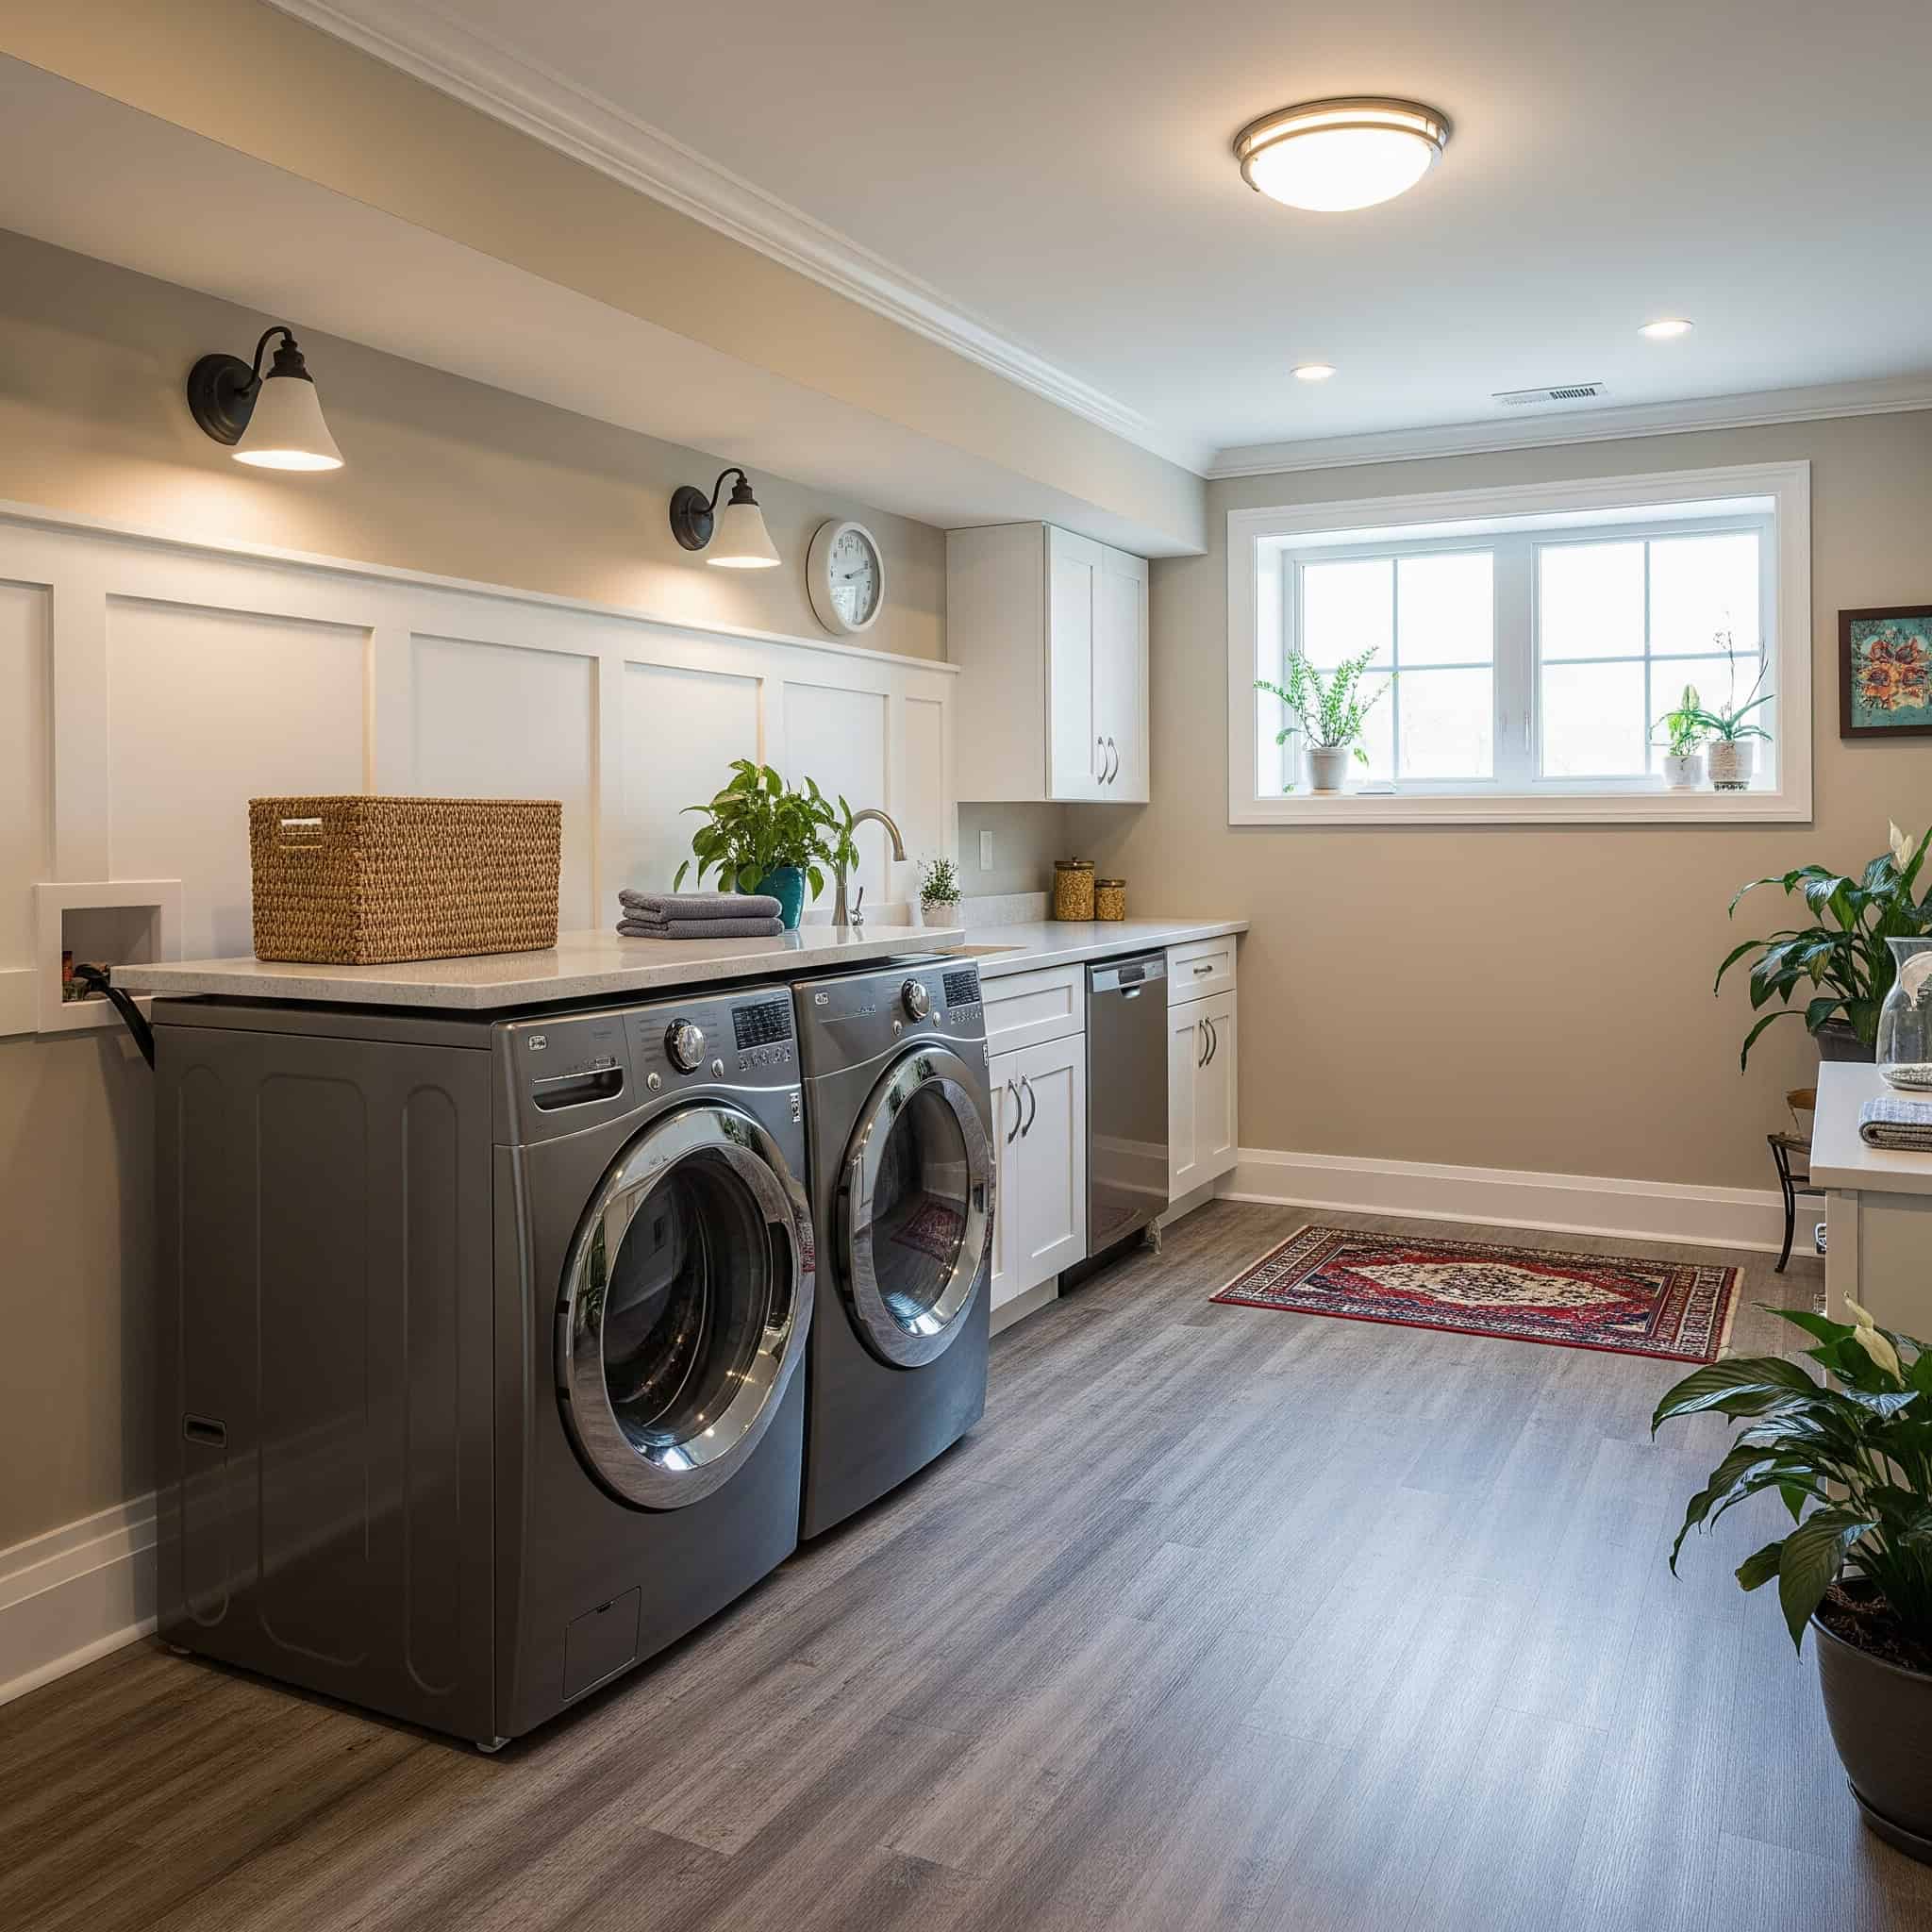
9. Laundry Room Upgrade
Create an efficient laundry space with modern washer and dryer units, ample counter space for folding, upper and lower cabinets for storage, and a utility sink. Add a hanging rod for air-drying items and good task lighting. Waterproof the floor and add a floor drain for leak protection. Design a functional layout that streamlines the laundry process. When upgrading your basement laundry room, our washer and dryer pick-up service can help you remove your old appliances quickly and make room for your new energy-efficient models.
Laundry room plumbing should include water hammer arrestors to prevent pipe damage, accessible shut-off valves, and ideally a floor drain with proper slope (1/4″ per foot) toward the drain. These plumbing details prevent water damage from leaks or overflows while making maintenance easier. The small additional cost for these features provides significant protection for your home.
Ventilation requirements for dryers specify smooth metal ductwork (not flexible), maximum run lengths of 25 feet (reduced by 5 feet for each 90° bend), and exterior venting with proper dampers. These specific requirements prevent lint buildup that can create fire hazards and ensure efficient dryer operation. I’ve seen many basement laundry rooms with improper venting that caused moisture problems throughout the basement.
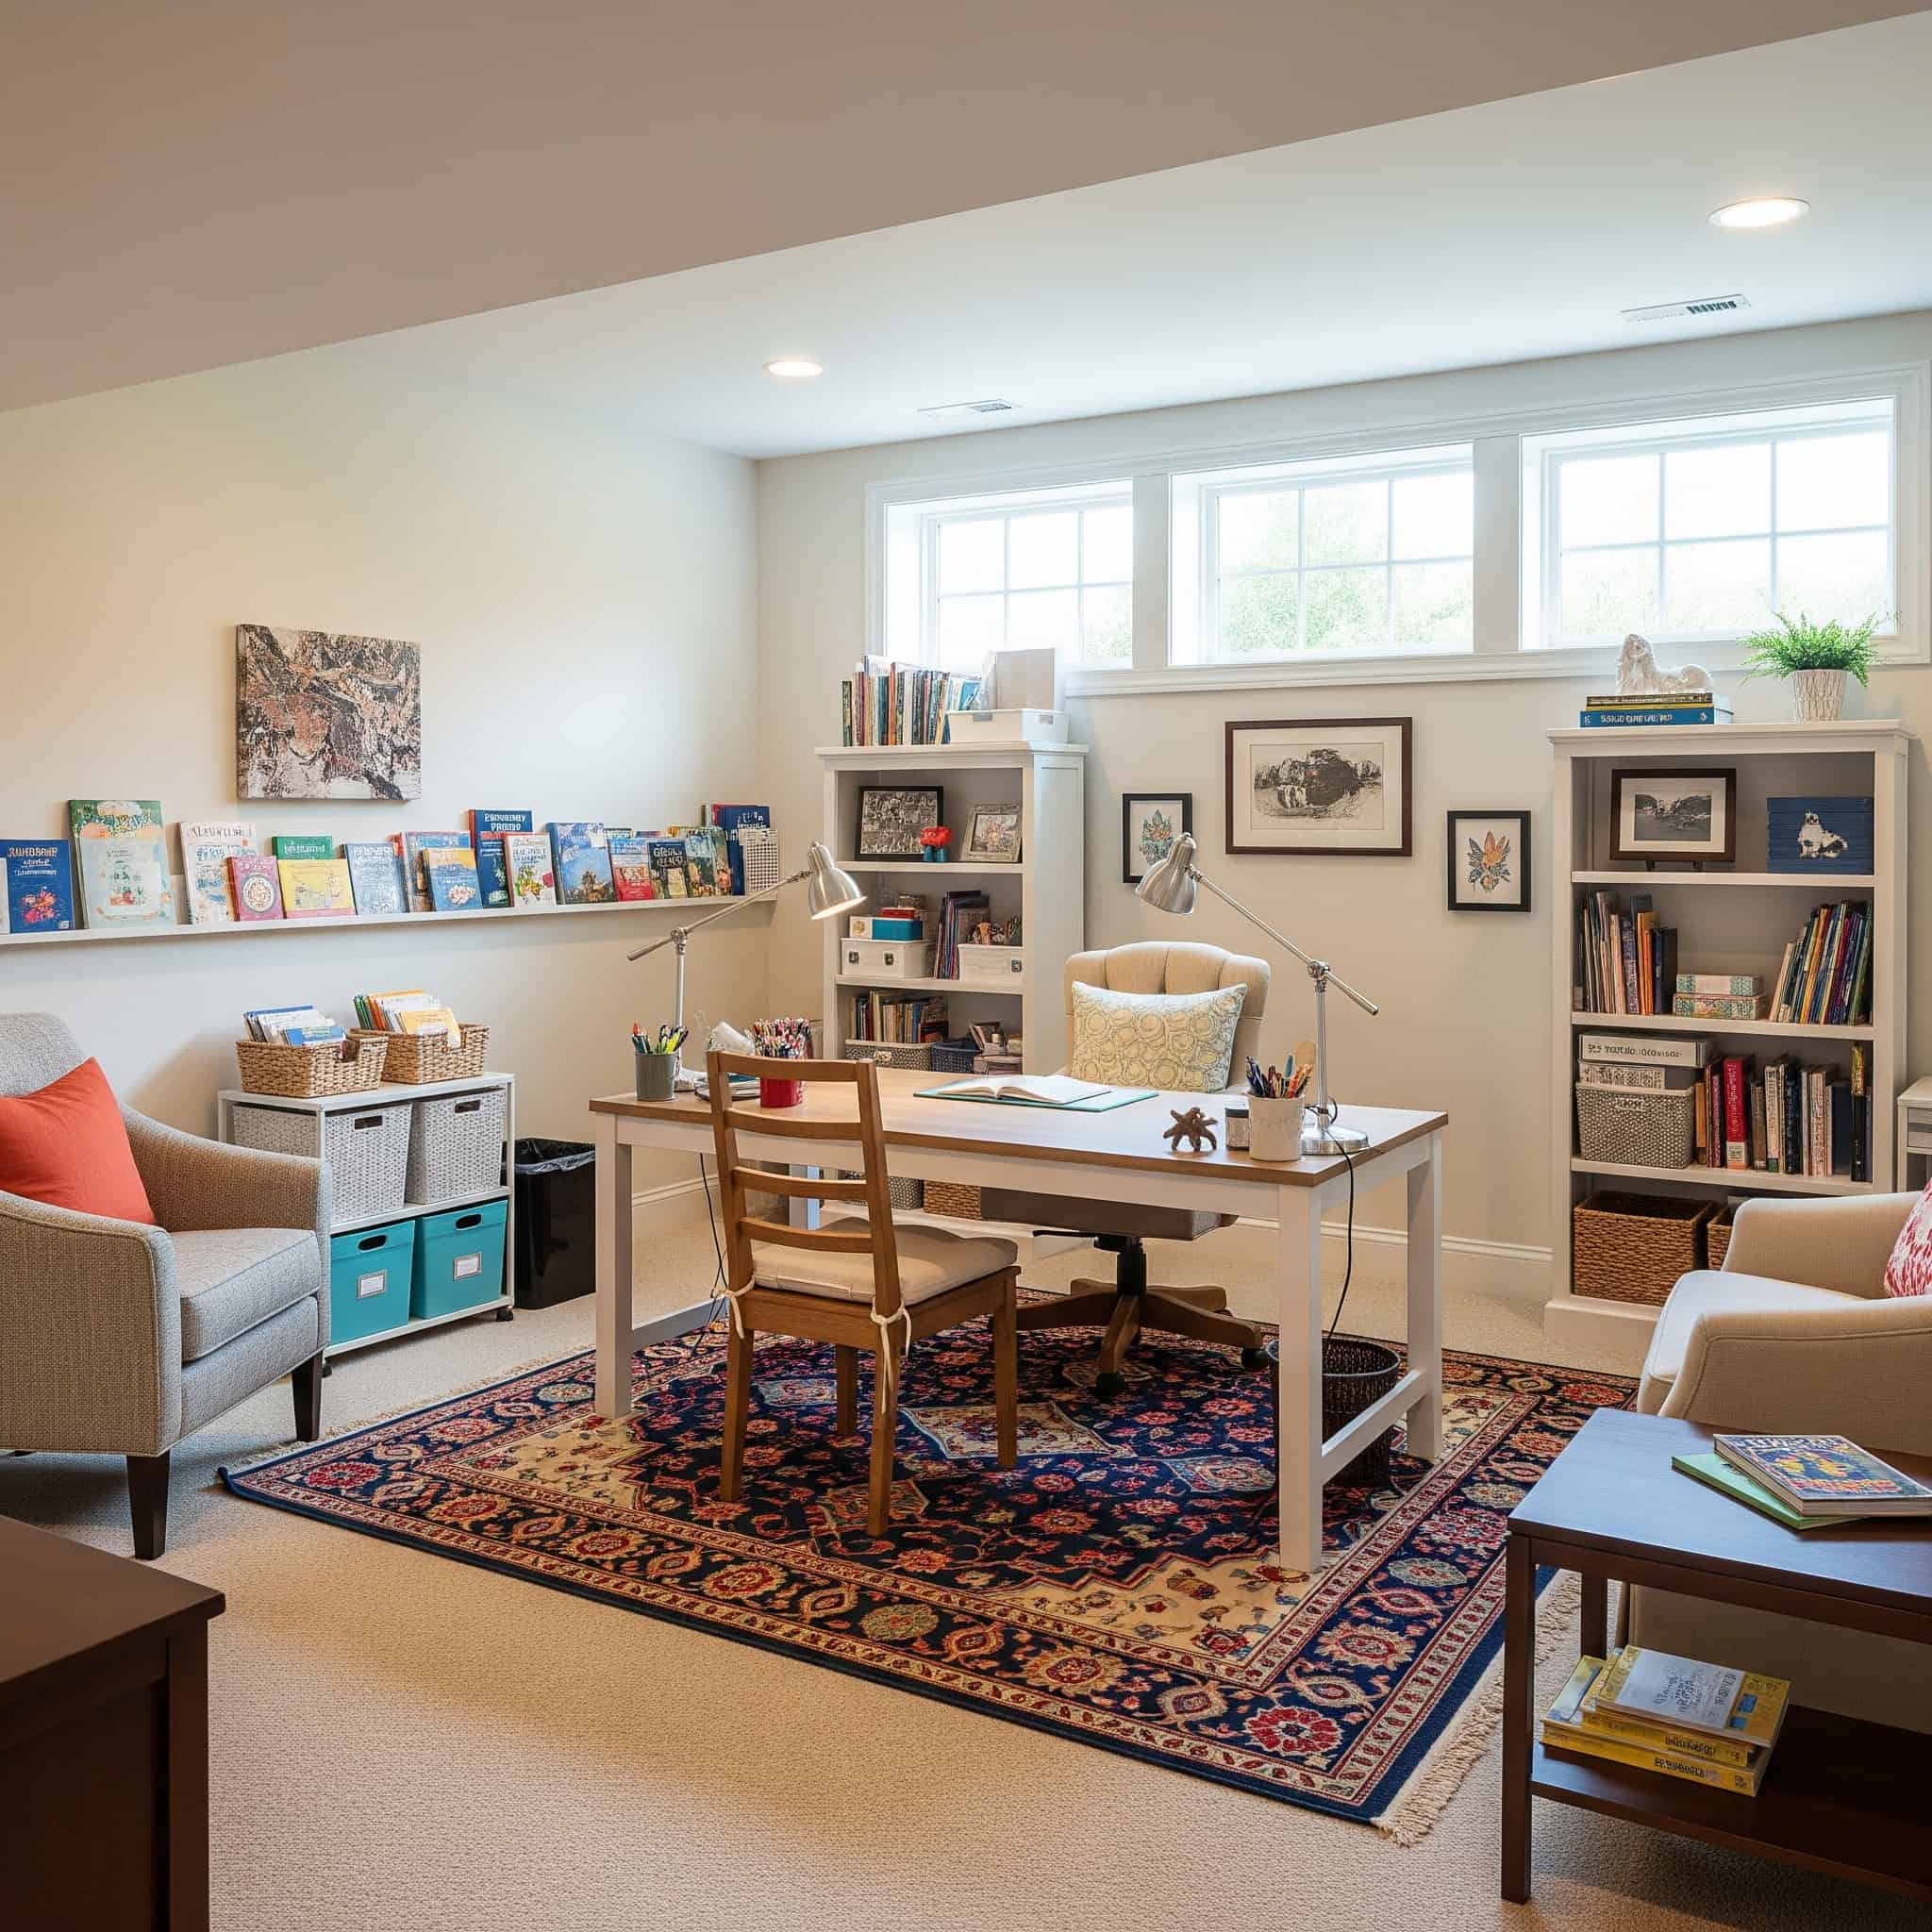
10. Home Classroom/Study Area
Set up a dedicated learning environment with individual desks or a large shared table, comfortable chairs, bookshelves, and whiteboard or corkboard walls. Ensure good lighting and organized supply storage. Include technology connections for online learning. Create a distraction-free environment with good acoustics to support concentration and learning.
Learning environments benefit from lighting that mimics natural daylight—aim for color temperatures between 4000-5000K with high color rendering index (90+ CRI) to reduce eye strain. This lighting quality significantly impacts focus and learning outcomes, especially in basement spaces with limited natural light. I recommend full-spectrum LED fixtures that can be adjusted throughout the day to match natural light patterns.
Sound transmission between basement classrooms and upper floors can be reduced by installing insulation with sound-dampening properties (STC rating 45+) between floor joists and using resilient channels before installing ceiling drywall. These acoustic improvements create a quieter learning environment while preventing classroom activities from disturbing the rest of the house. The investment in proper sound isolation makes the space more functional for its intended purpose.
Wellness and Fitness Spaces
11. Home Gym
Create a dedicated fitness space with rubber or foam flooring, wall mirrors, versatile equipment selection, and good ventilation. Include a TV for workout videos and a small refrigerator for drinks. Ensure the floor can support heavy equipment and that ceiling height accommodates standing exercises with raised arms or jumping movements.
|
Home Gym Equipment |
Space Required |
Floor Load |
Power Needs |
Ceiling Height Required |
|---|---|---|---|---|
|
Treadmill |
30-35 sq ft |
250-400 lbs |
Dedicated 20A circuit |
7’+ (8’+ preferred) |
|
Elliptical |
25-30 sq ft |
200-300 lbs |
Standard outlet |
7’6″+ |
|
Multi-gym |
35-50 sq ft |
300-800 lbs |
None |
6’8″+ (check specifications) |
|
Free Weights Area |
40-60 sq ft |
10-15 lbs per sq ft |
None |
7’6″+ for overhead lifts |
|
Stationary Bike |
10-12 sq ft |
100-150 lbs |
Standard outlet |
7’+ |
|
Rowing Machine |
20-25 sq ft |
60-100 lbs |
Standard outlet (if electronic) |
7’+ |
Flooring for home gyms should provide impact absorption—rubber flooring in 3/8″ to 1/2″ thickness can absorb up to 30% of impact force while protecting the subfloor from weights. This specialized flooring prevents structural damage while reducing noise transmission to other parts of the house. I recommend interlocking rubber tiles for easy installation and the ability to replace damaged sections individually.
Ventilation requirements increase significantly in exercise spaces—aim for 8-12 air changes per hour compared to the standard 4-6 for living spaces, potentially requiring dedicated HVAC solutions. This enhanced airflow removes excess humidity and odors while maintaining comfortable temperatures during workouts. A separate mini-split system often provides the most efficient solution for basement gym spaces.
12. Yoga/Meditation Studio
Design a minimalist space with cushioned flooring, simple storage for mats and props, adjustable lighting with dimmer switches, a small sound system, and calming wall colors. This is an excellent use for a basement with limited natural light, as many prefer dim lighting for meditation practices. Focus on creating a peaceful atmosphere away from household noise.
Flooring for yoga practices should provide proper balance between cushioning and stability—cork flooring offers natural antimicrobial properties with appropriate compression for joint protection. This sustainable material also maintains a comfortable temperature year-round, unlike synthetic options that can feel cold in basement environments. The natural variations in cork create visual warmth that enhances the peaceful atmosphere.
Sound insulation for meditation spaces should target both airborne and impact noise—composite solutions combining mass-loaded vinyl with acoustic foam can achieve noise reduction coefficients (NRC) of 0.70+. This level of sound isolation creates a truly peaceful environment conducive to meditation and mindfulness practices. I recommend treating at least the ceiling and any walls shared with mechanical rooms or other active spaces.
13. Sauna or Steam Room
Install a pre-fabricated sauna unit (typically cedar) with appropriate electrical connections and safety features. Include a changing area and nearby shower if possible. This installation requires professional expertise, proper ventilation, moisture management, and significant electrical capacity. Check building codes and permits required for this type of installation.
Sauna electrical requirements include dedicated 220V/40-60 amp circuits with GFCI protection, specialized heat-resistant wiring, and controls mounted outside the sauna enclosure. These specific electrical requirements ensure safe operation while providing sufficient power for heating elements. Working with an electrician experienced in sauna installations is essential for safety and proper function.
Humidity control systems for steam rooms must maintain 100% relative humidity while managing condensation—proper vapor barriers, sloped ceilings (for condensation runoff), and waterproof materials rated for continuous exposure to temperatures of 110-120°F are essential. These specialized construction techniques prevent moisture damage to surrounding areas while creating the proper therapeutic environment. The investment in proper moisture management prevents costly damage to your home’s structure.
14. Indoor Spa Retreat
Create a relaxation zone with a hot tub or jetted bathtub, comfortable seating, ambient lighting, waterproof surfaces, good ventilation, and a sound system for relaxing music. Water features require serious waterproofing, drainage solutions, and ventilation to manage humidity. Professional installation is essential for safety and functionality.
Hot tub installations in basements require structural engineering to support weights of 2,000-3,000 pounds when filled, plus reinforced flooring systems typically involving additional support beams. This significant structural requirement often necessitates consultation with a structural engineer to ensure your basement floor can safely support the load. I’ve seen successful installations where additional concrete footings were added beneath the hot tub location to transfer weight directly to the foundation.
Humidity management for spa areas requires dedicated ventilation systems capable of 10-15 air changes per hour with humidity sensors that trigger increased airflow when moisture levels exceed 60%. This automated approach prevents condensation on surfaces while maintaining comfortable conditions. The investment in proper ventilation protects your entire basement from moisture-related problems while creating a more enjoyable spa experience.
15. Massage/Treatment Room
Set up a dedicated space with a massage table, storage for linens and supplies, adjustable lighting, a small sink if possible, and a sound system for relaxing music. Create a peaceful environment with good sound insulation from the rest of the house. Consider temperature control, as massage rooms typically need to be warmer than normal living spaces.
Temperature control for massage spaces should maintain 75-80°F (warmer than standard living spaces) with independent thermostatic control and supplemental heating options like radiant floor systems. This elevated temperature ensures client comfort during treatments when they’re lying still for extended periods. I recommend programmable systems that can pre-heat the space before scheduled appointments.
Lighting design should include multiple zones with dimming capabilities—indirect lighting at 100-200 lumens for general illumination and task lighting of 300-400 lumens for treatment preparation. This layered approach allows for appropriate lighting during different phases of treatment. Wall sconces with warm-toned bulbs create a more relaxing atmosphere than overhead lighting.
Creative and Hobby Spaces
16. Art Studio
Install washable flooring, ample storage for supplies, a large work table or easels, task lighting that mimics natural light, a utility sink, and display areas for finished works. Prioritize locations near windows for natural light if possible. Ensure good ventilation if working with paints, solvents, or other materials with fumes.
Art studio lighting should achieve a color rendering index (CRI) of 95+ with adjustable color temperature controls to accurately represent colors under different lighting conditions. This specialized lighting ensures artists can see true colors while working, preventing surprises when artwork is viewed in different environments. I recommend full-spectrum LED fixtures specifically designed for art studios.
Ventilation systems for art studios working with solvents should provide 10-15 air changes per hour with activated carbon filtration to remove volatile organic compounds before air recirculation. This level of air purification protects your health while preventing odors from spreading throughout your home. The investment in proper ventilation makes your studio safer and more comfortable for extended creative sessions.
17. Music Room/Recording Studio
Incorporate acoustic treatment (bass traps, diffusers, acoustic panels), soundproofing for walls and ceiling, proper electrical setup for equipment, comfortable seating, and instrument storage. Soundproofing is essential to prevent noise from disturbing the rest of the house. Basement locations are ideal for sound isolation but may require dehumidification to protect instruments.
Professional guitarist Mark Thompson converted his 300 sq ft basement into a recording studio that rivals commercial facilities. The room-within-a-room construction features double walls with acoustic insulation, floating floors, and a separated ceiling to achieve an STC rating of 65. The control room houses his mixing equipment behind an acoustic glass window, while the recording space features variable acoustic panels that can adjust the room’s sound from “live” to “dead” depending on the instrument being recorded. A dedicated HVAC system maintains constant 40-45% humidity to protect his vintage guitar collection. Though expensive at $35,000, the studio has paid for itself through session work and remote recording projects he can now complete at home.
Professional acoustic treatment requires addressing specific frequency ranges—bass traps for low frequencies (below 250Hz), acoustic panels for mid-range (250-2000Hz), and diffusers for high frequencies (above 2000Hz). This comprehensive approach creates a balanced acoustic environment suitable for both recording and mixing. I recommend starting with corner bass traps, which provide the most noticeable improvement for the investment.
Soundproofing construction typically involves decoupled wall systems using staggered studs or resilient channels, multiple layers of drywall with acoustic damping compound between layers, and specialized acoustic door seals to achieve STC ratings of 55+. These construction techniques prevent sound transmission to other parts of your home while creating an isolated environment for music production. The investment in proper soundproofing makes the space usable at any time without disturbing others.
18. Crafting Workshop
Create a space with large work surfaces, organized storage for materials, good task lighting, comfortable seating, and specialized zones for different crafting activities. Consider electrical needs for craft tools and equipment, ventilation if using adhesives or paints, and washable surfaces for easy cleanup.
Task lighting for detailed craft work should provide 50-75 footcandles (500-800 lux) of illumination at the work surface with adjustable positioning to eliminate shadows. This focused lighting reduces eye strain during detailed work while improving accuracy and efficiency. I recommend articulating arm lamps that can be positioned precisely where needed for different projects.
Storage systems for craft supplies should incorporate modular components with clear visibility—shallow drawers (maximum 4″ depth) prevent items from being buried and lost, while vertical paper storage prevents warping. This organized approach makes creative sessions more productive by eliminating time spent searching for materials. I’ve found that transparent containers with detailed labeling dramatically improve workflow in craft spaces.
19. Wine Cellar/Tasting Room
Install proper wine racking systems, temperature and humidity control, a tasting table with seating, proper stemware storage, and ambient lighting that won’t damage the wine. Basements naturally provide good conditions for wine storage, but dedicated climate control may still be needed. Consider security features if storing valuable collections.
Wine storage requires precise environmental control—constant temperature between 55-57°F with minimal fluctuation (±1°F), humidity levels of 60-70%, and protection from UV light exposure. These specific conditions ensure proper aging while preventing cork drying, label damage, and premature oxidation. I recommend dedicated wine cooling units rather than relying on general basement conditions, which typically fluctuate too much for proper storage.
Cooling systems for wine cellars should be sized based on thermal load calculations accounting for room dimensions, insulation values, and exterior wall exposure—typically requiring 25-30 BTU per cubic foot of storage space. This precise sizing ensures efficient operation while maintaining stable conditions. Undersized units will run constantly and still fail to maintain proper temperatures, while oversized units cycle too frequently, causing temperature fluctuations.
20. Woodworking Shop
Set up with durable flooring, proper electrical for tools, dust collection system, adequate work surfaces, tool storage, and good task lighting. Include safety features like fire extinguishers. This space requires significant ventilation for dust and fumes, sound insulation for noisy tools, and potentially reinforced flooring for heavy equipment.
Dust collection systems should capture 99% of airborne particles at the source—this requires minimum airflow of 350-400 cubic feet per minute at each tool connection with ductwork sized to maintain 4,000 feet per minute air velocity. This engineered approach prevents fine dust from circulating throughout your home while creating a healthier workshop environment. I recommend central systems with blast gates at each tool rather than relying solely on shop vacuums.
Electrical requirements for woodworking shops typically include 220V/30-50 amp circuits for larger tools, dedicated 110V/20 amp circuits for dust collection, and specialized wiring with dust-tight conduit and explosion-proof switches in high-dust areas. This comprehensive electrical setup prevents fire hazards while providing sufficient power for all equipment to operate safely. Working with an electrician familiar with workshop requirements ensures proper installation.
Multi-Purpose and Specialized Spaces
21. Open Concept Multi-Use Area
Design a flexible space with modular furniture, movable partitions or screens, versatile lighting options, and multi-purpose storage solutions that allow the space to transform based on needs. This requires thoughtful planning to ensure different functions can coexist without constant major rearrangement. Consider traffic flow and electrical needs for various activities.
Modular electrical systems for multi-use spaces should include floor outlets on 8-10 foot grids, allowing furniture arrangements without cord hazards, plus perimeter outlets every 6 feet. This comprehensive electrical planning provides power access regardless of how the space is configured. I recommend recessed floor boxes with water-resistant covers that remain unobtrusive when not in use.
Movable partition systems range from simple screens to acoustic room dividers on ceiling tracks—commercial-grade systems can achieve sound transmission class (STC) ratings of 35-45 while maintaining flexibility. These versatile solutions allow you to reconfigure your space quickly for different activities without permanent construction. The investment in quality dividers provides both functional separation and acoustic privacy when needed.
22. Home Bar with Entertainment Zone
Combine a custom bar area (with counter, seating, refrigeration, and storage) with an adjacent entertainment space featuring comfortable seating, a TV or projector, and good acoustics. This requires plumbing for a sink, proper electrical for appliances and entertainment equipment, and a layout that allows for social interaction between the bar and seating areas.
Bar construction should include waterproof membranes beneath all wet areas, with countertops sloped 1/8″ per foot toward sinks to prevent standing water. These construction details prevent moisture damage to cabinets and flooring while ensuring easy maintenance. I recommend composite countertop materials that resist staining from wine and citrus while providing an attractive, durable surface.
Refrigeration systems for home bars require proper ventilation—under-counter units generate 1,000-1,500 BTUs of heat per hour that must be dissipated to prevent overheating and excessive energy consumption. This heat management consideration is often overlooked in basement bar designs, leading to premature appliance failure and uncomfortable temperatures. Front-venting refrigerators designed specifically for built-in applications provide the best solution for most home bars.
23. Indoor Play Zone for Children
Create a safe play area with cushioned flooring, wall-mounted activities, climbing features, reading nook, art station, toy storage, and washable surfaces throughout. Safety is paramount—avoid sharp corners, secure all furniture to walls, ensure good visibility throughout the space, and address any moisture issues thoroughly. Design with flexibility to adapt as children grow.
Impact-absorbing flooring for play areas should meet ASTM F1292 standards for fall heights—foam tiles in 1-2″ thickness can protect against falls from 1-4 feet depending on density. This safety feature prevents serious injuries from typical childhood falls while providing a comfortable play surface. I recommend interlocking foam tiles with different colors to create activity zones while maintaining consistent protection.
Child-safe materials should be free of VOCs, formaldehyde, and lead—look for products certified by GREENGUARD, CertiPUR-US, or similar programs that test for chemical emissions. These health-conscious choices protect developing respiratory systems and reduce allergy triggers. The small premium for certified child-safe materials provides significant health benefits for your family.
24. Home Theater with Gaming Area
Divide the space between a dedicated viewing area with tiered seating and screen, and an adjacent gaming zone with comfortable seating, game storage, and possibly arcade machines or gaming consoles. This requires careful acoustic planning so activities in one area don’t disturb the other. Consider a layout that allows both spaces to be used simultaneously.
Acoustic zoning between adjacent activities requires strategic sound barriers—partial height walls with acoustic treatment can achieve 25-30 dB noise reduction while maintaining an open feel. This balanced approach creates separate activity zones without completely dividing the space. I recommend combining physical barriers with electronic solutions like directional speakers that focus sound where intended.
Power management for entertainment zones should include separate circuits for audio/visual equipment and gaming systems, with power conditioning to prevent interference between sensitive components. This electrical isolation improves performance while preventing problems like audio hum or video artifacts caused by shared power. The investment in proper electrical design significantly enhances the user experience in both zones.
25. Sports Simulator Room
Install a golf/sports simulator system with projection screen, turf flooring or hitting mat, seating for spectators, and storage for equipment. Include a small refreshment area if space allows. This requires significant ceiling height (minimum 9-10 feet), proper electrical for the simulator technology, and potentially reinforced flooring or walls to withstand impact.
Golf simulator installations require minimum dimensions of 15′ width × 20′ length × 9′ height for full swing capability, with impact-resistant wall surfaces capable of withstanding 150+ mph ball impacts. These specific requirements ensure safe, enjoyable use without damaging your home. I recommend working with companies specializing in residential simulator installations to ensure proper setup and calibration.
Projection systems for simulators need specific throw ratios (typically 0.3:1 for short-throw projectors) to achieve full-size image projection within limited space constraints. This technical specification ensures the projected image fills the screen properly without requiring excessive distance between the projector and screen. High-brightness projectors (4,000+ lumens) provide the best experience, allowing use without complete darkness.
Budget-Friendly Alternatives
You don’t need unlimited funds to transform your basement. Consider economical approaches like partial finishing (leaving utility areas unfinished), phase-based renovation (completing your basement in stages), DIY-friendly elements (handling painting or simple flooring yourself), and using repurposed materials (reclaimed wood, second-hand furniture) to reduce costs while adding character. For affordable basement transformations, our budget-friendly junk removal services can help clear the space while being mindful of costs, allowing you to allocate more resources to your renovation project.
The Martinez family transformed their basement on a $7,500 budget by strategically combining DIY work with targeted professional help. They created a family entertainment space by having professionals handle the electrical work and egress window installation ($3,200) while tackling drywall finishing, painting, and flooring themselves. Instead of custom built-ins, they repurposed kitchen cabinets from a local remodel and installed them along one wall for storage. For the entertainment center, they used stacked wooden crates finished with polyurethane. The industrial-style ceiling was left exposed but painted black, saving on drop ceiling costs while preserving height. The finished space looks intentionally designed rather than budget-constrained, and the family gained 600 square feet of living space for less than $15 per square foot.
Partial basement finishing typically saves 30-40% compared to full finishing costs by maintaining unfinished utility areas while creating defined finished spaces. This strategic approach focuses your budget on areas that provide the most value while leaving mechanical areas accessible for maintenance. I often recommend this approach for homeowners with limited budgets who still want quality finishes in their primary living areas.
Phase-based renovation planning should prioritize rough-in work (electrical, plumbing, HVAC) during initial phases, allowing for easier completion of finish work in later phases without demolition. This forward-thinking approach prevents having to tear out finished surfaces for later upgrades. I recommend creating a comprehensive master plan even if you’ll be completing the work over several years.
|
Renovation Approach |
Cost Savings |
DIY Difficulty |
Time Investment |
Best For |
|---|---|---|---|---|
|
Partial Finishing |
30-40% |
Moderate |
Medium |
Maintaining utility access while creating living space |
|
Phase-Based Renovation |
15-25% |
Varies by phase |
High (extended timeline) |
Spreading costs over time while completing usable areas |
|
DIY Painting/Flooring |
10-15% |
Low-Moderate |
Medium |
Homeowners with basic skills looking to save on labor |
|
Open Ceiling Design |
5-10% |
Low |
Low |
Industrial aesthetic, maximizing height, easier utility access |
|
Repurposed Materials |
20-30% |
Moderate-High |
High |
Unique character, environmentally conscious renovations |
|
Pre-fabricated Components |
10-20% |
Low-Moderate |
Low |
Quick completion, predictable costs |
Small Basement Solutions
Compact basements require thoughtful space utilization strategies. Maximize vertical storage with floor-to-ceiling shelving, select multi-functional furniture that serves dual purposes, use lighter color palettes to create the illusion of spaciousness, strategically place mirrors to reflect light, and consider open-concept designs that minimize internal walls for an airier feel.
Vertical storage systems can increase usable storage capacity by 40-60% compared to traditional storage methods by utilizing wall space up to ceiling height. This dramatic improvement in storage efficiency frees up floor space for living functions while keeping items organized and accessible. I recommend adjustable shelving systems that can be reconfigured as your storage needs change.
Light reflectance values (LRV) significantly impact perceived space size—walls with LRV ratings of 60-80% can make spaces appear up to 15% larger than dark colors with LRV ratings below 25%. This optical effect creates a more open, airy feeling in compact spaces. I suggest using lighter colors for walls and ceilings while incorporating darker accents through furniture and accessories for visual interest without closing in the space.
Emerging Basement Trends for 2025
Stay current with the latest basement design trends, including biophilic elements (living walls, natural materials), smart home integration (automated lighting, climate control), sustainability focus (eco-friendly materials, energy-efficient systems), work-from-home adaptability (flexible transitional spaces), and aging-in-place considerations (universal design principles for accessibility).
Biophilic design elements have been shown to reduce stress and improve cognitive function—studies indicate productivity improvements of 8-12% in spaces incorporating natural elements. This research-backed approach creates healthier, more enjoyable environments through connection with nature. I recommend incorporating natural materials, living plants, water features, and nature-inspired patterns even in below-grade spaces.
Smart home systems specifically designed for basements now include water sensors integrated with automatic shut-off valves, humidity monitoring with alerts, and zoned climate control based on occupancy patterns. These specialized technologies address the unique challenges of basement environments while providing convenience and protection. The investment in smart systems often pays for itself through prevented water damage and improved energy efficiency.
Common Renovation Challenges and Solutions
Anticipate typical basement renovation obstacles including post-renovation settling (use flexible trim options), HVAC balancing (implement zoned climate control), sound transmission (install sound-dampening insulation), emergency egress requirements (ensure code-compliant exits), and utility access needs (create removable panels for maintenance). Addressing these challenges proactively prevents future headaches. When tackling basement renovation challenges, our debris removal service can help manage construction waste efficiently, keeping your project on schedule and your workspace clean.
Post-renovation settling typically occurs within the first 12-18 months—flexible trim materials like PVC or rubber can accommodate up to 1/4″ of movement without visible gaps. This adaptability prevents the need for repairs as your newly finished basement adjusts. I recommend these materials particularly around doors, windows, and where walls meet ceilings, as these junction points show movement most visibly.
HVAC balancing for basements often requires supplemental systems—mini-split heat pumps with SEER ratings of 18+ provide energy-efficient temperature control independent of main house systems. This zoned approach addresses the unique climate challenges of below-grade spaces while reducing energy costs. The investment in proper climate control significantly improves comfort and prevents moisture-related problems.
Finishing Touches That Make a Difference
Elevate your basement design with thoughtful details including textural contrasts (combining soft fabrics with harder elements), layered lighting (ambient, task, and accent), transitional spaces (designed entrances that set the tone), acoustic considerations (sound-absorbing elements), and personal memorabilia displays (meaningful collections that tell your story).
Layered lighting design follows the 60-30-10 rule—60% ambient lighting, 30% task lighting, and 10% accent lighting to create depth and visual interest. This balanced approach prevents the flat, institutional feel that often plagues basement spaces. I recommend putting all lighting on dimmer switches to adjust the atmosphere for different activities and times of day.
Acoustic treatment in basements should target a reverberation time (RT60) of 0.4-0.6 seconds for living spaces and 0.2-0.3 seconds for media rooms through strategic placement of absorptive materials. These specific acoustic goals create comfortable listening environments without the echo common in basement spaces. Soft furnishings, acoustic panels disguised as artwork, and area rugs can all contribute to improved acoustics while enhancing the design.
How Jiffy Junk Can Help
Before implementing any basement renovation, you’ll likely need to clear years of accumulated items cluttering your space. Jiffy Junk specializes in efficient, eco-friendly junk removal services that quickly prepare your basement for transformation. Their professional team handles all heavy lifting, ensuring items are properly sorted for recycling, donation, or disposal, leaving your basement broom-clean and ready for your exciting new project. Before starting your basement transformation, consider our dungeon be gone basement cleanout service to remove years of accumulated clutter and create a clean slate for your renovation project.
Professional junk removal services can complete basement cleanouts in 4-8 hours compared to the typical 2-3 weekends required for DIY removal, accelerating project timelines. This efficiency gets your renovation started sooner while saving you from the physical strain of moving heavy items up basement stairs. I’ve seen many projects delayed for weeks because homeowners underestimated the time required for proper cleanout.
Eco-friendly disposal practices divert up to 60-70% of basement cleanout materials from landfills through strategic sorting for recycling, donation, and specialized waste processing. This responsible approach reduces environmental impact while often saving money on disposal fees. Many items removed from basements still have useful life and can benefit others through donation programs.
Final Thoughts
Transforming your basement into a functional, beautiful space significantly enhances your home’s value and quality of life. By carefully planning your renovation, addressing potential challenges early, and incorporating thoughtful design elements, you’ll create an underground space that perfectly suits your lifestyle needs. Whether you choose a dedicated purpose or flexible multi-use area, your basement has unlimited potential to become your favorite part of the home.
Well-executed basement renovations typically add 50-70% of the project cost to home value, with specialized spaces like home theaters or in-law suites potentially returning 70-80% of investment. This financial benefit comes alongside the immediate lifestyle improvement from gaining substantial living space. I’ve had many clients express surprise at how quickly their renovated basement became the most used area in their home.
Basement renovations increase usable living space by 30-50% in most homes, effectively reducing the cost per square foot of your overall home investment. This expansion of living area without increasing your home’s footprint represents one of the most cost-effective ways to gain space. The transformation from storage catch-all to purposeful living space often feels like moving to a larger home without the stress and expense of relocation.