DIY Cabinet Doors: The Hidden Psychology Behind Professional Results That Most Builders Never Learn
Building professional-quality cabinet doors goes way beyond following instructions—you need to understand the psychological relationship between materials, techniques, and long-term performance. While “hanging cabinet doors is a project that’s harder in practice than it is in theory, particularly if you don’t do it a lot. The job could take 30 minutes or less, or you could end up fighting with it for three hours” according to Popular Science, the real challenge lies in making decisions during the planning phase that prevent these frustrating scenarios entirely.
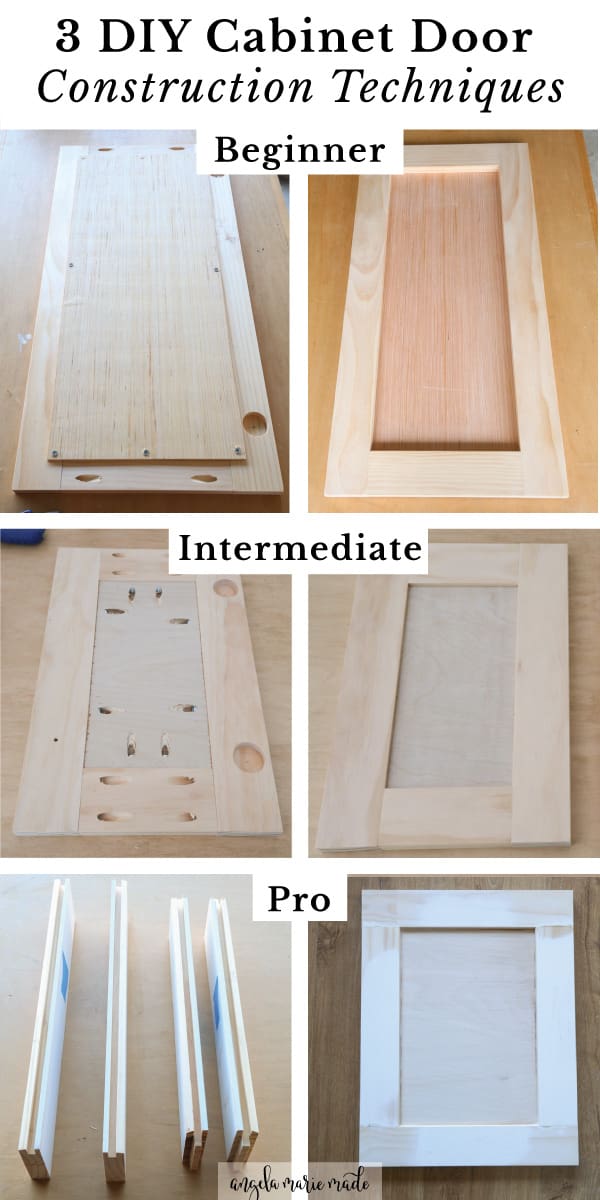
Table of Contents
- Material Psychology: Decoding Wood’s Secret Language
- Construction Methodology: The Assembly Sequence That Prevents Disasters
- Hardware Integration: The Mechanical Marriage
- Finishing Strategies: The Protective Psychology
- Shaker Door Mastery: The Deceptive Simplicity
- Advanced Construction Techniques: Beyond Basic Assembly
- Troubleshooting Common Failures
- Final Thoughts
TL;DR
- Wood selection impacts your project’s success more than skill level—understanding grain patterns and moisture content prevents 90% of door failures
- The order of assembly operations matters more than perfect cuts—getting the sequence wrong creates unfixable problems even with flawless measurements
- Hardware planning during design phase eliminates costly rebuilds—door weight and overlay decisions determine your entire construction approach
- Three thin finish coats outperform one thick coat every time—environmental control beats expensive equipment for professional results
- Shaker doors demand precision in proportions that separate authentic craftsmanship from amateur attempts
Material Psychology: Decoding Wood’s Secret Language
Understanding wood selection goes beyond aesthetics—it’s about matching material characteristics to your skill level and project requirements. Every piece of lumber carries stress patterns from its growth cycle that determine how your diy cabinet doors will behave over decades. Professional results start with reading these patterns before making your first cut.
When planning your diy cabinet doors project, it’s essential to understand that construction debris removal becomes necessary when material mistakes occur, making proper wood selection even more critical for budget-conscious builders.
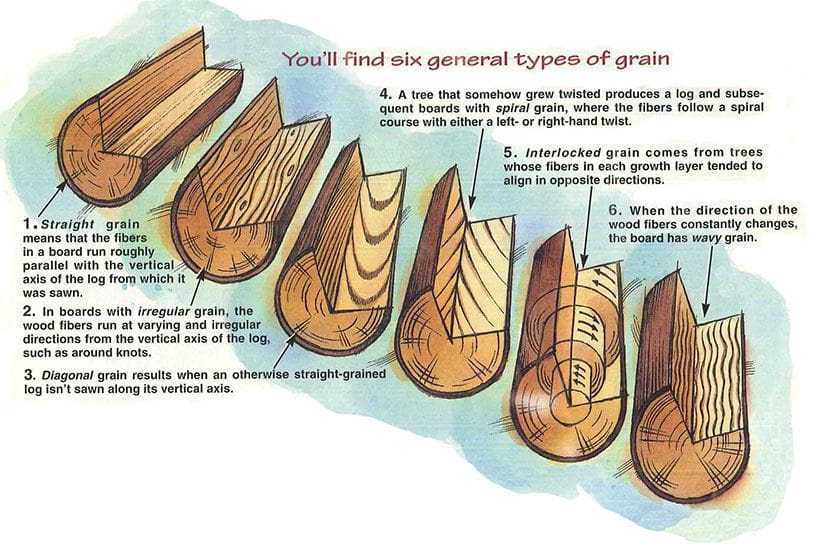
Wood grain direction acts as a structural roadmap that determines long-term door stability and movement patterns. I’ve seen too many builders ignore this fundamental principle and end up with warped doors within months of installation.
Moisture content between 6-8% represents the optimal range for cabinet door construction, preventing seasonal binding and gapping issues. Different wood species have distinct working characteristics that either support or fight against common DIY techniques.
Professional cabinet door modifications can save substantial money, with custom replacement options costing close to $800 for just a few doors according to Young House Love, making proper material selection even more critical for budget-conscious builders.
| Wood Species | Beginner Friendliness | Grain Pattern | Movement Rate | Best Applications |
|---|---|---|---|---|
| Poplar | Excellent | Closed, uniform | Low | Painted doors, learning projects |
| Oak | Moderate | Open, prominent | Medium | Traditional stained doors |
| Maple | Challenging | Closed, tight | Low | High-end painted or clear finish |
| Cherry | Advanced | Closed, variable | Medium | Premium stained applications |
| Pine | Good | Closed, soft | High | Budget painted projects |
| MDF | Excellent | None | None | Painted doors requiring perfect finish |
The Grain Direction Strategy
Wood grain isn’t decorative—it’s your blueprint for predicting how doors will move and warp over time. Reading grain patterns correctly prevents the warping disasters that plague amateur door builders. Every growth ring tells a story about stress distribution that you can use to your advantage.
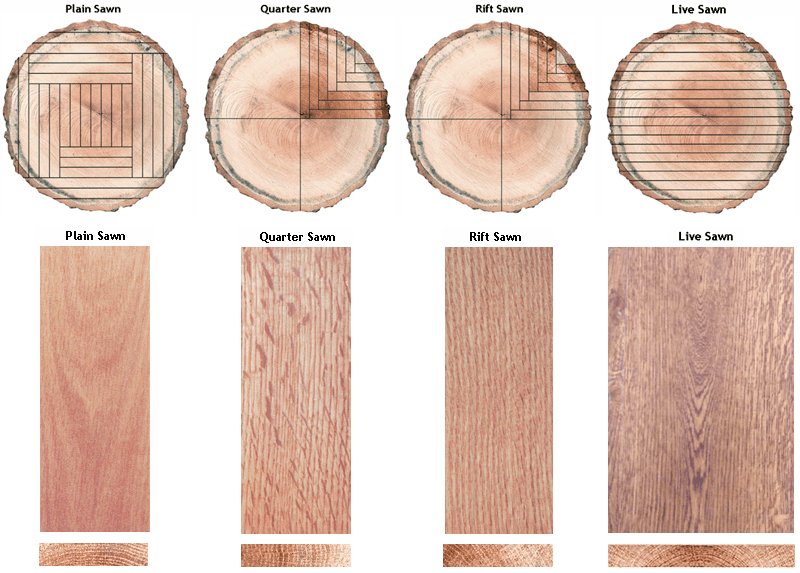
Growth ring orientation in glued-up panels should alternate to create stability and prevent cupping. Quarter-sawn lumber provides superior stability for door frames compared to plain-sawn alternatives. Grain matching between rails and stiles creates visual continuity while maintaining structural integrity.
Reading Wood Memory Patterns
Every board carries stress patterns from its original tree growth that become visible under workshop conditions. These patterns predict exactly where warping will occur and how severe it will be. Learning to read these signs before cutting saves entire projects from failure.
Stress patterns become visible when lumber is ripped or cross-cut, revealing internal tensions. End grain inspection shows growth ring density variations that indicate potential movement areas.
When examining a 1×6 poplar board for door rails, look at the end grain pattern. If you see tight growth rings on one side and loose rings on the other, that board will cup toward the tight ring side as it dries. Instead of using this board as-is, rip it into narrower pieces and alternate the grain orientation when gluing up your rail stock. This simple step prevents the warped doors that plague first-time builders.
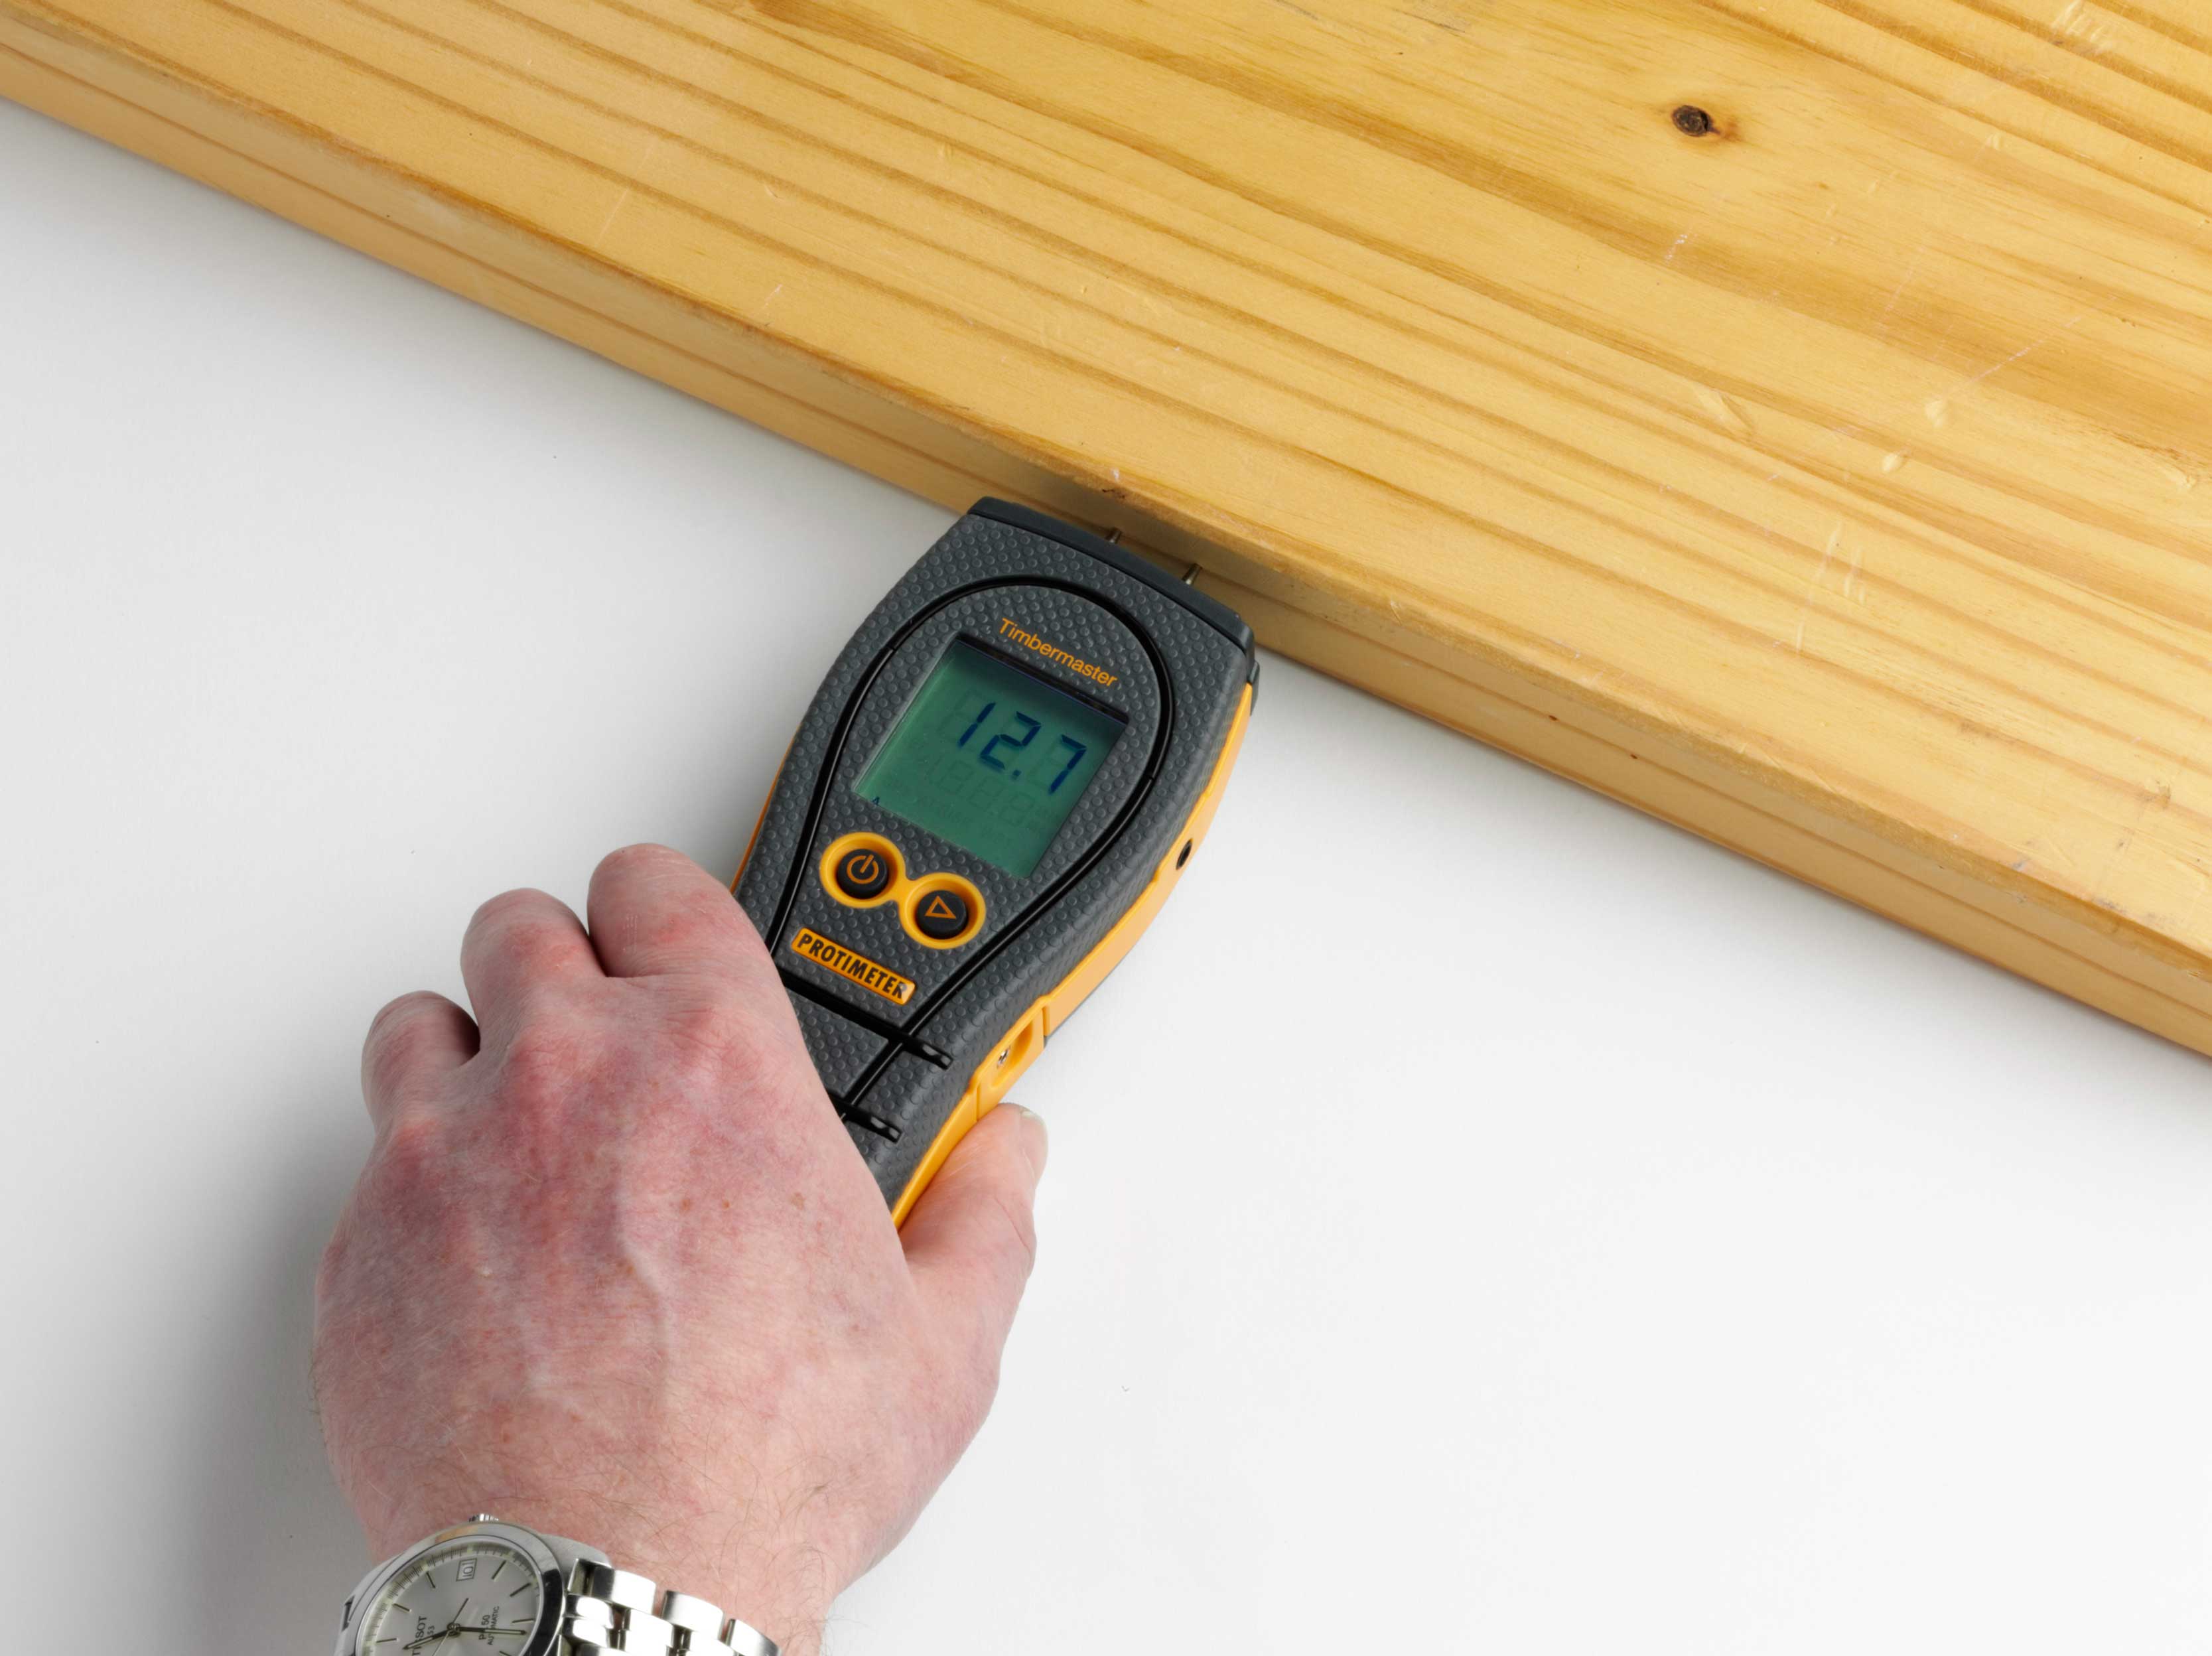
Moisture Content as Your Silent Partner
Professional cabinet makers measure moisture content religiously because it determines whether your doors will fit properly next year. Most DIYers skip this step and wonder why their doors bind in summer or gap in winter. A $30 moisture meter prevents hundreds of dollars in rebuilds.
Kiln-dried lumber should measure 6-8% moisture content for cabinet door applications. Seasonal movement calculations require 1/8″ allowance per 12″ of width for proper reveal planning.
The Species Selection Matrix
Different wood species have personalities that either work with your skill level or fight against it. Poplar forgives routing mistakes while oak demands precision but rewards with durability. Choosing the wrong species can doom your building cabinet doors project before you start cutting.
Hardwood density affects routing speed and bit selection—harder woods require slower feed rates and sharper cutters. Open-grain species need grain filling for smooth painted finishes, while closed-grain woods paint directly. Wood movement rates vary significantly between species, affecting joint tolerances and hardware placement.
Hardwood Hierarchy for Beginners
Poplar offers the most forgiveness for beginners, while cherry and maple provide beauty but demand higher skill levels. Understanding this hierarchy prevents frustrating failures.
Poplar machines cleanly with minimal tear-out, making it ideal for learning proper technique. Oak’s prominent grain pattern hides minor surface imperfections but requires careful sanding progression.
Engineered Solutions vs. Solid Wood Philosophy
MDF and plywood aren’t compromises—they’re strategic choices that eliminate variables that trip up first-time builders. These materials offer dimensional stability and consistent machining characteristics that solid wood can’t match.
MDF provides perfectly flat surfaces for painted doors without grain telegraphing through finish coats. Plywood cores offer superior screw holding power for hardware mounting compared to particleboard alternatives.
The Hidden Cost of Wood Movement
Wood movement isn’t theoretical—it’s a measurable force that will destroy your doors if ignored. Planning for 1/8″ of seasonal movement per 12″ of width during design prevents binding hardware and cracked panels later.
Seasonal movement calculations must account for both frame and panel expansion rates. Hardware placement requires movement allowances to prevent binding during humidity changes.
Tool Investment Psychology
The difference between frustration and flow state often comes down to having the right three tools rather than a workshop full of mediocre equipment. Quality tools don’t make better cuts—they make the entire building cabinet doors process more enjoyable and predictable.
A quality router table transforms cabinet door making from wrestling with handheld tools into precision manufacturing. Sharp router bits cut cleanly without burning, while dull bits tear grain and create poor joints. Consistent tool setup eliminates variables that cause joint fit problems across multiple doors.
The Router Table as Game Changer
A router table transforms cabinet door construction from a wrestling match into precision manufacturing. The fence system and flat surface create repeatable cuts that handheld routers simply cannot match. This single tool upgrade makes professional results achievable for beginners.
Fence-guided cuts eliminate the wandering that plagues handheld router operations. Consistent bit height settings across multiple pieces ensure perfect joint fits.
Jig-Making Mindset
Building custom jigs for repetitive cuts isn’t extra work—it’s the secret to consistency that separates amateur-looking doors from professional results. A simple stop block can eliminate measuring errors across dozens of pieces.
Stop blocks ensure identical piece lengths without measuring each cut individually. Template routing creates perfect curves and profiles that are impossible to achieve freehand.

Construction Methodology: The Assembly Sequence That Prevents Disasters
The order of operations in cabinet door construction is more critical than the techniques themselves. Getting the sequence wrong creates unfixable problems even with perfect cuts. Professional builders follow specific assembly sequences that reveal problems while they’re still correctable.
Understanding how to build cabinet doors requires proper planning for material waste, which is why many builders rely on construction waste disposal services to maintain organized workspaces during complex projects.
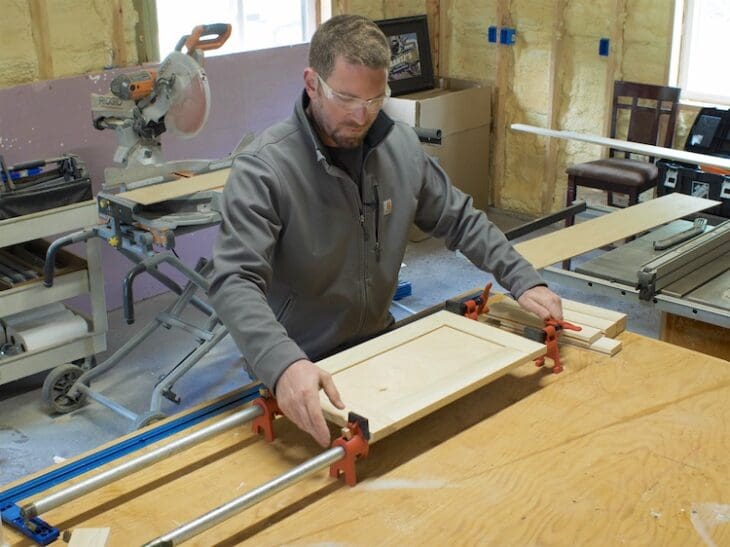
Three distinct dry-fit stages reveal different potential problems before glue makes mistakes permanent. Glue-up success depends on rehearsed sequences that account for working time limitations. Environmental conditions affect assembly timing more than most building cabinet doors enthusiasts realize.
The Dry-Fit Revelation Process
Professional door makers perform three distinct dry-fit stages, each revealing different potential problems before glue makes mistakes permanent. This process catches measurement errors, joint problems, and assembly issues while they’re still fixable.
Pre-assembly layout reveals grain matching opportunities and prevents measurement errors. Clamped dry-fits expose joint gaps and alignment issues without glue commitment. Stress testing assemblies reveals clamping pressure distribution problems.
Cabinet Door Assembly Checklist:
- ☐ All pieces cut to final dimensions
- ☐ Joint profiles test-fit on scrap wood
- ☐ Grain patterns arranged for best appearance
- ☐ All pieces labeled for assembly sequence
- ☐ Clamps sized and positioned for dry-fit
- ☐ Glue, brushes, and cleanup materials ready
- ☐ Workshop temperature between 65-75°F
- ☐ Assembly surface level and protected
Pre-Cut Visualization Techniques
Laying out your entire door sequence on the workbench before making any cuts reveals grain matching opportunities and prevents costly measurement errors. This simple step catches problems that cost hours to fix later.
Full door layout shows grain flow patterns across rails and stiles before cutting. Piece orientation marking prevents assembly confusion during glue-up operations.

The Stress Test Assembly
Assembling doors with clamps but no glue exposes joint gaps, alignment issues, and clamping pressure distribution problems while they’re still correctable. This step reveals whether your joints actually fit as well as they appear.
Clamping pressure reveals joint gaps that aren’t visible during hand assembly. Diagonal measurements confirm square assembly before glue application.
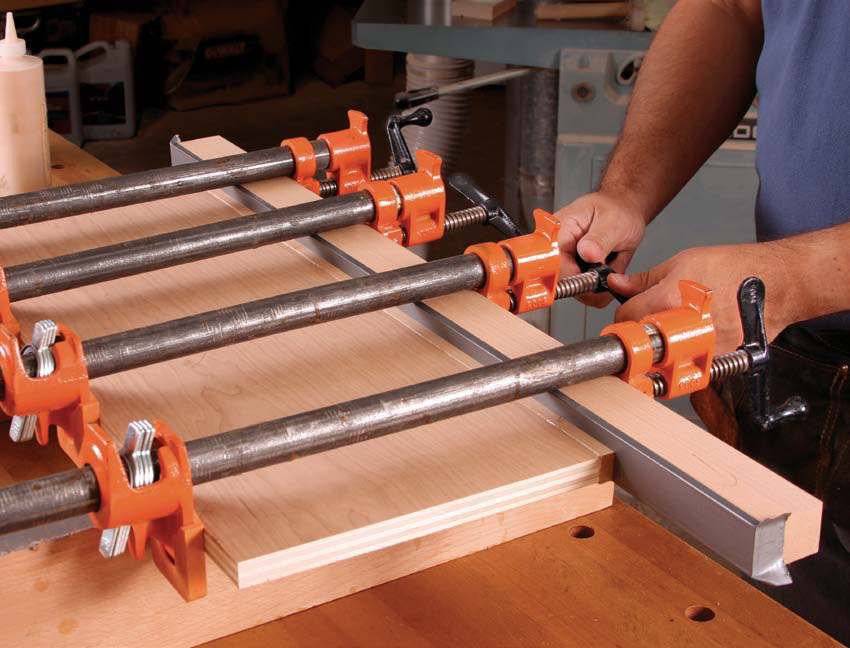
Glue-Up Choreography
The 15-minute window between glue application and setup requires a rehearsed sequence that most DIYers discover too late. Professional results come from planning every step of the assembly process before opening the glue bottle.
Workshop temperature affects glue working time more than most building cabinet doors projects account for. Caul boards prevent twisted doors that result from uneven clamping pressure. Glue cleanup timing determines whether squeeze-out cleans easily or requires scraping.
Temperature and Humidity Timing
Glue-up success depends on workshop conditions that most builders ignore. Cold shops need longer assembly times while humid conditions accelerate setup, requiring faster work. Understanding these variables prevents rushed assemblies and failed joints.
Cold temperatures extend glue working time but also slow cure rates. High humidity accelerates glue setup, requiring faster assembly sequences.
The Caul and Clamp Strategy
Using cauls (straight boards) across door faces during glue-up prevents the twisted doors that result from uneven clamping pressure. This technique rarely appears in basic tutorials but makes the difference between flat doors and problem assemblies.
Caul boards distribute clamping pressure evenly across door faces. Wax paper prevents cauls from bonding to door surfaces during glue-up.
Cleanup Timing Windows
Glue squeeze-out should be cleaned at the 20-minute mark when it’s rubbery but not fully set. Too early smears glue into wood pores, too late requires scraping that can damage surfaces. This timing window is critical for clean results.
Rubbery glue peels cleanly without smearing into wood grain. Sharp chisels remove hardened glue without gouging surrounding wood.
Hardware Integration: The Mechanical Marriage
Cabinet door hardware isn’t an afterthought—it’s a mechanical system that must be planned during the design phase to avoid costly rebuilds. Different hinge styles create distinct door behaviors, and handle placement affects daily usability more than aesthetics.
Hinge selection affects door weight capacity and closing behavior characteristics. Overlay decisions determine construction approaches and hardware compatibility. Handle placement impacts ergonomics and visual balance across cabinet runs. Custom-made cabinet doors can cost close to $1,000 according to Popular Science, emphasizing why proper hardware planning prevents costly rebuilds.
The trend toward “fluted cabinetry is popular lately because it’s a great way to add style and pizzazz to your kitchen” according to Family Handyman, with experts noting that these designs require careful hardware planning since the additional thickness affects hinge selection and door weight calculations.
Hinge Psychology and Door Behavior
Different hinge styles create distinct door personalities, from the self-closing confidence of European hinges to the traditional swing feel of butt hinges. Understanding these characteristics helps match hardware to your intended door behavior and user preferences.
European hinges provide adjustability that compensates for minor installation errors. Butt hinges require precise mortising but offer traditional aesthetics and long-term durability. Self-closing mechanisms reduce wear on door frames and improve kitchen functionality.
| Hinge Type | Weight Capacity | Adjustment Range | Installation Difficulty | Best Applications |
|---|---|---|---|---|
| European (Concealed) | 35-50 lbs | 3-way adjustment | Easy | Modern kitchens, face-frame cabinets |
| Butt Hinges | 25-40 lbs | None | Moderate | Traditional styles, inset doors |
| Piano Hinges | 15-25 lbs | None | Easy | Light doors, continuous support |
| Soft-Close European | 40-60 lbs | 3-way adjustment | Easy | Premium installations |
| Surface Mount | 20-35 lbs | Limited | Very Easy | Overlay doors, quick installs |
The Overlay Decision Tree
Full overlay, partial overlay, and inset doors each require different construction approaches and hardware solutions. Choosing the wrong path creates expensive do-overs because the decision affects everything from door sizing to hinge selection.
Full overlay doors hide frame construction errors but require precise sizing for consistent reveals. Inset doors demand perfect construction but offer superior aesthetics and functionality.
Weight Distribution Engineering
Door weight affects hinge selection more than aesthetics. A 15-pound door needs different support than a 5-pound door, regardless of style preferences. Calculating door weight during design prevents hardware failures and sagging problems.
Solid wood doors require heavy-duty hinges rated for 150% of actual door weight. Multiple hinges distribute weight loads better than single heavy-duty units.

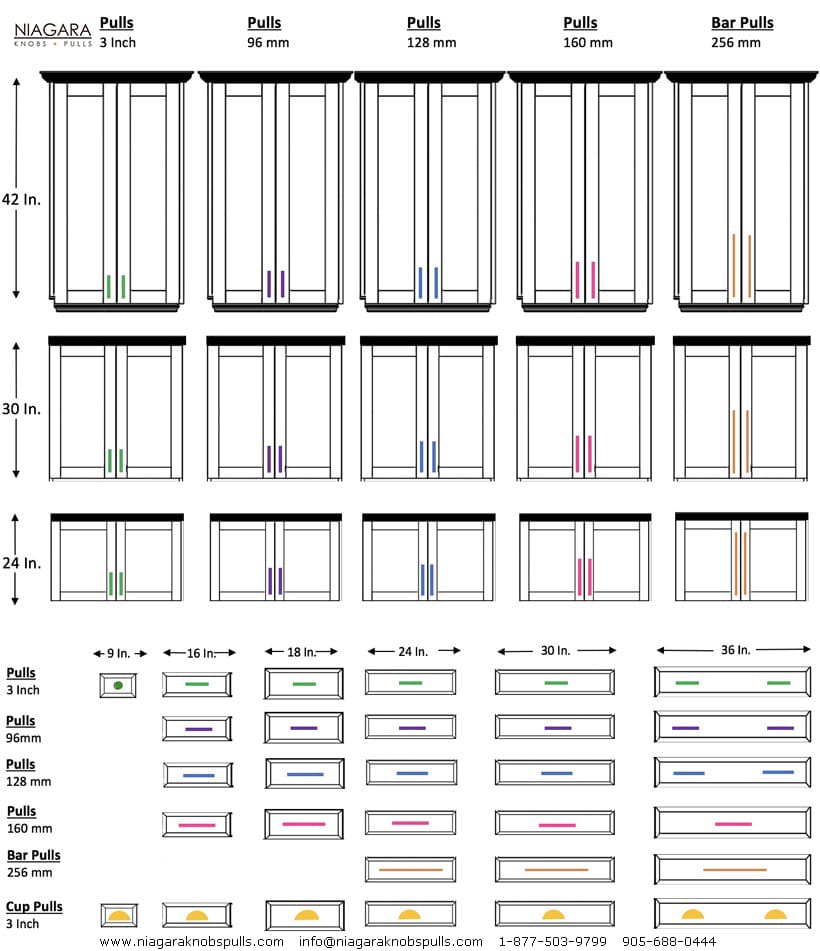
Handle and Knob Biomechanics
Handle placement affects how doors feel to use daily, with the 36″ height rule being a starting point for ergonomic customization. Understanding grip requirements and visual balance creates cabinets that feel as good as they look.
Handle height should accommodate primary users’ natural reach patterns. Grip diameter affects usability for users with arthritis or limited hand strength. Visual weight balance requires larger hardware on taller doors for proportional appearance.
The Grip Strength Consideration
Handle diameter and texture choices should consider who will use the cabinets most. Elderly users need different solutions than young adults, and planning for changing needs prevents future accessibility problems.
Larger diameter handles require less grip strength for operation. Textured surfaces provide better grip security for users with limited dexterity.
Visual Weight Balance
Hardware creates visual anchors that can make doors appear heavier or lighter than their actual weight. Understanding this principle helps create cohesive kitchen aesthetics that feel balanced and intentional.
Dark hardware appears heavier than light finishes of identical size. Handle length should relate proportionally to door width for visual balance.
Source: dekkorinc.com
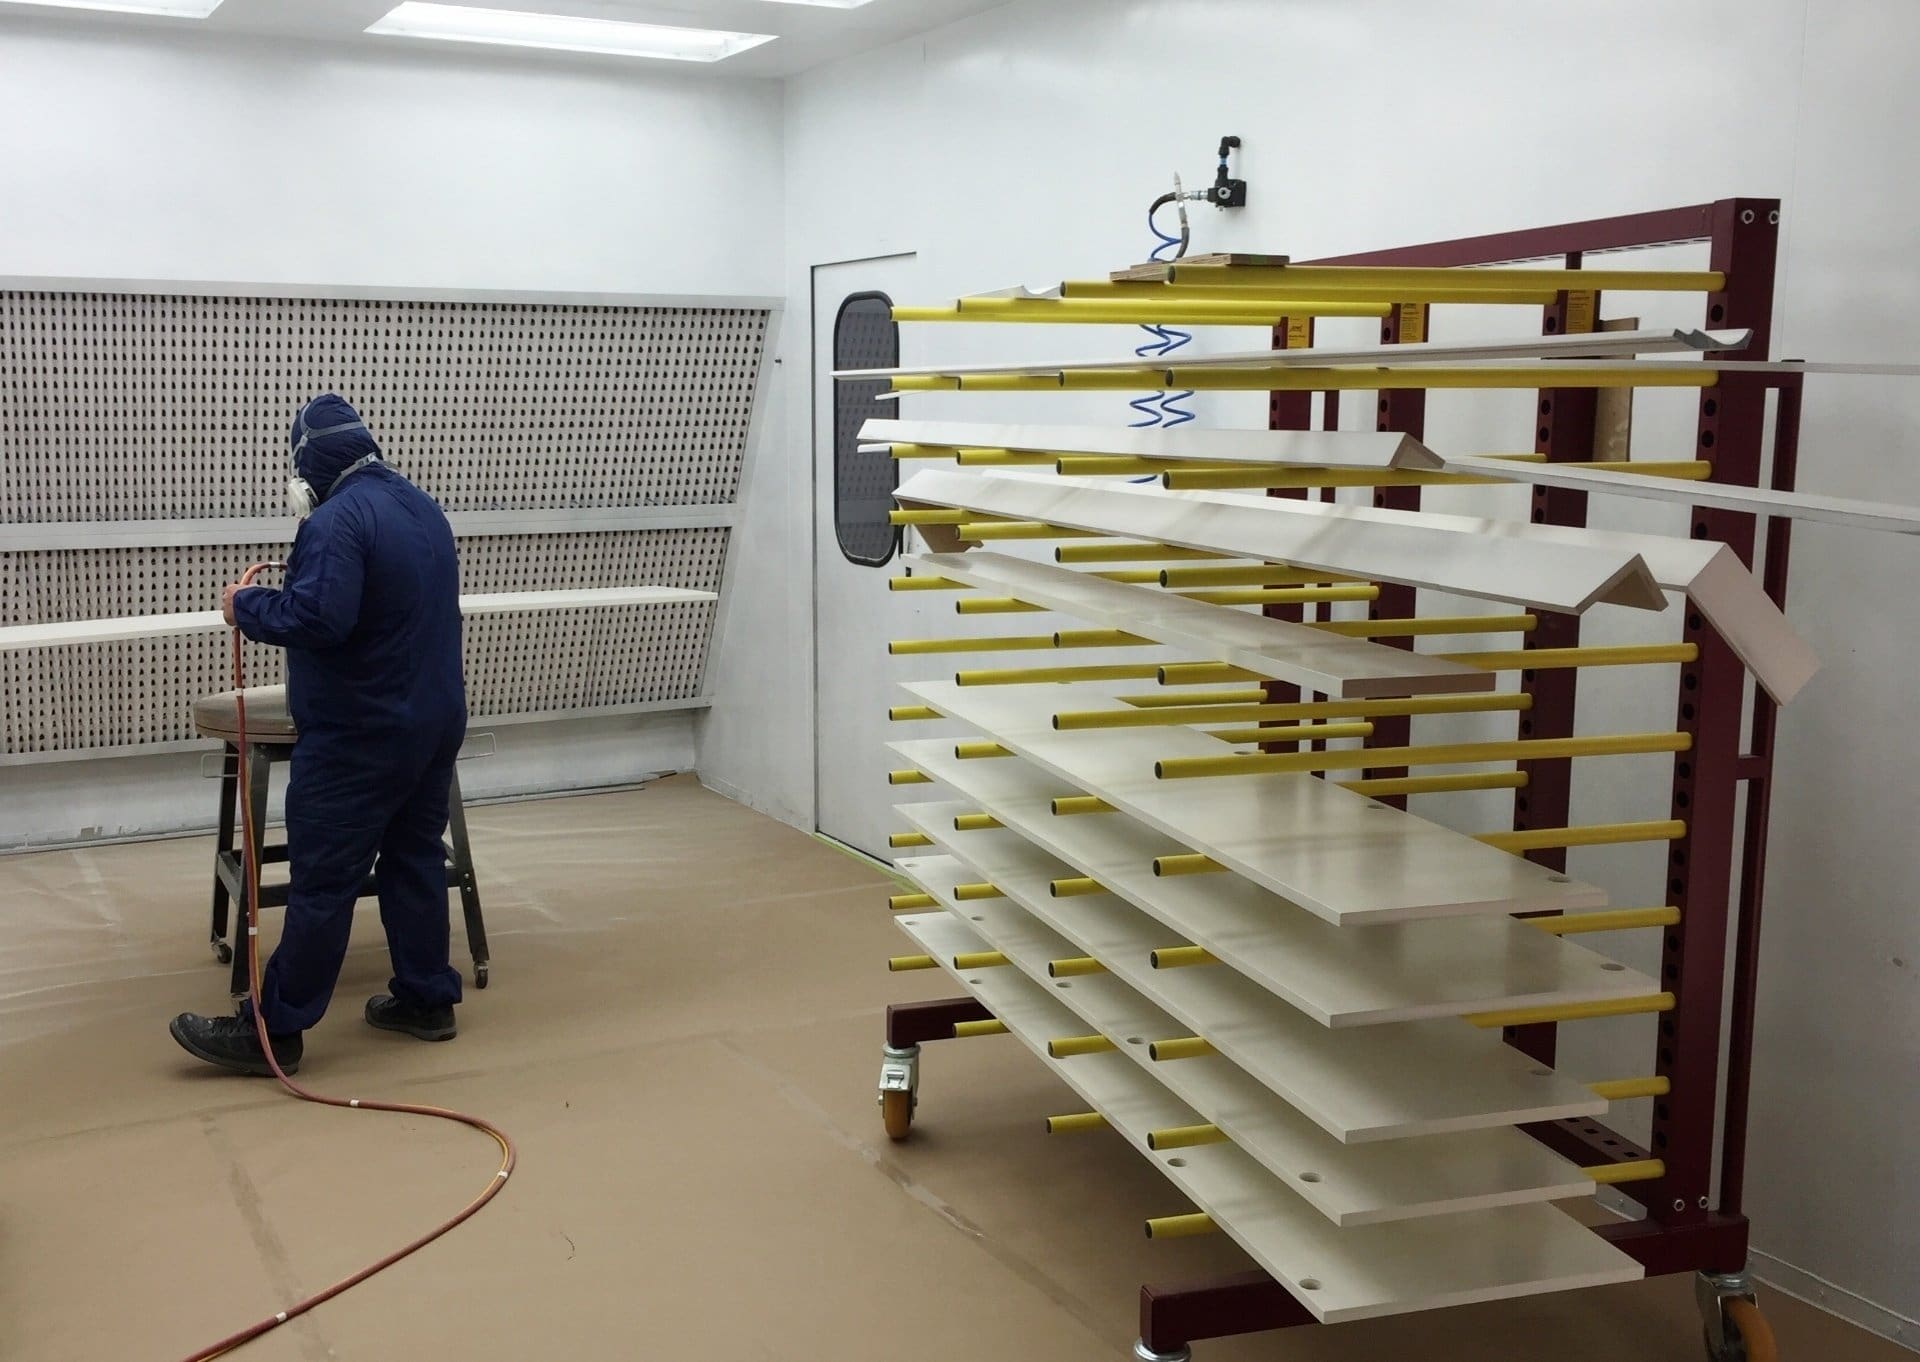
Finishing Strategies: The Protective Psychology
Cabinet door finishing creates a protective barrier that maintains your investment while enhancing daily interaction with surfaces. The choice between penetrating oils and film finishes determines maintenance requirements and repair options for years to come. Success depends more on environmental control and patience than expensive equipment.
Oil finishes penetrate wood fibers and allow spot repairs, while polyurethane creates surface protection requiring complete refinishing when damaged. Kitchen environments demand finishes that handle grease, humidity, and frequent cleaning beyond typical residential applications. Three thin coats build superior protection compared to single thick applications, with each coat serving distinct purposes.
The Penetrating vs. Film Finish Decision
Oil finishes soak into wood fibers and can be spot-repaired easily, while film finishes create surface barriers that require complete refinishing when damaged. Your maintenance personality should drive this choice—high-maintenance finishes on low-maintenance people create long-term dissatisfaction.
Penetrating finishes require regular reapplication but allow easy touch-ups without visible repair lines. Film finishes provide superior protection against moisture and stains but show damage more prominently. Hybrid finishes combine penetrating base coats with protective topcoats for balanced performance.
Consider a busy family kitchen where kids frequently grab cabinet doors with sticky fingers. A catalyzed lacquer finish might seem excessive, but it wipes clean effortlessly and maintains its appearance for years. Compare this to a tung oil finish that requires monthly conditioning and shows every fingerprint—the wrong choice for this lifestyle despite being “more natural.”
Maintenance Personality Matching
Choose finishes that align with your maintenance habits and lifestyle demands. Some people enjoy regular wood care rituals, while others prefer set-and-forget protection. Mismatching finish requirements to personal habits guarantees disappointment.
Oil finishes require annual reapplication but reward with easy maintenance and natural appearance. Catalyzed finishes offer decades of protection but demand professional repair when damaged.
Kitchen Environment Considerations
Kitchen finishing must withstand grease splatter, steam, and aggressive cleaning products that destroy residential finishes. Commercial-grade products excel where standard finishes fail, making the extra cost worthwhile for long-term performance.
Grease penetration requires finishes with superior chemical resistance beyond water-based protection. Steam exposure from cooking demands finishes that won’t cloud or delaminate under moisture stress.
Application Technique Psychology
Finish application success stems from environmental control and systematic approach rather than expensive spray equipment. Creating dust-free conditions and following proven sequences produces professional results with basic tools.
Dust-free finishing environments using plastic sheeting prevent orange peel texture that ruins otherwise perfect doors. Consistent application techniques matter more than brush quality for achieving smooth finish surfaces. Proper surface preparation determines finish adhesion and longevity more than topcoat selection.
Dust Management Systems
Creating a dust-free finishing environment prevents the orange peel texture that ruins otherwise perfect doors. Simple plastic sheeting and air filtration systems work better than expensive spray booths for small-scale door finishing.
Positive air pressure systems push dust away from wet finish surfaces during application. Tack cloth removal of surface dust between coats prevents embedded particles in final finish.
The Three-Coat Philosophy
Professional results emerge from three thin coats rather than attempting coverage in fewer applications. Each coat serves specific purposes: sealing, building, and protecting. Rushing this process guarantees inferior results regardless of product quality.
Sealer coats penetrate wood pores and provide foundation for subsequent applications. Build coats create thickness and smooth surface imperfections from previous applications.
Sanding Between Coats Strategy
Light sanding between finish coats with 220-grit paper creates mechanical adhesion that prevents finish failure. Skipping this step causes peeling problems that appear months after completion. The extra time investment prevents complete refinishing later.
220-grit paper removes surface imperfections without cutting through previous coat layers. Dust removal after sanding ensures clean bonding surfaces for subsequent coat applications.
Finishing Schedule Template:
- Day 1: Final sanding (220-grit), tack cloth, first coat application
- Day 2: Light sanding (220-grit), tack cloth, second coat application
- Day 3: Light sanding (320-grit), tack cloth, final coat application
- Day 4-7: Cure time before handling/installation
- Environmental requirements: 65-75°F, <50% humidity, dust-free conditions
Shaker Door Mastery: The Deceptive Simplicity
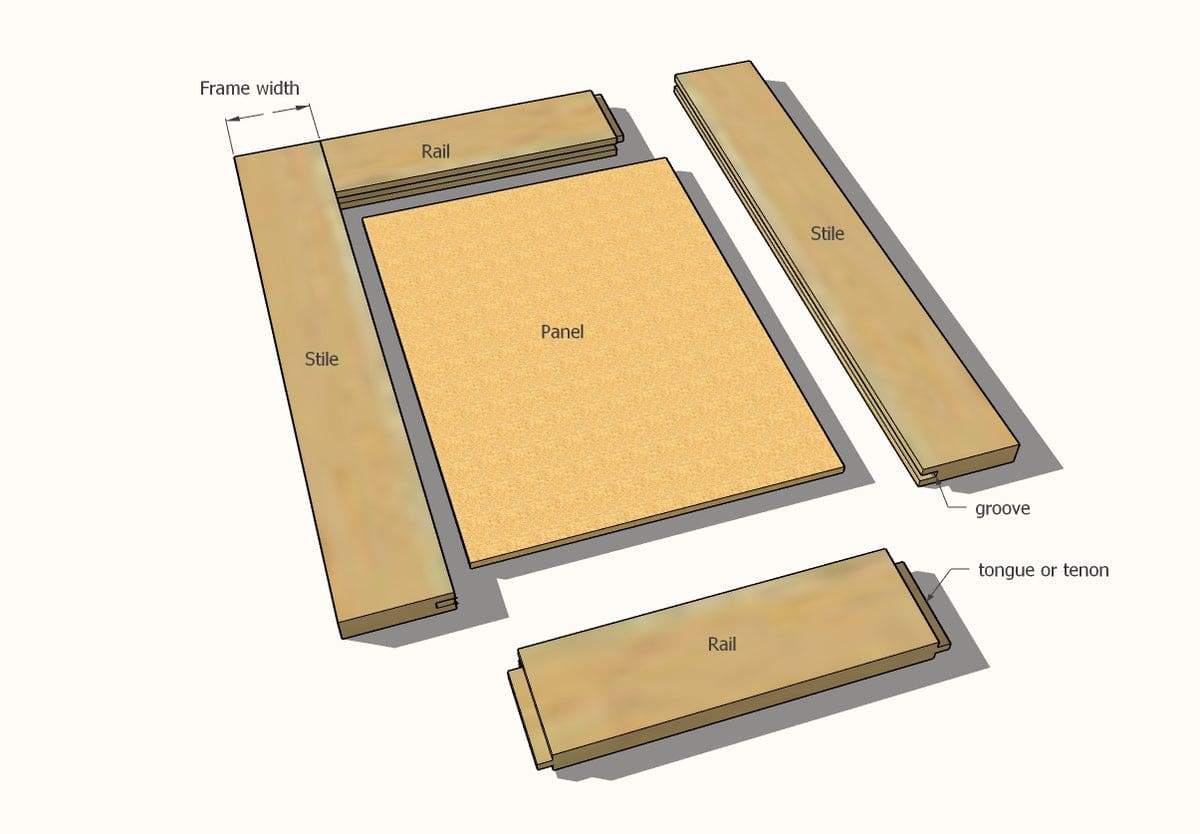
Shaker doors appear elementary but demand precision in proportions and joinery that separates authentic craftsmanship from amateur attempts. Traditional proportions were driven by lumber availability and structural requirements rather than aesthetic formulas, giving modern builders flexibility in adaptation.
Historical Shaker proportions resulted from sawmill capabilities rather than mathematical design principles. Cope and stick joinery creates strongest rail-to-stile connections but requires understanding wood movement principles. Panel raising alternatives offer creative opportunities beyond traditional raised panel designs.
The Golden Ratio Myth in Rail and Stile Proportions
Many assume diy shaker cabinet doors follow mathematical ratios, but traditional proportions actually resulted from lumber availability and structural requirements. This understanding frees modern builders from rigid formulas while maintaining authentic proportions.
Original Shaker craftsmen used 2.5″ rails and stiles because sawmills produced these dimensions efficiently. Contemporary doors can range from 1.75″ to 3.5″ frame widths depending on door size and visual requirements. Larger doors require wider frames for visual balance rather than following fixed proportion rules.
Modern DIY trends show that “focus more of your spend on those show-stopping doors that will get all of the attention and elevate your space to a more luxurious level” according to House Beautiful, emphasizing how proper Shaker proportions can transform budget cabinet boxes into custom-looking installations.
Historical Width Standards
Original Shaker craftsmen used standard widths because that’s what their sawmills produced efficiently, not because of design theory. Understanding this history provides flexibility in modern adaptations while respecting traditional aesthetics.
Period sawmill limitations determined standard lumber dimensions more than aesthetic considerations. Regional variations in Shaker furniture reflect local lumber availability rather than design preferences.
Modern Adaptation Strategies
Contemporary easy diy shaker cabinet doors can incorporate modern materials and proportions while maintaining authentic character. The key lies in understanding the functional principles behind traditional designs rather than copying exact dimensions.
Proportional scaling maintains visual balance when adapting traditional dimensions to modern door sizes. Modern lumber dimensions allow optimization of material usage while preserving authentic appearance.
Cope and Stick Joinery Secrets
This traditional joint creates the strongest connection between rails and stiles for diy shaker cabinet doors, but requires understanding wood movement principles that most tutorials ignore. Proper execution demands specific sequencing and setup procedures that ensure perfect fits.
Router bit sequencing logic requires cutting cope (end grain) first, then stick (long grain) to prevent tear-out. Test piece methodology using identical grain orientation provides accurate joint fit assessment. Seasonal adjustment techniques ensure panels float freely with proper expansion allowances.
When learning easy diy shaker cabinet doors construction, understanding that scrap metal pickup services can handle router bit disposal and workshop cleanup helps maintain the organized environment essential for precision joinery.
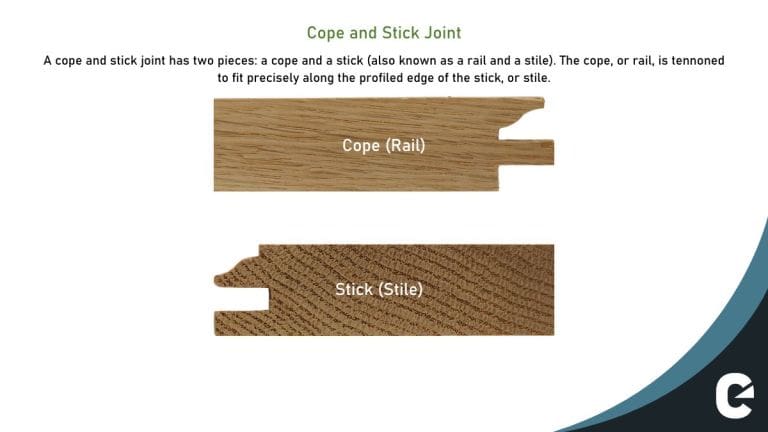
Router Bit Sequencing Logic
Always cut the cope (end grain) first, then the stick (long grain) to ensure perfect fits and prevent tear-out on visible surfaces. This sequence allows fine-tuning of the stick cut to match any variations in the cope profile.
End grain cutting creates reference profile that long grain cuts match precisely. Tear-out on cope cuts affects hidden surfaces while stick tear-out shows on door faces.
Test Piece Methodology
Cut test joints on scrap wood with identical grain orientation to your actual pieces. Cross-grain test pieces give false confidence because they behave differently than your actual door components during assembly and seasonal movement.
Grain orientation affects joint tightness and seasonal movement patterns significantly. Test pieces should match actual door component dimensions for accurate fit assessment.
Seasonal Adjustment Techniques
Shaker cabinet door diy panels must float freely in their grooves with 1/8″ expansion space on all sides to prevent cracking during humidity changes. This clearance appears excessive but prevents panel failure during extreme seasonal movement.
Panel expansion rates vary by species and grain orientation within the same door. Groove depth must accommodate panel thickness plus seasonal movement allowances.
A 12″ wide oak panel in a Shaker door needs 1/8″ clearance on each side (1/4″ total) to accommodate seasonal movement. In winter, the panel shrinks and rattles slightly in the groove. In summer, it expands and fits snugly. Both conditions are normal and prevent the cracked panels that result from insufficient clearance.
Panel Raising Alternatives
Traditional raised panels aren’t the only option for making shaker cabinet doors centers. Flat panels, beadboard, and even fabric inserts create unique interpretations while maintaining authentic Shaker simplicity and functionality.
Quarter-sawn flat panels with vertical grain create subtle elegance preferred by many over busy raised panel figures. Floating panel physics requires precise sizing to prevent frame cracking or panel rattling. Alternative materials expand design possibilities while respecting traditional construction principles.
Flat Panel Sophistication
Quarter-sawn panels with vertical grain patterns create subtle elegance that many prefer over busy raised panel figures. The consistent grain pattern provides visual calm while showcasing wood’s natural beauty without distraction.
Vertical grain orientation minimizes seasonal movement and provides consistent appearance. Quarter-sawn lumber costs more but delivers superior stability and refined grain patterns.
Floating Panel Physics
Panels must be sized precisely—too tight and they’ll crack the frame, too loose and they’ll rattle during door operation. Understanding expansion rates for different species and grain orientations ensures proper fit.
Panel width calculations must account for species-specific expansion rates and grain orientation. Seasonal movement testing reveals actual expansion amounts for specific wood combinations.
Advanced Construction Techniques: Beyond Basic Assembly
Professional-grade cabinet doors incorporate techniques that eliminate common failure points while creating heirloom-quality results. These methods require different skill sets and tool approaches but produce joints that outlast basic construction by decades.
Mortise and tenon joints create stronger connections than cope and stick but demand different skill sets. Biscuit joinery provides alignment and strength while being more forgiving than traditional methods. Domino systems combine traditional joint strength with modern precision and assembly speed.
Advanced builders learning how to build cabinet doors often generate significant appliance disposal needs when upgrading workshop equipment, making professional removal services valuable for maintaining workspace efficiency.
Mortise and Tenon Precision
Hand-cut mortise and tenon joints create stronger connections than cope and stick, but require different skill sets and tool approaches. The extra effort produces joints that can be disassembled and repaired, unlike glued cope and stick connections.
Sharp chisels and proper paring techniques create clean mortises while dull tools tear grain and create loose joints. Tenon shoulder accuracy ensures doors assemble flat since even slight angles create twisted assemblies. Hand-cut joints allow custom fitting that machine-cut joints cannot match for perfect connections.
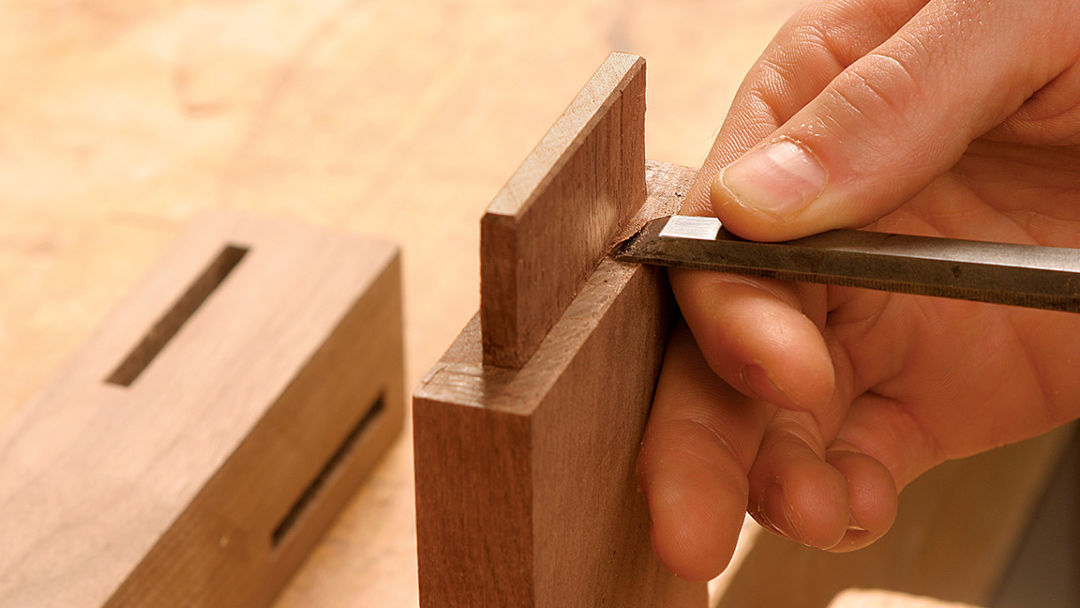
Chisel Technique Mastery
Sharp chisels and proper paring techniques create clean mortises, but dull tools tear grain and create loose joints that compromise door strength. Chisel maintenance and technique development are essential skills for quality joinery.
Chisel sharpening angles affect cutting performance and edge retention in different wood species. Paring cuts remove material gradually for precise fit rather than aggressive chopping motions.
Tenon Shoulder Accuracy
Perfectly square tenon shoulders ensure doors assemble flat—even slight angles create twisted assemblies that bind in frames. Shoulder cutting technique determines joint quality more than tenon fit itself.
Square shoulders transfer loads evenly across joint faces and prevent racking under stress. Shoulder cutting jigs ensure consistent angles across multiple door components.
Biscuit Joinery Applications
Biscuit joints provide alignment and strength for door assembly while being more forgiving than traditional joinery methods. Proper biscuit selection and glue application create strong joints without the precision demands of mortise and tenon work.
Size selection strategy uses #10 biscuits for rails under 2″ wide, #20 for standard frames, and #0 for thin applications. Glue application geometry applies adhesive to slots rather than biscuits for better control and cleaner assembly. Multiple biscuits distribute loads better than single large biscuits in door rail connections.
Size Selection Strategy
Use #10 biscuits for rails under 2″ wide, #20 for standard frames, and #0 for thin applications where larger biscuits would weaken the joint. Biscuit size affects joint strength more than quantity in most applications.
Biscuit thickness must not exceed one-third of material thickness to maintain joint strength. Multiple small biscuits provide better glue surface area than single large biscuits.
Glue Application Geometry
Apply glue to biscuit slots, not the biscuits themselves, for better control and cleaner assembly. This technique prevents glue squeeze-out problems while ensuring adequate adhesive coverage for strong bonds.
Slot application allows precise glue quantity control without waste or mess. Biscuit swelling from moisture contact can prevent proper joint closure if over-applied.
Domino Joinery Revolution
Festool’s domino system creates loose tenon joints that combine traditional strength with modern precision and speed. The system eliminates much of the skill barrier associated with traditional joinery while producing superior results.
Multiple small dominos create stronger joints than single large ones with better glue surface area and reduced wood removal. Fence setup consistency across matching pieces ensures perfect alignment without measuring each joint individually. Domino joints can be disassembled for repairs unlike permanent glue joints in other systems.
Domino Sizing Logic
Multiple small dominos create stronger joints than single large ones, with better glue surface area and reduced wood removal. This approach distributes loads more effectively while preserving material strength around joint areas.
Load distribution across multiple connection points prevents stress concentration failures. Smaller mortises preserve more material strength in narrow rail sections.
Fence Setup Consistency
Consistent fence settings across all matching pieces ensure perfect alignment without measuring each joint individually. This systematic approach eliminates cumulative errors that plague measured layout methods.
Reference fence settings eliminate measurement errors across multiple identical pieces. Setup blocks maintain consistent positioning for repetitive operations without re-measuring.
Troubleshooting Common Failures
Understanding why cabinet doors fail helps prevent problems before they occur and provides solutions when issues arise. Most failures result from predictable causes that proper technique and planning can eliminate entirely.
Door warping results from uneven moisture exposure, poor grain matching, or inadequate frame construction. Joint failures usually stem from inadequate glue surface area, poor fit, or premature stress rather than adhesive problems. Hardware mounting disasters are preventable with proper preparation and pilot hole techniques. Door installation projects can range from 30 minutes to 3 hours depending on preparation and skill level according to Popular Science, with most time spent correcting preventable mounting issues.
Warping Prevention Science
Door warping results from uneven moisture exposure, poor grain matching, or inadequate frame construction—all preventable with proper technique. Understanding the science behind warping allows builders to eliminate causes rather than fighting symptoms.
Finish balance requirements demand equal coating on both door faces to prevent differential moisture absorption. Grain matching strategies alternate growth ring orientation in glued-up panels for stability. Environmental control during construction and finishing prevents moisture-related movement problems.
Finish Balance Requirements
Both faces of diy cabinet doors must receive equal finish coats to prevent differential moisture absorption that causes warping. Unbalanced finishing is the leading cause of door warping in otherwise well-constructed projects.
Moisture absorption rates differ dramatically between finished and unfinished wood surfaces. Back-face sealing prevents moisture penetration even when doors aren’t visible from behind.
Grain Matching Strategies
Alternating growth ring orientation in glued-up panels creates stability, while matching grain direction prevents differential movement. Understanding grain behavior allows builders to work with wood’s natural characteristics rather than fighting them.
Growth ring alternation cancels opposing movement forces in wide panels. Grain direction matching ensures consistent expansion and contraction across door components.
Joint Failure Analysis
Failed joints usually result from inadequate glue surface area, poor fit, or premature stress rather than glue failure itself. Understanding failure modes helps builders identify and correct problems before they become catastrophic.
Glue line inspection reveals whether joints failed from insufficient adhesive or poor surface preparation. Stress concentration points at door corners require reinforcement through proper joint design and adequate material thickness. Joint geometry affects load distribution and determines long-term durability under normal use.
Glue Line Inspection
Visible glue lines indicate either too much glue or insufficient clamping pressure—both create weak bonds that fail under stress. Proper glue joints show minimal squeeze-out with complete surface coverage.
Starved joints from insufficient glue appear dry and powdery when failed. Excessive glue creates weak bonds by preventing proper wood-to-wood contact.
Stress Concentration Points
Door corners experience the highest stress loads, requiring reinforcement through proper joint design and adequate material thickness. Understanding load paths helps builders strengthen critical areas before problems develop.
Corner joints transfer loads from door weight and operational stresses to frame members. Material thickness at joints must accommodate stress loads without failure under normal use.
Hardware Mounting Disasters
Stripped screws, misaligned hinges, and loose handles plague DIY projects but are preventable with proper preparation. Understanding screw mechanics and wood properties eliminates most hardware mounting problems.
Pilot hole precision requires drilling 75% of screw diameter in hardwood, 60% in softwood using sharp bits. Thread engagement calculations need at least 1.5 times screw diameter penetration for full strength. Hardware alignment affects door operation and appearance more than hardware quality itself.
Source: bigdaishowa.com
Pilot Hole Precision
Drill pilot holes 75% of screw diameter in hardwood, 60% in softwood, and always use sharp bits to prevent tear-out. These percentages provide optimal thread engagement without splitting while ensuring strong connections.
Hardwood density requires larger pilot holes to prevent splitting during screw installation. Sharp drill bits create clean holes while dull bits tear fibers and weaken screw connections.
Thread Engagement Calculations
Screws need at least 1.5 times their diameter in thread engagement for full strength—shorter penetration creates weak connections that fail under normal use. Planning screw length during design prevents mounting problems.
Thread engagement depth determines pull-out strength more than screw diameter. Material thickness must accommodate full thread engagement plus clearance for proper installation.
Final Thoughts
Building professional-quality DIY cabinet doors requires understanding the hidden psychology behind material selection, construction sequencing, and finishing techniques that separate successful projects from frustrating failures. The difference between amateur and professional results often comes down to planning decisions made before cutting the first board rather than advanced woodworking skills.
Your success depends more on matching techniques to your skill level and available time than attempting complex joinery beyond your current abilities. Start with forgiving materials and proven methods, then advance to more challenging techniques as your confidence and skills develop. Learning how to make cabinet door effectively requires patience and systematic approach rather than rushing through critical steps.
When your cabinet door project generates more waste than expected—from practice cuts, material mistakes, or old doors being replaced—garage clean out services keep your workspace organized and productive. Their commitment to recycling and donating materials means your wood scraps get second chances rather than filling landfills, while their efficient removal maintains the clutter-free environment essential for precision woodworking.
Understanding how to make cabinet doors successfully involves embracing both traditional craftsmanship principles and modern efficiency techniques. Whether you’re exploring diy cabinet doors ideas for the first time or refining advanced skills, the key lies in methodical preparation and quality material selection that supports your construction goals.
Material selection and construction planning prevent 90% of door failures before they occur. Skill-appropriate technique selection ensures project success while building confidence for future challenges. Professional waste management maintains workspace organization essential for quality craftsmanship.
Door Measurement Worksheet:
- Door opening height: _____ inches
- Door opening width: _____ inches
- Overlay type: Full / Partial / Inset
- Frame width calculation: _____
- Panel size calculation: _____
- Hardware clearance requirements: _____
- Seasonal movement allowance: _____
- Final door dimensions: _____ x _____