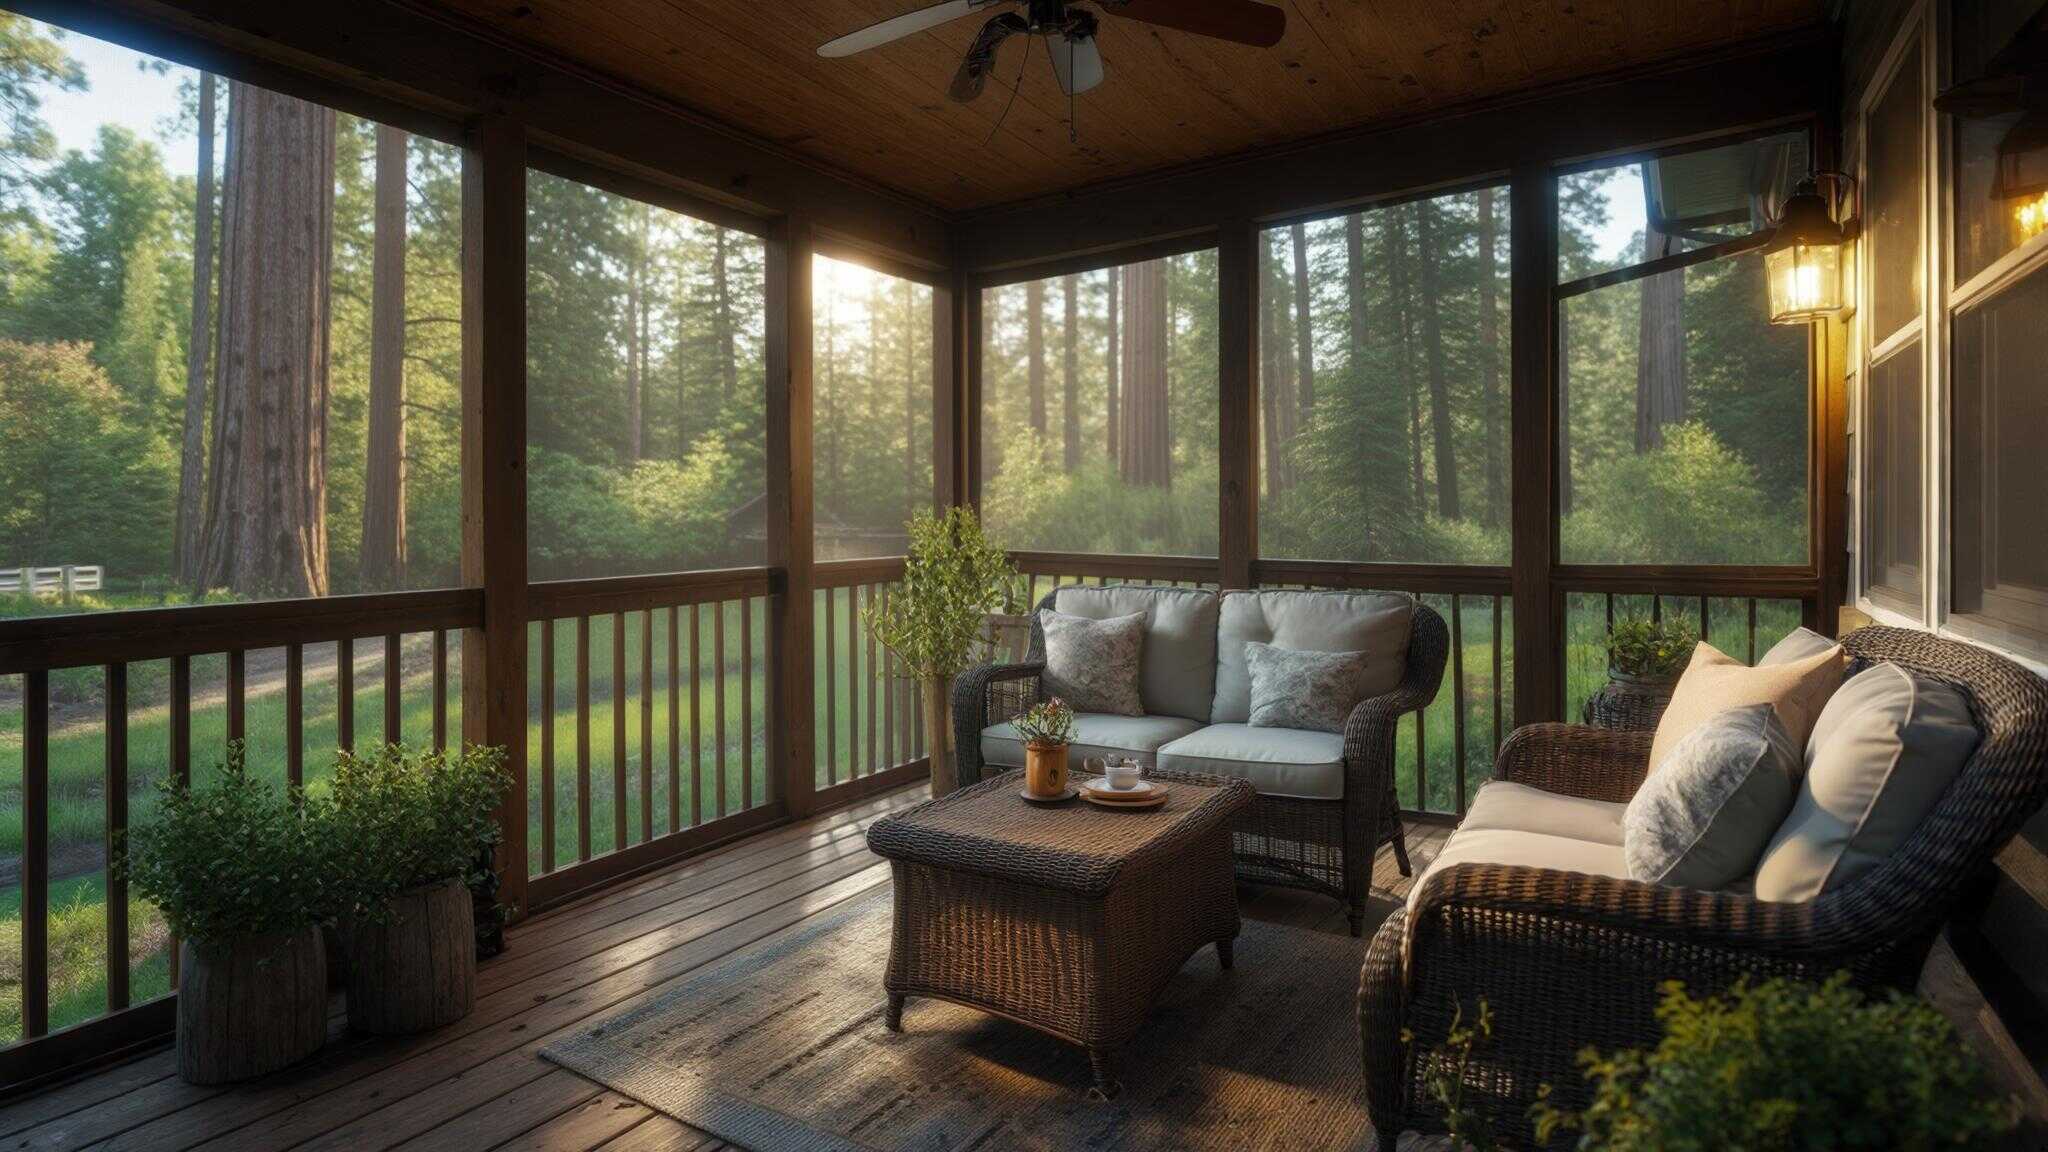
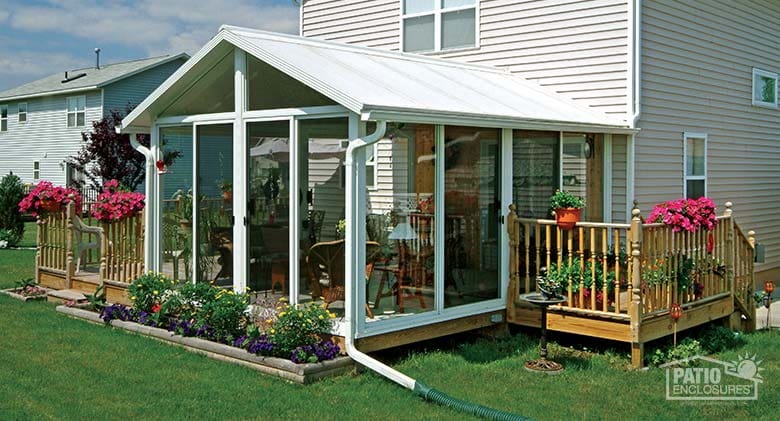
DIY Screened in Porch Secrets: The Hidden Science Behind Creating Your Perfect Outdoor Sanctuary
Building a screened porch isn’t just about throwing up some screens and calling it done. I’ve discovered that the most successful projects tap into sophisticated micro-climate control systems that go way beyond what you’ll find in basic construction guides. While most DIY resources focus on framing and materials, the real magic happens when you integrate advanced airflow dynamics, psychological design principles, and strategic infrastructure planning.
Understanding these hidden systems transforms your investment from a simple outdoor room into an engineered comfort zone that serves your family year-round. With proper planning and execution, homeowners can expect to recoup up to 75% of their investment in home value when adding a screened porch.
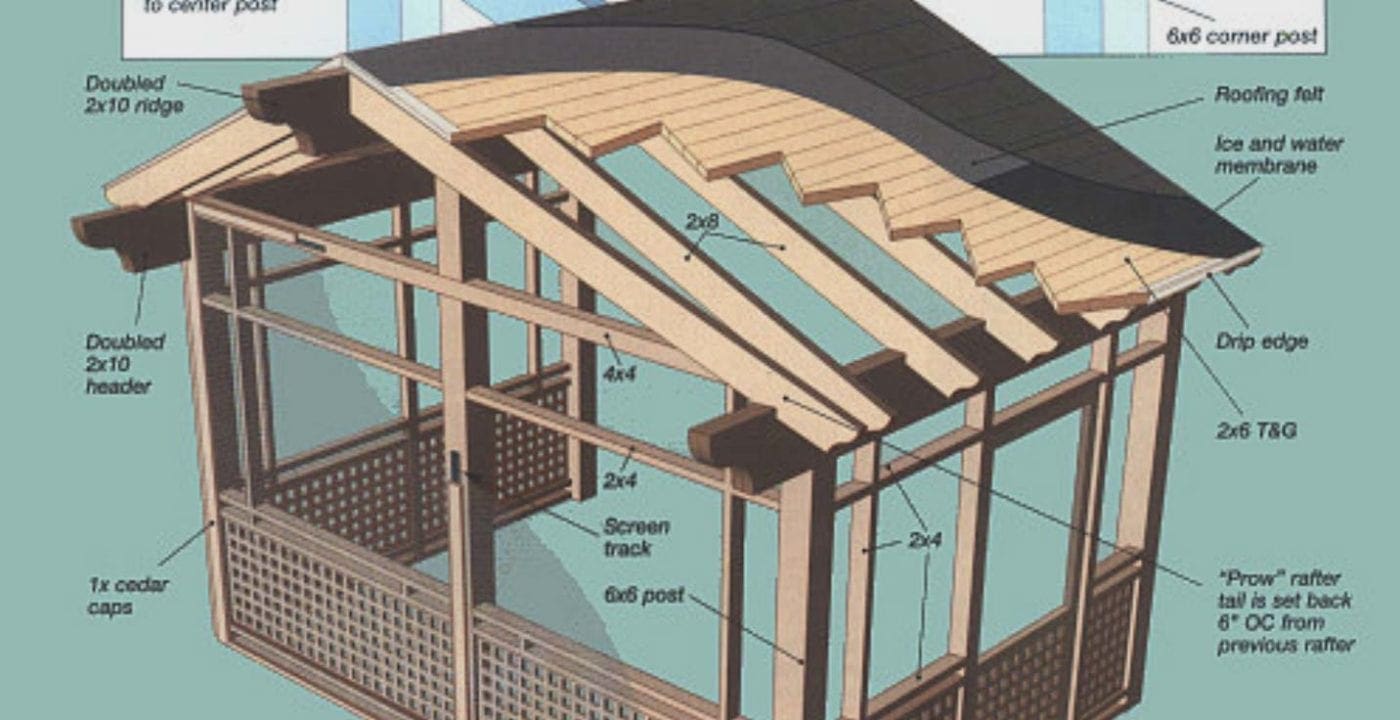
Table of Contents
- The Micro-Climate Engineering Revolution
- The Structural Psychology of Outdoor Rooms
- The Hidden Infrastructure Web
- Kit Customization and Hybrid Approaches
- The Underground Economy of Screen Porch Components
TL;DR
- Your screened porch functions as a sophisticated micro-climate control system requiring specific airflow calculations and pressure differential management
- Psychological design principles determine whether your investment becomes a beloved space or expensive storage area
- Future-proofing electrical, plumbing, and digital infrastructure during construction prevents costly retrofitting later
- Strategic material sourcing and timing can reduce project costs by 30-40% while accessing premium components
- Screen selection creates an entire ecosystem affecting beneficial insect populations and electromagnetic interference
The Micro-Climate Engineering Revolution
Your screen porch operates as a complex environmental system that most builders completely overlook. I’ve seen too many DIY projects fail because people treat these spaces as simple outdoor rooms instead of the sophisticated micro-climate control systems they actually are. Understanding airflow dynamics, humidity management, and seasonal adaptability transforms your project from a basic structure into an engineered comfort zone.
Most builders miss these critical elements entirely, which results in spaces that feel uncomfortable or require expensive modifications later. The difference between a screen porch that gets used daily and one that becomes expensive storage lies in these engineering principles.
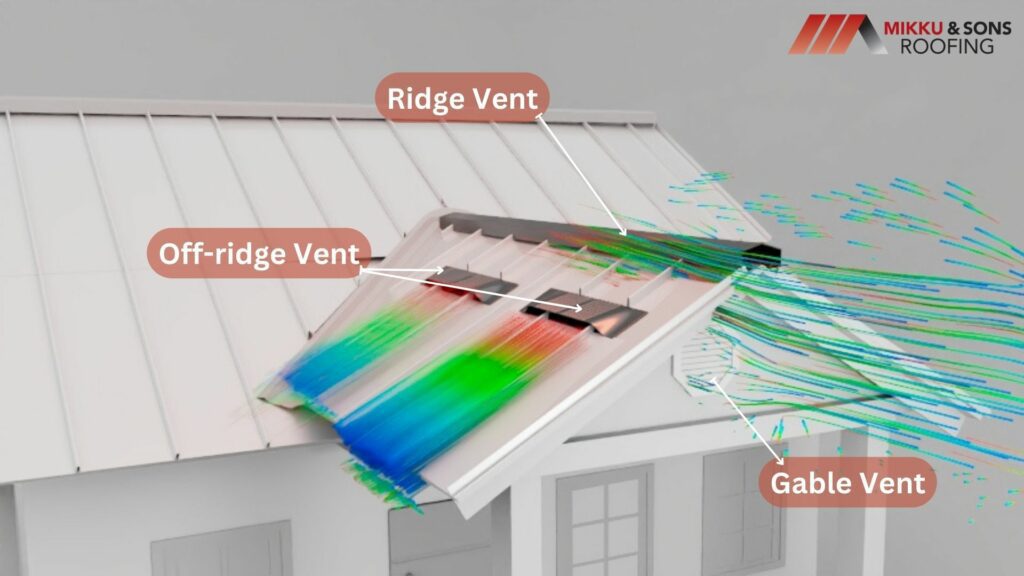
Calculate your porch’s height-to-width ratio at 1.2:1 for optimal stack effect. This specific ratio creates natural convection currents that keep air moving without mechanical assistance. Position intake vents exactly 18 inches from floor level and exhaust vents within 12 inches of ceiling height to maximize this effect.
Design openings at 30-degree angles to prevailing winds rather than perpendicular positioning. This creates venturi effects that increase airflow by up to 40% compared to standard placement. Most people position their openings straight into the wind, but that actually reduces efficiency.
Pressure Differential Mastery
Creating the perfect screen porch requires understanding how air pressure works within your enclosed space. This knowledge affects everything from screen longevity to daily comfort levels. Proper pressure management prevents the stuffiness and temperature inconsistencies that plague poorly designed outdoor rooms.
Install thermal breaks between porch flooring and main structure using closed-cell foam strips. This prevents heat transfer and condensation issues that can destroy your investment within just a few years. I’ve seen screen porches fail because builders skipped this crucial step.
Map your property’s wind patterns using ribbon tests across four seasons before finalizing design specifications. Wind patterns change dramatically throughout the year, and what works in spring might create problems in winter. Position vents strategically to harness natural convection currents that draw cool air from below while expelling warm air above.
According to Family Handyman, a properly designed screened porch with effective pressure management can be built for approximately $6,500, though costs vary significantly based on materials and regional factors.
Stack Effect Optimization
Harness natural convection by positioning your porch to create a chimney effect. This technique draws cool air from below and expels warm air above without mechanical assistance. The contrast between confined and open spaces enhances the perceived value of your destination area.
Maintain the ideal 1.2:1 height-to-width ratio to maximize natural air circulation through stack effect principles. This ratio isn’t arbitrary – it’s based on physics that creates optimal pressure differentials for natural ventilation.
Position intake vents exactly 18 inches from floor level to capture the coolest available air while avoiding ground-level debris. Install exhaust vents within 12 inches of ceiling height to effectively remove heated air before it creates uncomfortable hot spots.
Test airflow patterns using smoke pencils or incense sticks to verify proper circulation before finalizing vent placement. I always recommend this step because what looks right on paper doesn’t always work in reality.
The Johnson family in North Carolina discovered their 12×16 screen porch felt stuffy during summer afternoons despite proper screening. After implementing stack effect optimization with intake vents positioned 18 inches from the floor and exhaust vents 10 inches from the ceiling, they achieved a 15-degree temperature reduction during peak heat hours without mechanical ventilation.
Cross-Ventilation Geometry
Design openings at 30-degree angles to prevailing winds rather than perpendicular positioning. This creates a venturi effect that increases airflow by up to 40% compared to standard perpendicular placement. Most builders position openings straight into the wind, but angled placement actually accelerates airflow through the space.
Conduct seasonal wind pattern mapping using ribbons or lightweight fabric strips to identify consistent airflow directions. Wind patterns shift throughout the year, and your screen porch needs to work in all seasons. Position openings at precise 30-degree angles to prevailing winds to maximize venturi effect acceleration.
Create multiple airflow paths to prevent dead zones where air stagnates and temperatures rise uncomfortably. Install adjustable louvers or dampers to fine-tune airflow based on seasonal wind pattern changes.

Thermal Boundary Management
Install thermal breaks between your porch floor and the main structure using closed-cell foam strips. This prevents heat transfer that creates uncomfortable temperature differentials and condensation issues. Proper thermal boundary management extends the usable season of your screen porch significantly.
Apply closed-cell foam strips at all connection points between porch structure and existing building to eliminate thermal bridging. Install vapor barriers with removable sections that adjust based on seasonal humidity levels to prevent moisture damage.
Use reflective insulation materials under porch flooring to reduce radiant heat transfer from ground surfaces. Create expansion joints that accommodate thermal movement while maintaining weather sealing integrity.
Seasonal Adaptation Systems
Your screen porch should transform with the seasons through modular design elements. Most DIYers never consider these adaptations during initial construction, which limits their porch to fair-weather use only. Proper seasonal planning extends usability throughout the year and protects your investment.
Design frame systems to accept both screen panels and solid panels using track systems with weatherstripping channels. Install vapor barriers with seasonal accessibility to prevent condensation that destroys 60% of DIY porch projects within five years.
Plan for convertible elements that transform your space from summer screening to winter protection without reconstruction. This flexibility dramatically increases the value and usability of your screen porch investment.
| Season | Panel Type | Ventilation Setting | Additional Features |
|---|---|---|---|
| Spring | Standard Screen | Full Open | Rain protection setup |
| Summer | Fine Mesh Screen | Maximum Airflow | Misting system active |
| Fall | Convertible Panels | Partial Closure | Heating element prep |
| Winter | Solid Panels | Sealed/Minimal | Full weather protection |
Convertible Panel Integration
Design your frame to accept both screen panels and solid panels using a track system with weatherstripping channels. This allows winter conversion to a three-season room without reconstruction. The initial investment in convertible systems pays for itself through extended usability and increased home value.
Install dual-track systems that accommodate both screening materials and solid weather panels without frame modifications. Use weatherstripping channels that maintain seals regardless of panel type to prevent drafts and moisture infiltration.
Design panel storage solutions that keep off-season materials protected and easily accessible for seasonal changes. Select track materials that resist corrosion and thermal expansion to maintain smooth operation across temperature ranges.
Moisture Migration Prevention
Install vapor barriers with seasonal accessibility—removable sections that can be adjusted based on humidity levels. This prevents the condensation that destroys 60% of DIY porch projects within five years. Proper moisture management protects both structure and contents year-round.
Install removable vapor barrier sections that adjust based on seasonal humidity changes without compromising structural integrity. Use breathable materials that allow controlled moisture transfer while preventing damaging condensation accumulation.
Create drainage systems that handle both seasonal precipitation and condensation without pooling or structural damage. Monitor humidity levels using digital hygrometers to optimize vapor barrier configuration for current conditions.
Bio-Compatible Screen Selection
The screen material you choose creates an entire ecosystem that affects everything from beneficial insect populations to plant health in adjacent areas. Screen selection impacts your yard’s natural pest control system and the overall environmental balance around your home.
Use 18×14 mesh screens instead of standard 20×20 to allow beneficial insects passage while blocking mosquitoes and flies. Consider copper-core screens for antimicrobial properties and electromagnetic interference reduction.
Evaluate screen materials based on their impact on local beneficial insect populations and natural pest control systems. Your screen porch should enhance your property’s ecosystem, not disrupt it.
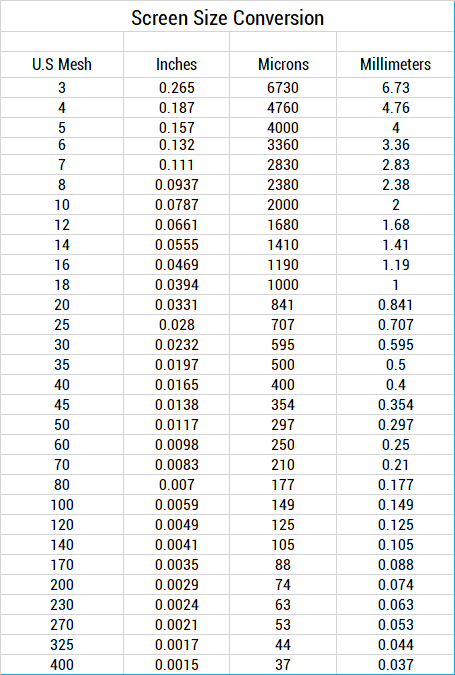
Beneficial Insect Preservation
Use 18×14 mesh screens instead of standard 20×20 to allow beneficial insects passage while blocking mosquitoes and flies. This maintains your yard’s natural pest control system. The slightly larger mesh openings don’t compromise human comfort but support ecological balance.
Select 18×14 mesh specifications that allow lacewings and minute pirate bugs passage while excluding larger pest insects. Maintain natural pest control systems by preserving beneficial insect access to your property’s ecosystem.
Balance human comfort with ecological responsibility through strategic mesh sizing that serves both purposes. Monitor beneficial insect populations before and after installation to verify ecosystem preservation effectiveness.
Electromagnetic Consideration
Copper-core screens provide natural antimicrobial properties and reduce electromagnetic interference from nearby devices. This creates a more peaceful environment while extending screen life by 300%. The initial cost premium pays for itself through longevity and improved comfort.
Install copper-core screening materials that naturally resist microbial growth and reduce maintenance requirements. Reduce electromagnetic interference from WiFi routers, cell towers, and electronic devices through conductive screen materials.
Extend screen lifespan by 300% through copper’s natural resistance to corrosion and UV degradation. Create more peaceful environments by filtering electromagnetic noise that can cause subtle stress and discomfort.
The Structural Psychology of Outdoor Rooms
The most successful screen porches tap into psychological principles of space perception and biophilic design that create subconscious comfort. These factors determine whether your investment becomes a beloved gathering space or an expensive storage area. Understanding spatial psychology transforms functional construction into emotionally satisfying environments.
Apply compression and release sequencing through ceiling height and passage width variations to make spaces feel larger. Incorporate biophilic design principles using natural patterns, materials, and light choreography for psychological comfort.
I’ve noticed that people often focus entirely on the technical aspects of building a screen porch while completely ignoring how the space will actually feel to use. The psychological elements are what separate spaces people love from spaces they avoid.
Threshold Transition Design
The boundary between your indoor and outdoor spaces requires careful psychological choreography to feel natural and inviting. Poor transitions feel jarring or institutional, while proper design creates seamless flow that encourages regular use. This boundary design significantly impacts how often you’ll actually use your completed screen porch.
Create 6-8 foot compression zones with lower ceilings or narrower passages before opening into main porch spaces. Transition flooring materials gradually to prevent jarring visual breaks that make spaces feel disconnected.
Design threshold sequences that build anticipation and make destination spaces feel more dramatic and welcoming. Recent outdoor living trends emphasize the importance of “creating seamless transitions between indoor and outdoor spaces” according to Family Handyman, with successful projects incorporating gradual material changes and psychological design elements that encourage regular use.
Compression and Release Sequencing
Create a 6-8 foot “compression zone” with a lower ceiling or narrower passage before opening into your main screen porch space. This psychological technique makes the porch feel 30% larger and more dramatic upon entry. The contrast between confined and open spaces enhances the perceived value of your destination area.
Design compression zones measuring 6-8 feet in length with ceiling heights 12-18 inches lower than main porch areas. Create width restrictions in transition areas that are 20-30% narrower than destination spaces for maximum psychological impact.
Use lighting transitions that move from dimmer compression areas to brighter release spaces to enhance the dramatic effect. Position compression zones to build anticipation while maintaining clear sightlines to the destination space beyond.
Material Gradient Strategy
Transition flooring materials gradually—indoor flooring to a transitional material in the threshold, then to your porch flooring. This prevents the jarring visual break that makes spaces feel disconnected. Gradual material transitions create psychological continuity that makes the entire area feel cohesive.
Use luxury vinyl plank or similar transitional materials that bridge indoor and outdoor flooring characteristics. Create three-stage material transitions that gradually shift from indoor to outdoor specifications without abrupt changes.
Match color temperatures and textures across material transitions to maintain visual flow and psychological continuity. Install transition strips that accommodate different material thicknesses while maintaining smooth, safe passage.
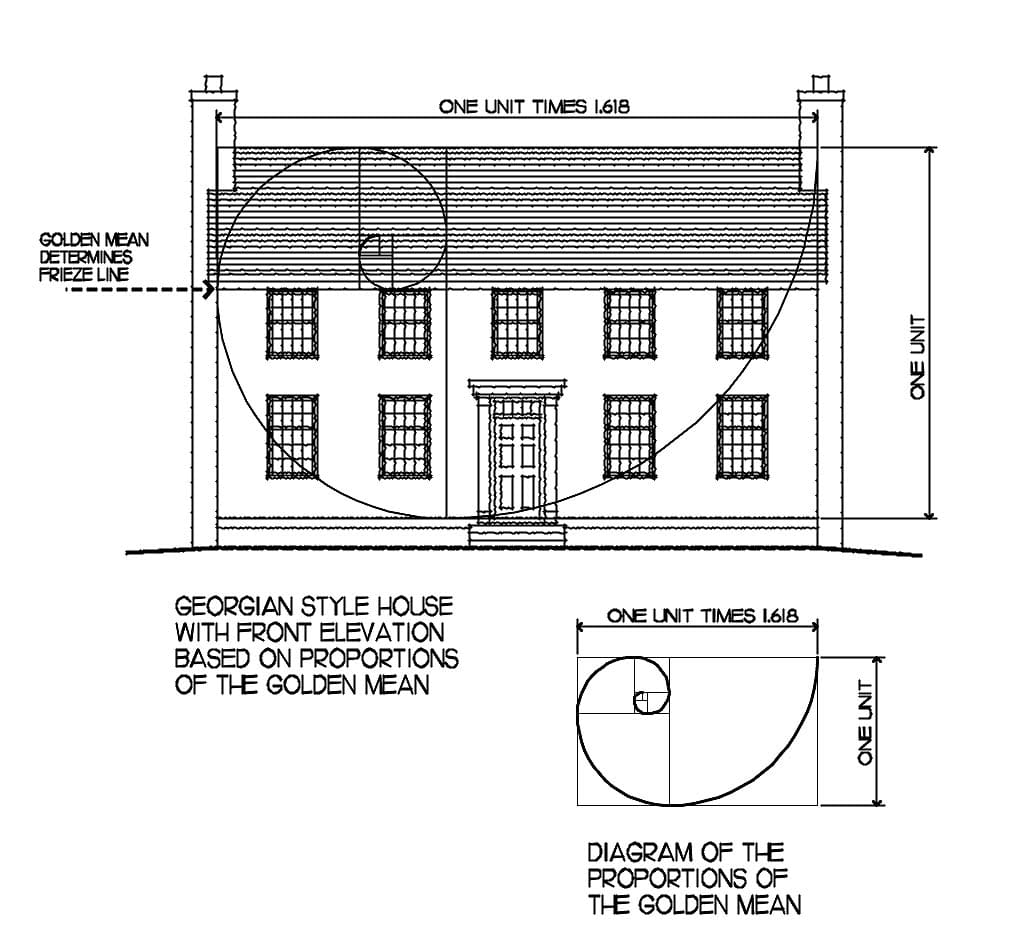
Biophilic Integration Principles
Incorporating natural patterns and elements into your screen porch design triggers positive psychological responses that increase usage and satisfaction. Biophilic design principles connect humans with natural environments even in constructed spaces. These elements work subconsciously to create comfort and reduce stress.
Design screen panel frames using mathematical ratios found in nature, particularly the 1:1.618 golden ratio for visual harmony. Position porches to capture dappled light patterns that mimic forest canopy conditions for psychological comfort.
Install sound elements and design features that amplify pleasant natural sounds while dampening harsh neighborhood noises. These subtle environmental modifications create sanctuary-like feelings that encourage extended use.
Fractal Pattern Implementation
Design your screen panel frames using mathematical ratios found in nature, particularly the 1:1.618 golden ratio. This subconsciously feels more harmonious and reduces visual fatigue during extended use. Natural mathematical patterns create comfort that people feel but can’t necessarily identify.
Apply golden ratio proportions (1:1.618) to screen panel dimensions, structural elements, and architectural details. Create repeating patterns that scale naturally from large structural elements down to hardware and trim details.
Use mathematical progressions found in natural forms such as spiral shells, leaf arrangements, and tree branching patterns. Design visual rhythms that follow natural sequences to reduce eye strain and create subconscious comfort.
Natural Light Choreography
Position your screen porch to capture “dappled light” patterns by incorporating overhead elements that create moving shadows throughout the day. This mimics the psychological comfort of being under a forest canopy. Dynamic light patterns create visual interest and reduce the monotony of static lighting conditions.
Install overhead elements such as pergola slats or decorative screens that create moving shadow patterns as sun angles change. Position porch orientation to capture optimal light during preferred usage times while avoiding harsh glare conditions.
Use translucent or perforated materials that filter light naturally rather than blocking it completely. Design light patterns that change throughout the day to maintain visual interest and prevent monotonous lighting conditions.
Sound Layering Architecture
Install subtle sound elements and design corners that amplify pleasant natural sounds while dampening harsh noises from neighboring properties. Strategic acoustic design creates peaceful environments that encourage relaxation and extended use. Sound management often determines whether spaces feel sanctuary-like or stressful.
Position wind chimes and sound elements to catch cross-breezes and create gentle, natural audio backgrounds. Design corner angles and surface materials that reflect pleasant sounds while absorbing harsh neighborhood noises.
Use water features, rustling plants, or other natural sound generators to mask unwanted ambient noise. Create acoustic zones within larger porches that offer different sound environments for various activities.
The Hidden Infrastructure Web
Successful DIY screened in porch projects require understanding invisible systems—electrical, plumbing, and digital infrastructure—that need integration during construction rather than expensive retrofitting later. Modern screen porches serve as outdoor offices, entertainment centers, and year-round living spaces. Planning these systems during initial construction saves thousands in future renovation costs.
Install 20% more electrical capacity than current needs anticipate, including dedicated 20-amp circuits for future additions. Run capped plumbing lines to strategic locations during construction for future outdoor kitchens, misting systems, or wash stations.
I can’t stress enough how important it is to think beyond your immediate needs when planning infrastructure. The screen porch you build today might become your outdoor office, entertainment center, or even a semi-enclosed dining room in the future.
DIY Infrastructure Planning Checklist:
- Calculate electrical load requirements plus 20% expansion capacity
- Plan conduit runs for future low-voltage systems
- Mark locations for capped plumbing rough-ins
- Design cable management for smart home integration
- Install weatherproof outlets in strategic locations
- Plan for dedicated WiFi access points
- Consider future heating/cooling system integration
Future-Proofing Utility Integration
Modern screen porches serve as outdoor offices, entertainment centers, and year-round living spaces, requiring infrastructure planning that most DIY guides ignore. Future-proofing utility systems during initial construction prevents expensive retrofitting when your needs expand. The cost of running infrastructure during construction is a fraction of adding it later.
Install electrical capacity exceeding current needs by 20% with dedicated circuits for heating, cooling, and charging stations. Run plumbing rough-ins to strategic locations even without immediate water feature plans for future flexibility.
Plan digital infrastructure including ethernet connections and WiFi access points for remote work capabilities. These additions seem excessive during construction but become essential as your screen porch evolves into a multi-functional space.
Electrical Load Anticipation
Install 20% more electrical capacity than you think you need, including dedicated 20-amp circuits for future additions. Run conduit for future low-voltage systems during initial construction. The electrical demands of modern outdoor living spaces continue expanding as technology integration increases.
Install dedicated 20-amp circuits for high-demand appliances such as outdoor heaters, large fans, or electric vehicle charging stations. Run empty conduit during construction to accommodate future low-voltage systems without wall or ceiling damage.
Plan electrical panel capacity to handle current loads plus 20% expansion without requiring panel upgrades. Position outlets strategically for furniture arrangements you haven’t yet considered but might want in the future.
Professional contractors estimate that electrical systems typically cost $2 per square foot when installed during initial construction, compared to $8-12 per square foot for retrofitting completed spaces.
Plumbing Rough-In Strategy
Even if not installing water features immediately, run capped plumbing lines to strategic locations during construction. Future additions become simple connections rather than major renovations. The cost of running plumbing during construction is minimal compared to retrofitting through finished spaces.
Install capped water supply lines to corners and walls where future outdoor kitchens, bars, or wash stations might be located. Run drainage rough-ins for potential water features, misting systems, or appliance connections before flooring installation.
Plan plumbing access points that remain accessible for future connections without requiring structural modifications. Consider both hot and cold water supplies to locations where outdoor cooking or cleaning facilities might be added.
Digital Infrastructure Planning
Install weatherproof ethernet connections and consider dedicated WiFi access points, as screen porches increasingly serve as remote work spaces. Plan cable management systems that can accommodate future smart home integration. Digital infrastructure requirements continue expanding as outdoor spaces become functional extensions of indoor living.
Install weatherproof ethernet jacks and dedicated WiFi access points to ensure reliable internet connectivity for remote work. Run cable management conduits that can accommodate future smart home devices, security systems, and entertainment equipment.
Plan power and data connections for outdoor televisions, sound systems, and smart lighting controls. Consider network infrastructure that supports outdoor security cameras and smart home integration systems.

Kit Customization and Hybrid Approaches
While screened in porch kits offer convenience, the most successful DIY projects combine kit efficiency with custom modifications that address site-specific challenges and personal needs. Generic solutions can’t accommodate unique property conditions or individual preferences. Strategic kit enhancement creates custom results while maintaining warranty coverage and construction efficiency.
Choose screen porch kits with expansion capabilities, then modify foundation and framing to accommodate future additions. Enhance standard porch screen panels with regional adaptations for local climate conditions and building codes.
The Martinez family in Arizona purchased a standard screen porch kit but enhanced it with UV-resistant treatments, reinforced wind bracing, and specialized desert ventilation systems. Their modifications increased the kit cost by 25% but resulted in a porch that performs optimally in extreme desert conditions while maintaining the manufacturer’s structural warranty.
Kit Enhancement Strategies
Transform basic porch screen panels and screened in porch kits into custom solutions through strategic modifications that maintain warranty coverage while achieving personalized results. Kit enhancement allows you to capture the efficiency of manufactured systems while addressing unique site conditions and personal preferences that standard kits can’t accommodate.
Select kits with modular expansion capabilities and immediately modify foundations to accommodate future enlargements. Enhance standard components with climate-specific modifications while maintaining manufacturer warranty coverage.
Integrate custom elements that address site-specific challenges without compromising kit system integrity. This approach gives you the best of both worlds – manufacturing efficiency and custom performance.
| Kit Component | Standard Specification | Climate Enhancement | Cost Impact |
|---|---|---|---|
| Frame Structure | Aluminum standard gauge | Hurricane clips (coastal) | +15% |
| Screen Material | 20×20 fiberglass | 18×14 copper-core | +40% |
| Foundation | Concrete piers | Frost-protected footings | +25% |
| Roofing | Standard shingles | Impact-resistant materials | +30% |
| Electrical | Basic outlet placement | Smart home integration | +50% |
Modular Expansion Design
Choose screen porch kits with expansion capabilities, then immediately modify the foundation and framing to accommodate future additions. This prevents expensive reconstruction when you want to enlarge your space. Planning for expansion during initial construction costs a fraction of adding space later.
Select kit systems designed with standardized connection points that accommodate future expansion modules. Over-build foundation systems to support additional sections without requiring structural reinforcement later.
Plan utility rough-ins that extend beyond current kit boundaries to serve future expansion areas. Design initial installations with removable end panels that become connection points for additional sections.
Climate-Specific Modifications
Enhance standard porch screen panels with regional adaptations—hurricane clips in storm-prone areas, snow load reinforcements in northern climates, or UV-resistant treatments in desert environments. Regional modifications ensure your kit performs optimally in local conditions while maintaining manufacturer support.
Add hurricane clips and reinforced connections in areas prone to high winds without voiding kit warranties. Install snow load reinforcements in northern climates where standard kit specifications may be inadequate.
Apply UV-resistant treatments and upgraded materials in desert environments where sun exposure exceeds standard kit assumptions. Modify drainage systems to handle regional precipitation patterns that may exceed kit design specifications.
Modern outdoor living projects increasingly focus on “portable privacy products and modular systems” that can adapt to changing needs, according to House Digest, reflecting the growing demand for flexible outdoor space solutions.
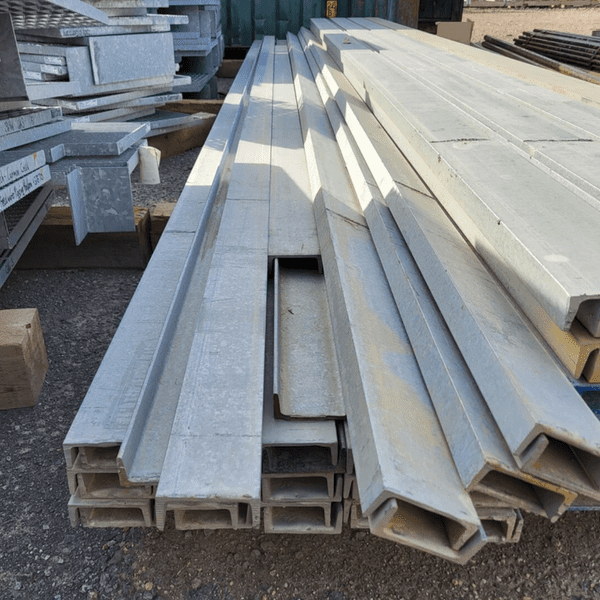
The Underground Economy of Screen Porch Components
The screen porch industry operates on a complex supply chain with seasonal pricing fluctuations, regional material variations, and insider sourcing strategies. Understanding these market dynamics can dramatically impact your project cost and timeline. Strategic purchasing and alternative sourcing can reduce costs by 30-40% while accessing premium materials unavailable through standard retail channels.
Purchase screening materials during late fall manufacturer clearances when outdoor living inventory turns over for maximum savings. Source materials from unconventional suppliers including architectural salvage, industrial surplus, and agricultural resource networks.
Most people buy materials at retail prices during peak season, which is exactly when you’ll pay the most and have the fewest options. Understanding the industry’s seasonal patterns opens up significant savings opportunities.

Material Timing Intelligence
Strategic purchasing based on industry cycles and regional patterns can reduce your screen porches project costs by 30-40% while ensuring premium material availability. Understanding seasonal demand patterns and regional supply chains allows you to time purchases for maximum value and selection.
Time material purchases during seasonal clearance periods when suppliers transition inventory for maximum cost savings. Source materials from regional suppliers during off-peak demand periods to access better pricing and selection.
Organize group purchases with neighbors or building cooperatives to access contractor pricing tiers. Industry data shows that screening materials cost between $3-5 per square foot during peak season, but strategic off-season purchasing can reduce these costs by 30-40% while accessing premium materials unavailable during high-demand periods.
Seasonal Procurement Windows
Purchase screening materials during late fall manufacturer clearances when outdoor living inventory turns over. January through March offers the deepest discounts on premium materials as suppliers prepare for spring inventory. Timing purchases strategically can reduce material costs by 30-40%.
Shop late fall clearances when manufacturers transition from outdoor living season to indoor product focus. Target January through March purchasing windows when suppliers offer deepest discounts to clear winter inventory.
Plan project timelines to accommodate seasonal purchasing opportunities without delaying construction schedules. Build relationships with suppliers to receive advance notice of clearance events and special pricing opportunities.
Regional Supply Chain Optimization
Source aluminum framing from southeastern manufacturers during winter months when hurricane season demand drops. Northern suppliers offer better pricing on cold-weather materials during summer peaks. Regional supply chain knowledge provides access to better pricing and specialized materials.
Source aluminum framing from southeastern manufacturers during winter months when hurricane preparation demand decreases. Purchase cold-weather materials from northern suppliers during summer months when demand shifts to cooling products.
Identify regional manufacturing centers that specialize in specific materials for direct purchasing opportunities. Understand transportation costs and lead times when sourcing materials from distant regional suppliers.
Bulk Purchasing Cooperatives
Join local building cooperatives or organize neighborhood group purchases to access contractor pricing tiers. Five households purchasing together typically qualify for 15-25% trade discounts on screen porch materials. Cooperative purchasing requires coordination but delivers significant savings.
Organize neighborhood purchasing groups of five or more households to qualify for contractor pricing tiers. Join existing building cooperatives that aggregate purchasing power for member discounts on construction materials.
Coordinate delivery schedules and material specifications across multiple households to maximize group purchasing benefits. Negotiate directly with suppliers for group discounts when purchasing volumes exceed standard retail quantities.

Alternative Material Networks
Beyond traditional suppliers, unconventional sourcing channels provide unique materials and significant cost savings for creative DIY builders. Alternative networks offer access to premium materials at reduced costs while providing unique character elements unavailable through standard retail channels.
Source unique materials from architectural salvage yards that offer period-appropriate elements with character that new materials can’t replicate. Access high-grade materials from industrial surplus suppliers that exceed residential building standards at reduced costs.
Utilize agricultural suppliers for specialized ventilation components and climate control systems designed for plant protection. These alternative sources require more research but often provide superior materials at lower costs.
Architectural Salvage Integration
Historic building demolitions often yield period-appropriate materials perfect for screen porch character elements. Salvage yards stock unique column styles, vintage hardware, and reclaimed lumber with patina that new materials can’t replicate. Salvaged materials add character while reducing costs significantly.
Source period-appropriate columns, brackets, and architectural details from historic building demolitions. Find vintage hardware and fasteners that provide authentic character details unavailable in modern manufacturing.
Select reclaimed lumber with natural patina and character that new materials require years to develop. Verify structural integrity of salvaged materials through professional inspection before incorporating into load-bearing applications.
A homeowner in Charleston, South Carolina, sourced 1920s heart pine flooring and cast iron brackets from a demolished historic home for their screen porch project. The salvaged materials cost 60% less than new premium materials while providing authentic period character that increased their home’s value by $15,000.
Industrial Surplus Applications
Aerospace and marine industries discard high-grade aluminum extrusions and specialized fasteners ideal for porch construction. These materials exceed residential building standards while costing less than standard building supplies. Industrial surplus requires knowledge but provides premium materials at discount prices.
Source high-grade aluminum extrusions from aerospace industry surplus that exceed residential building material specifications. Find specialized fasteners and hardware from marine industry suppliers designed for harsh environmental conditions.
Access premium materials that surpass standard building codes while costing less than conventional residential supplies. Verify material specifications and compatibility with residential building codes before incorporating surplus materials.
Agricultural Resource Adaptation
Greenhouse suppliers offer superior ventilation components, specialized screening materials, and climate control systems designed for plant protection that translate perfectly to human comfort in screen in porch applications. Agricultural suppliers often provide better performance at lower costs than residential building suppliers.
Source ventilation components from greenhouse suppliers designed for precise climate control and air circulation. Find specialized screening materials developed for plant protection that offer superior durability and performance.
Access climate control systems designed for agricultural applications that provide better performance than residential HVAC options. Adapt irrigation and misting systems designed for plant care to create comfortable outdoor living environments.
Quality Verification Protocols
Establishing material authentication processes prevents costly mistakes and ensures long-term performance in ways that standard building inspections miss. Quality verification protocols protect your investment by identifying potential failures before they occur. Professional-grade testing prevents expensive repairs and warranty issues.
Implement load testing on frame connections using incremental weight increases before installing screening materials. Conduct accelerated aging tests on material samples to predict 10-year performance in 30 days and prevent premature failures.
Document failure points and stress limits to identify weak connections before weather exposure creates catastrophic damage. These testing procedures might seem excessive, but they prevent expensive failures down the road.

Stress Testing Procedures
Implement load testing on frame connections using incremental weight increases before installing screening. Document failure points to identify weak connections before weather exposure creates catastrophic failures. Stress testing prevents expensive repairs and safety hazards.
Apply incremental weight loads to frame connections to identify failure points before installing screening materials. Document stress limits and connection performance to establish maintenance schedules and replacement intervals.
Test joint integrity under various load conditions including wind, snow, and thermal expansion scenarios. Verify fastener performance and connection strength before committing to full installation and finishing work.
Environmental Resistance Validation
Conduct accelerated aging tests on material samples using UV lamps, salt spray, and thermal cycling to predict 10-year performance in 30 days. This prevents premature material failure that voids warranties. Environmental testing identifies problems before they become expensive failures.
Use UV lamps to simulate years of sun exposure on material samples in days to predict long-term performance. Apply salt spray testing to metal components to verify corrosion resistance in coastal or winter salt environments.
Conduct thermal cycling tests that simulate seasonal temperature variations to identify expansion and contraction issues. Document material performance under accelerated aging conditions to predict maintenance requirements and replacement schedules.

When you’re ready to start your DIY screened porch project, clearing the construction area and managing debris becomes a significant challenge. Jiffy Junk’s white glove service handles the heavy lifting of debris removal, old structure demolition, and construction waste management that can quickly overwhelm even well-organized projects. Their same-day service keeps your work area safe and clutter-free, allowing you to focus on the technical aspects of creating your perfect outdoor sanctuary.
Ready to transform your outdoor space? Contact Jiffy Junk today to handle the cleanup so you can focus on building.
Final Thoughts
Creating a successful DIY screened in porch extends far beyond basic construction techniques into sophisticated micro-climate engineering, psychological design principles, and strategic material sourcing. The difference between a functional outdoor room and a beloved sanctuary lies in understanding these hidden systems that most builders overlook.
Your investment in proper planning, quality materials, and future-proofing infrastructure pays dividends through extended usability, reduced maintenance costs, and increased home value. The techniques outlined here transform standard construction into engineered comfort that serves your family for decades.
Remember that your screened porch creates an entire ecosystem affecting everything from beneficial insect populations to electromagnetic environments. These considerations seem minor during construction but significantly impact long-term satisfaction and environmental harmony.
Apply micro-climate engineering principles including pressure differential management and seasonal adaptation systems to create year-round comfort. Integrate psychological design elements such as compression and release sequencing with biophilic patterns to ensure regular usage and emotional satisfaction.
Future-proof your investment through strategic infrastructure planning and quality verification protocols that prevent expensive retrofitting and premature failures. These advanced techniques separate professional-quality results from basic DIY construction.