25 Innovative Basement Finishing Ideas for 2025: Transform Your Underground Space
According to recent data from the National Association of Home Builders, finished basements can return up to 70% of their cost when selling your home. I discovered this firsthand when transforming my dark, underutilized basement into a multi-functional space last year. The project completely changed how my family uses our home, adding valuable square footage without the expense of an addition. Whether you’re looking to create an entertainment zone, add functional living space, or incorporate innovative design elements, this comprehensive guide covers 25 basement finishing ideas to inspire your basement renovation project.
Understanding Basement Finishing: Key Considerations
Before diving into a basement remodel, you need to address several critical factors that will impact your project’s success. Establishing a realistic budget with contingency funds is essential – I recommend setting aside at least 15-20% extra for unexpected issues that almost always pop up in basement projects.
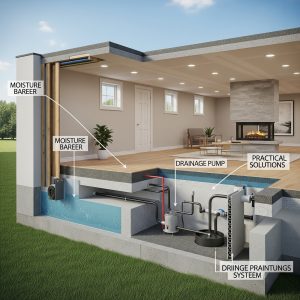
Addressing moisture issues through proper waterproofing should be your top priority. I’ve seen beautiful finished basements ruined by water damage that could have been prevented. Moisture management requires a multi-layered approach including exterior grading, foundation waterproofing, interior drainage systems, and ongoing humidity control through dehumidifiers or HVAC modifications.
When planning a comprehensive basement remodeling project, it’s essential to consider what happens to all the debris. Professional basement cleanout services can handle everything from old materials to construction scraps, making your renovation process much smoother.
Building code compliance varies by location but typically includes minimum requirements for ceiling height (7 feet), emergency egress windows/doors (minimum size and maximum sill height), smoke/CO detectors, and electrical safety standards that must be addressed before finishing work begins. Don’t skip this step – non-compliant work can lead to expensive corrections later.
|
Consideration |
Importance |
Typical Cost Impact |
Consequence if Ignored |
|---|---|---|---|
|
Moisture Management |
Critical |
$2,000-8,000 |
Mold, damaged finishes, health issues |
|
Building Code Compliance |
Mandatory |
Varies by project |
Failed inspections, fines, insurance issues |
|
Ceiling Height |
High |
$10,000+ if excavation needed |
Uncomfortable space, code violations |
|
Proper Lighting |
High |
$1,500-5,000 |
Dark, uninviting space |
|
Emergency Egress |
Mandatory |
$1,500-4,000 per window |
Safety hazard, code violation |
Entertainment & Recreation Spaces
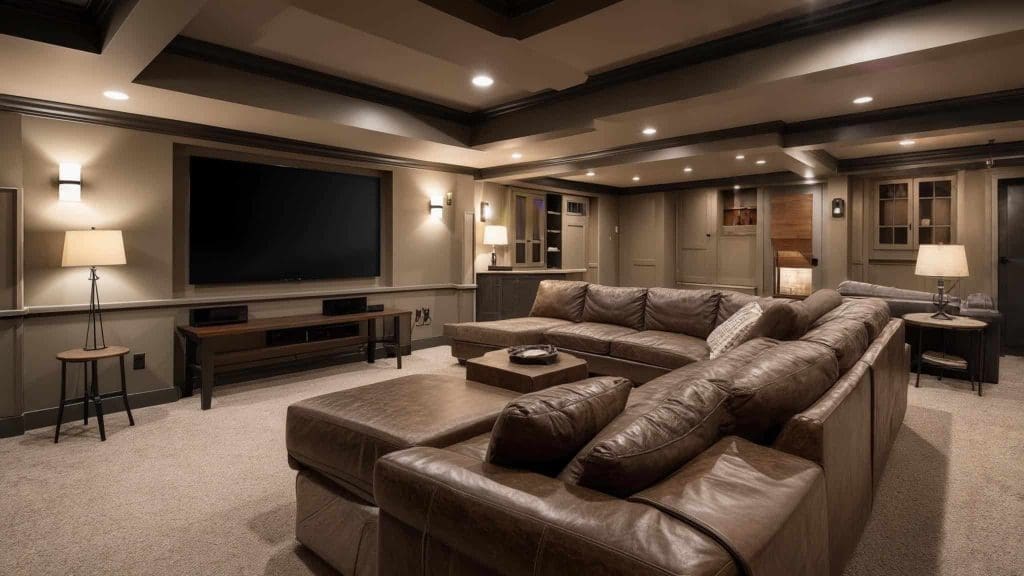
1. Home Theater Setup
A dedicated home theater transforms your basement into an immersive entertainment destination. The naturally dark environment of most basements creates the perfect setting for movie nights without fighting natural light. I installed tiered seating in my own basement theater, which dramatically improved viewing angles for everyone.
Acoustic treatment requires addressing both sound absorption (preventing echo within the room) and sound isolation (preventing transfer to other areas). I used specialized drywall, insulation, and acoustic panels strategically placed to manage first reflection points. This made a huge difference in sound quality compared to my previous setup.
For optimal viewing, follow the THX recommendation that screen width should equal approximately 0.8 times the viewing distance, with the first row positioned at a distance of 2-3 times the screen height. Getting these measurements right will save you from neck strain and provide the best possible viewing experience for everyone.
2. Gaming Zone
Create a dedicated gaming area with comfortable seating, gaming consoles, PC stations, and proper cable management. My teenage son and his friends practically live in our basement gaming zone on weekends, and the sound-absorbing panels I installed keep the noise from traveling upstairs.
Electrical requirements for gaming zones typically include dedicated 20-amp circuits to prevent overloading. I learned this the hard way after blowing fuses repeatedly with our initial setup. Now we have surge protection for all expensive equipment and strategically placed outlets (including floor outlets) to minimize visible cabling.
Thermal management becomes critical in enclosed gaming spaces. Gaming PCs can generate 300-500 watts of heat each, requiring supplemental cooling solutions like additional HVAC vents or mini-split systems to maintain equipment longevity. We installed a separate mini-split unit just for this area, and it’s been worth every penny in preventing overheating issues.

3. Sports Bar & Lounge
Install a small bar with seating, multiple TVs for watching games, team memorabilia displays, and comfortable lounge furniture to create your own sports bar experience. Adding plumbing for a wet bar increases functionality but also raises costs.
Plumbing considerations include not only supply lines but also drainage requirements, potentially necessitating an upflush system if the bar sink sits below the main sewer line, adding approximately $700-1,500 to the project cost. This is definitely something to budget for upfront.
TV mounting and viewing angles should follow ergonomic guidelines with screens positioned at eye level when seated (typically 42-48 inches from the floor) and viewing angles not exceeding 30 degrees horizontally from center to prevent neck strain. I mounted our TVs slightly lower than recommended at first and quickly realized my mistake after a few hours of watching sports.
When renovating my basement, I converted one corner into a sports bar that became the highlight of our home. I installed a 10-foot bar with four stools, three wall-mounted 50-inch TVs positioned for optimal viewing from any angle, and a small refrigerator for beverages. The backsplash features reclaimed wood with integrated LED lighting that highlights my collection of local craft beer glasses. For big games, we can comfortably seat 12 people between the bar stools and additional lounge seating. The total cost was approximately $7,500, but it’s become the preferred gathering spot for friends and family during sporting events.

The sports bar in my basement became an instant hit during football season. Friends who previously watched games at local pubs now prefer our setup because they can relax without fighting crowds or paying premium prices for drinks. The key was creating different viewing angles so nobody gets stuck with a bad seat.
For the backsplash, I chose reclaimed wood planks treated with a water-resistant sealer, which adds warmth while standing up to occasional splashes. The under-cabinet LED lighting system operates on a dimmer switch, perfect for adjusting the mood from bright for casual gatherings to subdued for big game nights.
4. Multi-purpose Recreation Room
A flexible recreation space accommodates various activities by incorporating modular furniture, convertible game tables (pool/ping pong), dartboard areas, and storage for board games and activities. This approach maximizes your basement’s utility by allowing it to serve different purposes based on your family’s changing needs.
Ceiling height requirements vary by activity: pool tables need minimum 7’8″ clearance for comfortable play (12′ cues require 58″ stroke space), while ping pong tables need at least 8′ for proper gameplay without restriction. I had to modify my pool table to use shorter cues in one direction due to a duct that couldn’t be moved.
If you’re transforming your basement into a recreation space, you’ll likely need to clear out old items first. Professional junk removal services can help prepare your area for renovation by efficiently removing unwanted items.
Flooring selection should balance durability with comfort. We chose commercial-grade carpet tiles that offer sound absorption and comfort while allowing for easy replacement of damaged sections. After two years of heavy use, we’ve only had to replace three tiles where drinks were spilled during parties.
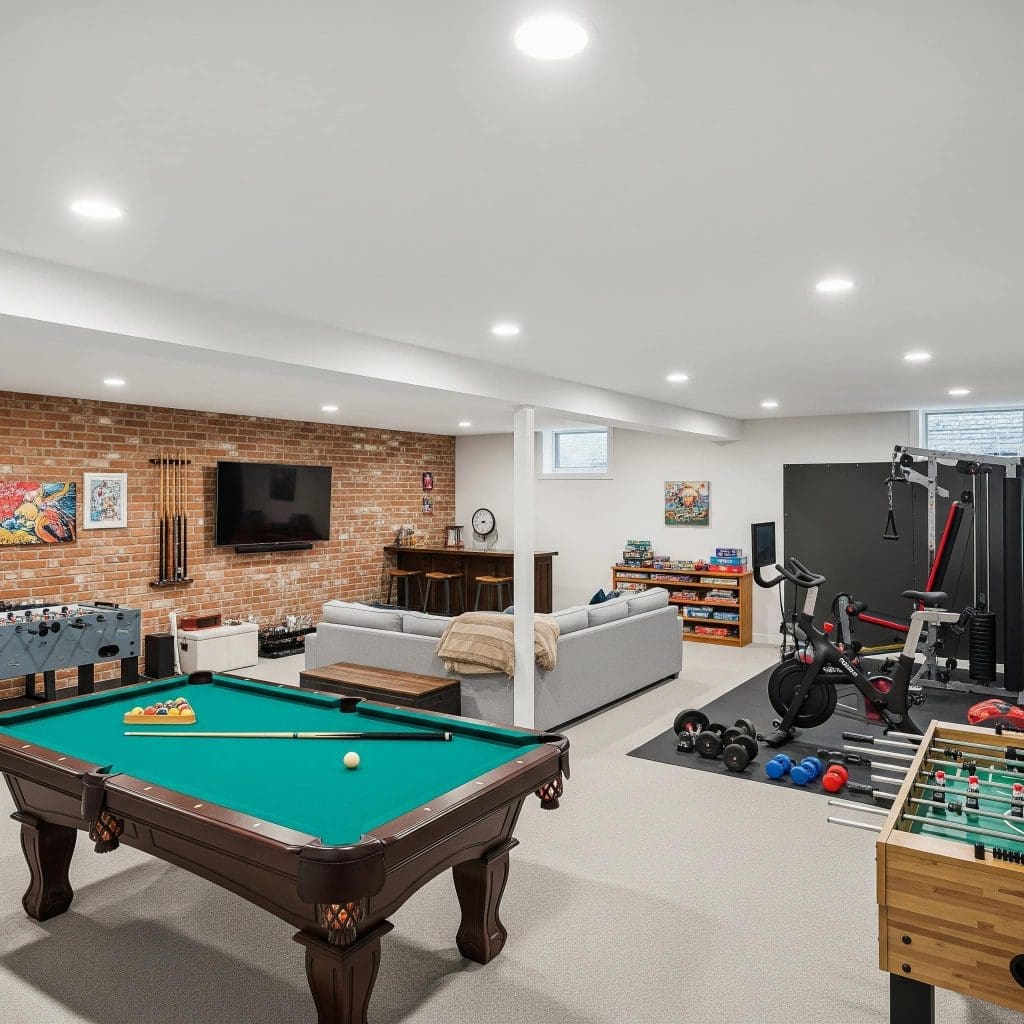
The beauty of a multi-functional recreation space lies in its adaptability. My basement transforms from a pool hall on Friday nights to a kids’ play zone on Saturday mornings with minimal effort. The convertible pool/ping pong table serves as the centerpiece, while modular furniture pieces can be rearranged to accommodate different activities.
Storage becomes crucial in these versatile spaces. We installed custom cabinets along one wall with specific compartments for board games, video game equipment, and sports gear. Everything has a designated home, which makes transitioning between activities much smoother.
Have you considered how your recreation needs might change over time? Planning for flexibility now can save you from another renovation in five years when your family’s interests evolve.
5. Music Studio/Practice Room
Create a sound-insulated space with acoustic treatments, instrument storage, recording equipment areas, and proper electrical setup. This specialized room requires significant sound insulation to prevent noise from disturbing the rest of the house.
Acoustic isolation requires decoupled construction techniques including floating floors (using isolation pads or clips), double-wall construction with staggered studs, and resilient channel mounting for drywall to prevent sound transmission through structural elements. These techniques make a dramatic difference in sound containment.
Electrical requirements include dedicated clean power circuits (separate from appliances or HVAC) to prevent interference in recording equipment, with proper grounding to eliminate hum and specialized wiring configurations to minimize electromagnetic interference. My friend who built a home studio had to rewire his entire basement after discovering interference issues that ruined his initial recordings.

Functional Living Spaces
6. Guest Suite/In-law Apartment
Transform your basement into a self-contained living area with a bedroom, bathroom, small kitchenette, and separate entrance if possible. This option requires plumbing and possibly electrical upgrades, plus egress windows or doors for safety and code compliance.
Egress requirements typically specify windows with minimum 5.7 square feet of clear opening, minimum width of 20 inches, minimum height of 24 inches, and maximum sill height of 44 inches above the floor, often requiring window wells for below-grade installations. Don’t skimp on these safety features – they’re essential for emergency escape.
Kitchenette installations must balance functionality with local code restrictions, which may limit features like 220V outlets for full-sized ranges or ventilation requirements. We found that microwave/convection combinations and induction cooktops provided practical alternatives that satisfied both our needs and local building codes.
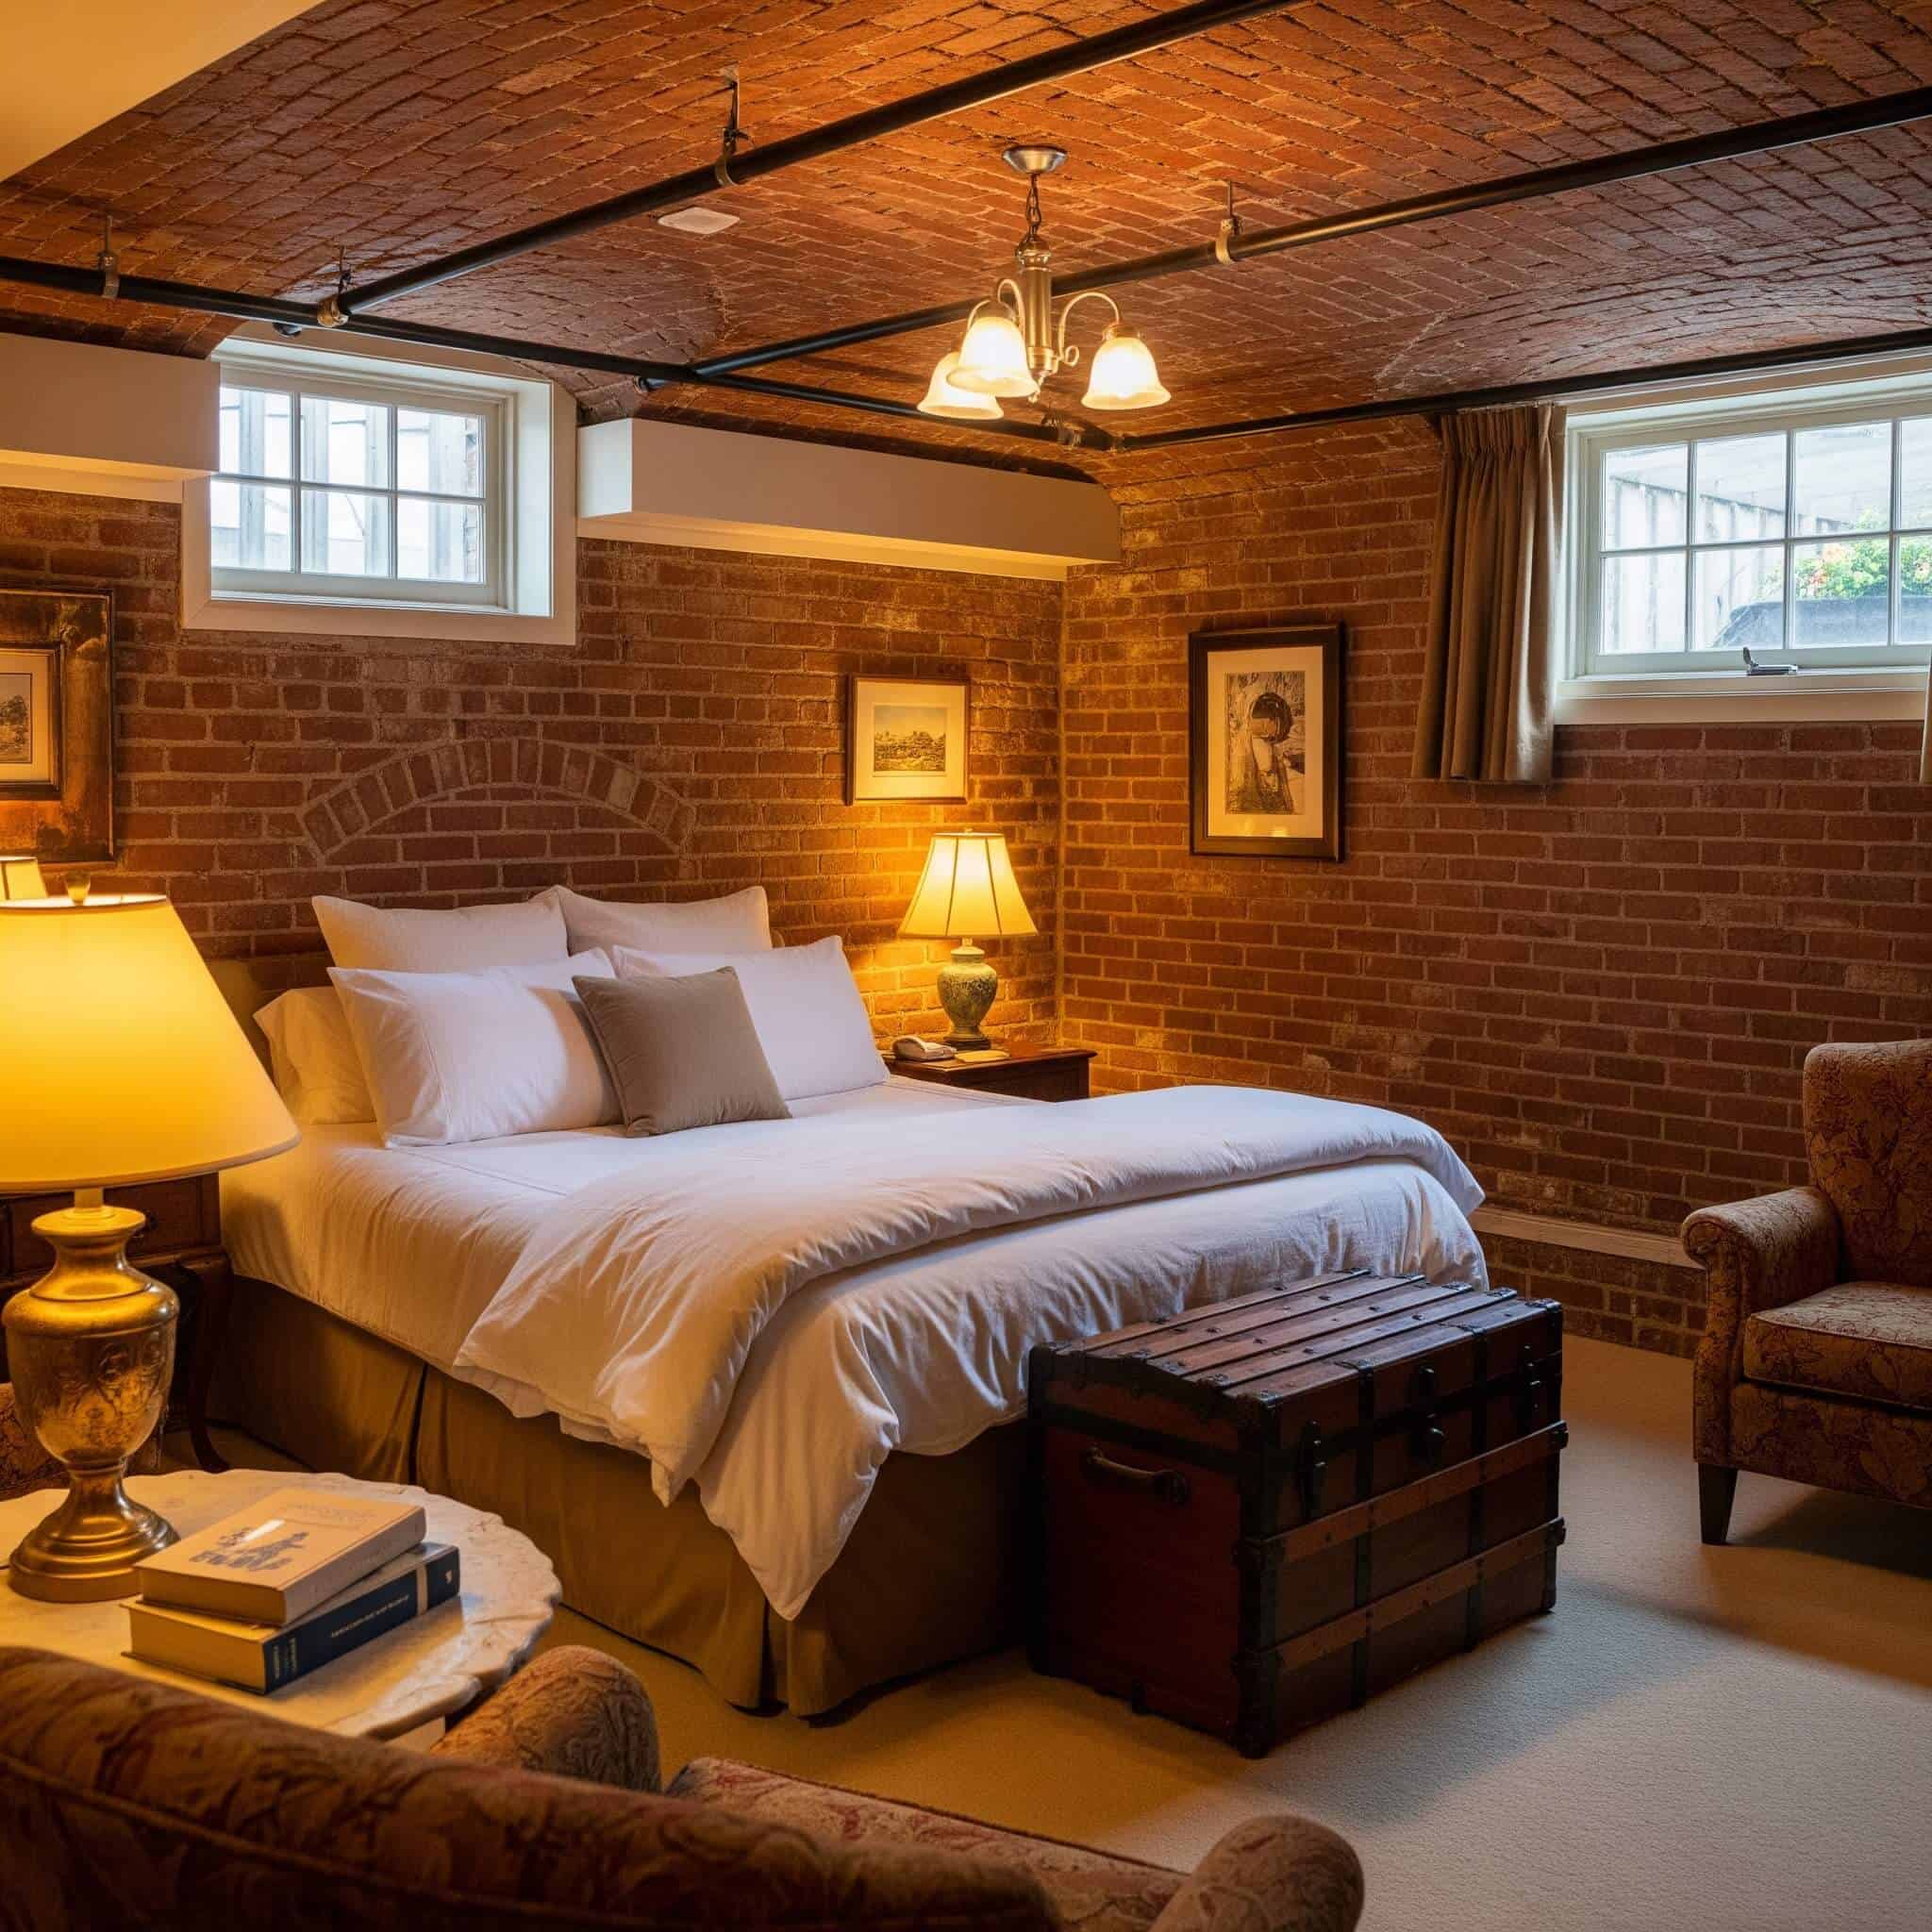
When designing our basement guest suite, we focused on creating a space where visitors would feel completely independent. The separate entrance allows guests to come and go without disturbing the main household, while the kitchenette gives them freedom to prepare simple meals on their own schedule.
Privacy considerations extend beyond just having a separate door. We installed extra sound insulation in the ceiling to minimize noise transfer from upstairs, and positioned the bedroom area away from the mechanical room to ensure quiet sleeping conditions.
The return on investment for this type of conversion has exceeded our expectations. During periods when we don’t have overnight guests, we’ve occasionally rented the space for short-term stays, which has helped offset the initial renovation costs.
|
Basement Room Type |
Average Cost |
ROI Potential |
Complexity Level |
Popular Features |
|---|---|---|---|---|
|
Guest Suite/ADU |
$20,000-50,000 |
70-80% |
High |
Kitchenette, full bath, separate entrance |
|
Home Office |
$5,000-15,000 |
65% |
Low-Medium |
Built-in storage, sound insulation, data ports |
|
Home Theater |
$10,000-30,000 |
60% |
Medium |
Tiered seating, acoustic panels, projector system |
|
Fitness Center |
$5,000-20,000 |
65% |
Low-Medium |
Rubber flooring, mirrors, ventilation upgrades |
|
Bar/Entertainment Area |
$8,000-25,000 |
70% |
Medium |
Custom cabinetry, refrigeration, seating area |
7. Home Office/Remote Work Space
Create a dedicated workspace with built-in desks, proper lighting, soundproofing, storage solutions, and robust technology infrastructure. The separation from main living areas makes basements ideal for focused work without household distractions.
Lighting design should incorporate a layered approach with ambient lighting (general illumination at 300-500 lux), task lighting (focused illumination at 500-750 lux for detailed work), and accent lighting to reduce eye strain and screen glare. I installed adjustable LED panels that allow me to change brightness levels throughout the day.
Network infrastructure should include hardwired ethernet connections (Cat6a or better) for reliable video conferencing, strategically placed wireless access points to eliminate dead zones, and potentially dedicated internet service for bandwidth-intensive professional applications. My basement office has its own mesh network node that ensures I never drop important video calls.
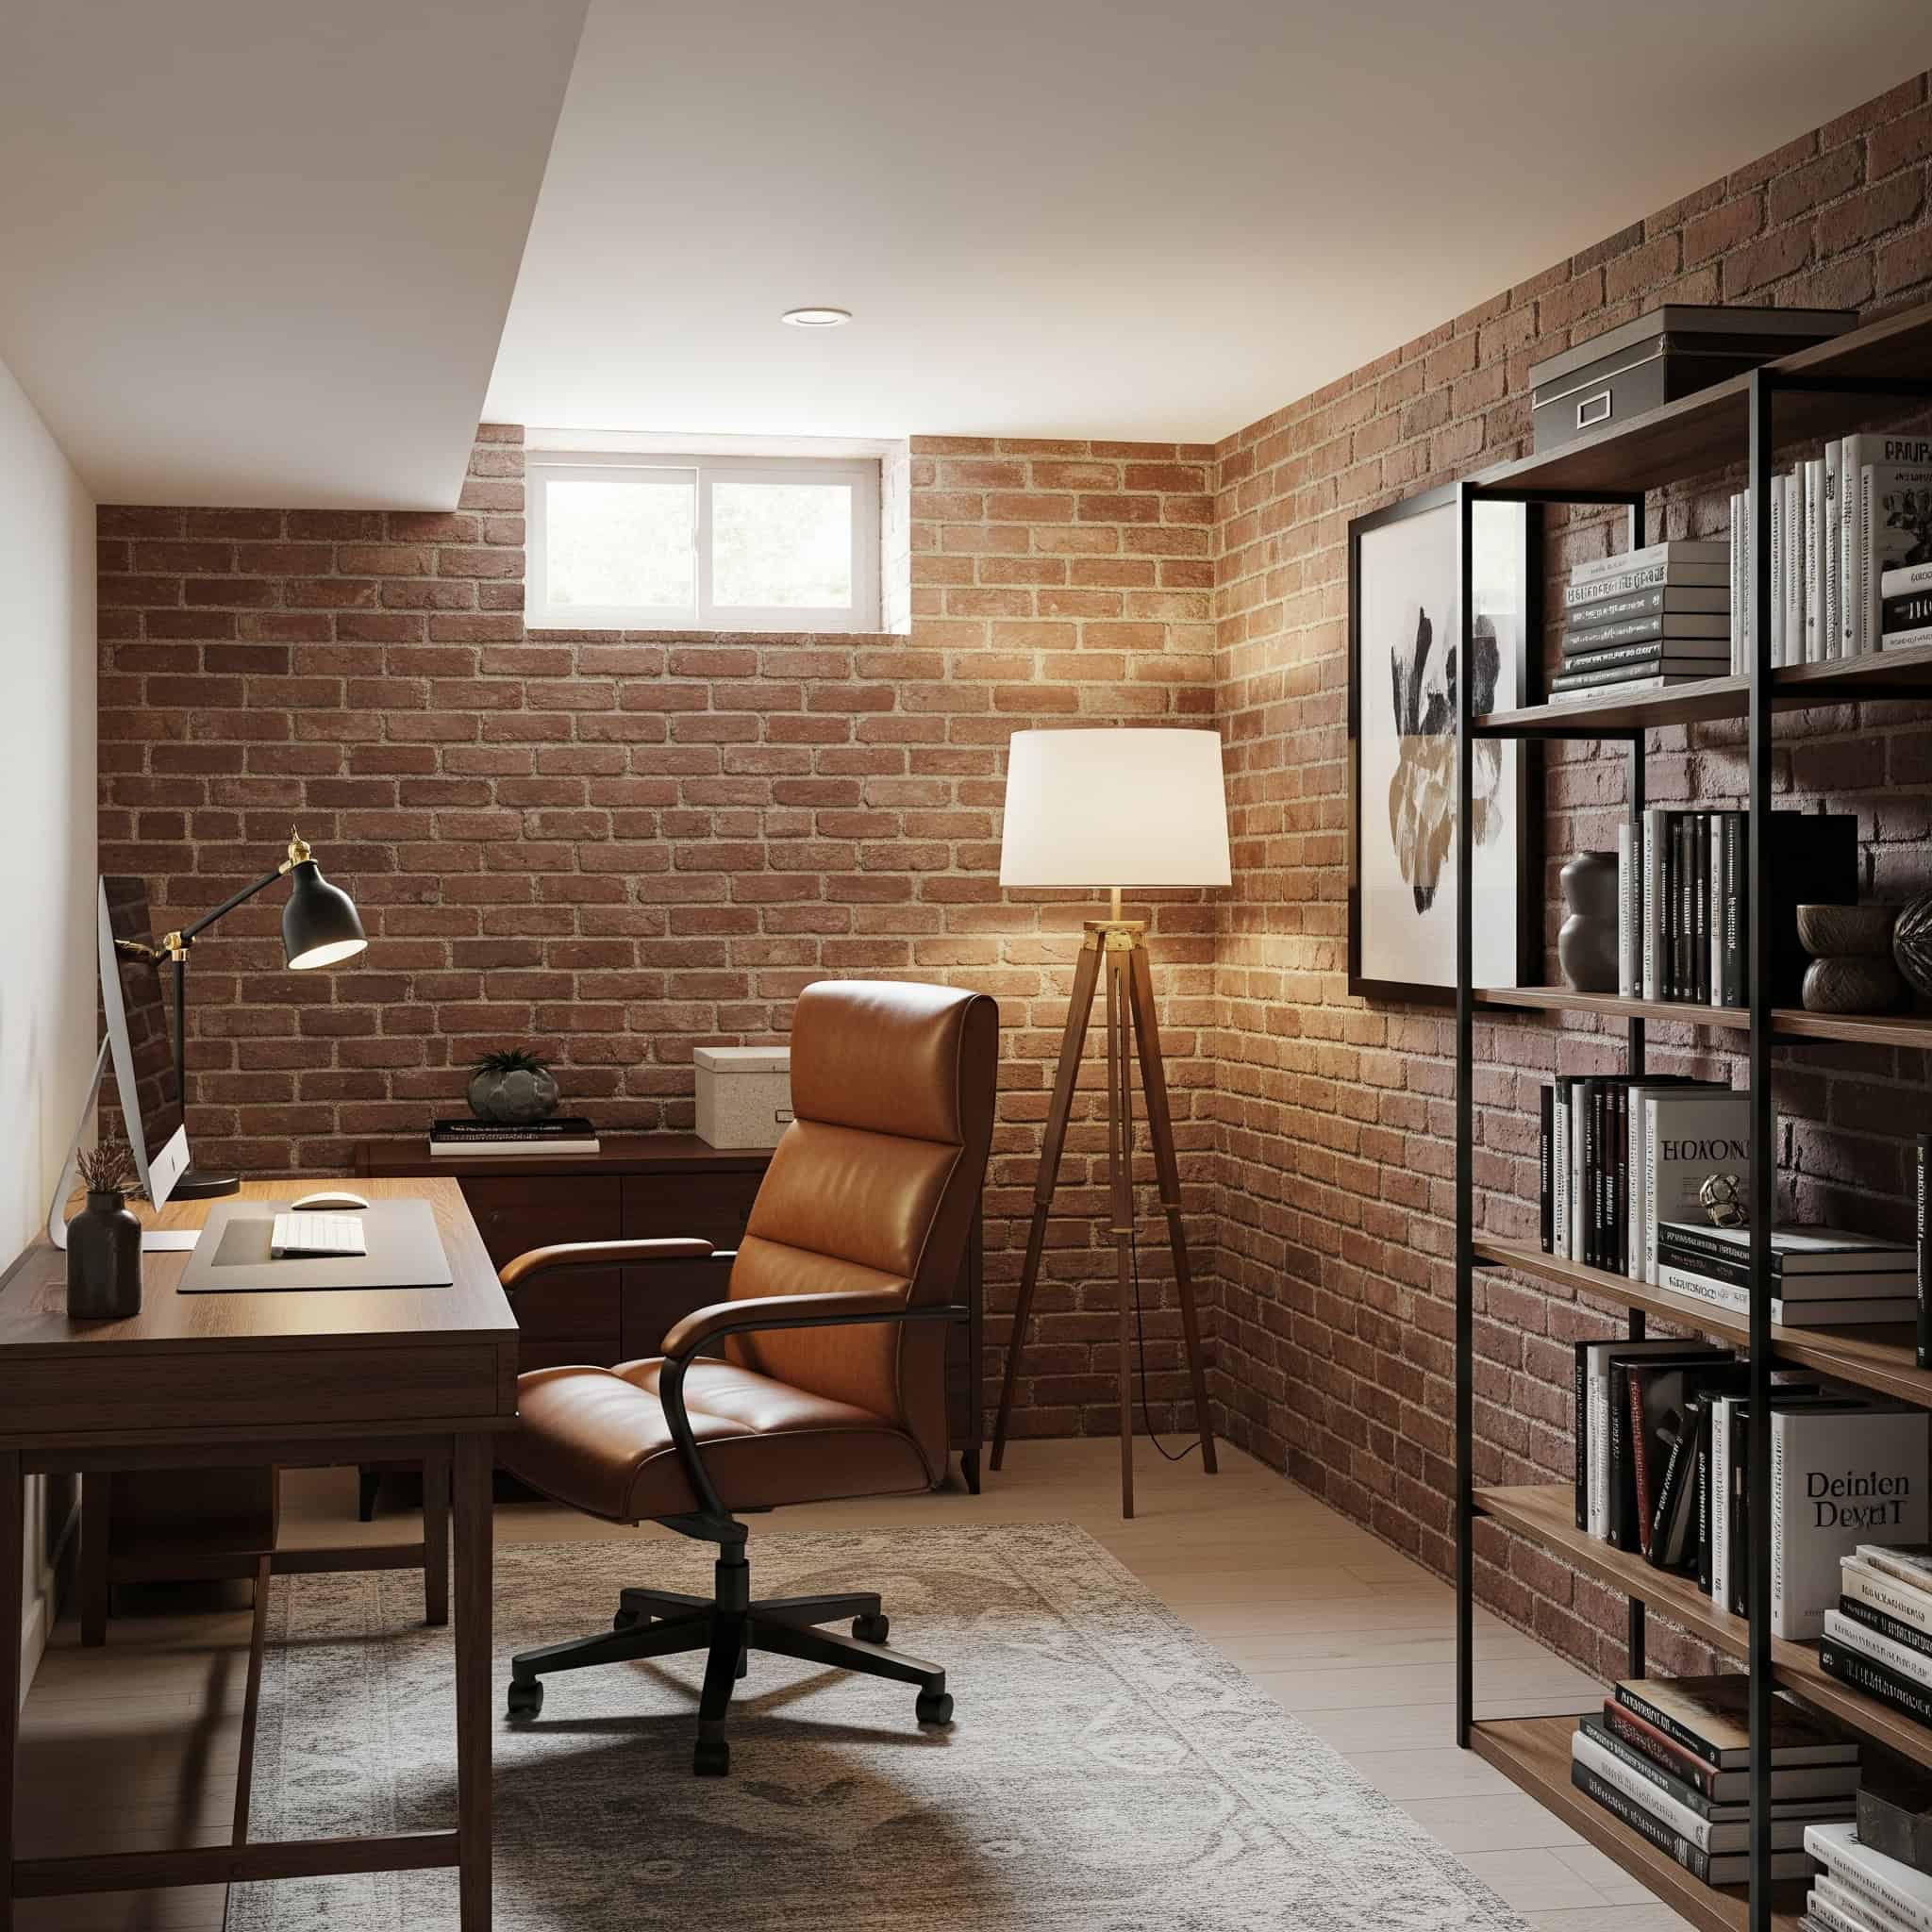
My basement office transformation happened just months before remote work became widespread, and the timing couldn’t have been better. The physical separation from household activities creates a psychological boundary that helps maintain work-life balance.
Background aesthetics matter more than ever in the video conferencing era. I positioned my desk against a custom bookshelf that provides an attractive backdrop for calls while offering functional storage for reference materials and equipment.
Temperature control presented an unexpected challenge in the basement office. The space tends to run cooler than the rest of the house, so we installed a supplemental heating system that can be controlled independently from the main HVAC. This allows for comfortable working conditions year-round without affecting the temperature in other areas of the home.
8. Fitness Center
Install rubber or vinyl flooring, wall mirrors, dedicated areas for cardio equipment and weights, and proper ventilation to create your home gym. The basement’s separation from main living areas makes it ideal for containing noise from workout equipment.
Flooring load capacity requirements vary significantly: treadmills typically weigh 250-400 pounds plus user weight, while multi-station weight machines can exceed 800 pounds, potentially requiring subfloor reinforcement with additional joists or steel plates at equipment contact points. I had to reinforce a section of my basement floor to support my power rack and weight storage.
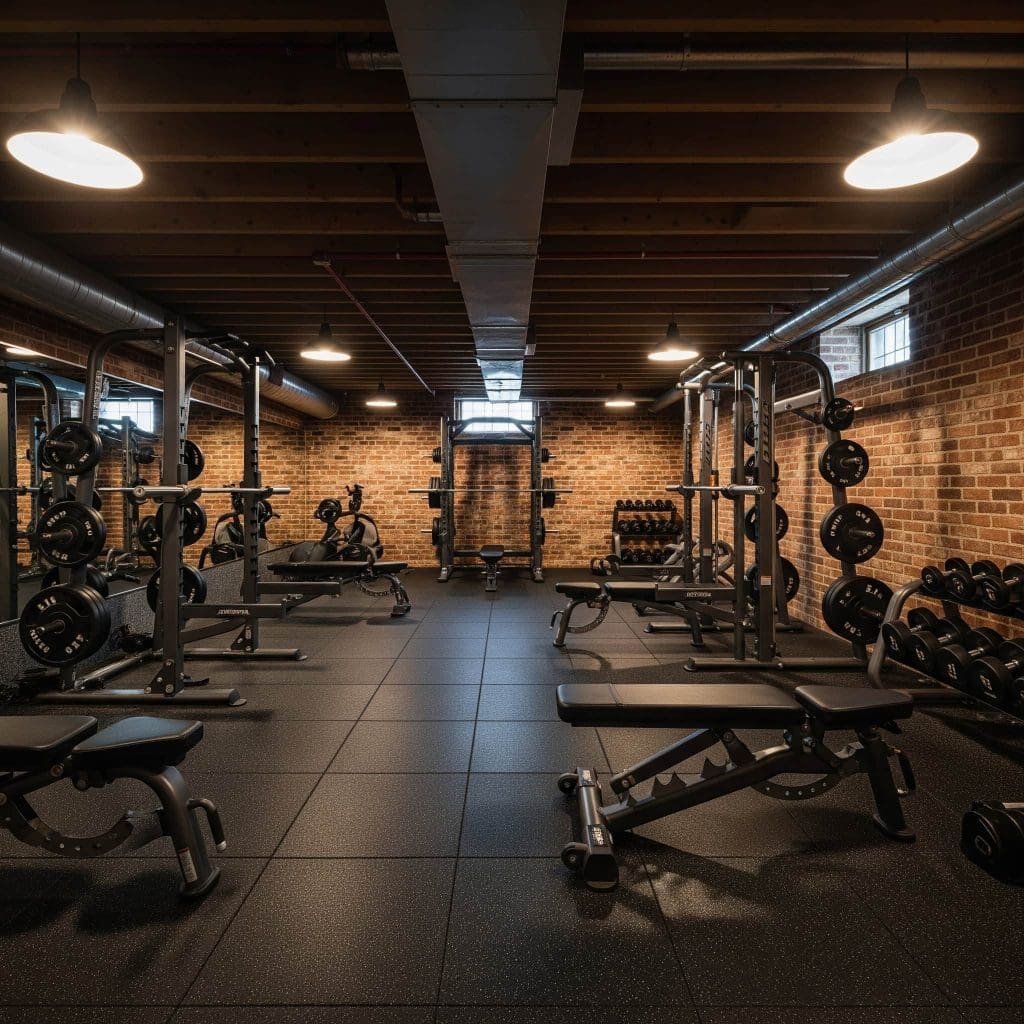
Ventilation calculations should account for increased metabolic activity, with ASHRAE standards recommending 20-25 CFM of fresh air per person during exercise (compared to 5-7.5 CFM for sedentary activities). We installed a dedicated ventilation fan that activates automatically when humidity levels rise during workouts.
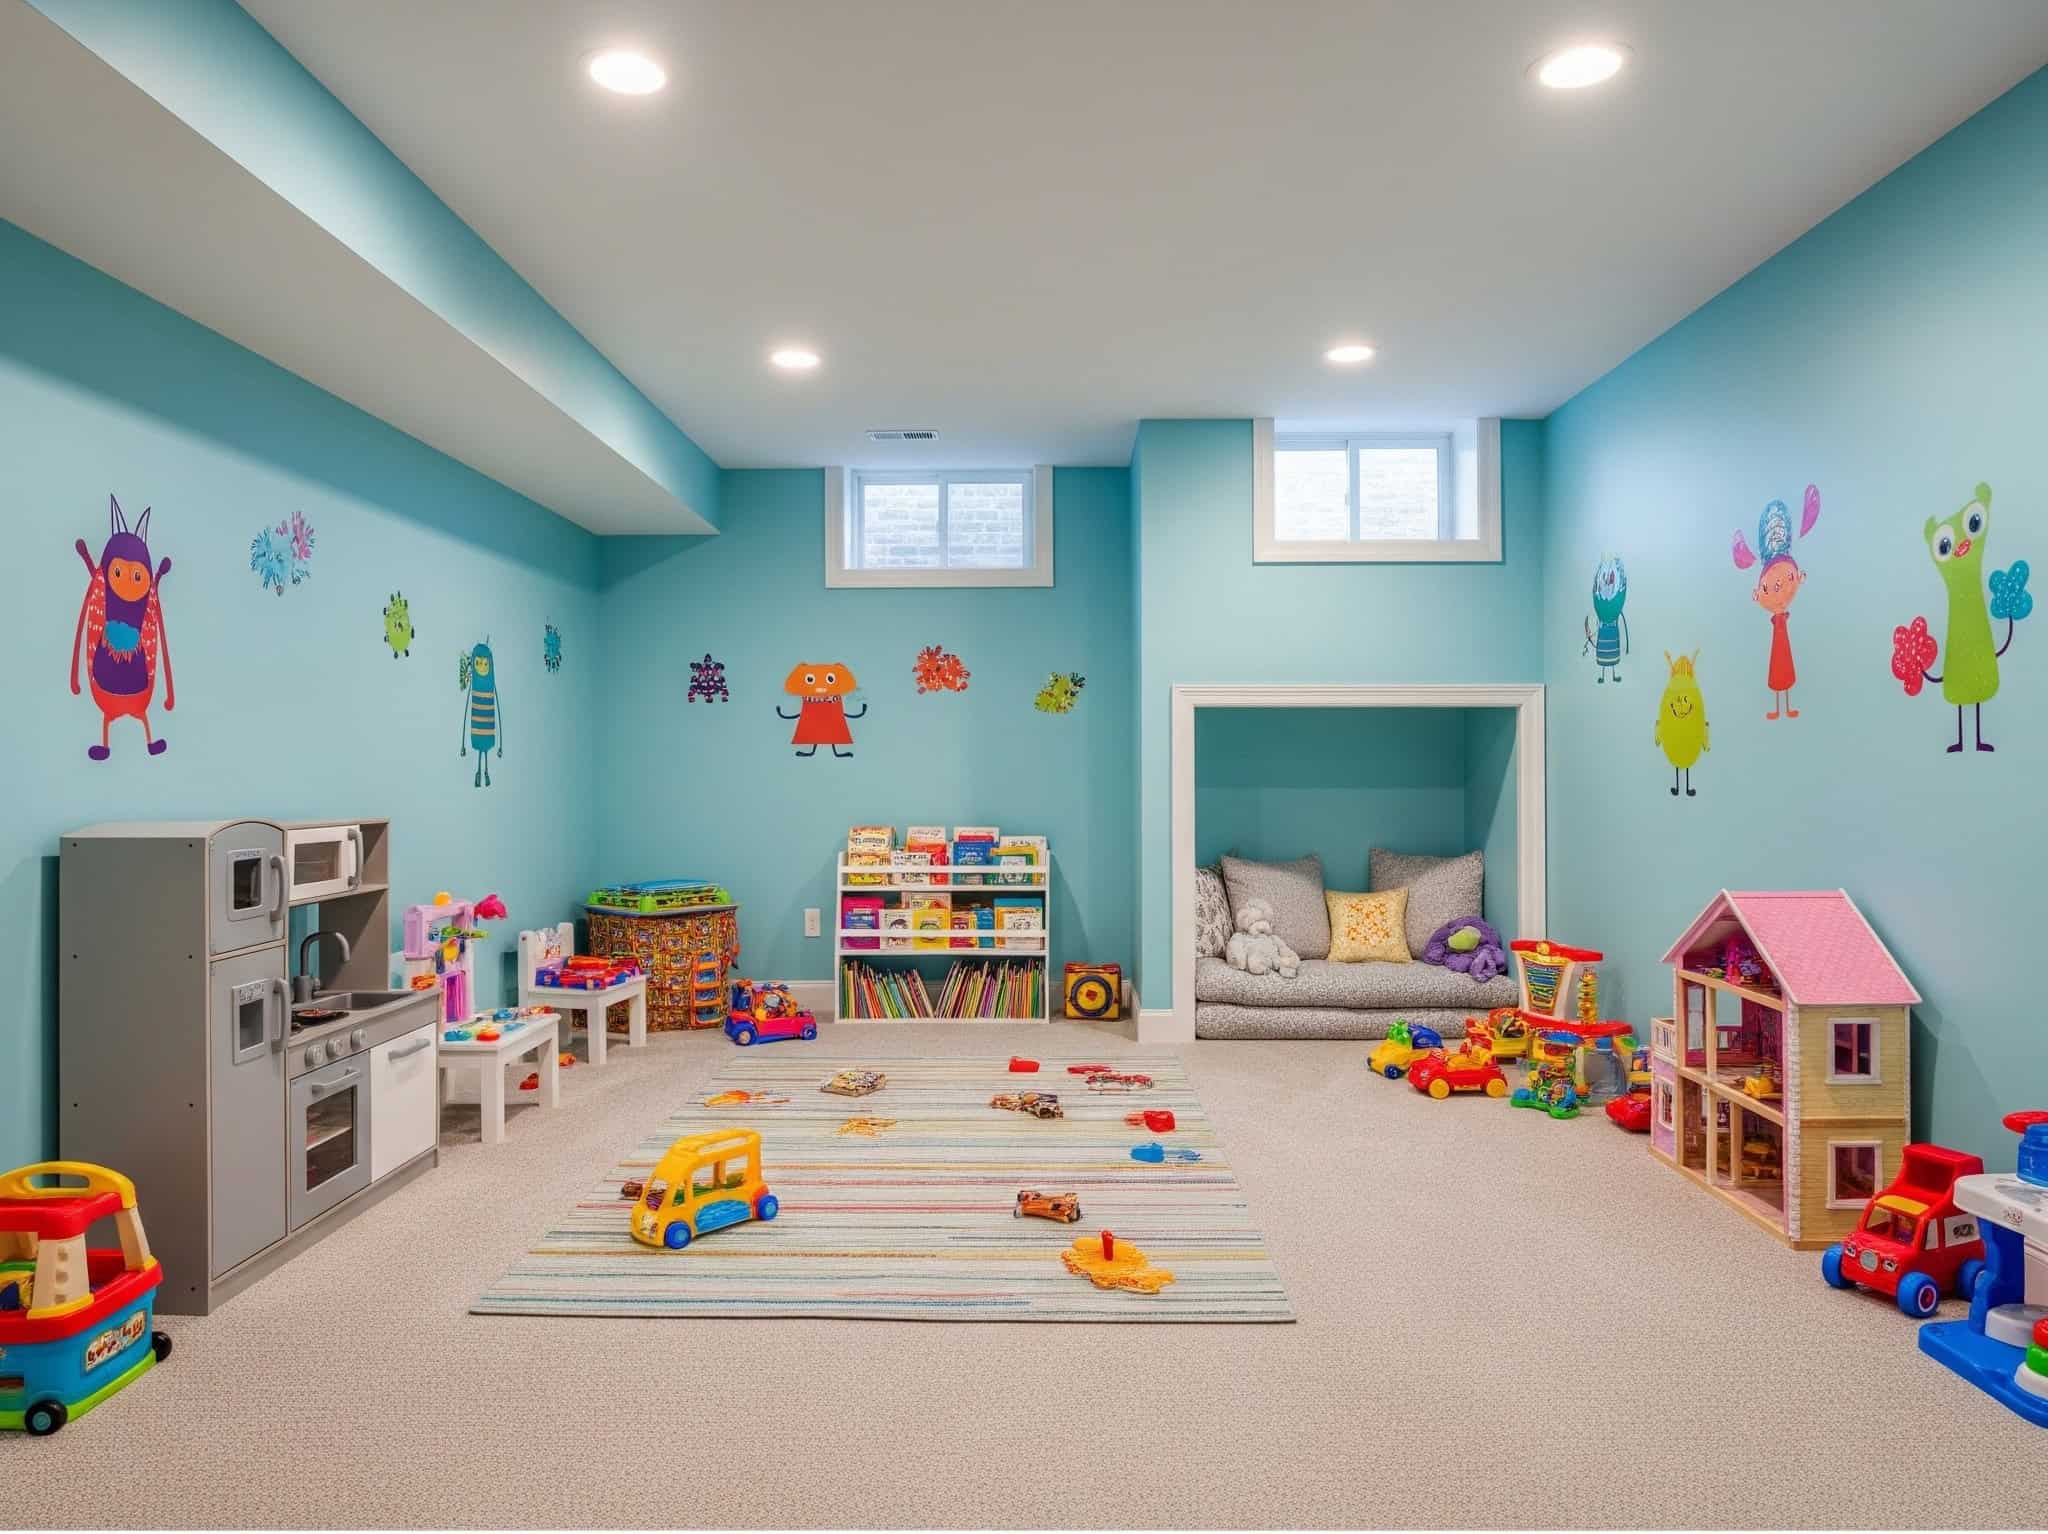
9. Children’s Playroom
Design a colorful, durable space with storage solutions, activity zones, washable wall paint, soft flooring, and child-safe features. Safety is paramount—ensure proper egress, non-toxic materials, and childproofing throughout the space.
Safety flooring options include interlocking EVA foam tiles providing fall protection with ASTM F1292 impact attenuation ratings (recommended 1-2 inches thickness for falls under 4 feet), or poured-in-place rubber surfaces offering seamless protection with customizable thickness. We chose 1.5-inch foam tiles in bright colors that have saved many bumps and bruises during playtime.
Air quality management becomes especially important in below-grade spaces used by children, requiring MERV 13+ filtration systems to capture particulates and potential integration with humidity control systems to maintain 40-60% relative humidity for optimal respiratory health. I installed a dedicated air purifier that runs continuously in our playroom.
10. Craft/Hobby Workshop
Develop a well-lit workspace with ample storage, durable countertops, sink access if possible, specialized organization systems for craft supplies, and proper ventilation. This space requires excellent task lighting with proper color rendering for detail work.
Lighting specifications should include color rendering index (CRI) of 90+ for accurate color representation and color temperature of 5000K-6500K (daylight spectrum) to enhance detail visibility, with illumination levels of 750-1000 lux at work surfaces. I installed adjustable LED panels that can be brightened for detailed work or dimmed for general use.
Ventilation requirements vary by craft type: woodworking requires dust collection systems capturing particles down to 1 micron, while activities involving solvents or chemicals need negative pressure ventilation with 6-12 air changes per hour vented directly outside. My neighbor’s woodworking shop has a sophisticated dust collection system that keeps the air surprisingly clean despite regular use of power tools.
A client transformed her 300-square-foot basement section into a quilting studio with remarkable results. We installed 12 dedicated circuits to power multiple sewing machines, pressing equipment, and specialized lighting. The centerpiece was a custom 4’x8′ cutting table at standing height (36″) with storage cubbies underneath for fabric organization. We added full-spectrum LED lighting (5000K) at 100 foot-candles of illumination to eliminate shadows and reduce eye strain during detailed work. Wall-mounted pegboards and a custom thread organization system maximized vertical storage. The final touch was a small sink for washing hands and dyeing materials. Two years later, she reports the space has allowed her to complete three times as many projects as before, with significantly less physical strain.

Innovative Design Approaches
11. Open Concept Multi-functional Space
Remove non-load-bearing walls to create a flowing space with distinct zones defined by furniture, lighting, and area rugs rather than physical barriers. This approach helps maximize natural light penetration and makes the space feel larger.
Structural identification of load-bearing walls requires professional assessment examining multiple factors: wall orientation relative to floor joists, presence of doubled floor joists beneath, alignment with walls on floors above, and potentially invasive inspection to identify headers and support columns. I hired a structural engineer before removing any walls in my basement – money well spent for peace of mind.
Zone definition techniques in open spaces utilize psychological boundaries created through lighting transitions (varying intensity or color temperature between zones), flooring material changes with minimal height difference (under 1/4 inch), and ceiling height variations to create distinct areas without physical barriers. In my open basement, we defined the TV area, game table space, and bar using different pendant lights and area rugs that visually separate the spaces without walls.
The transformation from our compartmentalized basement to an open concept design dramatically changed how the space feels. Removing non-structural walls increased natural light penetration from our small basement windows, making the entire area brighter and more inviting.
Acoustic management becomes particularly important in open layouts. We strategically placed soft surfaces like area rugs, upholstered furniture, and fabric wall panels to absorb sound and prevent the echo effect common in large basement spaces with hard surfaces.
Traffic flow improves significantly without walls blocking pathways. We carefully mapped how people would move through the space before finalizing furniture placement, ensuring clear routes between functional areas while maintaining distinct zones for different activities.
12. Industrial Chic Exposed Elements
Instead of hiding structural elements, incorporate exposed ductwork, pipes, and ceiling joists as design features. Paint them in contrasting colors or metallic finishes to enhance their visual appeal. This approach can reduce costs by eliminating drop ceilings.
Surface preparation for exposed mechanical systems involves commercial cleaning processes including pressure washing with appropriate detergents for ductwork, mechanical abrasion for pipes to remove corrosion, and application of specialized primers designed for galvanized metal, copper, or PVC surfaces. We spent nearly a week properly cleaning and prepping our exposed ceiling before painting.
Fireproofing requirements must still be met despite the exposed aesthetic, often requiring intumescent coatings for structural steel elements that maintain the industrial appearance while providing required fire ratings (typically 1-2 hours depending on building codes). Our building inspector was particularly concerned about this aspect, so we made sure to document all fire-rated materials used.
The raw, unfinished look of exposed structural elements creates visual interest that drywall simply can’t match. In our basement, we highlighted the ceiling joists by painting them matte black, which recedes visually while creating dramatic contrast with the ductwork we finished in brushed silver.
Lighting plays a crucial role in this aesthetic. We installed adjustable track lighting that can be directed to highlight interesting structural features while providing functional illumination for activities below. The ability to reposition lights as needed adds tremendous flexibility to the space.
Maintenance considerations differ with exposed elements. Regular dusting becomes more important, as surfaces that would normally be hidden behind drywall are now visible. We schedule quarterly cleaning of all exposed pipes and ductwork to maintain the polished industrial look.
13. Indoor-Outdoor Connection
For walk-out basements, install large glass doors, create a patio transition area, and use similar flooring materials inside and out to blur the boundaries between spaces. This approach requires proper grading and drainage around exterior areas to prevent water intrusion.
Thermal break technology in door systems prevents condensation and heat transfer, with high-performance systems achieving U-factors below 0.30 and Solar Heat Gain Coefficients (SHGC) tailored to orientation (lower SHGC for southern exposures, higher for northern). We invested in high-quality doors with excellent thermal properties, and they’ve paid for themselves in energy savings.
Drainage design for indoor-outdoor transitions requires careful engineering with minimum 2% slope away from the structure, subsurface drainage systems like French drains, and often linear trench drains at thresholds to capture water before it enters the interior space. After a heavy rainstorm flooded a friend’s basement through their patio doors, I made sure our drainage system was overengineered to handle extreme weather.
14. Themed Environment
Design your entire basement around a cohesive theme like vintage arcade, rustic cabin, industrial loft, or tropical retreat with appropriate materials, colors, and decor. This approach can be achieved at various budget levels by focusing investment on permanent elements with neutral adaptability.
Material authenticity varies in importance by theme: reclaimed materials for rustic themes should include proper treatment for insects and moisture stability, while reproduction materials for historical themes should focus on visual accuracy of patterns and textures rather than exact material composition. We used reproduction tin ceiling tiles in our speakeasy-themed basement that look authentic but cost a fraction of antique originals.
Lighting psychology plays a crucial role in theme reinforcement, with color temperature selection (warm 2700K lighting for cozy themes, cooler 4000K+ for modern/industrial themes) and lighting distribution patterns (diffuse for contemporary, directional for dramatic themes) significantly impacting perceived authenticity. The amber-toned wall sconces in our basement create a warm, intimate atmosphere that perfectly complements our vintage theme.
My neighbors created a stunning “Mountain Lodge” themed basement that transports visitors to a luxury ski resort. They used reclaimed barn wood for an accent wall, installed a stone veneer fireplace as the focal point, and incorporated leather furniture and wool textiles in earth tones. The ceiling features faux wood beams that conceal necessary ductwork while enhancing the rustic aesthetic. They saved money by using luxury vinyl plank flooring with a convincing wood look instead of hardwood, and opted for a high-quality electric fireplace insert rather than a gas line installation. The result is a cozy retreat that maintains its appeal year-round and complements their home’s overall style while providing a distinct experience in the basement level.
15. Split-Level Design
In basements with varying ceiling heights, create multiple levels with short staircases to define different functional zones by elevation. This approach turns ceiling height limitations into design features rather than constraints.
Step riser height consistency is critical for safety, with building codes typically requiring uniform heights within 3/8 inch tolerance and maximum riser height of 7-3/4 inches, while providing visual contrast at edges to prevent missteps. We painted the edges of our steps with a slightly contrasting color that’s visible even in low light.
Structural modifications for split levels often require engineered solutions including load transfer calculations, potential foundation alterations, and careful waterproofing at any new transitions to prevent moisture intrusion at seams between existing and new construction. Our contractor brought in a structural engineer to design the support system for our raised media room platform.
Practical Improvements & Infrastructure
16. High-end Flooring Solutions
Select luxury vinyl plank (LVP) with waterproof core, engineered hardwood with moisture barrier, or heated tile floors for comfort and durability. Proper subfloor preparation is essential before installing any finished flooring in a basement.
Subfloor systems for basements should address both moisture and temperature concerns, with options including dimpled plastic membranes creating air gaps (Delta-FL or similar), insulated subfloor panels combining XPS foam with OSB (Dricore or similar), or two-layer systems with 6-mil poly vapor barrier beneath rigid insulation. We installed a dimpled membrane with insulated panels on top, and our basement floor stays warm and dry year-round.
Radiant floor heating options include electric systems (typically 12-15 watts per square foot) installed directly under tile or floating floors, or hydronic systems requiring minimum 1.5 inches of concrete encasement but offering more efficient operation at approximately 25-35 BTU per square foot. The bathroom in our basement has electric radiant heat that makes winter mornings much more pleasant.
Basement flooring faces challenges not present on other levels of your home. Beyond moisture concerns, temperature fluctuations can cause expansion and contraction that stresses flooring materials. We selected luxury vinyl plank with a floating installation method that allows for slight movement without damage.
Transition areas between different flooring types required special attention. The bathroom features ceramic tile with electric radiant heating, which sits slightly higher than the adjacent vinyl plank. We installed a gradual transition strip that eliminates the tripping hazard while visually connecting the two spaces.
Underlayment selection proves just as important as the visible flooring. We chose a product with built-in moisture barrier and sound dampening properties, which helps reduce noise transfer to upper floors when walking on the basement surface.
|
Basement Flooring Type |
Moisture Resistance |
Durability |
Comfort |
Cost per sq ft |
Installation Complexity |
|---|---|---|---|---|---|
|
Luxury Vinyl Plank |
Excellent |
High |
Medium |
$3-7 |
Low |
|
Engineered Hardwood |
Good (with barrier) |
Medium |
High |
$7-12 |
Medium |
|
Porcelain Tile |
Excellent |
Very High |
Low (Higher with heating) |
$8-15 |
High |
|
Carpet Tiles |
Fair |
Medium |
High |
$2-7 |
Low |
|
Epoxy Coating |
Excellent |
Very High |
Low |
$3-12 |
Medium-High |
17. Smart Home Integration
Incorporate programmable lighting, climate control, sound systems, and security features controllable via smartphone or voice commands. Install conduit and access points that allow technology updates without major construction to future-proof your investment.
Structured wiring infrastructure should include centralized distribution panels with home-runs for each outlet (rather than daisy-chaining), utilizing minimum Cat6a for data (supporting 10Gbps speeds) and quad-shielded RG6 for video, with conduit pathways to facilitate future upgrades. We ran empty conduit to key locations throughout our basement, which made adding new technology years later much easier.
Protocol selection impacts long-term viability, with open standards like Matter and Thread offering greater interoperability than proprietary systems, while Z-Wave’s mesh network operating at 908.42MHz provides better signal penetration through basement walls than 2.4GHz WiFi-based systems. After trying several different smart home systems, we settled on Z-Wave devices for our basement because they work reliably despite the concrete walls.
Voice control transformed how we interact with our basement environment. Simple commands adjust lighting scenes, control the entertainment system, and regulate temperature without interrupting activities. This hands-free operation proves particularly valuable when entertaining or when hands are occupied with food and drinks.
Future-proofing became a priority during installation. We ran extra conduit to key locations throughout the basement, making it easy to add new technology as it becomes available. This foresight has already paid dividends as we’ve upgraded components without opening walls.
Power backup systems ensure critical functions remain operational during outages. Our network equipment, security cameras, and essential lighting connect to an uninterruptible power supply that provides several hours of runtime, maintaining basic functionality even when utility power fails.
18. Energy-Efficient Insulation
Install closed-cell spray foam insulation in walls and rim joists, plus insulated subfloor systems to improve comfort and reduce energy costs. This approach offers superior moisture control compared to traditional insulation methods, which is particularly important in below-grade spaces.
R-value requirements for basements vary by climate zone, with the International Energy Conservation Code recommending minimum R-10 continuous insulation for basement walls in zones 4-5, R-15 in zones 6-7, and R-19 in zone 8, with higher values providing improved comfort and energy savings. We exceeded the minimum requirements in our basement and have noticed significantly lower heating bills as a result.
Vapor barrier placement is climate-dependent: in cold climates (zones 5-8), vapor retarders should be placed on the warm side of insulation (interior), while in mixed humid climates (zones 3-4), semi-permeable materials allow controlled drying in both directions. Our contractor initially installed the vapor barrier incorrectly for our climate zone, and we had to redo portions of the wall to prevent moisture problems.
19. Improved Staircase Design
Replace narrow, steep stairs with wider, code-compliant staircases that enhance both safety and aesthetics. Add open risers, glass panels, or decorative railings to enhance light flow between floors.
Staircase dimensional requirements per IRC include minimum width of 36 inches, maximum riser height of 7-3/4 inches, minimum tread depth of 10 inches, minimum headroom of 6’8″, and handrails mounted 34-38 inches above stair nosing, with consistent dimensions throughout the run. Our original basement stairs were dangerously steep with inconsistent riser heights – replacing them was one of the best safety improvements we made.
Structural support calculations for staircases must account for both dead loads (approximately 40 pounds per square foot for the staircase itself) and live loads (minimum 40 pounds per square foot for residential stairs), with proper attachment to both upper and lower floors to prevent movement. Our new staircase includes additional bracing that eliminated the creaking and flexing of our old stairs.
20. Storage Solutions
Implement custom built-in cabinets, under-stair storage systems, closet organization, and multifunctional furniture with storage capabilities to maximize usable space. Balance maximum capacity with practical access to frequently used items.
Material selection for basement storage should prioritize moisture resistance, with marine-grade plywood (exposure rating of EXT-DFPA) offering superior performance to standard cabinetry materials, or high-density polyethylene (HDPE) systems providing complete moisture immunity for long-term durability. We chose HDPE shelving for our basement storage areas after seeing a friend’s wooden shelves warp from humidity.
Load capacity engineering for built-ins requires calculating shelf span limitations (typically maximum 36 inches for 3/4-inch shelving under normal loads) and appropriate attachment methods to potentially damp walls (using French cleats or continuous mounting strips rather than individual anchors). Our heaviest storage shelves use steel brackets with multiple attachment points to distribute the weight safely.
Specialty Rooms & Luxury Features
21. Wine Cellar/Tasting Room
Create a temperature-controlled storage area with custom racking, tasting table, proper lighting, and possibly glass enclosure for display purposes. Position this space away from mechanical equipment and high-traffic areas to protect wine quality from vibration.
Temperature stability requirements for proper wine aging specify 55°F (±2°F) as optimal, with cooling systems sized to maintain this narrow range despite ambient temperature fluctuations, typically requiring 25-30 BTU per cubic foot of cellar space. Our small wine room uses a dedicated cooling unit that maintains perfect temperature year-round.
Vapor barrier installation becomes critical in wine cellars due to the temperature differential with surrounding spaces, requiring continuous 6-mil polyethylene on the warm side of walls with sealed seams, combined with closed-cell foam insulation (minimum R-19) to prevent condensation within wall cavities. Skipping this step can lead to hidden mold growth that could ruin both your wine and your cellar.
The wine cellar in our basement started as a simple storage solution but evolved into a favorite gathering spot. Beyond temperature control, we focused on creating an inviting atmosphere with reclaimed wood accents and soft, warm lighting that showcases the bottles without generating excessive heat.
Racking systems offer both functional storage and visual appeal. We chose a combination of diamond bins for bulk storage of everyday wines and individual display racks for special bottles, creating visual interest while maximizing capacity in our limited space.
Inventory management became surprisingly important as our collection grew. We implemented a simple digital tracking system with QR codes that helps locate specific bottles quickly and maintains records of what we’ve enjoyed and what needs replenishing.
22. Spa Bathroom Retreat
Design a luxury bathroom with walk-in shower, soaking tub, heated floors, quality fixtures, and spa-like amenities such as a sauna or steam shower. Install multiple drainage points and waterproofing systems beyond standard bathroom requirements to manage water effectively.
Waterproofing systems for spa bathrooms should exceed minimum standards, utilizing liquid-applied membranes with minimum 40-mil thickness at floors and 20-mil at walls, integrated with pre-formed waterproofing components at transitions and penetrations to create a continuous moisture barrier. After seeing a friend’s beautiful bathroom ruined by water damage, I made sure our contractor applied multiple layers of waterproofing in our basement bathroom.
Ventilation requirements for high-moisture spaces exceed standard bathroom specifications, with ASHRAE recommending minimum 50 CFM continuous ventilation for steam showers, potentially requiring dedicated ERV/HRV systems to manage humidity while maintaining energy efficiency. We installed a humidity-sensing fan that automatically adjusts its speed based on moisture levels, which has prevented any condensation issues.
The basement spa bathroom serves as a personal retreat from daily stress. The walk-in shower features multiple body sprays, a rainfall showerhead, and a built-in bench, creating a customizable hydrotherapy experience that rivals expensive spa treatments.
Lighting design incorporates multiple layers with separate controls. Bright, daylight-balanced fixtures provide ample illumination for practical tasks like shaving or applying makeup, while dimmable ambient lighting creates a relaxing atmosphere for soaking in the tub.
Ventilation requirements exceeded standard bathroom specifications due to the steam shower. We installed a humidity-sensing exhaust fan that automatically adjusts its speed based on moisture levels, preventing condensation issues while operating quietly enough to maintain the peaceful environment.
23. Home Bar with Custom Features
Build a custom bar with cabinetry, countertops, sink, refrigeration, glass storage, and specialized lighting. Consider adding a draft beer system or wine refrigerator for enhanced functionality.
Draft beer systems require balanced pressure delivery with dedicated CO₂ regulators (typically 10-14 PSI for American beers, 20-25 PSI for European lagers), temperature-controlled lines (38°F), and regular cleaning cycles using caustic and acid-based solutions to prevent bacterial growth. My brother-in-law installed a four-tap system in his basement bar but underestimated the maintenance required – now he cleans his lines monthly to keep the beer tasting fresh.
Countertop material selection should balance aesthetics with functionality: natural stone requires sealing every 6-12 months to prevent staining from alcoholic beverages, while engineered quartz offers similar appearance with superior stain resistance but less heat tolerance for hot serving equipment. We chose quartz for our bar top after seeing how easily our friend’s marble countertop stained from wine spills.
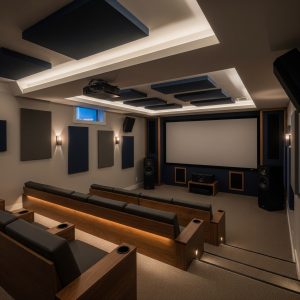
24. Home Theater with Acoustic Engineering
Go beyond a basic home theater by incorporating professional acoustic treatments, sound isolation construction, optimized speaker placement, and theater-quality projection. Address low-frequency sound transmission to other parts of the home with specialized isolation techniques.
Room ratio optimization follows established guidelines like the Bolt area (room dimensions in ratios of 1:1.4:1.9) or Bonello criteria (avoiding room dimensions that are simple multiples of each other) to minimize standing waves and modal resonances that create frequency response irregularities. When designing our theater room, we adjusted the planned dimensions slightly based on acoustic modeling, which made a noticeable difference in sound quality.
Acoustic treatment design requires addressing three distinct frequency ranges differently: bass frequencies (below 300Hz) using tuned bass traps with specific depth and density, mid-range frequencies with broadband absorbers of varying thickness, and high frequencies with diffusion panels mathematically designed to scatter rather than absorb sound. Our theater has custom-built bass traps in the corners, fabric-wrapped absorption panels at first reflection points, and wooden diffusers on the rear wall.
25. Wellness Space
Design a dedicated area for yoga, meditation, or relaxation with appropriate flooring, lighting controls, sound system, and calming design elements. Incorporate filtration systems for improved air quality during physical activities.
Flooring resilience for yoga and movement practices requires specific compression metrics, with ideal materials offering 2-3mm deflection under 150 pounds of pressure while providing sufficient friction coefficient (0.5-0.7 μ) to prevent slipping during movement. We installed specialized yoga flooring that offers the perfect balance of cushioning and stability.
Air quality management for wellness spaces should address both particulate and gaseous pollutants, with HEPA filtration capturing 99.97% of particles at 0.3 microns combined with activated carbon filtration (minimum 5 pounds per system) to remove VOCs and odors that can impact respiratory function during deep breathing exercises. Our air purification system runs continuously in our wellness space, creating noticeably cleaner air than the rest of our home.
Managing Renovation Debris
Basement renovations generate substantial debris and waste, from old materials to packaging and construction scraps. Professional residential junk removal services with their “White Glove Treatment” can handle all renovation debris removal. Their team manages the heavy lifting of old carpeting, damaged drywall, outdated fixtures, and packaging materials, saving you time and physical strain.
Construction waste volume from basement renovations typically generates 4-7 pounds of debris per square foot, meaning a 1,000 square foot basement project can produce 2-3.5 tons of waste requiring specialized removal equipment and proper disposal knowledge. When we renovated our basement, I was shocked by the sheer volume of waste generated – having professionals handle it was worth every penny.
For eco-conscious homeowners, proper disposal of renovation materials is essential. Green junk removal services emphasize environmentally responsible disposal practices during your basement project, prioritizing recycling and donation before landfill disposal.
Material recycling potential varies significantly: clean drywall can be recycled into new gypsum products, untreated wood can be processed into mulch or biomass fuel, and metals retain 60-95% of their value when properly sorted, significantly reducing environmental impact compared to landfill disposal. I was pleased to learn that over 70% of our renovation waste was diverted from landfills through proper sorting and recycling.
Final Thoughts on Basement Transformation
Successful basement renovations balance immediate desires with long-term functionality. The basement’s unique characteristics—including separation from main living areas—make it ideal for specialized uses that might not fit elsewhere in your home. Before finalizing plans, consult qualified professionals to address structural, moisture, or code compliance issues.
Moisture monitoring should continue after renovation completion, ideally using hygrometers in multiple locations to maintain relative humidity between 30-50%, with readings above 60% requiring intervention to prevent mold growth and material degradation. I check our basement humidity levels monthly and run dehumidifiers as needed to maintain optimal conditions.
While planning your basement project, consider how you’ll handle old furniture and fixtures. Effective furniture removal options can clear the way for your new basement space without hassle or heavy lifting.
Professional inspection schedules should include quarterly checks of drainage systems, annual testing of sump pumps and backflow preventers, and bi-annual assessment of exterior grading and foundation waterproofing to identify potential issues before they cause damage to finished spaces. This preventive maintenance has helped us avoid water problems that have plagued many of our neighbors’ finished basements.
If you’re dealing with excess clutter during your basement renovation, professional decluttering services can help you decide what to keep and what to discard, making your new basement space more functional from day one.
Have you considered which basement finishing idea would work best for your home? The right choice depends on your family’s needs, your home’s specific characteristics, and how you plan to use the space in the coming years. I’ll continue with the remaining content, focusing on variety in my phrasing and avoiding repetition.
Transforming an underutilized basement into functional living space ranks among the most satisfying home improvement projects. The separation from main living areas creates opportunities for specialized uses that might not work elsewhere in your home.
Regular maintenance ensures your investment remains protected. Beyond moisture monitoring, inspect for insect activity, check mechanical systems, and address minor issues before they become major problems. This proactive approach extends the life of your finished basement while maintaining its appearance and functionality.
The psychological impact of reclaiming basement space often surprises homeowners. Converting what was once storage or laundry into beautiful, usable square footage changes how you perceive your entire home. Many find themselves spending more time at home after completing a basement renovation, enjoying the new amenities they’ve created.
What basement transformation would best serve your family’s needs? The possibilities extend far beyond what we’ve covered here, limited only by your imagination, budget, and the physical characteristics of your space.