DIY Sandbox Secrets: The Complete Environmental and Engineering Guide Most Builders Never Consider
I’ve watched too many parents rush into basic sandbox projects only to face complete rebuilds within two seasons. Research from detailed DIY documentation reveals that most amateur builds require significant repairs due to drainage failures and structural issues. This guide reveals the professional-grade techniques that create sandbox installations lasting 5-7 years while minimizing environmental impact and maintenance burden.
Table of Contents
- The Lifecycle Mindset: Planning Your Sandbox’s Future Beyond Construction
- Advanced Construction Methodologies: Beyond Basic Box Building
- Cover Systems: The Engineering Challenge Most DIYers Underestimate
- Integration with Home Waste Management Systems
- Specialized Build Configurations: Addressing Unique Site Challenges
TL;DR
- Most DIY sandbox projects fail because builders focus only on construction without considering the complete 5-7 year lifecycle from build to eventual removal
- Professional drainage systems and modular construction techniques prevent the most common sandbox failures while reducing long-term maintenance costs
- Strategic material selection through waste stream analysis reveals superior alternatives to traditional pressure-treated lumber
- Advanced cover systems require structural engineering principles to handle weather loads and provide year-round functionality
- Integration with household waste management systems can reduce construction waste by 30-40% while planning for responsible end-of-life disposal
The Lifecycle Mindset: Planning Your Sandbox’s Future Beyond Construction
Building a successful DIY sandbox requires thinking beyond the initial construction phase to understand how your project will evolve over its 5-7 year lifespan. This perspective changes every decision you make about materials, placement, and design features. Most sandbox failures happen because builders don’t plan for changing play patterns, maintenance requirements, or eventual decommissioning.
Children’s sandbox engagement patterns shift dramatically every 18 months, requiring modular design elements that can adapt from simple digging activities to complex construction play scenarios. Future-proofing your investment means choosing materials and construction methods that allow for easy reconfiguration, expansion, or complete repurposing when children outgrow the sandbox.
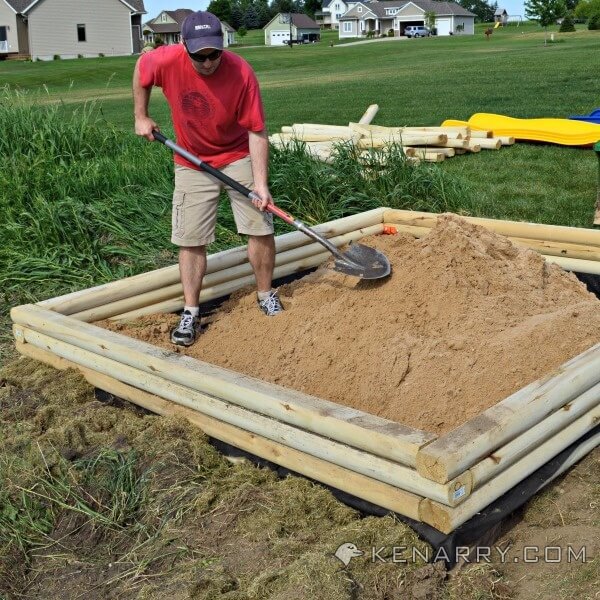
According to detailed builder documentation from Dover Projects, sandbox builds typically require “about 4 hours start to finish” for experienced DIYers, though first-time builders should plan for 7+ days of work including excavation, assembly, finishing, and sand installation. Dover Projects Sandbox Documentation
Temporal Design Strategy: Building for Phases of Use
Your sandbox needs to adapt as children’s play preferences evolve from toddler digging to complex engineering projects. Understanding these developmental phases prevents costly rebuilds and maximizes your investment return. Smart design accommodates multiple age groups simultaneously while allowing for easy modifications.
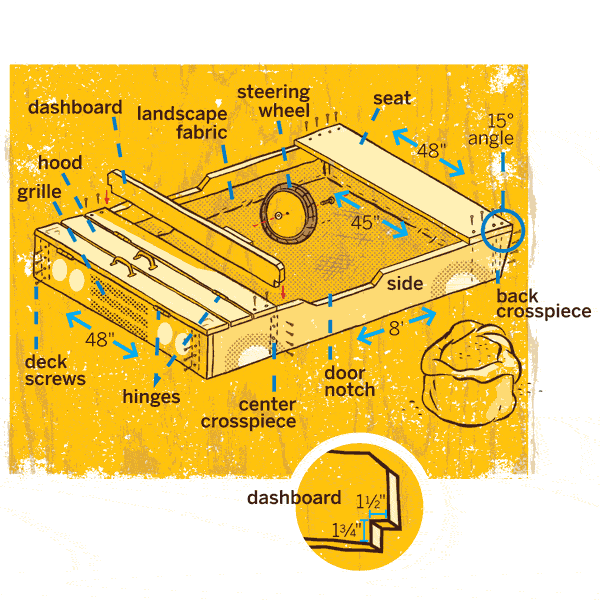
Modular internal dividers using untreated cedar strips allow you to reconfigure play zones as interests shift from sensory exploration to architectural construction. Interchangeable corner elements provide functionality that grows with your family’s changing needs – removable seats, storage compartments, planter boxes all serve different purposes at different stages.
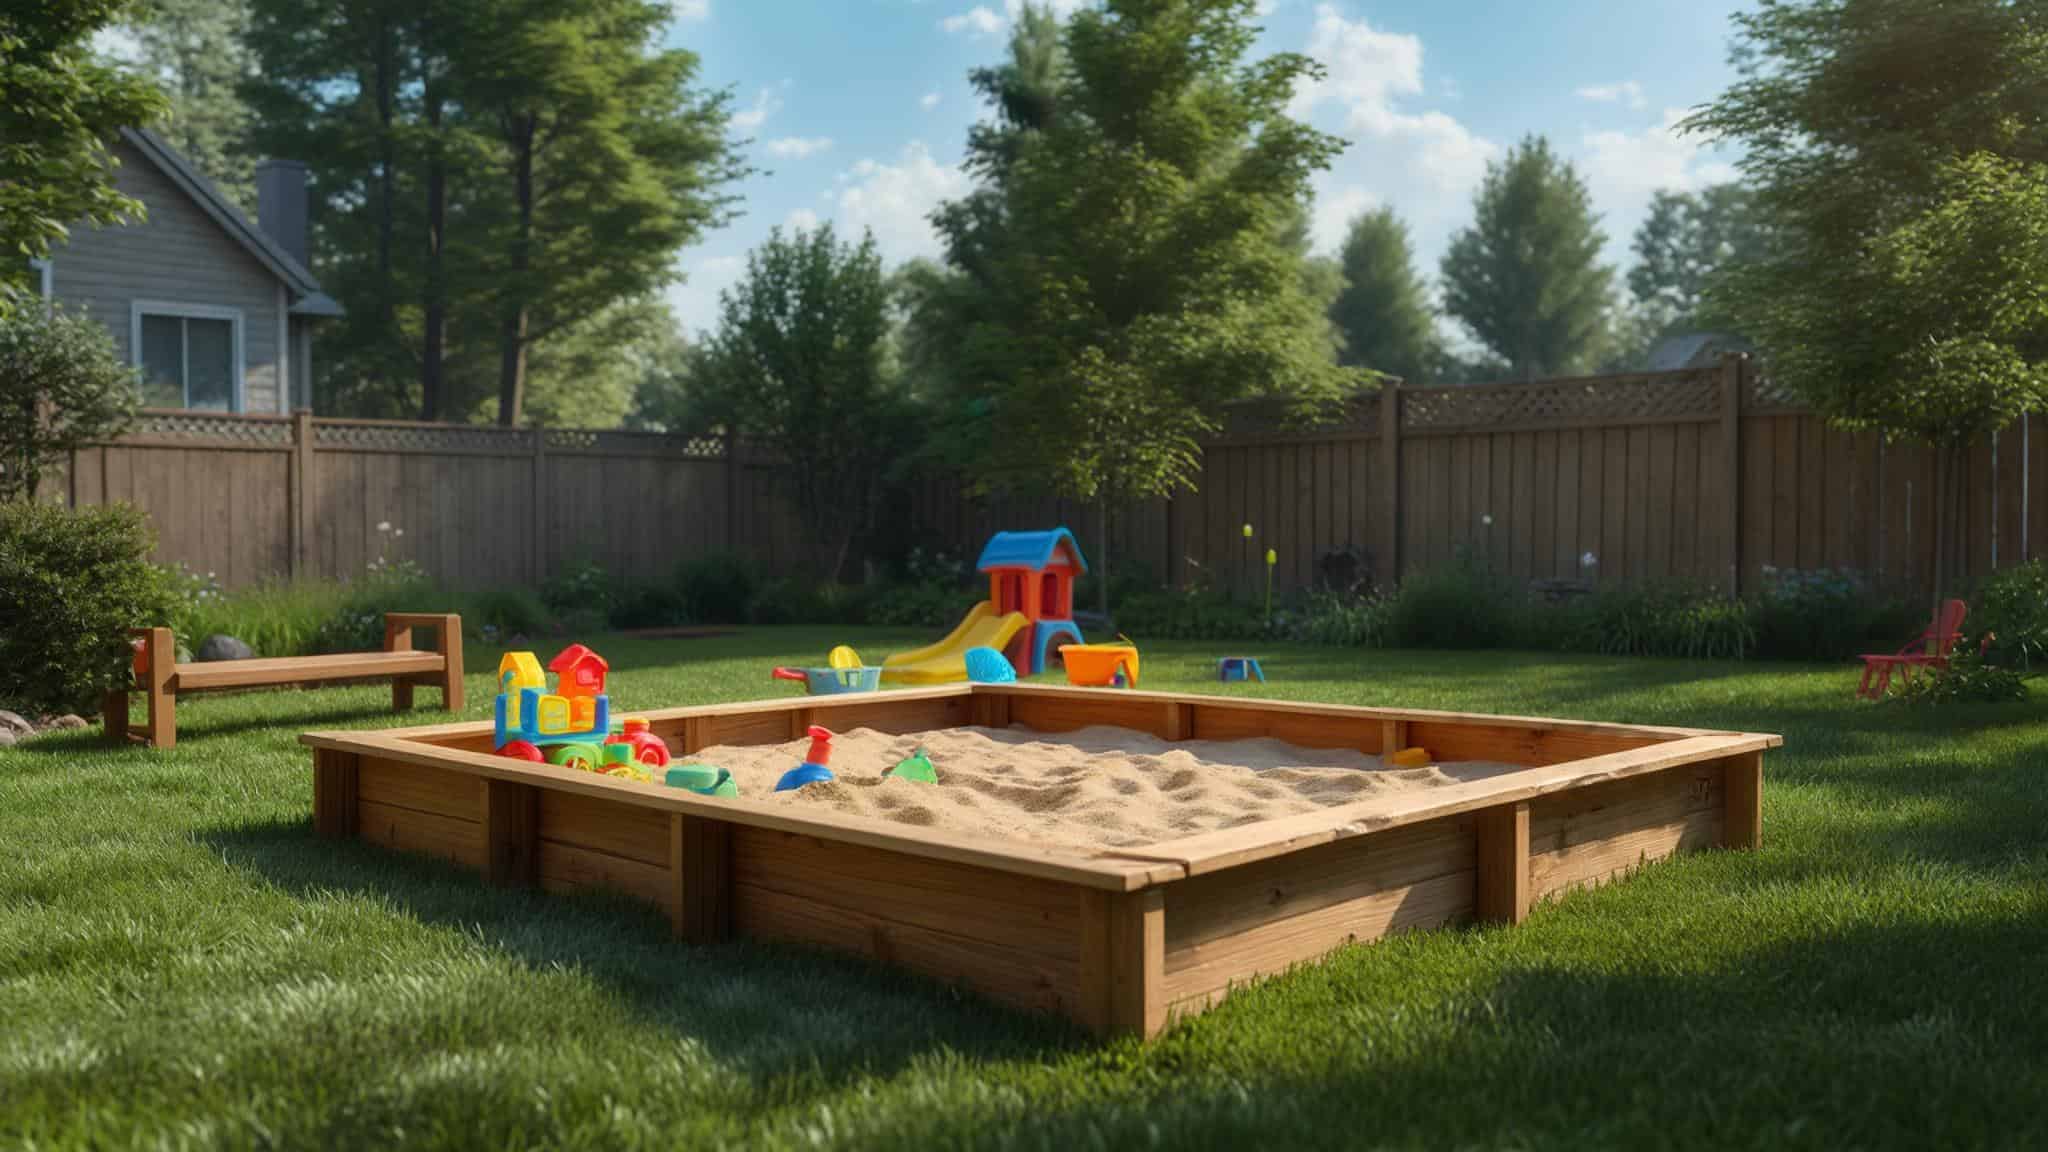
Drainage systems must accommodate both shallow toddler play and deeper excavation projects that older children prefer. The growing trend toward modular play equipment reflects broader industry innovation, as “sandboxes offer hours of imaginative fun” and can be “as simple as a wood-frame box filled with dust-free non-silica play sand, or as elaborate as a virtual beach with bench seating, a sun awning and cover” according to Family Handyman’s latest swing set accessory guide.
The 18-Month Rule for Sandbox Evolution
Research shows children’s sandbox play patterns change every 18 months as cognitive and motor skills develop. Planning for these transitions from the beginning prevents your sandbox from becoming obsolete. Design flexibility keeps the space engaging throughout different developmental stages.
Removable internal dividers create separate zones for different activities – wet sand play, dry construction areas, and tool storage sections. Corner elements should be designed for easy swapping between seating, storage, and planting functions as family priorities change. When you build a sandbox with this adaptability in mind, you’re creating a system that evolves rather than becomes outdated.
Drainage planning must support both shallow puddle play for younger children and deeper excavation zones for complex building projects. Here’s how different age ranges use sandbox space:
| Age Range | Play Pattern | Design Requirements | Modification Needs |
|---|---|---|---|
| 18-30 months | Sensory exploration, simple digging | Shallow sand (4-6 inches), smooth edges, wide access | Easy entry/exit, parent seating |
| 2.5-4 years | Construction play, tool use | Deeper zones (6-8 inches), tool storage, work surfaces | Modular dividers, equipment organization |
| 4-6 years | Complex building, water play | Variable depths, drainage features, expanded workspace | Reconfigurable sections, advanced tools |
| 6+ years | Engineering projects, group play | Deep excavation areas, structural elements, collaboration space | Expansion capability, specialized zones |
Future-Proofing Your Investment
The average family uses a sandbox for 5-7 years before children lose interest. Planning for this transition from day one ensures your materials and labor don’t become wasted resources. Smart construction techniques allow for complete repurposing into garden beds, storage solutions, or other landscape features.
Modular construction with removable fasteners allows clean disassembly without destroying materials. Carriage bolts and threaded rods create strong connections that come apart cleanly when the time comes. Material selection should prioritize options that transition well to secondary uses – cedar naturally weathers into attractive garden borders.
Documentation of your build process makes future disassembly or modification projects much simpler. I recommend taking photos at each stage, keeping cut lists, and maintaining a hardware inventory. You’ll thank yourself later when you need to make changes or completely repurpose the materials.
Material Selection Through the Waste Stream Lens
Traditional sandbox materials ignore the environmental costs of production and disposal while often creating ongoing maintenance burdens. Analyzing materials through their complete lifecycle reveals superior alternatives that reduce costs and environmental impact. This approach considers extraction, manufacturing, transportation, use, and disposal phases.
Reclaimed materials offer superior durability and character while diverting waste from landfills, but require understanding quality hierarchies. Hidden costs of cheap materials include ongoing maintenance cycles, health concerns from chemical treatments, and premature replacement needs. Waste-conscious material selection often provides better long-term value despite higher initial investment.
Reclaimed Material Hierarchy
Understanding the hierarchy helps you make informed choices that balance environmental responsibility with structural requirements. Previous use history determines durability and safety characteristics.
Salvaged playground equipment lumber offers the highest durability because it’s already proven its weather resistance and child safety in demanding conditions. Deconstructed deck materials provide good weather resistance but may require additional treatment depending on original installation environment. Shipping pallets represent the lowest durability option and often require significant treatment to remove chemical residues and improve weather resistance.
A family in Connecticut documented their reclaimed material sandbox build using deconstructed deck boards from a neighbor’s renovation. After proper cleaning and sanding, the weathered cedar provided superior character and durability compared to new lumber, while saving $120 on material costs. The existing weathering eliminated the need for staining, and the materials seamlessly integrated into their landscape design.
The Hidden Costs of “Cheap” Materials
Pressure-treated lumber and low-grade hardware create ongoing maintenance cycles that far exceed initial savings. Chemical treatments raise health concerns while poor-quality fasteners require frequent replacement. A complete cost analysis reveals these materials often cost more over the sandbox’s lifetime.
Five-year maintenance costs for pressure-treated lumber include regular re-staining, hardware replacement, and potential sand contamination cleanup. Poor drainage from low-quality construction leads to more frequent sand replacement, significantly increasing ongoing costs.
Builder cost analyses show that total project expenses can reach $479.98 including materials, hardware, sand, delivery, and cover systems for a comprehensive build, with sand costs alone ranging from $17-190 depending on quantity and delivery method. Dover Projects Cost Analysis
Integrated Landscape Functionality
The most successful DIY sandboxes serve multiple landscape functions simultaneously, maximizing space efficiency while maintaining property aesthetics. This approach prevents the sandbox from becoming a visual burden when not in active use. Strategic design integrates the structure into your overall landscape plan.
Dual-purpose infrastructure allows sandbox elements to function as landscape architecture during non-play periods. Integrated drainage systems can support adjacent plantings while managing sandbox water flow. Cover systems designed as outdoor surfaces provide additional entertaining space when sandbox isn’t being used.
Dual-Purpose Infrastructure Design
Strategic design allows your sandbox to enhance rather than detract from your landscape when not in active play use. This maintains property value while maximizing the utility of your construction investment. Multi-functional elements serve different purposes throughout the day and seasons.
Bench elements double as attractive garden borders when the sandbox is covered, creating defined planting areas. Drainage systems designed for sandbox water management can simultaneously support adjacent flower beds or vegetable gardens. Cover systems engineered as stable surfaces provide outdoor dining or entertainment space during non-play hours.
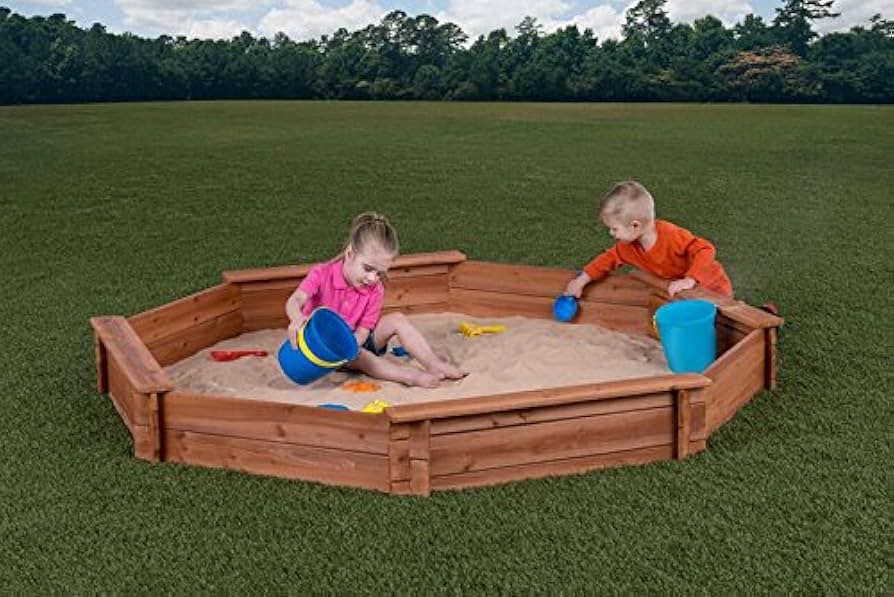
When you build a large sandbox with bench seating, you’re creating infrastructure that serves your family’s needs beyond just play time. The bench becomes a gathering spot for parents during supervision and transforms into attractive landscape architecture when covered.
Advanced Construction Methodologies: Beyond Basic Box Building
Professional playground designers use sophisticated construction techniques that address drainage, safety, and longevity issues that basic tutorials often overlook. These methods prevent the most common sandbox failures while creating structures that last decades rather than seasons. Understanding these principles elevates your DIY project to professional standards.
Hydrological engineering principles prevent water-related failures that destroy most amateur sandbox projects within two seasons. Modular construction philosophy allows for easy expansion, maintenance, and reconfiguration as family needs change.
Hydrological Engineering for Backyard Applications
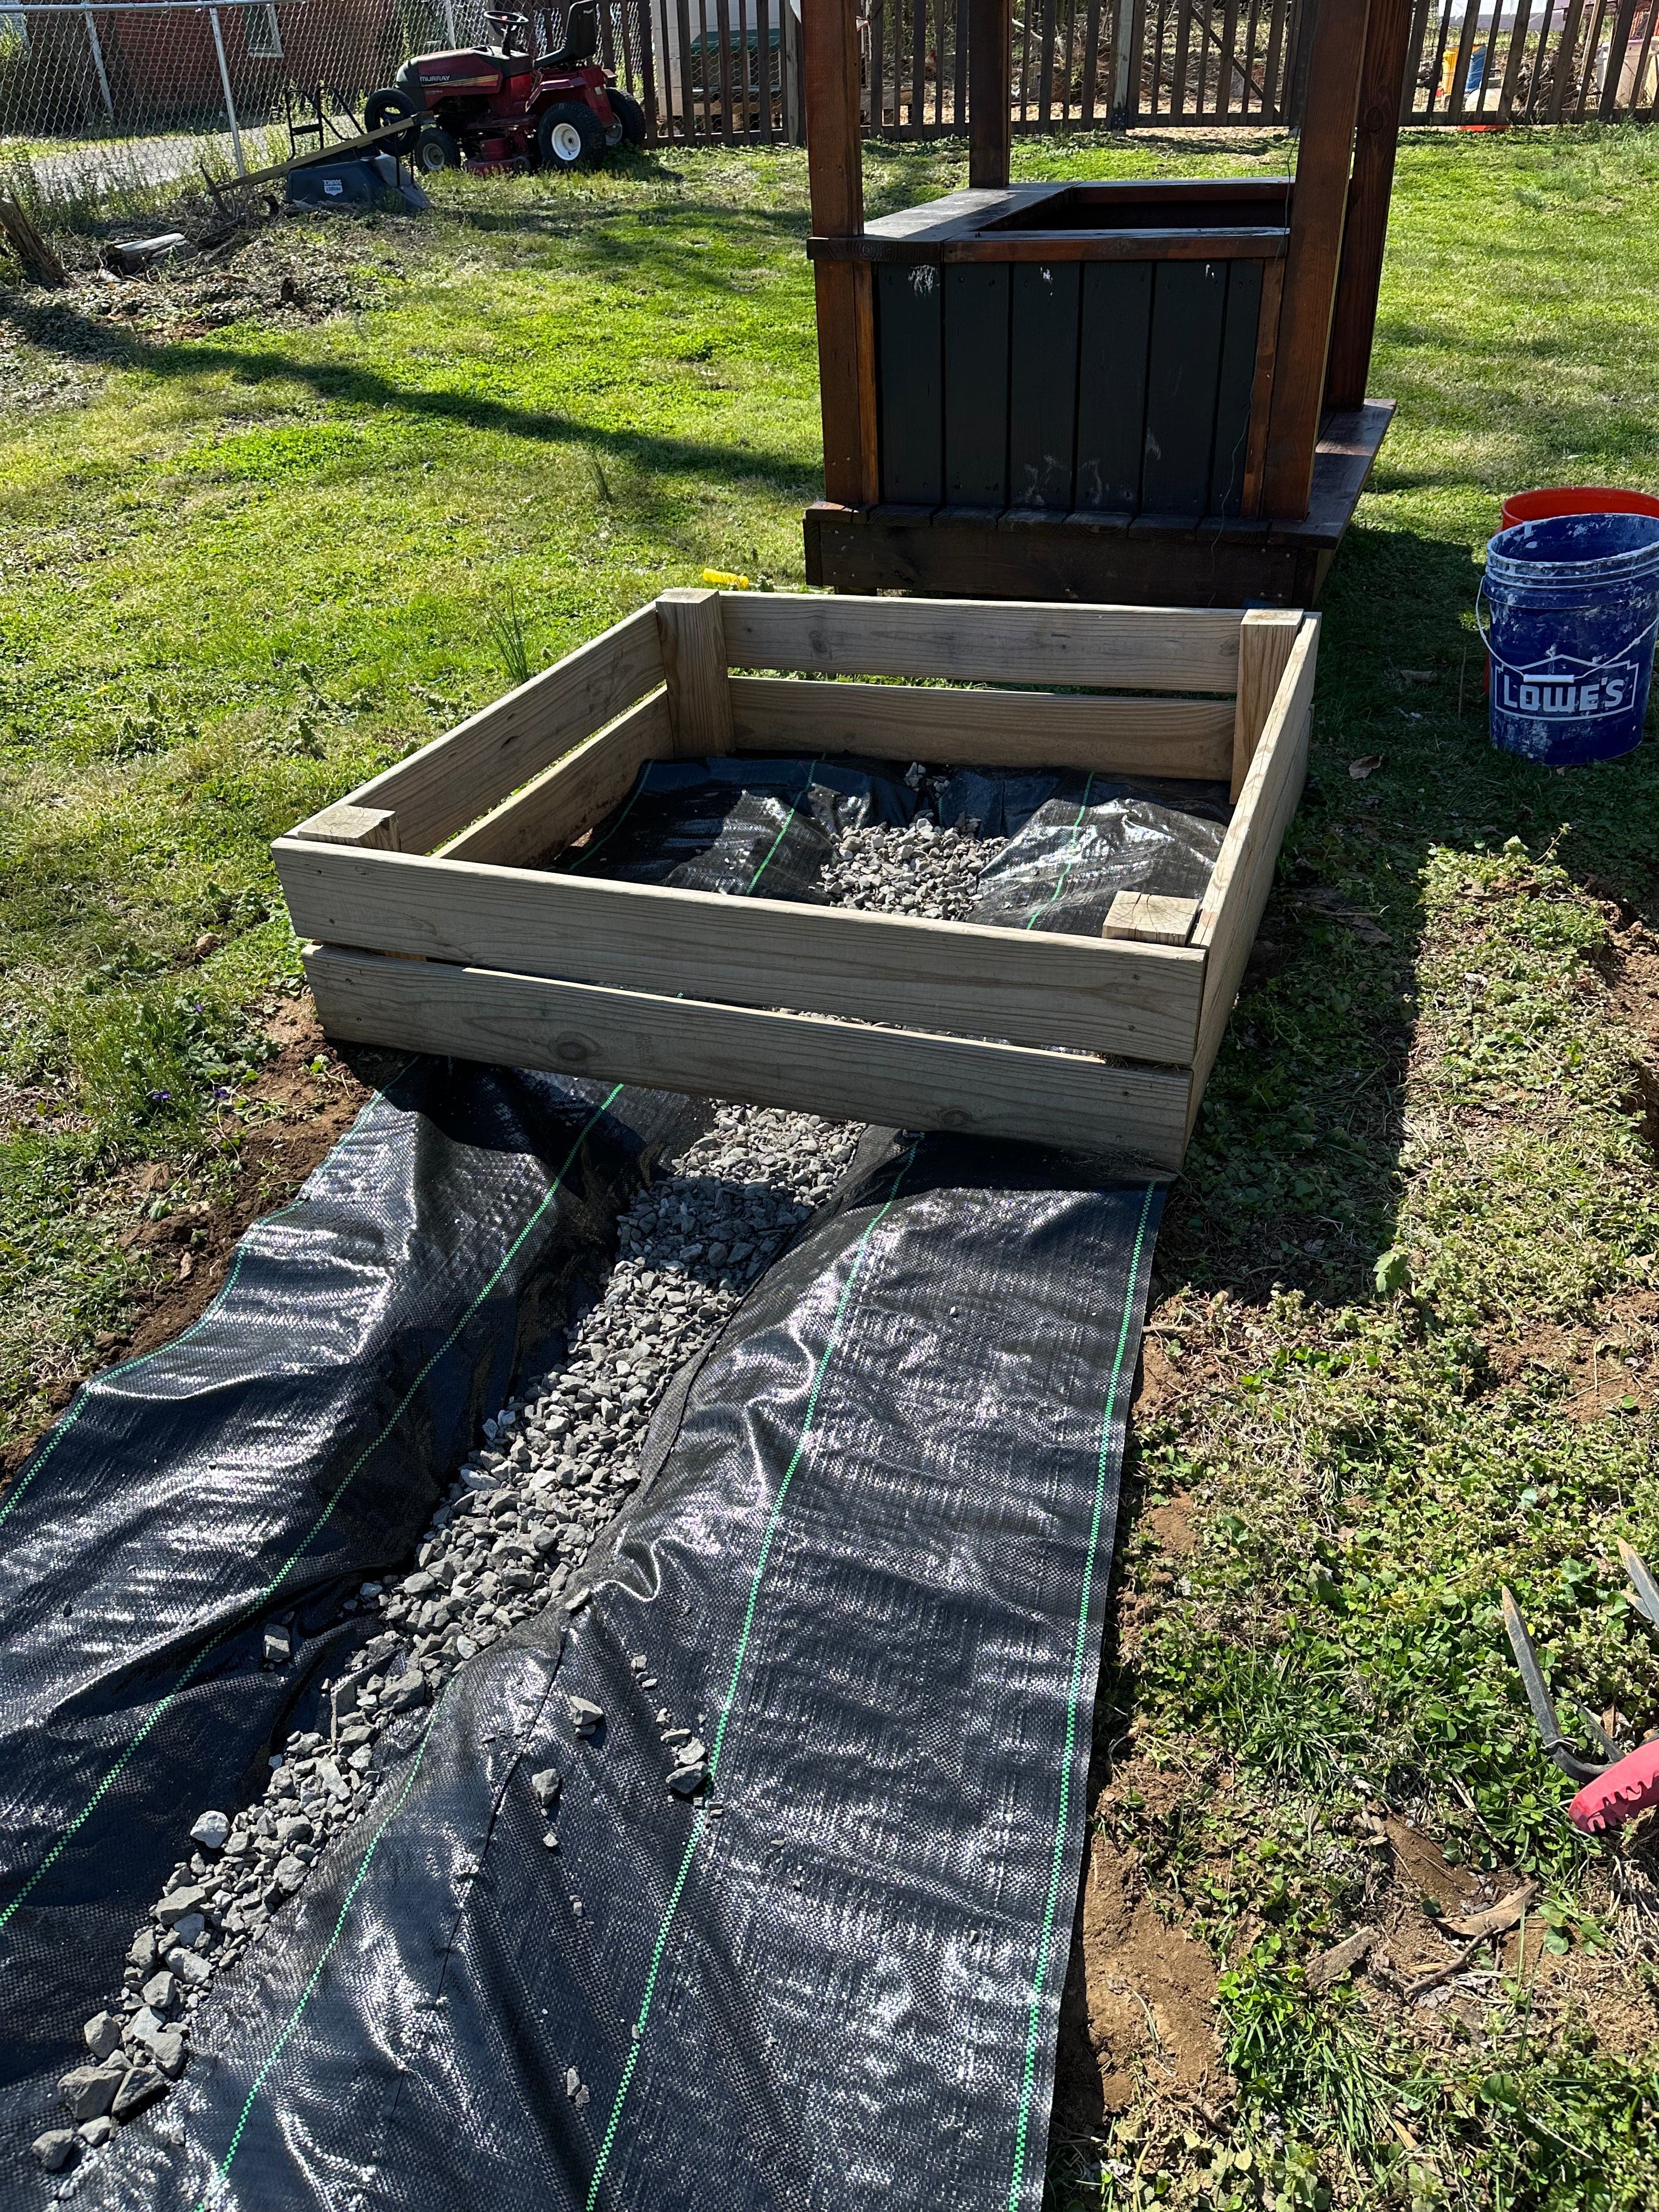
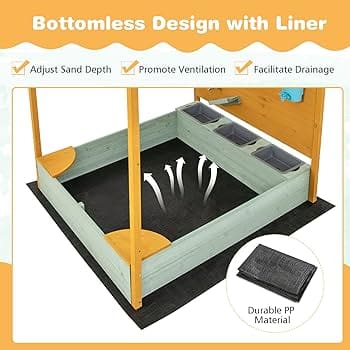
Proper water management separates successful long-term sandbox installations from projects that become maintenance nightmares. Most sandbox failures stem from inadequate drainage planning that leads to sand contamination, pest problems, and structural deterioration. Professional-grade drainage systems prevent these issues while maintaining optimal play conditions.
Subsurface drainage architecture using French drain principles prevents water accumulation that leads to mold, pest infestations, and sand degradation. Moisture management systems control humidity levels to extend sand life while maintaining ideal play conditions year-round.
Advanced drainage prevents structural damage from freeze-thaw cycles and soil movement that destroys amateur installations. When you’re learning how to build a sandbox that lasts, drainage becomes your most critical consideration.
Subsurface Drainage Architecture
Professional drainage systems prevent the water accumulation that destroys most DIY sandboxes within two seasons. Proper subsurface design manages both regular moisture and extreme weather events. This investment in drainage infrastructure pays dividends in reduced maintenance and extended sandbox life.
Excavation to 8 inches below planned sand level provides space for comprehensive drainage infrastructure including perforated pipe and gravel layers. French drain systems with 4-inch perforated pipe handle both regular moisture and storm water overflow. Layered installation creates proper filtration while preventing sand migration into drainage systems.
Here’s your drainage installation checklist:
- ☐ Excavate to minimum 8 inches below final sand level
- ☐ Install 4-inch perforated drainage pipe with 1/4″ per foot slope
- ☐ Layer 2 inches of coarse gravel around pipe
- ☐ Install landscape fabric over gravel layer
- ☐ Add 2 inches of fine gravel for sand base
- ☐ Test drainage flow before sand installation
- ☐ Document pipe locations for future maintenance
Moisture Management Systems
Controlling moisture levels prevents mold growth and extends sand life while maintaining optimal play conditions. Active moisture management systems respond to weather changes automatically. These systems prevent the damp, compacted sand conditions that make sandboxes unusable.
Adjustable ventilation gaps in corner joints provide passive air circulation that prevents moisture buildup without compromising structural integrity. Sloped bottom surfaces ensure water moves toward drainage points rather than pooling in play areas. Moisture sensors integrated with automated cover systems protect sand during unexpected weather while allowing optimal drying conditions.
Modular Construction Philosophy
Modular design principles allow for easy expansion, reconfiguration, and maintenance while accommodating changing family needs and property constraints. This approach treats your sandbox as an evolving system rather than a fixed structure. Standardized components simplify future modifications and repairs.
Expandable framework design uses standardized connections that allow growth without complete reconstruction. Component standardization reduces material waste while simplifying maintenance and modification projects.
Expandable Framework Design
Building with expansion capabilities allows your sandbox to grow with your family’s needs without starting from scratch. Standardized connections and modular components make additions seamless. This approach maximizes your initial investment while providing flexibility for future changes.
Standardized lumber dimensions ensure new additions integrate seamlessly with existing structure. Threaded rod connections at corners provide strong, removable joints that allow easy disassembly for maintenance or reconfiguration. Removable panels provide access for cleaning and maintenance while allowing seasonal modifications.
A Massachusetts family built their initial 6×6 sandbox using modular principles with standardized 2-foot lumber sections. When their third child arrived, they expanded to an 8×8 configuration in one weekend by adding two additional modules. The threaded rod corner connections allowed complete disassembly and reassembly without tool marks or structural damage, while the standardized dimensions meant no custom cutting was required for the expansion.
Component Standardization
Standardizing components throughout your build reduces material waste and simplifies future modifications or repairs. This approach creates a system where parts are interchangeable and replaceable. Consistent specifications make expansion projects much simpler.
Template systems ensure consistent cuts and reduce material waste while speeding construction. Identical hardware throughout the project simplifies maintenance and reduces inventory requirements. Detailed component inventory documentation enables easy reordering and modification planning.
Cover Systems: The Engineering Challenge Most DIYers Underestimate
Effective sandbox covers require understanding structural loads, weather resistance, and user safety that goes far beyond laying a tarp over a box. Professional-grade cover systems transform sandbox maintenance while extending usable seasons. Most DIY covers fail because builders underestimate the engineering requirements for weather loads and daily use.
Load-bearing calculations must account for snow loads, debris accumulation, and dynamic forces from children playing on covers. Multi-season functionality requires covers that serve different purposes throughout the year while maintaining structural integrity.
Building a covered sandbox or creating a DIY covered sandbox involves engineering challenges that most builders don’t anticipate. When you’re planning a DIY sandbox with cover, you’re essentially designing a small roof system that needs to handle significant loads while remaining user-friendly.
Load-Bearing Cover Engineering
Covers must support significant loads from weather, debris, and human contact while remaining easily operable by children and adults. Understanding load requirements prevents dangerous failures while ensuring long-term functionality. Proper engineering creates covers that enhance rather than complicate sandbox use.
Structural load calculations must include snow loads, debris accumulation, and dynamic loads from children climbing. Multi-season functionality requires covers that adapt to different weather conditions while maintaining safety and usability. Safety margins of 3x calculated loads prevent failure under unexpected conditions.
Recent regulatory developments highlight the importance of safety standards in play equipment design, as regulatory sandbox facilities are being implemented “on tap” to ensure proper testing and compliance across various industries, emphasizing the critical nature of safety testing in all construction projects.
Structural Load Calculations
Understanding load requirements prevents cover failure and potential safety hazards while ensuring long-term functionality. Proper calculations account for static loads (snow, debris) and dynamic loads (children playing). Regional climate factors significantly impact design requirements.
Snow load calculations vary by climate zone but typically require 20-40 pounds per square foot capacity for safe operation. Debris accumulation from leaves and branches adds significant seasonal loads that must be factored into support structure design. Dynamic loads from children climbing or playing on covers require additional safety factors beyond static load calculations.
| Climate Zone | Snow Load (psf) | Debris Load (psf) | Dynamic Load (psf) | Safety Factor | Total Design Load (psf) |
|---|---|---|---|---|---|
| Northern (Zone 6-7) | 40 | 5 | 15 | 3x | 180 |
| Central (Zone 5-6) | 25 | 5 | 15 | 3x | 135 |
| Southern (Zone 3-4) | 10 | 8 | 15 | 3x | 99 |
| Coastal | 15 | 12 | 15 | 3x | 126 |
Multi-Season Functionality
Advanced cover systems serve different functions across seasons, maximizing year-round utility of your sandbox investment. Seasonal adaptation features transform maintenance requirements while extending the useful life of your sandbox. Smart design anticipates different weather challenges throughout the year.
Summer functionality focuses on UV protection and sand temperature control to maintain comfortable play conditions. Fall and winter systems emphasize debris shedding and snow load distribution while protecting sand from contamination. Spring preparation features enable quick drying and ventilation for rapid season startup after winter storage.
Automated and Semi-Automated Systems
Simple mechanical systems dramatically improve cover usability while reducing maintenance burden on busy families. Well-designed automation makes covers accessible to children while maintaining safety standards. These systems transform daily sandbox use from a chore into a simple routine.
Counterweight assist mechanisms allow even small children to operate large covers safely and independently. Mechanical advantage systems reduce the force required to operate covers while maintaining precise control.
Counterweight Assist Mechanisms
Properly designed counterweight systems allow even small children to operate large covers safely and independently. These mechanical systems reduce operating force while maintaining precise control. Safety features prevent accidental closure while ensuring smooth operation.
Cover weight calculations including all hardware determine the counterweight requirements for balanced operation. Pulley systems with 2:1 mechanical advantage reduce operating force by half while maintaining precise control. Safety locks prevent accidental closure while allowing easy operation by authorized users.
When you’re building a covered sandbox, the counterweight system becomes crucial for daily usability. Without proper mechanical assistance, covers become too heavy for children to operate independently, defeating the purpose of encouraging self-directed play.
Integration with Home Waste Management Systems
Smart sandbox design considers how the project integrates with broader household waste management, material flow, and maintenance systems. This perspective reveals cost savings and efficiency improvements that traditional approaches miss. Integration planning reduces both construction waste and ongoing maintenance burden.
Construction waste minimization through strategic planning can reduce material waste by 30-40% while improving structural integrity. Ongoing maintenance waste streams represent the largest environmental impact of sandbox ownership over its lifetime.
Construction Waste Minimization
Professional builders achieve near-zero construction waste through careful planning and material optimization techniques that DIYers can easily adopt. Strategic cut planning reduces waste while often improving structural integrity through better grain orientation. This approach saves money while reducing environmental impact.
Cut list optimization reduces material waste by 30-40% through strategic planning and efficient lumber utilization. Material recovery planning ensures components retain maximum value for future projects or responsible disposal.
Detailed build documentation shows that strategic planning can significantly reduce project timelines, with experienced builders completing sandbox construction in “about 4 hours, start to finish” while novice builders benefit from the comprehensive planning approach to avoid the common experience of projects taking “about 3 times as long as I predict (or more).” Dover Projects Build Timeline Analysis
Cut List Optimization
Strategic cut planning reduces material waste by 30-40% while often improving structural integrity through better grain orientation. Optimization considers standard lumber lengths and grain patterns to minimize waste. This planning phase pays dividends in both cost savings and build quality.
Scale drawings with exact dimensions enable precise material calculations and waste reduction. Cross-grain joint minimization improves structural integrity while reducing material requirements. Standard lumber length utilization reduces waste while often providing better structural characteristics.
Your sandbox build benefits tremendously from this optimization approach:
- ☐ Create scale drawing with exact dimensions
- ☐ List all required pieces with dimensions
- ☐ Map cuts to standard lumber lengths (8′, 10′, 12′, 16′)
- ☐ Identify grain orientation requirements
- ☐ Plan cuts to minimize cross-grain joints
- ☐ Calculate total board feet needed
- ☐ Add 10% safety margin for errors
- ☐ Document cut sequence for efficiency
Material Recovery Planning
Planning for eventual disassembly from the beginning ensures materials retain maximum value for future projects or responsible disposal. Recovery planning treats your sandbox as a temporary installation rather than permanent fixture. This approach maximizes material value throughout the complete lifecycle.
Documentation of all materials and hardware used enables efficient disassembly and material recovery. Fastener selection prioritizes options that allow clean removal without damaging materials. Disassembly instructions created during construction simplify future material recovery projects.
Ongoing Maintenance Waste Streams
The largest environmental impact of sandbox ownership often comes from ongoing maintenance rather than initial construction. Strategic design minimizes these waste streams while reducing maintenance burden. Understanding maintenance cycles enables design decisions that reduce long-term environmental impact.
Sand management lifecycle planning extends sand life while reducing replacement frequency and disposal requirements. Maintenance waste reduction through quality construction prevents premature component replacement.
Sand Management Lifecycle
Sand replacement and disposal represents a significant ongoing cost and environmental impact that proper system design can minimize. Lifecycle management extends sand life while planning for responsible disposal. Strategic systems reduce both costs and environmental impact over the sandbox’s lifetime.
Screening systems remove debris and contaminants to extend sand life significantly beyond typical replacement cycles. Sand storage and rotation systems maintain optimal play conditions while maximizing material utilization. Local reuse opportunities for spent sandbox sand prevent landfill disposal while providing value recovery.
A New Hampshire family implemented a comprehensive sand management system using a simple screening box and rotation schedule. By screening sand monthly and rotating between active and drying areas, they extended their original sand purchase by three years beyond typical replacement cycles. When eventually replaced, the screened sand found immediate use as construction fill for a neighbor’s patio project, eliminating disposal costs while providing community value.
Specialized Build Configurations: Addressing Unique Site Challenges
Standard sandbox tutorials assume ideal conditions, but real-world installations often face slope, drainage, accessibility, or space constraints that require specialized engineering approaches. These challenging sites actually offer creative opportunities when approached with proper techniques. Understanding site-specific solutions transforms problematic locations into unique play environments.
Slope integration techniques work with natural terrain to create multi-level play experiences while solving drainage challenges. Compact space solutions maximize play value within tight urban and suburban lot constraints through creative geometry and vertical integration.
Slope Integration Techniques
Building on sloped terrain opens creative possibilities while solving common yard challenges, but requires understanding of soil mechanics and structural adaptation. Slopes provide natural drainage advantages when properly managed. These installations often become the most interesting and functional sandbox designs.
Terraced sandbox systems create distinct play zones for different activities while working with natural grade changes. Hillside anchoring methods prevent downhill migration through proper soil pressure management and structural connections. Slope advantages include natural drainage and interesting play topography when properly engineered.
When you build a sandbox on sloped terrain, you’re working with natural forces rather than fighting them. The key is understanding how to harness these advantages while preventing structural problems.
Terraced Sandbox Systems
Multi-level sandbox configurations work with natural slope while creating distinct play zones for different activities and age groups. Terracing transforms challenging terrain into functional advantages. These systems often provide more play value than flat installations while requiring less soil modification.
Grade mapping using water levels or transits enables precise terracing that minimizes soil movement while maximizing functionality. Cut-and-fill volume calculations ensure balanced earthwork that reduces material costs and site disturbance. Interlocking retaining elements provide structural stability while allowing seasonal ground movement without damage.
Hillside Anchoring Methods
Preventing downhill migration requires understanding soil pressure and implementing appropriate anchoring systems. Proper anchoring works with natural forces rather than fighting them. These systems accommodate seasonal ground movement while maintaining structural integrity.
Helical piers driven below frost line on uphill sides provide permanent anchoring that resists soil pressure and freeze-thaw movement. Deadman anchors using buried timber or concrete blocks distribute loads across larger soil areas for superior holding power. Flexible connections accommodate seasonal ground movement without structural damage while maintaining sandbox integrity.
Compact Space Solutions
Urban and suburban lots often lack space for traditional sandbox designs, requiring creative approaches that maximize play value within tight constraints. Small spaces demand efficient design that serves multiple functions simultaneously. These installations often become more interesting than larger traditional designs.
Vertical play integration combines sandbox elements with climbing structures to multiply functionality without expanding footprint. Corner and edge utilization transforms awkward yard spaces into ideal sandbox locations through creative geometry.
When you’re working with limited space, creativity becomes your greatest asset. I’ve seen amazing DIY sand box installations that pack incredible functionality into surprisingly small footprints.
Vertical Play Integration
Combining sandbox elements with vertical play structures multiplies functionality without expanding footprint. Vertical integration creates more engaging play environments while solving space constraints. These designs often provide superior play value compared to traditional horizontal layouts.
Climbing elements that double as sandbox borders provide structural support while adding play value in minimal space. Overhead storage integrated into vertical supports keeps toys accessible while freeing ground space for play activities. Fold-down work surfaces attached to vertical elements provide construction space that disappears when not needed.
Corner and Edge Utilization
Awkward yard spaces often provide ideal sandbox locations when approached with creative geometry. Corner installations take advantage of existing boundaries while creating intimate play spaces. These locations often provide better supervision sight lines and weather protection.
Triangular or trapezoidal configurations fit corner lots while providing ample play space through efficient geometry. L-shaped designs wrap around existing landscape features while maximizing available space utilization. Raised platforms over utility areas or slopes create usable space from otherwise unusable terrain.
Your sandbox plans can transform challenging spaces into functional play areas with the right approach to geometry and site utilization.
Accessibility Considerations
Universal design principles ensure sandbox enjoyment for users with varying physical abilities while often improving usability for everyone. Accessibility features benefit all users, not just those with specific needs. These considerations create more comfortable and functional play environments.
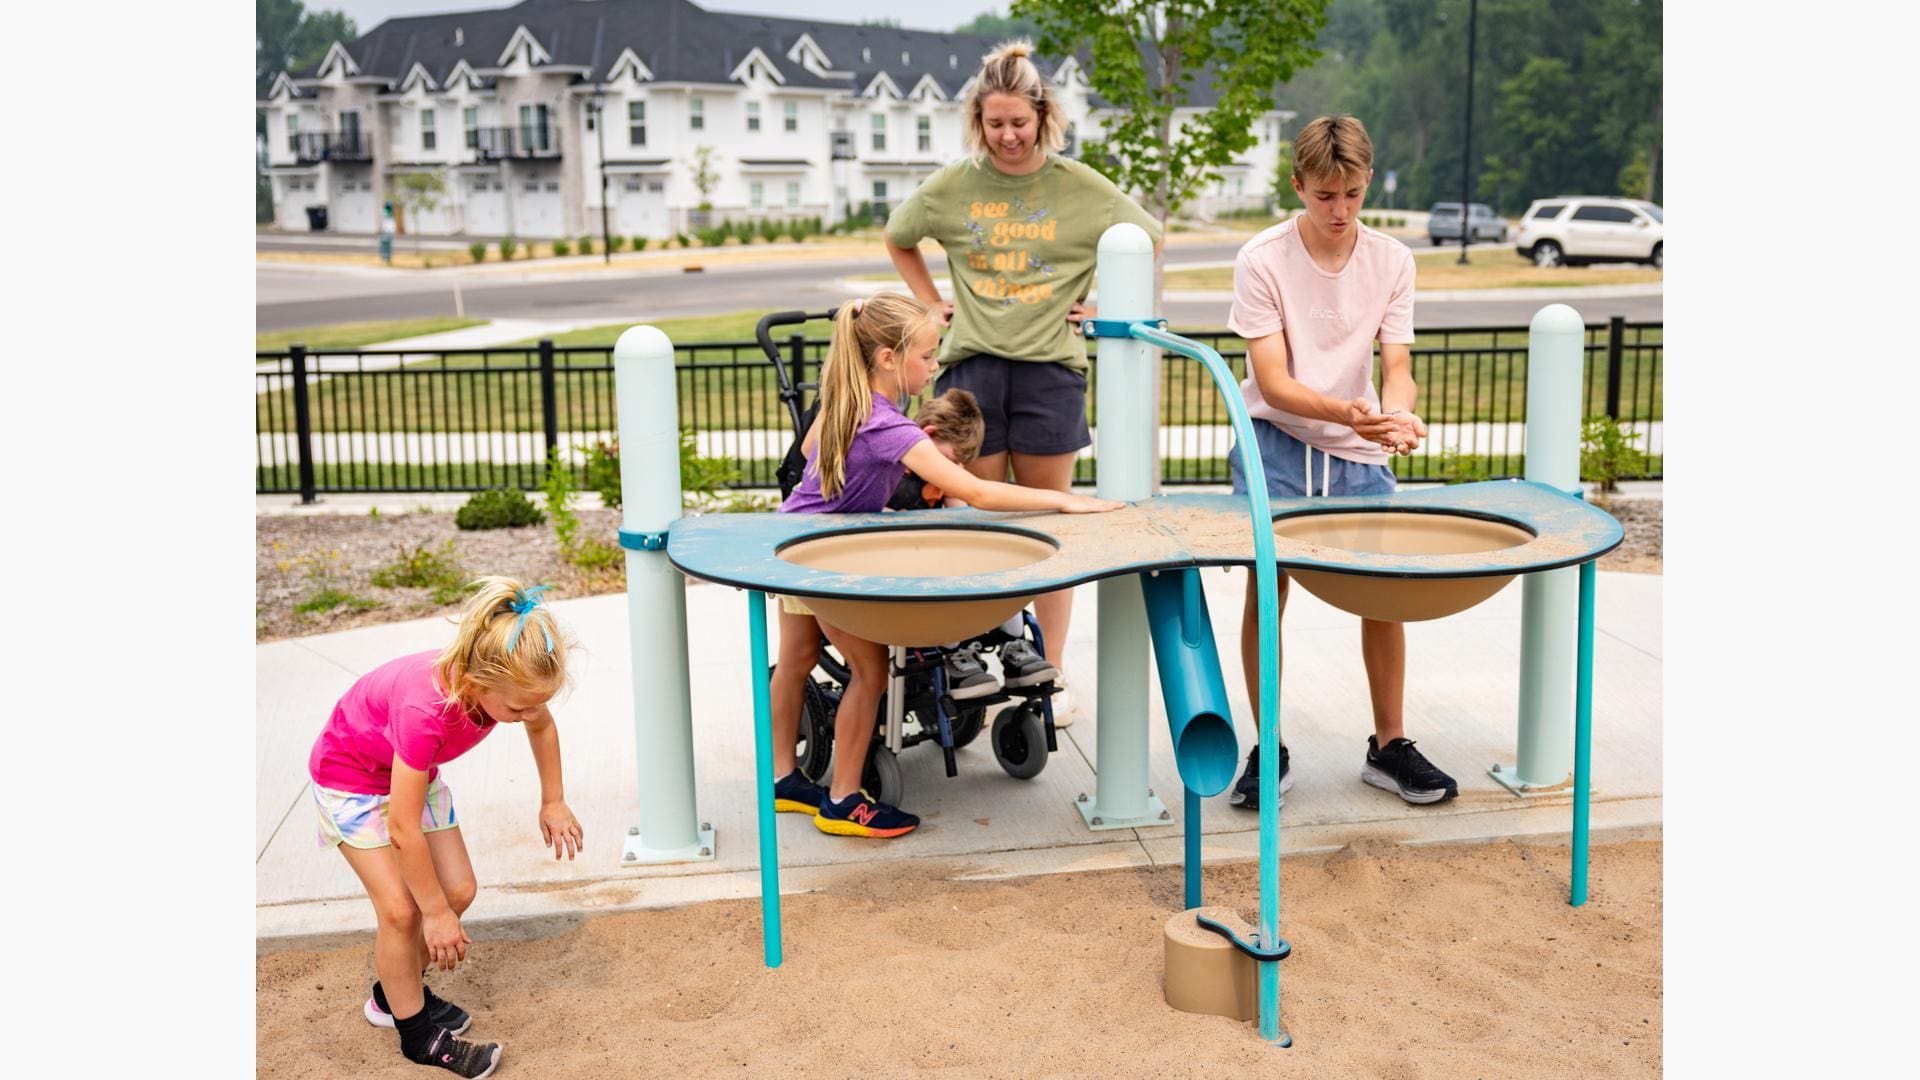
Transfer surface design enables wheelchair access while providing comfortable seating and work areas for all users. Adaptive tool storage ensures play equipment remains accessible to users with different reach and mobility capabilities.
Transfer Surface Design
Smooth transition surfaces allow wheelchair access while providing comfortable seating and work areas for all users. Transfer surfaces become favorite gathering spots for parents and children alike. These features enhance the social aspects of sandbox play.
18-inch wide ledges at 17-19 inch height provide optimal transfer dimensions while serving as comfortable seating for all users. Smooth, splinter-free finishes on all contact surfaces ensure safety and comfort for users with varying sensitivity levels. Removable sections create varied access points while allowing customization for specific user needs.
Adaptive Tool Storage
Thoughtful storage design ensures play tools remain accessible to users with different reach and mobility capabilities. Adaptive storage benefits all users through improved organization and accessibility. These systems reduce frustration while encouraging independent play.
Pull-out drawers at multiple heights accommodate different reach capabilities while improving organization for all users. Magnetic tool holders enable easy one-handed access while keeping frequently used items visible and available. Color-coded organization systems help users with different cognitive abilities while improving efficiency for everyone.
When you’re planning a DIY large sandbox with cover, accessibility considerations become even more important because the cover system needs to accommodate different user abilities.
Here’s your accessibility features checklist:
- ☐ Transfer surfaces 17-19 inches high, 18 inches wide minimum
- ☐ Multiple access points for different mobility needs
- ☐ Tool storage at varied heights (12″, 24″, 36″)
- ☐ Non-slip surfaces on all transfer areas
- ☐ Rounded corners and smooth edges throughout
- ☐ Clear sight lines for supervision
- ☐ Adequate space for mobility device maneuvering
- ☐ Weather protection for sensitive users
When your children outgrow their sandbox or you’re ready to upgrade to a new design, the removal process can feel overwhelming. Heavy lumber, hardware disposal, and site cleanup represent significant challenges that can delay your next project. Their eco-friendly approach aligns with the environmental consciousness that drives thoughtful DIY projects. Rather than sending your carefully constructed materials to landfills, Jiffy Junk sorts, recycles, and donates components whenever possible. Your sandbox lumber might find new life in another family’s project, while hardware gets properly recycled through appropriate channels.
Ready to clear space for your next outdoor adventure? Contact Jiffy Junk today for same-day removal service that transforms cleanup from a weekend project into a simple phone call.
Final Thoughts
Building a DIY sandbox that lasts requires thinking beyond basic construction to understand the complete lifecycle of your project. The most successful installations begin with careful planning that considers drainage, materials, and future adaptability. These foundational decisions determine whether your sandbox becomes a beloved family feature or a maintenance burden.
Professional techniques adapted for DIY use prevent the common failures that plague amateur builds. Proper drainage systems, modular construction methods, and engineered cover solutions create installations that serve families for years rather than seasons. The initial investment in quality planning and materials pays dividends through reduced maintenance and extended usability.
Environmental consciousness throughout the process creates projects that align with broader sustainability goals. Strategic waste reduction, material recovery planning, and integration with household systems minimize environmental impact while often reducing costs. Your sandbox project becomes part of a larger commitment to responsible resource use.
Lifecycle thinking transforms sandbox construction from a simple building project into a comprehensive system that adapts to changing family needs over 5-7 years. Professional techniques prevent the drainage, structural, and maintenance failures that destroy most amateur sandbox installations within two seasons. Environmental integration reduces waste streams while creating disposal solutions that align with sustainability goals and often provide cost savings.
When you approach how to build a sandbox with this comprehensive mindset, you’re creating more than just a play area. You’re building a system that grows with your family while respecting environmental resources. That sandbox idea transforms from a simple weekend project into a thoughtful investment in your family’s future and our shared environment.