DIY Solar Panels: The Hidden Financial Traps That Could Destroy Your Investment
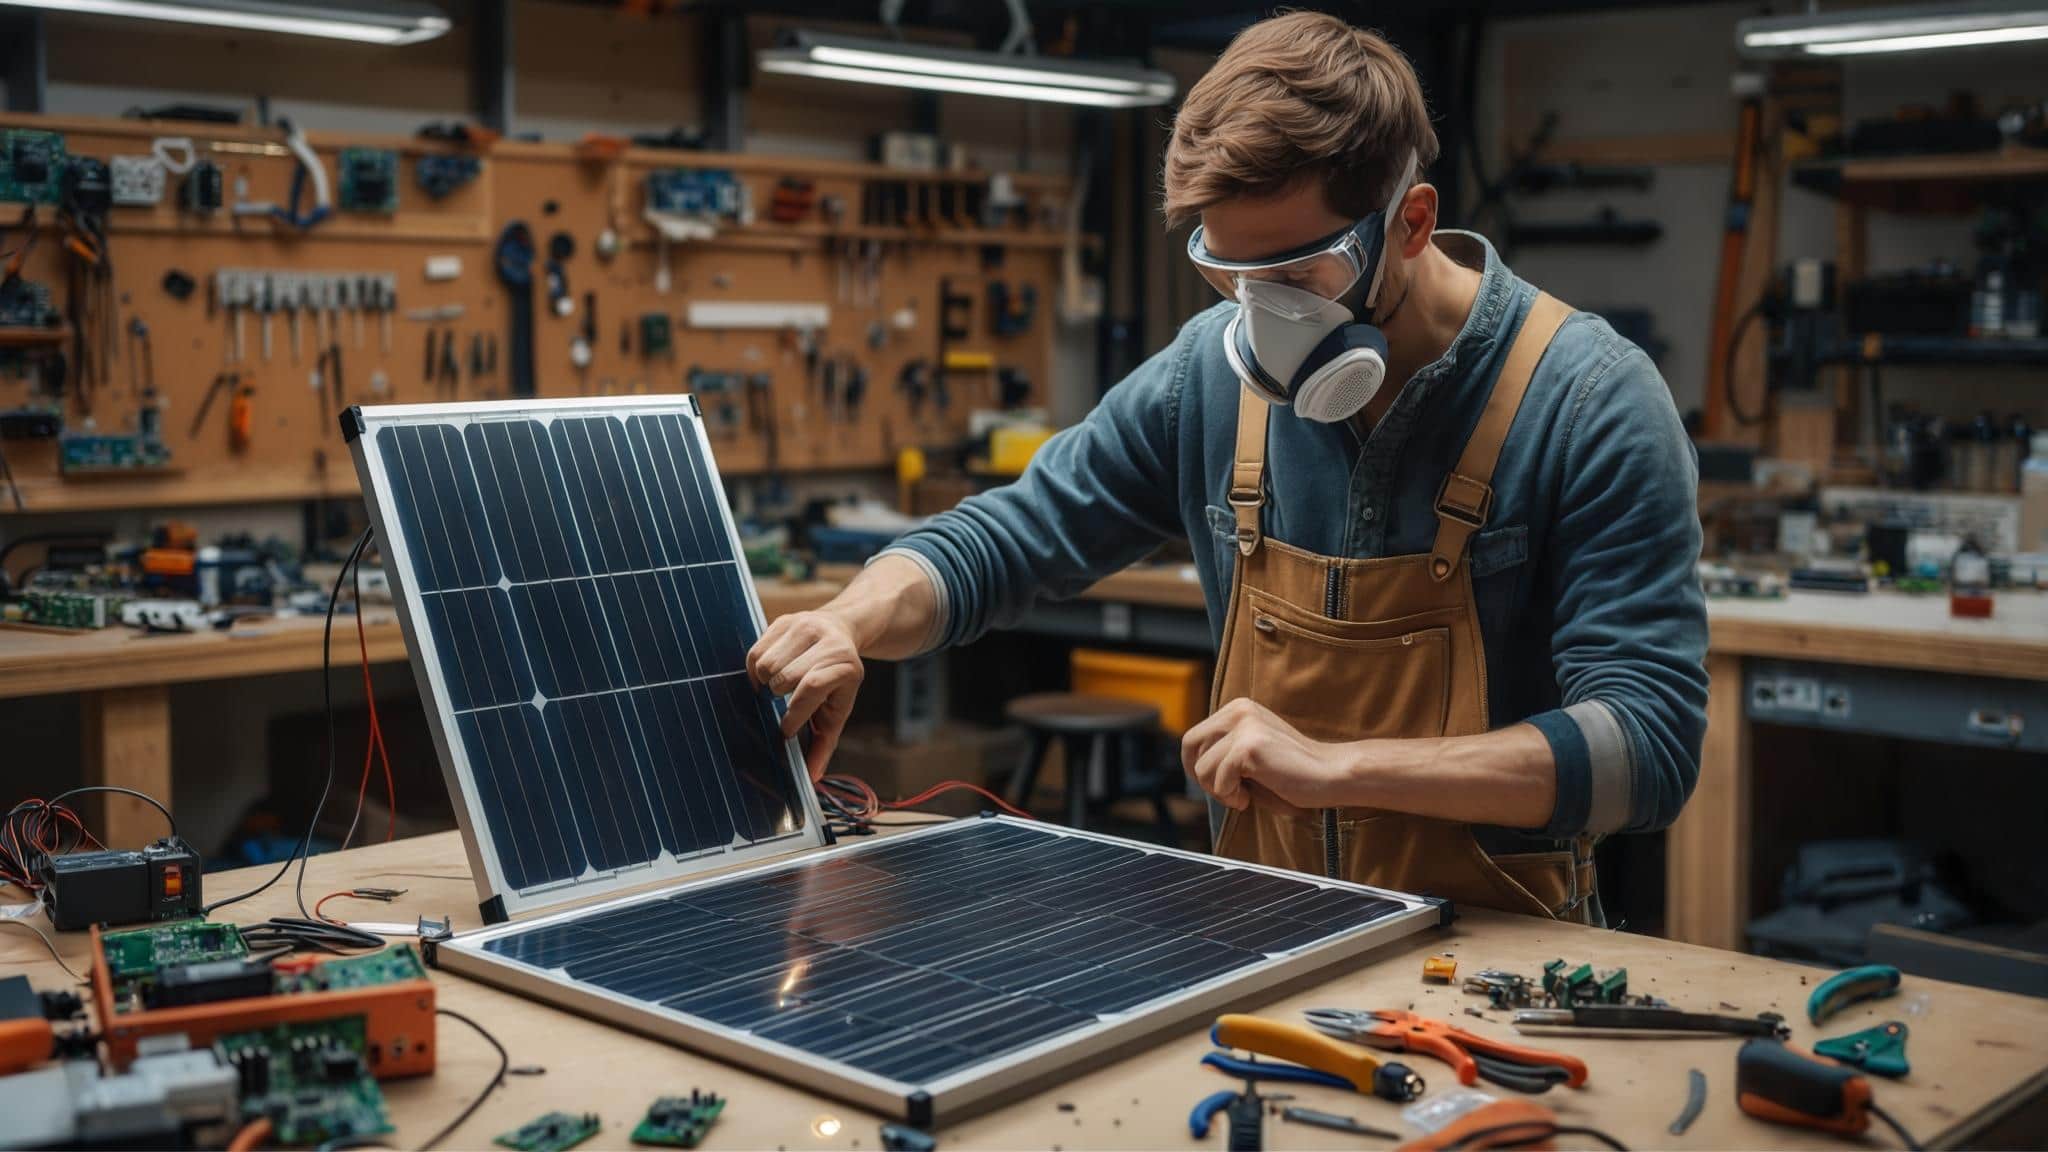
DIY solar installations might seem like an attractive way to reduce costs, but the reality is far more complex than most homeowners realize. With the average cost of an 11 kW solar panel installation reaching $20,552 after federal tax credits according to EnergySage, many homeowners are drawn to DIY approaches to cut expenses.
However, the hidden financial architecture of insurance modifications, permit cascades, and long-term maintenance cycles can make or break your investment returns if not properly planned and budgeted from the beginning. I’ve seen too many homeowners discover these costs after they’ve already committed to their DIY solar project, turning what seemed like a money-saving venture into a financial nightmare.
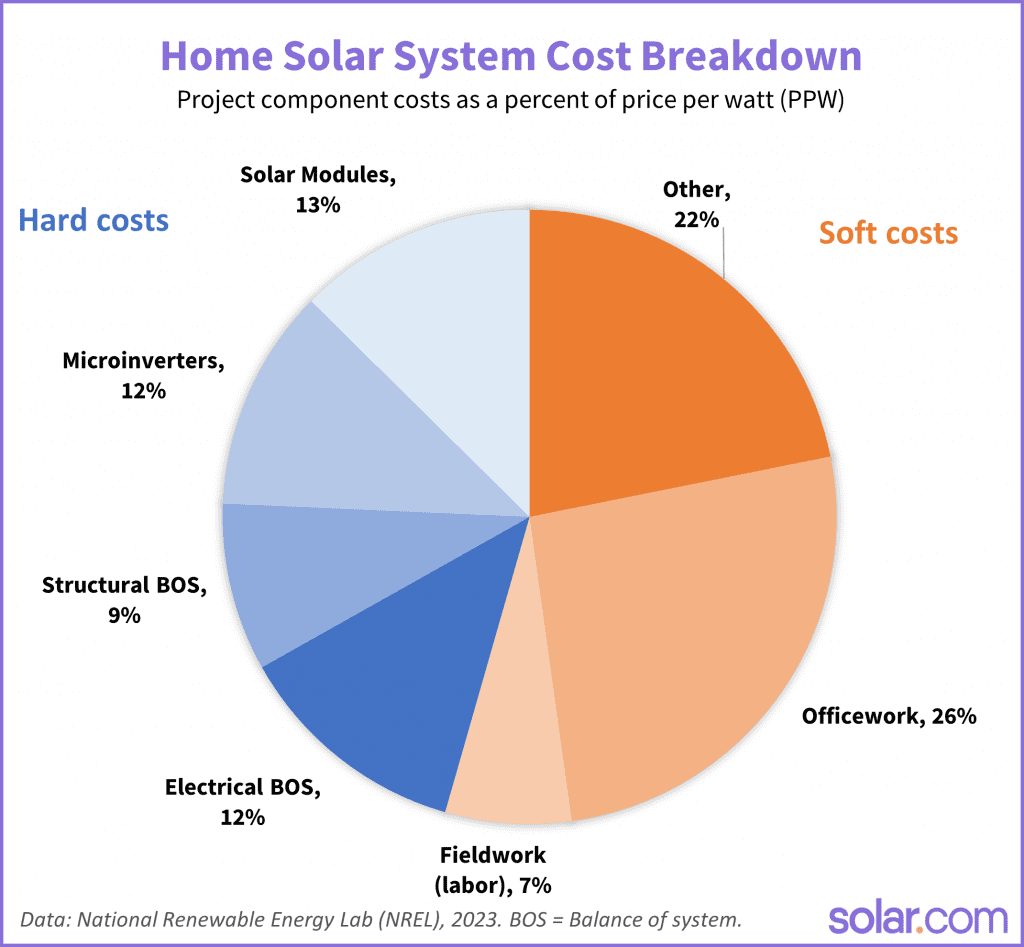
Table of Contents
-
The Lifecycle Economics of DIY Solar Investment
-
The Technical Integration Challenges of Hybrid Systems
-
The Material Sourcing and Quality Verification Underground
-
Post-Installation Optimization and Troubleshooting Mastery
-
The Regulatory Navigation and Code Compliance Labyrinth
TL;DR
-
DIY solar systems carry hidden costs beyond equipment that can increase your total investment by 30-50%, including insurance premium increases, permit cascade effects, and mandatory electrical upgrades
-
Component compatibility issues between different manufacturers can reduce system performance by 10-15% even when specifications appear identical on paper
-
Inverter replacement cycles every 10-15 years create $2,000-4,000 expenses that compound with technology evolution making older systems incompatible with newer equipment
-
Surplus and used solar panels require specialized testing equipment to verify actual performance, as visual inspection misses critical defects that can reduce output by 20-40%
-
Net metering policies are rapidly changing, with many utilities eliminating compensation for new installations while grandfathering existing systems for limited timeframes
-
Seasonal performance optimization requires active management rather than passive installation, with proper snow removal and cleaning strategies maintaining 60-80% production in challenging climates
The Lifecycle Economics of DIY Solar Investment
Understanding the complete 25-30 year financial picture of your DIY solar investment requires looking beyond upfront equipment costs to include hidden expenses, maintenance cycles, and end-of-life value recovery strategies that most homeowners discover too late in the process.
Insurance companies typically increase homeowner premiums by 15-25% when DIY solar is added, while property tax assessments may rise despite renewable energy exemptions due to improvement value clauses that aren’t clearly explained during the permit process. I’ve worked with homeowners who thought they had all their costs figured out, only to receive insurance renewal notices with significantly higher premiums months after their DIY solar installation was complete.
The complete economic model must account for inverter replacement every 10-15 years at $2,000-4,000 per cycle, plus potential incompatibility costs when newer technology can’t integrate with older panel arrays. This creates a recurring expense that many DIY solar enthusiasts don’t factor into their initial calculations, leading to unpleasant surprises down the road.

The Hidden Cost Architecture Beyond Initial Investment
Beyond panels and inverters, DIY solar systems generate invisible financial burdens through permit requirements, insurance modifications, and regulatory compliance that can make or break your return on investment if not properly planned and budgeted.
Insurance rate modifications occur because DIY installations are viewed as higher risk than professional installations, requiring written confirmation of coverage changes before equipment purchase to avoid policy cancellation. I can’t stress this enough – you need to contact your insurance company before you buy a single solar panel. Many homeowners assume their existing coverage will automatically extend to their new DIY solar panel system, only to discover their policy has been cancelled after a claim.
Permit cascade effects trigger additional inspections, electrical upgrades, and structural assessments that weren’t apparent during initial project planning, often adding $2,000-5,000 to budgets. What starts as a simple building permit application can snowball into requirements for electrical panel upgrades, structural engineering reports, and utility service modifications that nobody mentioned during your initial research.
Professional electrical work documentation becomes critical for maintaining insurance validity, as DIY electrical connections can void coverage even when the solar installation itself is permitted. According to EnergySage data, solar panels represent just 12% of the total cost of a solar panel installation, highlighting how equipment costs are only a small fraction of the total investment required for a complete system.
Insurance Rate Modifications and Property Tax Implications
Adding DIY solar triggers homeowner insurance reviews that increase premiums while property tax assessments rise through improvement value clauses, creating ongoing costs that reduce long-term savings if not factored into initial financial calculations.
Insurance providers require written confirmation of coverage changes before equipment purchase because post-installation policy modifications can result in coverage gaps or cancellation. I’ve seen homeowners lose their entire insurance coverage because they installed DIY solar without notifying their provider first. The insurance company viewed the undisclosed modification as a material change that voided their policy.
County solar property tax exemption requirements vary significantly and often include professional installation clauses that DIY systems may not qualify for. Even in states with generous solar exemptions, the fine print often excludes DIY solar installations or requires specific documentation that most homeowners don’t maintain properly.
Professional electrical work documentation must be maintained throughout the system lifetime as insurance claims can be denied for undocumented DIY electrical connections. Property tax improvement value assessments can increase annual taxes by $200-800 even in states with solar exemptions due to structural and electrical system upgrades.
|
Hidden DIY Solar Costs |
Low Range |
High Range |
Impact Timeline |
|---|---|---|---|
|
Insurance Premium Increase |
15% |
25% |
Annual |
|
Property Tax Assessment |
$200 |
$800 |
Annual |
|
Permit Cascade Effects |
$2,000 |
$5,000 |
One-time |
|
Electrical Panel Upgrade |
$1,500 |
$3,000 |
One-time |
|
Professional Electrical Documentation |
$500 |
$1,200 |
One-time |
The Permit Cascade Effect on Total Project Costs
Initial building permits often trigger mandatory additional inspections, electrical upgrades, and structural assessments that weren’t apparent during project planning, creating budget overruns that can exceed equipment costs in older homes.
Pre-permit consultations with local building departments reveal hidden requirements before equipment purchase. I always recommend scheduling a meeting with your local building department before you commit to any DIY solar system design. They’ll walk through your specific property and identify potential issues that could derail your project or explode your budget.
Structural engineer assessments become mandatory when roof age, condition, or load capacity is questioned during permit review, adding $500-1,500 to project costs. Older homes are particularly susceptible to these requirements, especially if your roof is over 15 years old or shows any signs of wear.
Electrical code compliance often requires panel upgrades, grounding system modifications, or service entrance changes that weren’t apparent during initial system design. Budget planning should include 30% contingency beyond equipment costs specifically for permit-related requirements that emerge during the approval process.
Long-term Performance Degradation and Replacement Economics
Solar panels lose efficiency at predictable rates over their 25-30 year lifespan, but the replacement economics of supporting equipment create unique financial challenges that differ significantly from commercial grid-tied installations.
Panel degradation rates of 0.5-0.8% annually are predictable, but inverter failure patterns create irregular replacement costs that don’t align with energy production decline curves. While your DIY solar panels will gradually produce less power over time, your inverter might fail suddenly after 12 years, requiring an immediate $3,000 replacement regardless of your budget or timing preferences.
Technology evolution makes older system components incompatible with newer replacements, forcing complete subsystem upgrades rather than simple component swaps. DIY systems lack the economies of scale that commercial installations use for bulk replacement scheduling, making individual component failures more expensive to address.
Inverter Replacement Cycles vs. Panel Longevity Mismatch
While solar panels operate effectively for 25-30 years, inverters require replacement every 10-15 years, creating recurring $2,000-4,000 expenses that compound when technology evolution makes older systems incompatible with newer inverter models.
Inverter lifespan mismatch creates 2-3 replacement cycles during panel lifetime, with each replacement potentially requiring additional electrical modifications as technology standards evolve. Your DIY solar investment isn’t just about the initial installation – you’re committing to ongoing equipment replacement cycles that can significantly impact your long-term savings.
Technology compatibility issues force complete inverter system upgrades rather than individual unit replacement when communication protocols or safety standards change. Replacement cost escalation occurs because newer inverters often require updated electrical infrastructure, monitoring systems, or safety equipment that wasn’t part of the original installation.
Warranty coverage gaps emerge when inverter manufacturers discontinue product lines or exit the market, leaving DIY installers without replacement options for failed units. A homeowner installed a DIY solar system in 2015 with a string inverter costing $1,800. When the inverter failed in 2025, the replacement required not only a new $3,200 inverter but also $1,400 in electrical upgrades to meet current safety codes, plus $600 for new monitoring equipment that wasn’t compatible with the original system architecture.
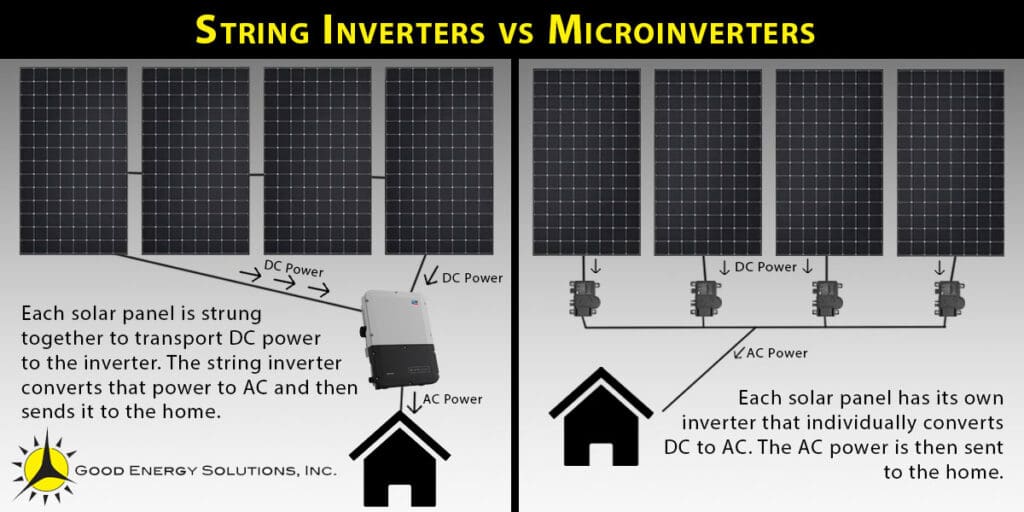
Micro-Inverter vs. String Inverter Economic Trade-offs
Micro-inverters cost 40% more upfront but reduce long-term replacement expenses through individual unit replacement capability, while string inverters offer better monitoring for DIY troubleshooting but require complete system shutdown during maintenance.
Micro-inverter systems allow individual unit replacement without affecting overall system operation, reducing labor costs and system downtime during maintenance cycles. When one micro-inverter fails in your DIY solar system, the rest of your panels keep producing power while you replace the single failed unit.
String inverter monitoring provides better system-level diagnostics for DIY troubleshooting, but single point failures can shut down entire panel arrays until repairs are completed. Replacement cost analysis must factor in labor savings from micro-inverter individual replacement against the higher upfront cost per watt of distributed inverter architecture.
Performance optimization differs between systems, with micro-inverters providing panel-level maximum power point tracking while string inverters require careful string design to minimize shading losses.
Energy Storage Integration Timeline Strategy
The timing of battery storage addition to DIY solar systems involves complex considerations around technology evolution, utility rate changes, and equipment compatibility that require strategic planning rather than reactive decision-making.
Battery-ready inverter installation during initial system construction avoids costly electrical modifications when storage is added later, even if batteries aren’t immediately installed. I recommend planning for battery integration from day one of your DIY solar system design, even if you don’t install batteries immediately.
Utility net metering policy monitoring helps time battery addition to maximize economic benefits as compensation rates decline or time-of-use rates are implemented. Technology evolution in battery chemistry and management systems requires compatibility planning to avoid stranded investments in obsolete storage technologies.
Battery Chemistry Evolution and Retrofit Compatibility
LiFePO4 batteries are becoming the standard for solar storage, but retrofitting older DIY systems requires charge controller upgrades and electrical modifications that can exceed the cost of the batteries themselves.
LiFePO4 battery integration requires charge controllers with specific voltage and current profiles that older solar installations may not support, forcing equipment upgrades. Electrical infrastructure modifications for battery integration include DC disconnect switches, monitoring systems, and safety equipment that weren’t part of original solar-only installations.
Retrofit compatibility issues arise when existing inverters lack battery charging capabilities or communication protocols needed for modern energy management systems. Installation timing strategy should consider utility rate structure changes and net metering policy evolution to optimize battery addition for maximum economic benefit.
Recent developments show the growing DIY solar market, with “IKEA now selling affordable DIY solar panel kits in Germany” from IKEA, offering balcony solar systems ranging from 449 to 2,000 euros that customers can easily assemble and install themselves, demonstrating the mainstream adoption of DIY solar solutions.
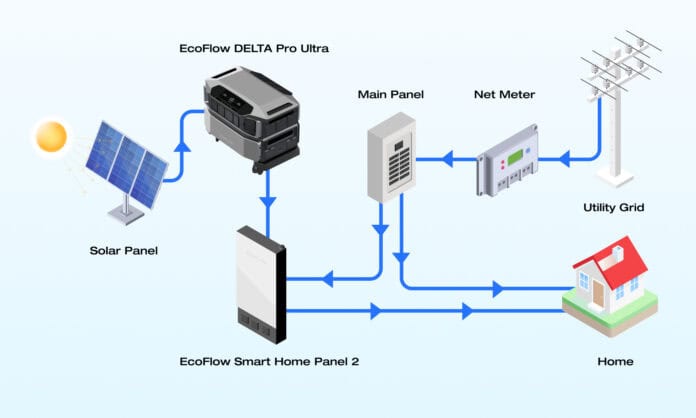
The Technical Integration Challenges of Hybrid Systems
DIY solar installations rarely operate in isolation but must integrate with existing electrical systems, backup generators, and smart home technology in ways that create unique technical challenges not addressed in standard installation guides.
Grid-tie safety protocols require specific inverter programming and testing procedures that protect utility workers during power outages, with improper implementation creating serious liability issues. I’ve seen DIY solar installations that looked perfect on paper but failed basic safety requirements because the installer didn’t understand anti-islanding protection requirements.
Multi-source power coordination between solar, batteries, and generators requires sophisticated load management to prevent equipment damage and optimize energy efficiency during various operating scenarios. Your DIY solar panel system needs to play nicely with your existing electrical infrastructure, and that coordination is more complex than most people realize.
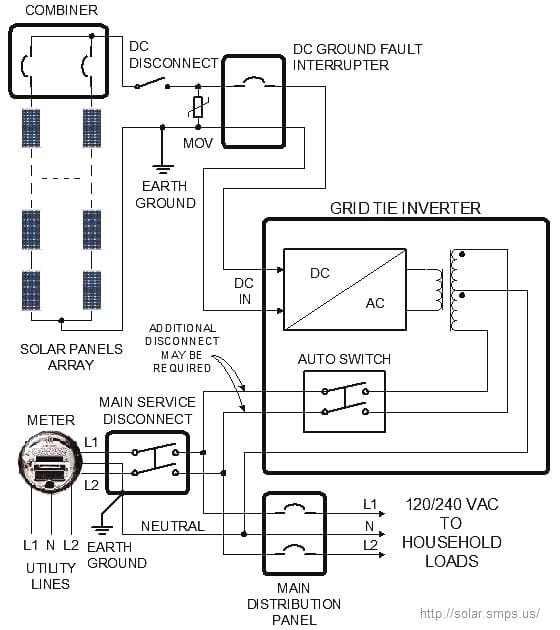
Grid-Tie Safety and Utility Interconnection Complexities
Connecting DIY solar systems to the electrical grid involves safety protocols and utility requirements that extend far beyond basic electrical knowledge, with potentially dangerous and legally problematic consequences for improper implementation.
Anti-islanding protection systems must automatically disconnect solar production during grid outages to protect utility workers, requiring specific inverter programming and quarterly testing procedures. Utility interconnection requirements vary significantly between service territories and include technical specifications that aren’t standardized across different utility companies.
Safety disconnect installation and accessibility requirements must meet both electrical code and utility standards, with improper placement creating code violations and safety hazards.
Anti-Islanding Protection and Utility Worker Safety
Solar systems must automatically disconnect during power outages to protect utility workers from unexpected energized lines, requiring specific inverter programming and testing procedures that many DIY installers overlook, potentially creating serious liability issues.
Anti-islanding functionality testing requires manufacturer-specific procedures performed quarterly to ensure proper operation during grid outage conditions. Most DIY solar installers don’t realize they’re responsible for ongoing testing and maintenance of these safety systems.
Utility interconnection agreements include liability clauses that hold system owners responsible for worker injuries caused by improper anti-islanding protection. Disconnect switch installation must meet utility accessibility requirements for emergency shutdown by utility personnel during maintenance or emergency situations.
Inverter programming verification ensures proper voltage and frequency monitoring that triggers immediate shutdown when grid parameters fall outside acceptable ranges.
Backup Generator Integration and Transfer Switch Coordination
Combining solar production with existing backup generators requires sophisticated electrical coordination to prevent equipment damage and ensure seamless power transitions during extended outages or peak demand periods.
Load management during multi-source operation prevents equipment damage by prioritizing power sources and managing electrical loads based on availability and efficiency. Transfer switch programming coordinates solar, battery, and generator operation to optimize fuel efficiency while maintaining critical load coverage during extended outages.
Communication protocol integration between solar charge controllers and generator control panels enables automated start/stop sequences based on battery levels and weather conditions.
Load Management During Multi-Source Power Scenarios
When solar, batteries, and generators operate simultaneously, load prioritization becomes critical to prevent equipment damage and optimize fuel efficiency, requiring programmable transfer switches that cost $1,500-3,000 but provide essential system coordination.
Essential load mapping separates critical circuits from whole-house power to optimize battery runtime and reduce generator fuel consumption during extended outages. Sub-panel installation creates dedicated circuits for critical loads that can operate independently from non-essential household electrical systems.
Programmable transfer switches coordinate power source priority, automatically selecting solar/battery power over generator operation when sufficient renewable energy is available. Load shedding capabilities automatically disconnect non-essential circuits when battery levels drop or generator capacity is exceeded during peak demand periods.
A real-world example comes from “California blackouts solar panels Reddit” discussion where one user’s “18,100W panels hooked up to a Pecron E3600LFP with one E3000 expansion battery” successfully powered essential loads including Starlink, a small PC, lights, and devices for 24 hours during power outages while maintaining 40% battery capacity.
Generator Auto-Start Integration with Solar Production
Smart generators can be programmed to start automatically when battery levels drop during extended cloudy periods, but integration requires compatible communication protocols between solar charge controllers and generator control panels.
Generator communication compatibility requires solar equipment with relay outputs or communication protocols that can interface with generator control systems. Battery monitoring integration triggers generator start signals based on state-of-charge levels, weather forecasts, and time-of-day programming to optimize fuel efficiency.
Time delay programming prevents unnecessary generator cycling during brief cloud cover or temporary load spikes that don’t require backup power activation. Fuel management systems coordinate generator runtime with solar production forecasts to minimize fuel consumption while maintaining adequate battery charge levels.
The Material Sourcing and Quality Verification Underground
The DIY solar component market includes legitimate surplus industrial panels alongside questionable imports with falsified certifications, requiring specialized verification skills and testing equipment to avoid costly mistakes that can compromise system performance and safety.
Surplus panel authentication requires electroluminescence testing and certification verification to identify hidden defects and ensure compliance with safety standards. I’ve seen too many DIY solar enthusiasts get burned by panels that looked perfect but had serious internal defects that only showed up months after installation.
Component compatibility verification prevents performance losses and warranty issues that arise when mixing equipment from different manufacturers with varying specifications. The do it yourself solar market is flooded with components that appear compatible on paper but create real-world integration problems.
Surplus Panel Authentication and Performance Verification
Used and surplus solar panels can provide significant cost savings, but verifying their actual performance, remaining warranty coverage, and safety compliance requires specialized knowledge and testing equipment that most DIY installers don’t possess.
Electroluminescence testing reveals hidden panel defects that visual inspection cannot detect, including micro-cracks and cell degradation that can reduce performance by 20-40%. Certification verification through testing laboratories confirms legitimate safety compliance, as counterfeit certifications are common in discount solar equipment markets.
Performance documentation and test results become essential for warranty claims and insurance coverage, requiring systematic testing before installation rather than after problems emerge.
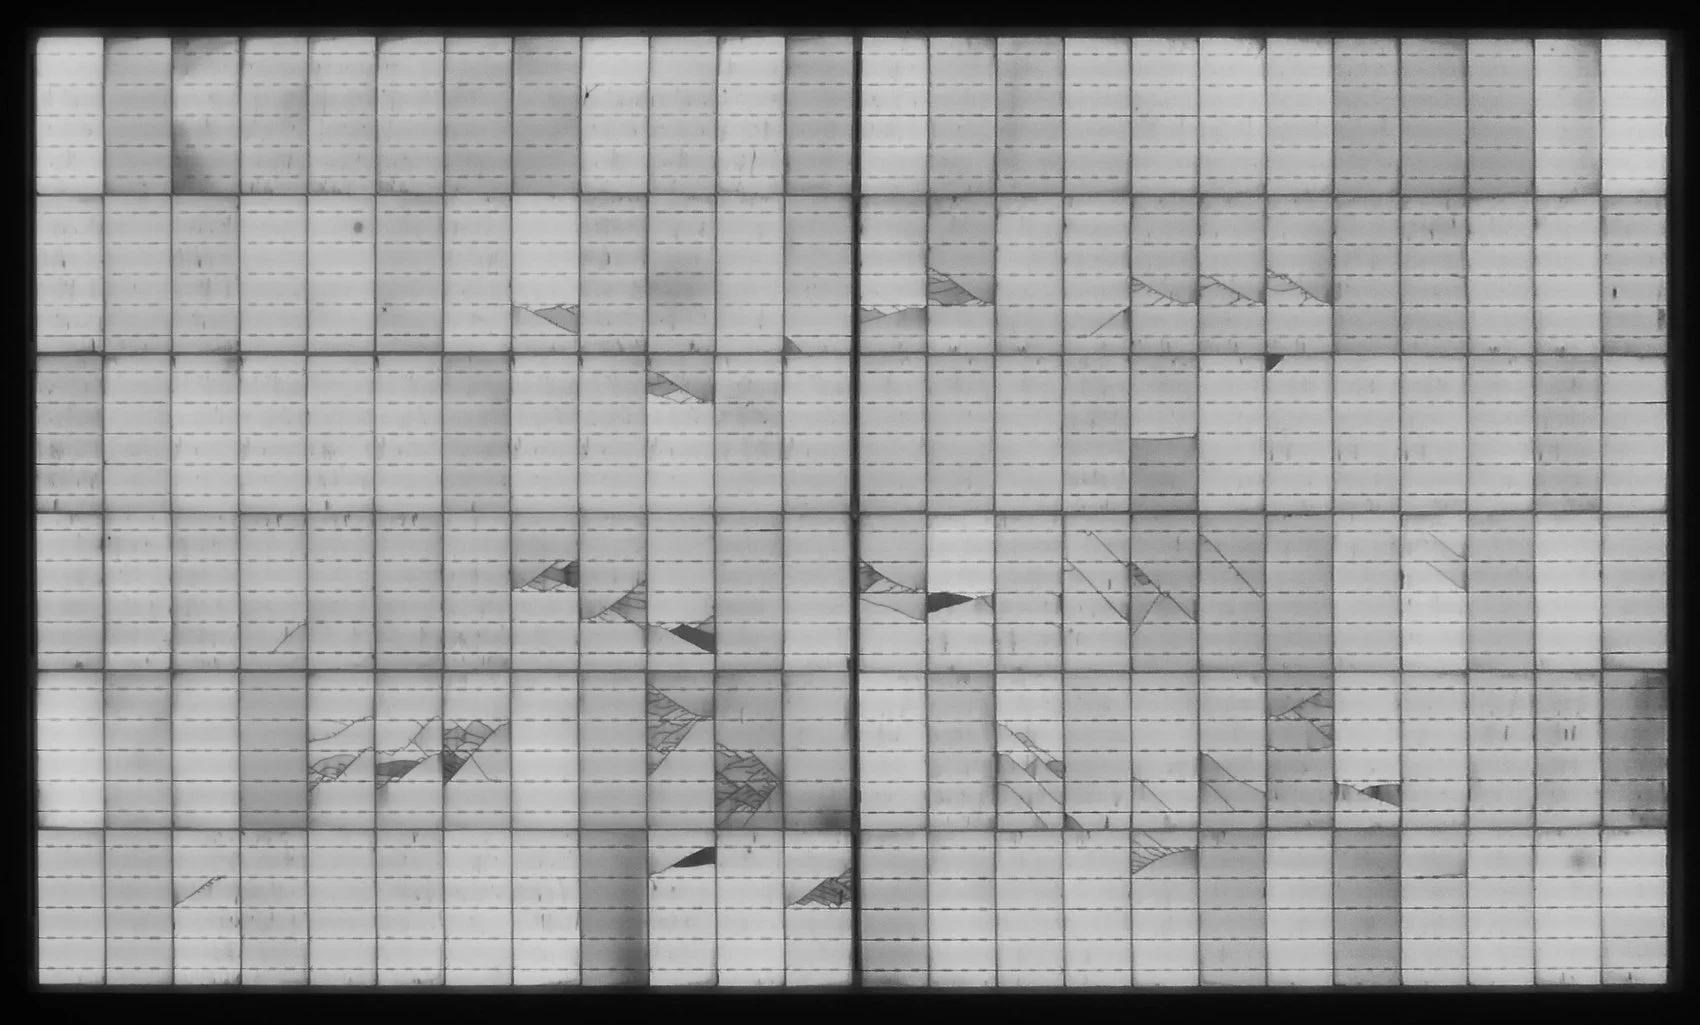
Electroluminescence Testing for Hidden Panel Defects
Visual inspection fails to identify critical defects such as micro-cracks and cell degradation that only appear under electroluminescence imaging, which can reveal panels with 20-40% performance loss despite appearing perfect to the naked eye.
EL testing equipment investment of $200-500 pays for itself by identifying defective panels before installation, avoiding costly removal and replacement after mounting. Micro-crack detection through EL imaging reveals stress damage that will worsen over time, causing progressive performance degradation and potential safety hazards.
Cell degradation patterns visible under EL testing indicate manufacturing defects or previous damage that may not be covered under warranty claims. Documentation of EL test results provides evidence for warranty claims and insurance coverage, establishing baseline performance for future comparison.
Certification Verification and Import Compliance
Counterfeit UL and IEC certifications are widespread in discount solar equipment markets, and installing non-certified equipment can void insurance coverage while creating code compliance issues during home sales or inspections.
Direct verification with testing laboratories confirms legitimate certifications, as seller documentation can be easily falsified or misrepresented. Manufacturer reputation research includes US distributor networks and service support availability, which affects long-term warranty coverage and technical support.
Certification documentation retention becomes critical for future inspections, insurance claims, and home sale requirements that may occur years after installation. Import compliance verification ensures equipment meets current safety standards and isn’t subject to recall or regulatory action that could affect system operation.
Industry data shows significant price variations in solar panels, with budget options available for $0.40 per watt compared to premium panels at over $1.00 per watt, according to DIY Solar Forum discussions, where users report that higher-priced panels typically guarantee 85-90% output after 25 years versus 80% for budget options after 20 years.
Component Compatibility Matrix and System Integration
Mixing components from different manufacturers creates compatibility challenges that reduce system performance, complicate troubleshooting procedures, and void warranties in unexpected ways that aren’t apparent during initial system design.
Voltage and current matching across mixed component systems prevents performance losses that occur when slight manufacturer variations create imbalanced string operation. Communication protocol compatibility ensures monitoring system functionality across all components, avoiding blind spots in system performance tracking.
Warranty coordination between multiple manufacturers becomes complex when component interactions cause failures that may not be covered under individual product warranties.
Voltage and Current Matching Across Mixed Component Systems
Different panel manufacturers have slight voltage and current variations that create imbalanced string performance, reducing overall system output by 10-15% even when panels have identical nameplate ratings and specifications.
Electrical specification documentation for all components enables string sizing calculations that account for temperature coefficients and manufacturing tolerances. String sizing calculators verify compatibility across operating temperature ranges, ensuring optimal performance during seasonal temperature variations.
Identical panel grouping within strings maximizes performance by eliminating current limiting effects that occur when panels with different characteristics are connected in series. Performance monitoring at the string level identifies imbalanced operation that may indicate compatibility issues or individual panel failures within mixed component systems.
|
Component Compatibility Factor |
Impact on Performance |
Detection Method |
Mitigation Strategy |
|---|---|---|---|
|
Voltage Mismatch |
5-10% loss |
String monitoring |
Group identical panels |
|
Current Imbalance |
10-15% loss |
Individual panel testing |
Match specifications |
|
Temperature Coefficients |
3-8% seasonal loss |
Temperature analysis |
Calculate for worst case |
|
Communication Protocols |
Monitoring blind spots |
System testing |
Use compatible equipment |
|
Warranty Conflicts |
Coverage gaps |
Documentation review |
Single-source critical components |
Communication Protocol Compatibility for Monitoring
Solar monitoring systems use different communication protocols including Modbus, CAN bus, and proprietary wireless systems, and mixing incompatible components can eliminate visibility into system performance issues and troubleshooting capabilities.
Standardized communication protocol selection enables comprehensive system monitoring across all components, avoiding gaps in performance data collection. Monitoring architecture planning before component purchase ensures compatibility and prevents costly retrofitting of communication systems after installation.
Component communication testing before final installation verifies data collection and control capabilities across the entire system architecture. Protocol conversion equipment may be required when mixing components with different communication standards, adding cost and complexity to monitoring systems.
Post-Installation Optimization and Troubleshooting Mastery
The real DIY solar learning curve begins after installation when seasonal performance variations, equipment interactions, and maintenance requirements reveal the difference between a functioning system and an optimized high-performance installation.
Seasonal performance optimization requires active management strategies for snow removal, cleaning schedules, and environmental adaptation rather than passive installation approaches. Advanced troubleshooting capabilities using thermal imaging and performance analysis tools enable early problem detection and resolution before minor issues become major failures.
Seasonal Performance Tuning and Environmental Adaptation
Solar system performance varies dramatically with seasons, weather patterns, and environmental changes in ways that require active management and adaptation strategies rather than set-and-forget installation approaches.
Snow load management through proper panel angle selection and heating element integration maintains 60-80% winter production in heavy snow climates. Dust and debris mitigation strategies based on performance monitoring data optimize cleaning schedules and methods to maximize energy production while protecting panel longevity.
Environmental adaptation includes hydrophobic coatings and automated cleaning systems that reduce maintenance requirements while improving self-cleaning capabilities. A homeowner in Minnesota found their DIY solar system’s winter output dropped to 15% of summer production due to persistent snow cover. After installing heating cables on critical panels and adjusting the array angle from 30° to 65°, they maintained 75% winter production while reducing manual snow removal by 80%.
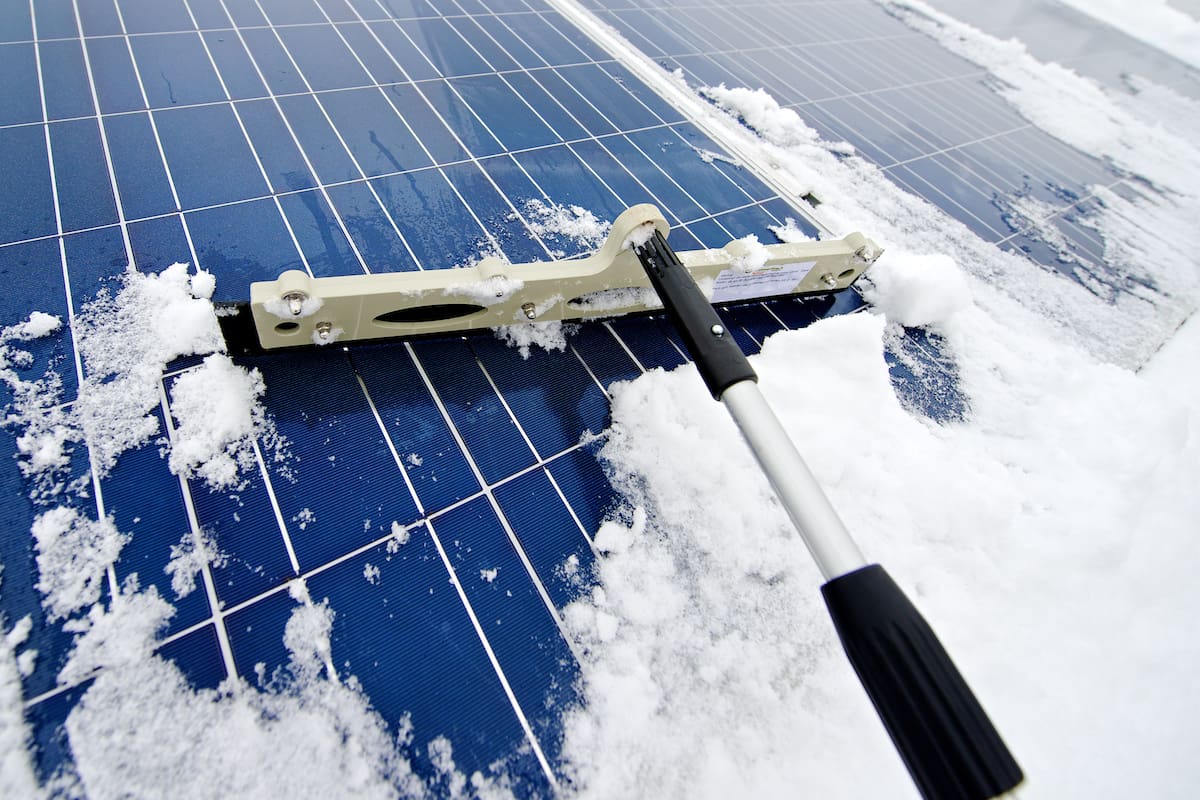
Snow Load Management and Winter Performance Optimization
Snow accumulation can reduce system output to zero for extended periods, but proper panel angle adjustment, heating element integration, and safe snow removal strategies can maintain 60-80% winter production even in heavy snow climates.
Steep panel angle installation at 60+ degrees promotes natural snow shedding in heavy snow regions, reducing manual removal requirements and maintaining winter production. Heating element integration for critical panels provides targeted snow melting capability during persistent snow cover periods when natural shedding is insufficient.
Safe snow removal procedures protect panels and warranties while maintaining access for maintenance, requiring specialized tools and techniques that don’t damage panel surfaces. Winter performance monitoring identifies patterns in snow accumulation and melting that inform optimization strategies for panel placement and heating system operation.
Dust, Pollen, and Debris Impact Mitigation
Dust accumulation reduces panel output by 15-25% annually in most climates, but cleaning frequency and methods significantly impact both performance recovery and long-term panel durability and warranty coverage.
Performance monitoring data determines optimal cleaning schedules based on actual output loss rather than arbitrary time intervals, maximizing efficiency while minimizing maintenance costs. Water-fed cleaning systems enable safe ground-level panel maintenance without roof access, reducing safety risks and enabling more frequent cleaning cycles.
Hydrophobic coating application reduces cleaning frequency requirements and improves natural self-cleaning during rain events, lowering long-term maintenance costs. Cleaning method selection affects panel warranty coverage, as improper cleaning techniques or harsh chemicals can void manufacturer warranties and damage panel surfaces.
Advanced Troubleshooting and Performance Analysis
DIY solar systems require ongoing diagnostic skills and specialized equipment to identify and resolve performance issues that can significantly impact energy production and equipment lifespan if not detected and addressed promptly.
String performance analysis and thermal imaging enable early detection of individual panel failures and hot spots that can create fire hazards if left unaddressed. Systematic inspection routines using diagnostic equipment identify developing problems before they cause significant performance losses or safety hazards.
Performance data analysis reveals patterns in system operation that indicate equipment degradation, environmental impacts, or installation issues requiring attention.
String Performance Analysis and Hot Spot Detection
Individual panel failures within strings can be difficult to identify without proper diagnostic tools, and hot spots can create fire hazards that develop gradually over months or years before becoming apparent through visual inspection.
Thermal imaging equipment investment enables identification of hot spots and failing panels before they create safety hazards or cause cascading failures in string performance. Individual string monitoring isolates problems quickly by comparing performance across different panel groups, enabling targeted troubleshooting rather than system-wide diagnostics.
Systematic inspection routines using thermal and electrical testing identify developing problems during early stages when repairs are less expensive and disruptive. Hot spot documentation provides evidence for warranty claims and insurance coverage while establishing patterns that may indicate installation or environmental issues requiring correction.
According to SolarReviews industry survey data, 52% of solar installers report that monitoring, communication, and internet connection problems are the most common issues with solar installations, while 36% cite inverter hardware and software problems as primary concerns.
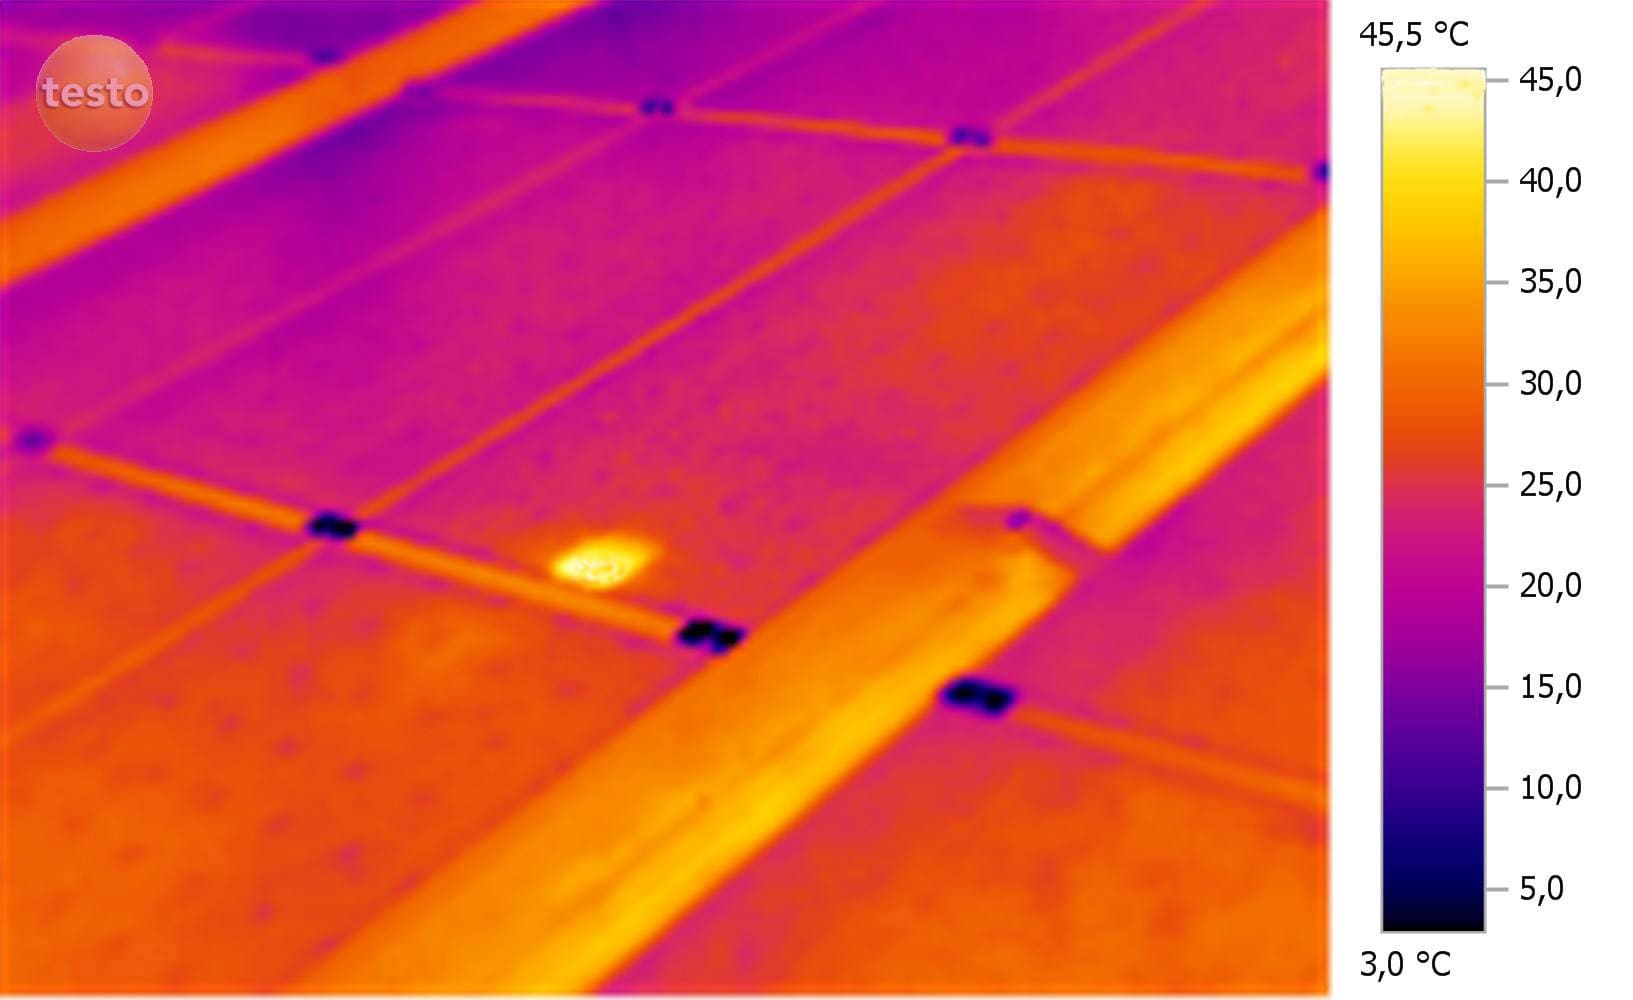
A DIY installer discovered through thermal imaging that three panels in a 20-panel array were running 40°F hotter than others, indicating micro-cracks that weren’t visible during installation. Early detection allowed warranty replacement before the hot spots caused string failures that would have reduced system output by 30% and created potential fire hazards.
As you navigate the complexities of DIY solar installation, you’ll generate substantial waste from packaging materials, old electrical equipment, and replaced components. Jiffy Junk’s eco-friendly disposal services align perfectly with your environmental goals, ensuring your renewable energy project doesn’t create unnecessary waste burdens. When you’re ready to clear installation debris or replace aging equipment, our professional removal services handle the heavy lifting while maintaining the same environmental responsibility that drives your solar investment.
The Regulatory Navigation and Code Compliance Labyrinth
DIY solar installations operate within rapidly evolving regulations, local codes, and utility requirements that change faster than installation guides can track, creating compliance gaps that can result in system shutdowns, financial penalties, or forced reinstallation.
Municipal code evolution requires understanding grandfathering provisions that protect existing investments while new installations must meet increasingly expensive current standards. Utility interconnection policy shifts toward reduced net metering compensation and time-of-use rates fundamentally change the economic calculations for DIY solar installations.
Municipal Code Evolution and Grandfathering Protections
Solar codes change annually at local levels, and understanding grandfathering provisions protects your investment from forced upgrades while new installations must meet current standards that may be significantly more expensive than previous requirements.
Setback requirement changes by fire departments can force existing installations to reduce array size by 20-30% during permit renewals unless grandfathering protection is properly documented. Electrical code updates mandate new safety equipment that wasn’t required in older installations, creating retrofit costs that can be avoided through proactive compliance planning.
Installation timing and documentation strategies establish grandfathering eligibility that protects against future code changes and forced equipment upgrades.
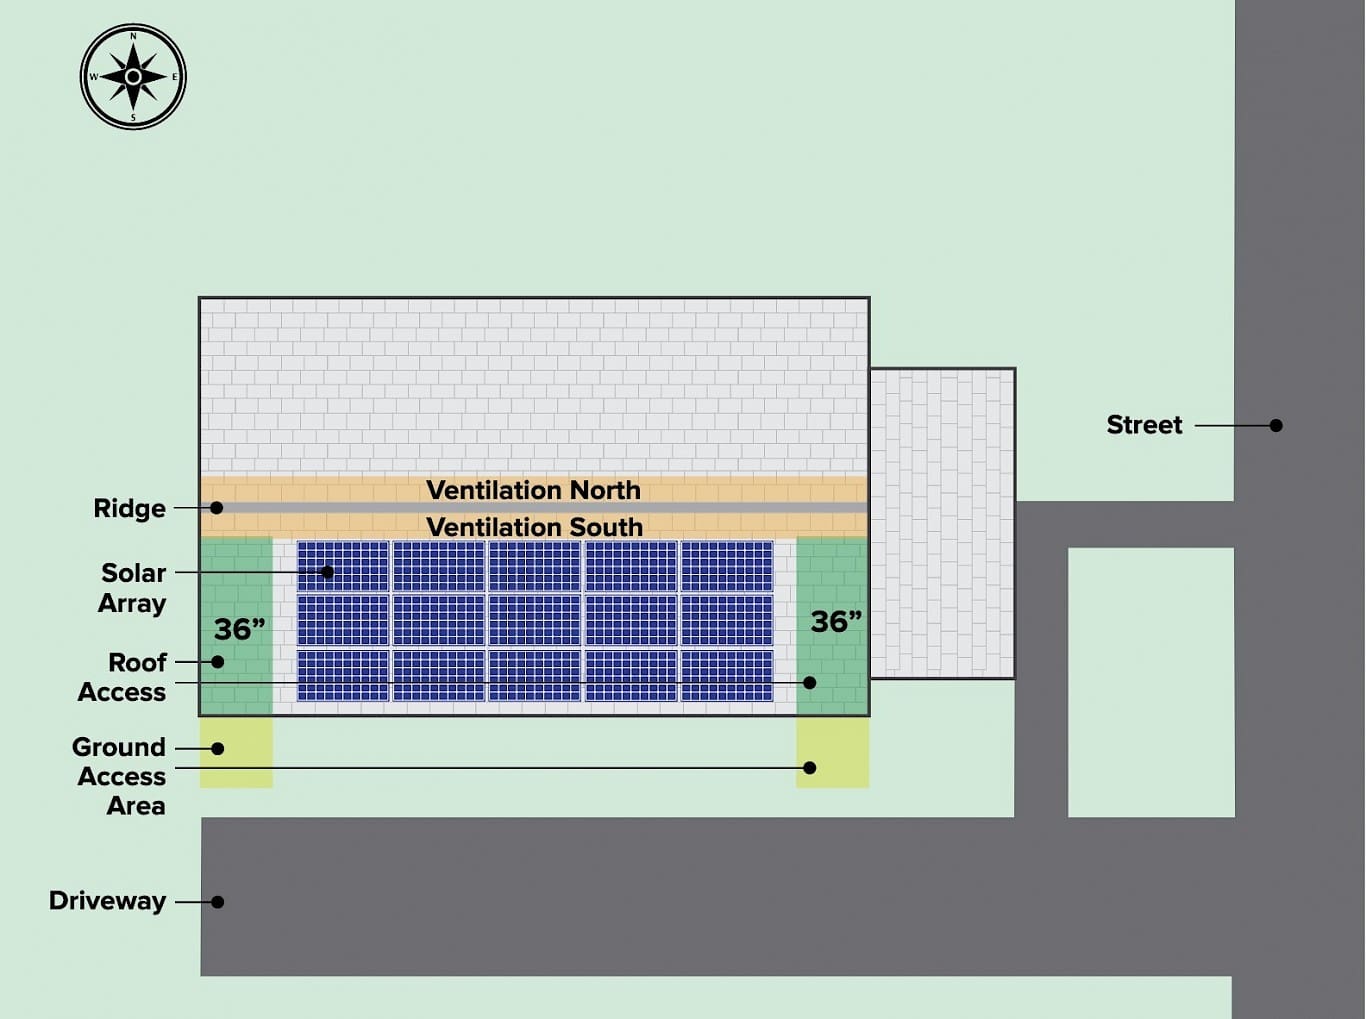
Setback Requirements and Fire Access Compliance Changes
Fire departments increasingly require 3-foot pathways around solar arrays for emergency access, and retrofitting existing installations to meet new setback requirements can reduce usable roof space and system capacity by 20-30% during permit renewals.
Fire department setback research includes current requirements and proposed changes that may affect array layout decisions during initial installation planning. Installation design with extra margin beyond minimum setbacks accommodates future requirement changes without forcing costly array reconfiguration.
Documentation of installation dates and permits establishes grandfathering eligibility that protects existing arrays from new setback requirements during permit renewals. Emergency access pathway planning ensures compliance with evolving fire safety requirements while maximizing available roof space for solar panel installation.
Electrical Code Updates and Arc Fault Protection Requirements
National Electrical Code updates now mandate rapid shutdown devices and arc fault circuit interrupters that weren’t required in older installations, creating retrofit costs of $500-1,500 per system when code compliance is enforced.
Current code-compliant equipment installation provides future-proofing against retrofit requirements even when not mandated for current installation dates. Conduit and wiring infrastructure planning accommodates future safety device additions without requiring complete electrical system reconstruction.
Electrical inspector relationships provide advance notice of upcoming code changes that affect existing installations and retrofit requirements. Safety equipment integration during initial installation avoids higher retrofit costs and system downtime when code updates are enforced during permit renewals.
Utility Interconnection Policy Shifts and Net Metering Changes
Utility policies toward distributed solar generation are changing rapidly, with net metering reductions, time-of-use rate implementation, and interconnection fees creating new economic calculations that can dramatically affect DIY installation returns.
Net metering sunset clauses eliminate compensation for new installations while grandfathering existing systems for limited timeframes, making installation timing critical for long-term economics. Time-of-use rate optimization requires battery storage or load shifting strategies when utility compensation doesn’t align with peak solar production periods.
Interconnection policy monitoring through utility commission proceedings provides advance warning of rate changes that affect solar investment returns.
Net Metering Sunset Clauses and Rate Structure Evolution
Many utilities are eliminating net metering compensation for new installations while grandfathering existing systems for 10-20 years, making installation timing critical for capturing maximum long-term economic benefits from solar investments.
Interconnection agreement applications before policy deadlines secure grandfathered net metering rates even when installation completion extends beyond deadline dates. Utility commission proceeding monitoring provides advance notice of rate changes and policy deadlines that affect solar compensation structures.
System oversizing before net metering elimination maximizes grandfathered benefits by capturing higher compensation rates for larger production capacity. Rate structure analysis compares current net metering benefits against proposed time-of-use rates to optimize installation timing and system sizing decisions.
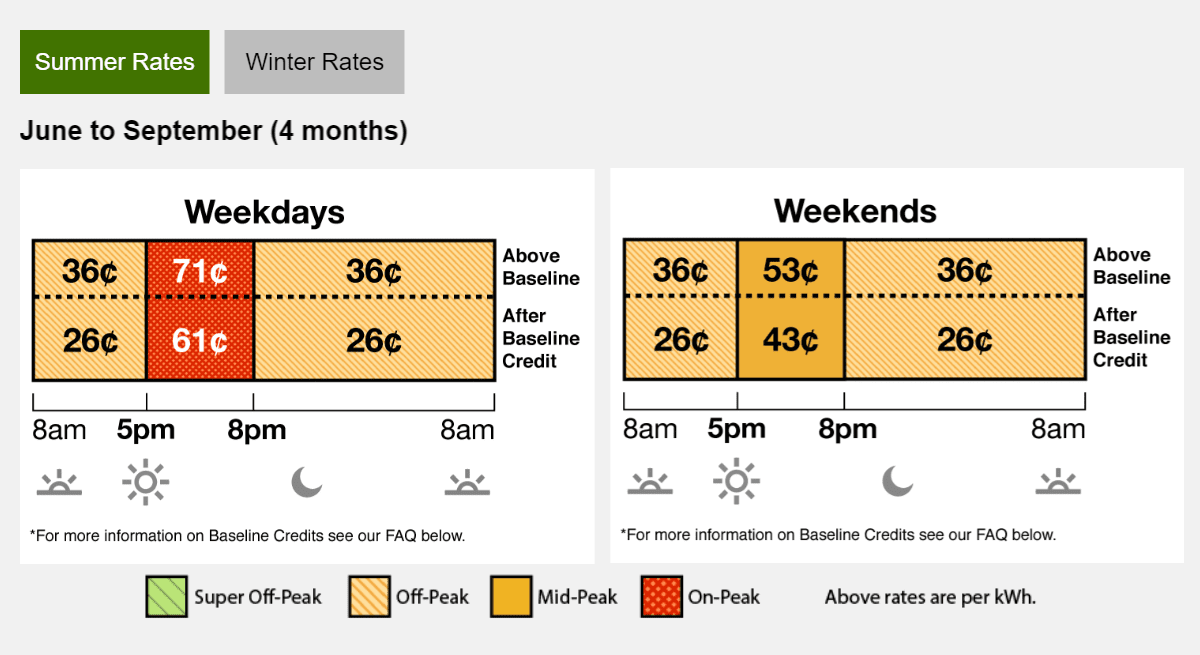
Time-of-Use Rate Optimization for Solar Production Curves
Utilities are implementing time-of-use rates that may not align with peak solar production periods, requiring battery storage or intelligent load shifting to maintain economic benefits when solar generation doesn’t match peak rate periods.
Time-of-use rate analysis against typical solar production curves identifies misalignment between generation and peak compensation periods. Smart load controller installation shifts energy-intensive activities to peak solar production hours, maximizing self-consumption when utility rates are unfavorable.
Battery system sizing captures off-peak solar production for on-peak consumption, optimizing economic returns under time-of-use rate structures. Load shifting strategies include water heating, electric vehicle charging, and appliance scheduling that aligns energy consumption with solar production patterns.
DIY Solar Installation Compliance Checklist:
-
Research current electrical code requirements in your jurisdiction
-
Verify fire department setback requirements and proposed changes
-
Document installation date and permit approval for grandfathering protection
-
Install rapid shutdown devices and arc fault protection as required
-
Plan conduit routing for future safety equipment additions
-
Establish relationship with local electrical inspector
-
Monitor utility commission proceedings for rate change announcements
-
Apply for interconnection agreement before policy deadline dates
-
Analyze time-of-use rate structures against solar production curves
-
Plan battery storage integration for rate optimization
Final Thoughts
DIY solar installation success depends on understanding the complete ecosystem of costs, regulations, and technical challenges that extend far beyond equipment selection and basic installation procedures. The hidden financial architecture of insurance modifications, permit cascades, and long-term maintenance cycles can make or break your investment returns if not properly planned and budgeted from the beginning.
Technical integration challenges with existing electrical systems, backup generators, and smart home technology require specialized knowledge that goes beyond standard installation guides. Component compatibility issues, communication protocol mismatches, and performance optimization strategies separate functioning systems from truly optimized installations that deliver maximum long-term value.
The regulatory environment continues evolving rapidly, with net metering policies, electrical codes, and utility interconnection requirements changing faster than most DIY installers can track. Understanding grandfathering provisions, timing installation deadlines, and maintaining compliance documentation protects your investment against forced upgrades and policy changes that could significantly impact system economics.
Success in DIY solar requires treating the project as a 25-30 year business investment rather than a weekend home improvement project, with comprehensive financial planning that includes hidden costs and long-term maintenance cycles. Technical competency development in system monitoring, troubleshooting, and performance optimization becomes essential for maintaining system efficiency and identifying problems before they become expensive failures.
Regulatory compliance and policy monitoring provide protection against changing requirements while positioning your installation to take advantage of grandfathering provisions and favorable rate structures before they expire.

DIY Solar Pre-Installation Assessment Template:
Financial Readiness Checklist:
-
Calculate total project budget including 30% contingency for hidden costs
-
Obtain insurance rate modification quotes before equipment purchase
-
Research property tax exemption eligibility and documentation requirements
-
Evaluate financing options against cash purchase long-term savings
-
Plan for inverter replacement cycles at 10-15 year intervals
Technical Compatibility Assessment:
-
Verify electrical panel capacity (minimum 200 amps recommended)
-
Document roof structural capacity and age assessment
-
Map existing electrical circuits for essential load separation
-
Research generator integration requirements if applicable
-
Plan communication protocol standardization across all components
Regulatory Compliance Planning:
-
Contact building department for pre-permit consultation
-
Research utility interconnection requirements and timelines
-
Identify grandfathering protection opportunities and deadlines
-
Plan installation timeline around policy changes
-
Establish documentation retention system for long-term compliance