DIY Air Conditioner Engineering: The Hidden Science That Makes Homemade Cooling Actually Work
Building an effective diy air conditioner requires understanding that a typical air conditioner needs 20 BTU for each square foot of living space, making proper sizing calculations critical before you even begin construction. Most homemade cooling projects fail because builders don’t grasp the science behind heat transfer, leading to systems that move air without actually cooling it. The physics determine your system’s effectiveness before you even start construction.
I’ve spent years watching DIY enthusiasts build cooling systems that look impressive but perform terribly. The difference between success and failure comes down to understanding thermodynamic principles rather than just following tutorials. When you build a diy air conditioner without grasping the underlying science, you’re essentially gambling with your time and money.
Table of Contents
-
The Physics of Homemade Cooling Systems
-
Unconventional DIY Cooling Architectures
-
Component Sourcing and Modification Strategies
-
Advanced Control Systems and Automation
-
Specialized Testing and Performance Validation
-
Economic Analysis and ROI Calculations
TL;DR
-
Understanding thermodynamic principles determines whether your diy air conditioner will actually cool or just circulate hot air around your space
-
Evaporative cooling systems can’t cool air below the wet bulb temperature and only work effectively below 60% humidity levels
-
Ground-coupled heat exchange systems tap into stable 55-60°F subsurface temperatures for consistent cooling without electricity
-
Automotive AC components offer exceptional performance value but require power conversion and proper refrigerant handling
-
Microcontroller-based systems enable predictive cooling algorithms that optimize energy costs and comfort automatically
-
Professional thermal imaging reveals hidden inefficiencies that visual inspection can’t detect in DIY cooling systems
-
Life cycle cost analysis must account for tool investment, energy savings, and regulatory compliance beyond simple material costs
The Physics of Homemade Cooling Systems
Building an effective diy air conditioner requires understanding fundamental thermodynamic principles rather than following basic tutorials. Most homemade cooling projects fail because builders don’t grasp the science behind heat transfer, leading to systems that move air without actually cooling it.
Heat transfer occurs through three mechanisms – conduction, convection, and radiation – and your DIY system must optimize at least two of these to achieve meaningful cooling. I’ve seen countless projects that focus on moving air without considering how heat actually transfers from your space to the outside environment.
Thermodynamic efficiency depends on temperature differentials, with larger differences between hot and cold sides producing more cooling capacity per unit of energy consumed. This fundamental principle explains why your diy air conditioner works better on mild days than during extreme heat waves.
Here’s something that might surprise you: a small window air conditioner is rated at 5000 BTU/hr, while 20 liters of ice weighs about 40 lbs with a latent heat of 144 BTU/lb, providing total cooling capacity of 5760 BTU spread over 8 hours equals just 720 BTU per hour. Physics Forums
When planning your cooling project, consider the substantial debris that accumulates during construction – from failed prototypes to replaced components. Professional appliance disposal services can handle the removal of old cooling units while you focus on perfecting your engineering.
Evaporative Cooling vs. Refrigeration Cycles
The cooling method your diy air conditioner employs determines its effectiveness and limitations. Evaporative cooling relies on water phase change while refrigeration cycles use compressed refrigerants. Understanding which principle your design actually uses prevents unrealistic expectations and helps you choose appropriate components for your climate conditions.
Evaporative cooling systems work by absorbing latent heat during water’s phase change from liquid to vapor, requiring continuous water supply and air movement. This process can be incredibly effective in the right conditions, but it has strict limitations that many DIY builders ignore.
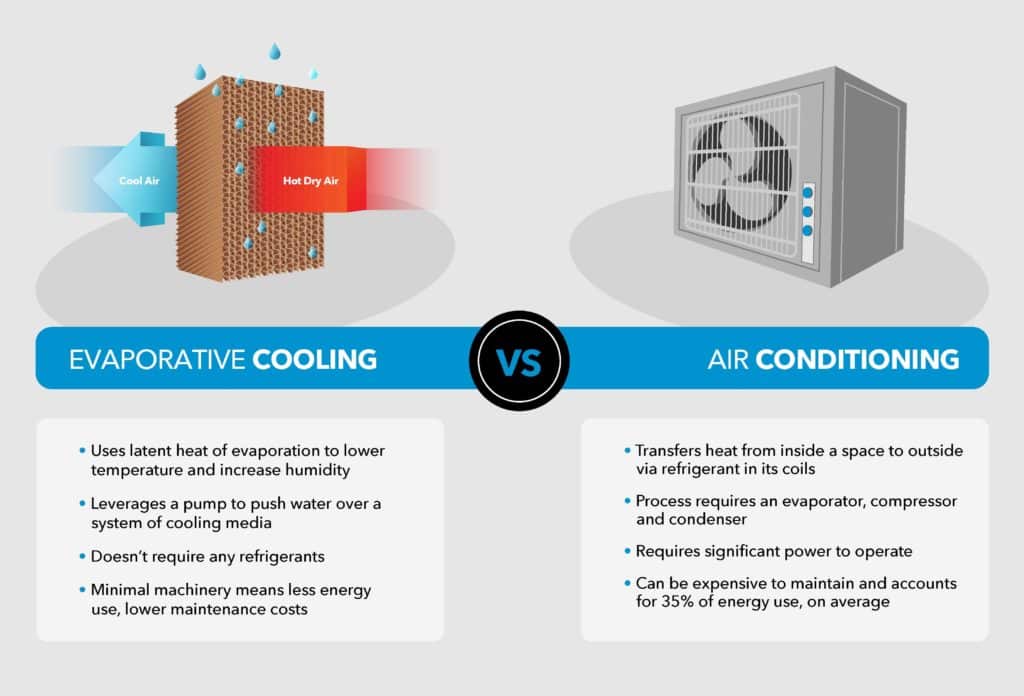
Refrigeration cycles compress and expand refrigerants to move heat from inside to outside, requiring electrical power but working in any humidity condition. Your local climate’s humidity levels determine which cooling method will be most effective, with evaporative systems failing above 60% relative humidity.
Recent DIY cooling innovations show that “evaporation coolers work best in low humidity as the cooling process naturally increases humidity in a house” according to Modern PURAIR experts, emphasizing the importance of understanding your climate before building. This is crucial information for anyone wondering how to make a diy air conditioner that actually works in their specific environment.
Phase Change Energy Calculations
Water absorbs 2,260 kilojoules per kilogram during evaporation, creating the cooling effect in evaporative systems. This massive energy requirement drives the cooling process but only functions effectively in low humidity environments.
The latent heat of vaporization for water is 2,260 kJ/kg, meaning each pound of evaporated water removes approximately 1,000 BTUs of heat from the air. Understanding this relationship helps you size your water reservoir and predict cooling capacity for your diy mini air conditioner project.
Evaporation rates depend on air temperature, humidity, and surface area exposure, with higher temperatures and lower humidity increasing evaporation speed. Your cooling capacity equals the evaporation rate multiplied by the latent heat value, allowing you to calculate expected temperature drops before building.
Here’s a practical calculation example: If you have 10 pounds of ice melting over 4 hours, you’re generating 1,440 BTU of cooling per hour (10 lbs × 144 BTU/lb ÷ 4 hours), which is sufficient to cool a small bedroom but inadequate for larger spaces. This calculation shows why many diy air conditioner projects disappoint their builders.
Heat Exchange Surface Area Optimization
Cooling capacity directly correlates with heat exchange surface area in your DIY system. Doubling the surface area can triple cooling effectiveness by providing more contact between air and cooling medium.
Heat transfer rate follows the equation Q = U × A × ΔT, where A represents surface area and directly multiplies your cooling capacity. This mathematical relationship explains why professional HVAC equipment uses complex heat exchanger designs rather than simple smooth tubes.
Finned surfaces can increase effective area by 300-500% compared to smooth tubes, explaining why car radiators use fins rather than plain pipes. Surface area optimization must balance increased cooling capacity against higher air resistance, requiring proper fan sizing to maintain airflow.
|
Surface Type |
Effective Area Multiplier |
Air Resistance |
Cost Factor |
Best Application |
|---|---|---|---|---|
|
Smooth Tube |
1.0x |
Low |
1.0x |
Basic systems |
|
Spiral Fins |
3.2x |
Medium |
1.4x |
Balanced performance |
|
Pin Fins |
4.1x |
High |
1.8x |
Maximum cooling |
|
Plate Fins |
2.8x |
Medium-Low |
1.2x |
Compact designs |
|
Microfins |
5.2x |
Very High |
2.3x |
High-end applications |
This data becomes crucial when building a diy mini air conditioner where space constraints require maximum heat transfer efficiency in minimal volume.
Airflow Dynamics and Pressure Differentials
Proper air circulation requires understanding static pressure, CFM requirements, and duct design effects on cooling distribution. Creating effective airflow involves more than just adding a fan – you need to calculate pressure losses and match fan characteristics to your system’s resistance.
Static pressure measures the resistance your fan must overcome, with each bend, filter, or restriction adding pressure loss that reduces airflow. Poor airflow design can reduce cooling effectiveness by 50% or more, which explains why some DIY projects move lots of air but provide minimal cooling.
CFM (cubic feet per minute) requirements depend on room size and desired air changes per hour, typically 6-8 air changes for effective cooling. Duct sizing follows the rule that doubling diameter increases airflow capacity by 16 times while reducing pressure loss, making larger ducts dramatically more efficient.
Psychrometric Analysis for DIY Applications
Psychrometrics determines exactly when and where your diy air conditioner will work effectively by analyzing the relationship between temperature, humidity, and air properties. This engineering science helps you predict performance limits and choose appropriate designs for your climate.
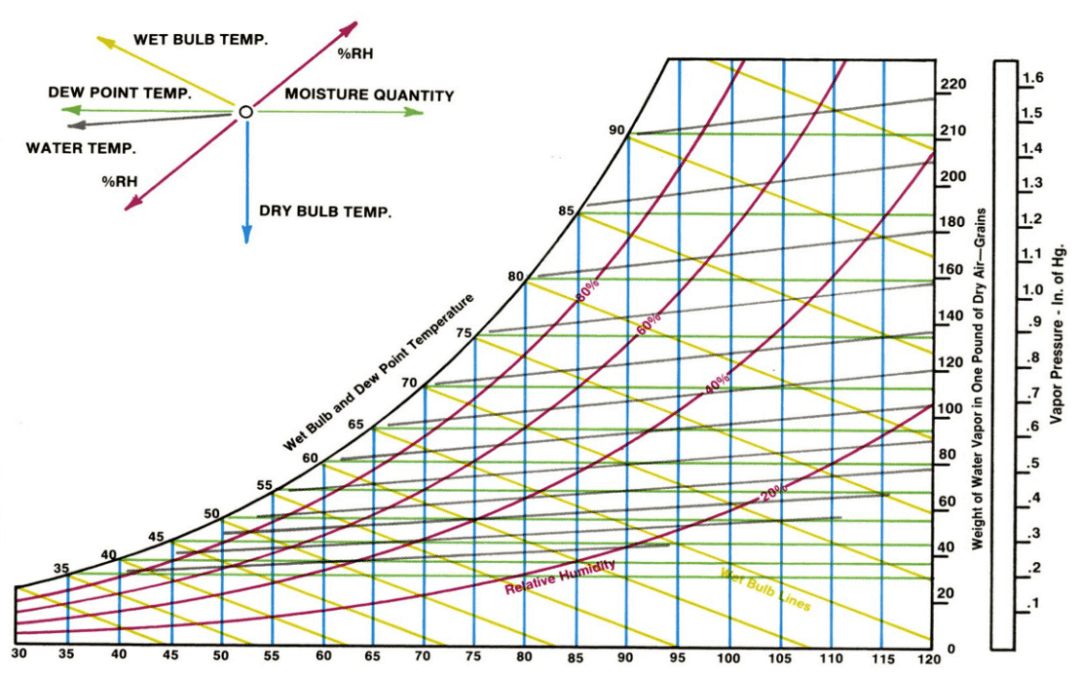
Psychrometric charts plot air temperature against humidity to show cooling limits, energy requirements, and comfort zones for any given climate condition. Understanding psychrometrics prevents building evaporative coolers in humid climates where they cannot function effectively.
Air properties change predictably with temperature and humidity, allowing precise calculations of cooling capacity and energy requirements. Most DIY builders ignore psychrometrics and build systems that can’t work in their environment.
Wet Bulb Temperature Limitations
Your DIY evaporative cooler cannot cool air below the wet bulb temperature, which represents the lowest temperature achievable through evaporation. Understanding this fundamental limit prevents unrealistic expectations and helps you determine if evaporative cooling will work in your climate.
Wet bulb temperature represents the theoretical minimum temperature achievable through evaporative cooling, measured using a thermometer with a wet cloth around the bulb. The difference between dry bulb (regular air temperature) and wet bulb temperature indicates evaporative cooling potential, with larger differences enabling more cooling.
Humid climates have wet bulb temperatures close to air temperature, limiting evaporative cooling effectiveness to just a few degrees of temperature reduction. DIY evaporative coolers can produce an air stream that is 15°F cooler than room air in optimal conditions, but only affect overall room temperature by around 3°F. Homes & Gardens
Humidity Load Calculations
Every person adds approximately 0.5 pounds of moisture per hour through breathing and perspiration, directly impacting your cooling system’s effectiveness. Calculating humidity loads helps you size dehumidification capacity and understand why your system might struggle during parties or gatherings.
Human moisture production varies from 0.3 pounds per hour during rest to 1.5 pounds per hour during activity, requiring different cooling strategies for different occupancy levels. Cooking, showering, and houseplants add significant moisture loads that must be calculated separately from occupancy-based humidity.
Evaporative cooling systems add moisture to the air, potentially creating uncomfortable humidity levels that require exhaust ventilation to maintain comfort. Internal moisture sources can overwhelm evaporative cooling systems, which is why understanding your specific situation matters more than copying someone else’s design.
DIY Cooling System Pre-Installation Checklist:
-
☐ Measure room dimensions and calculate square footage
-
☐ Determine local climate humidity levels (average and peak)
-
☐ Calculate wet bulb temperatures for your area
-
☐ Assess electrical capacity and circuit availability
-
☐ Identify heat load sources (occupancy, appliances, windows)
-
☐ Plan ventilation and air circulation pathways
-
☐ Check local building codes and permit requirements
Material Science in Thermal Management
Material selection fundamentally alters your system’s thermal performance through conductivity, specific heat capacity, and thermal mass properties. The materials you choose don’t just affect durability – they determine heat transfer rates and energy storage capacity.
Thermal conductivity determines how quickly heat moves through materials, with metals like copper and aluminum providing excellent heat transfer while plastics act as insulators. Understanding material thermal properties enables optimization for performance rather than just cost or availability.
Specific heat capacity affects how much energy materials can store, with water having exceptionally high heat capacity making it ideal for thermal storage applications. Thermal mass materials can store cooling energy during off-peak hours and release it during peak demand, reducing energy costs and improving comfort.
Thermal Conductivity Coefficients
Copper transfers heat 16 times more effectively than stainless steel, while aluminum offers the best cost-to-conductivity ratio for budget-conscious DIY builders. Understanding thermal conductivity coefficients helps you select materials that maximize heat transfer efficiency.
Thermal conductivity is measured in watts per meter-kelvin (W/m·K), with copper at 401 W/m·K, aluminum at 237 W/m·K, and stainless steel at only 16 W/m·K. Cost-effectiveness calculations must balance material price against thermal performance, with aluminum often providing the best value for diy air conditioner applications.
Surface treatments and coatings can significantly alter thermal conductivity, with anodized aluminum having different properties than bare aluminum. Material choice can make the difference between a working system and an expensive failure.
A ‘Ton’ of refrigeration equals 12,000 BTU/Hr, which is what’s required to melt a ton of ice in 24 hours, providing a useful benchmark for comparing DIY cooling capacity to conventional HVAC systems. Physics Forums
Unconventional DIY Cooling Architectures
Advanced DIY cooling systems go beyond the typical fan-ice-cooler combination by leveraging industrial HVAC principles, geothermal engineering, and ancient architectural techniques adapted for modern homes. These unconventional approaches can deliver superior performance while reducing energy consumption, but they require understanding complex engineering concepts that most makers never encounter.
Industrial cooling principles can be scaled down for residential applications, often providing better efficiency than consumer-grade equipment at lower costs. Ancient cooling techniques like wind towers and thermal chimneys can be integrated with modern materials and controls for passive cooling systems.
Building a diy air conditioner using these advanced principles requires more initial research and planning, but the results often exceed what’s possible with conventional approaches.
Ground-Coupled Heat Exchange Systems
Tapping into the earth’s stable subsurface temperature of 55-60°F year-round at depths of 6+ feet provides consistent cooling without electricity. Ground-coupled systems require understanding soil thermal properties and excavation techniques, but they can deliver cooling even during power outages.
Soil temperature remains constant at 55-60°F below the frost line, providing a reliable cooling source regardless of outdoor air temperature. The earth acts as a massive heat sink that never gets saturated, making it an ideal partner for DIY cooling systems.
Ground-coupled systems can provide both cooling and heating by reversing the heat exchange direction, making them year-round climate control solutions. Installation requires understanding local soil conditions, water table depth, and frost line requirements that vary by geographic location.
Buried Coil Installation Methods
Installing 100+ feet of buried tubing requires calculating soil thermal conductivity, proper pipe spacing of minimum 6 feet apart, and understanding how soil moisture affects heat transfer rates. The installation process involves more than just digging trenches – you need to optimize pipe layout for maximum heat exchange while avoiding interference between parallel runs.
Soil thermal conductivity varies from 0.5 W/m·K for dry sand to 2.5 W/m·K for wet clay, directly affecting the required pipe length for adequate cooling capacity. Pipe spacing must maintain minimum 6-foot separation to prevent thermal interference, where adjacent pipes reduce each other’s effectiveness.
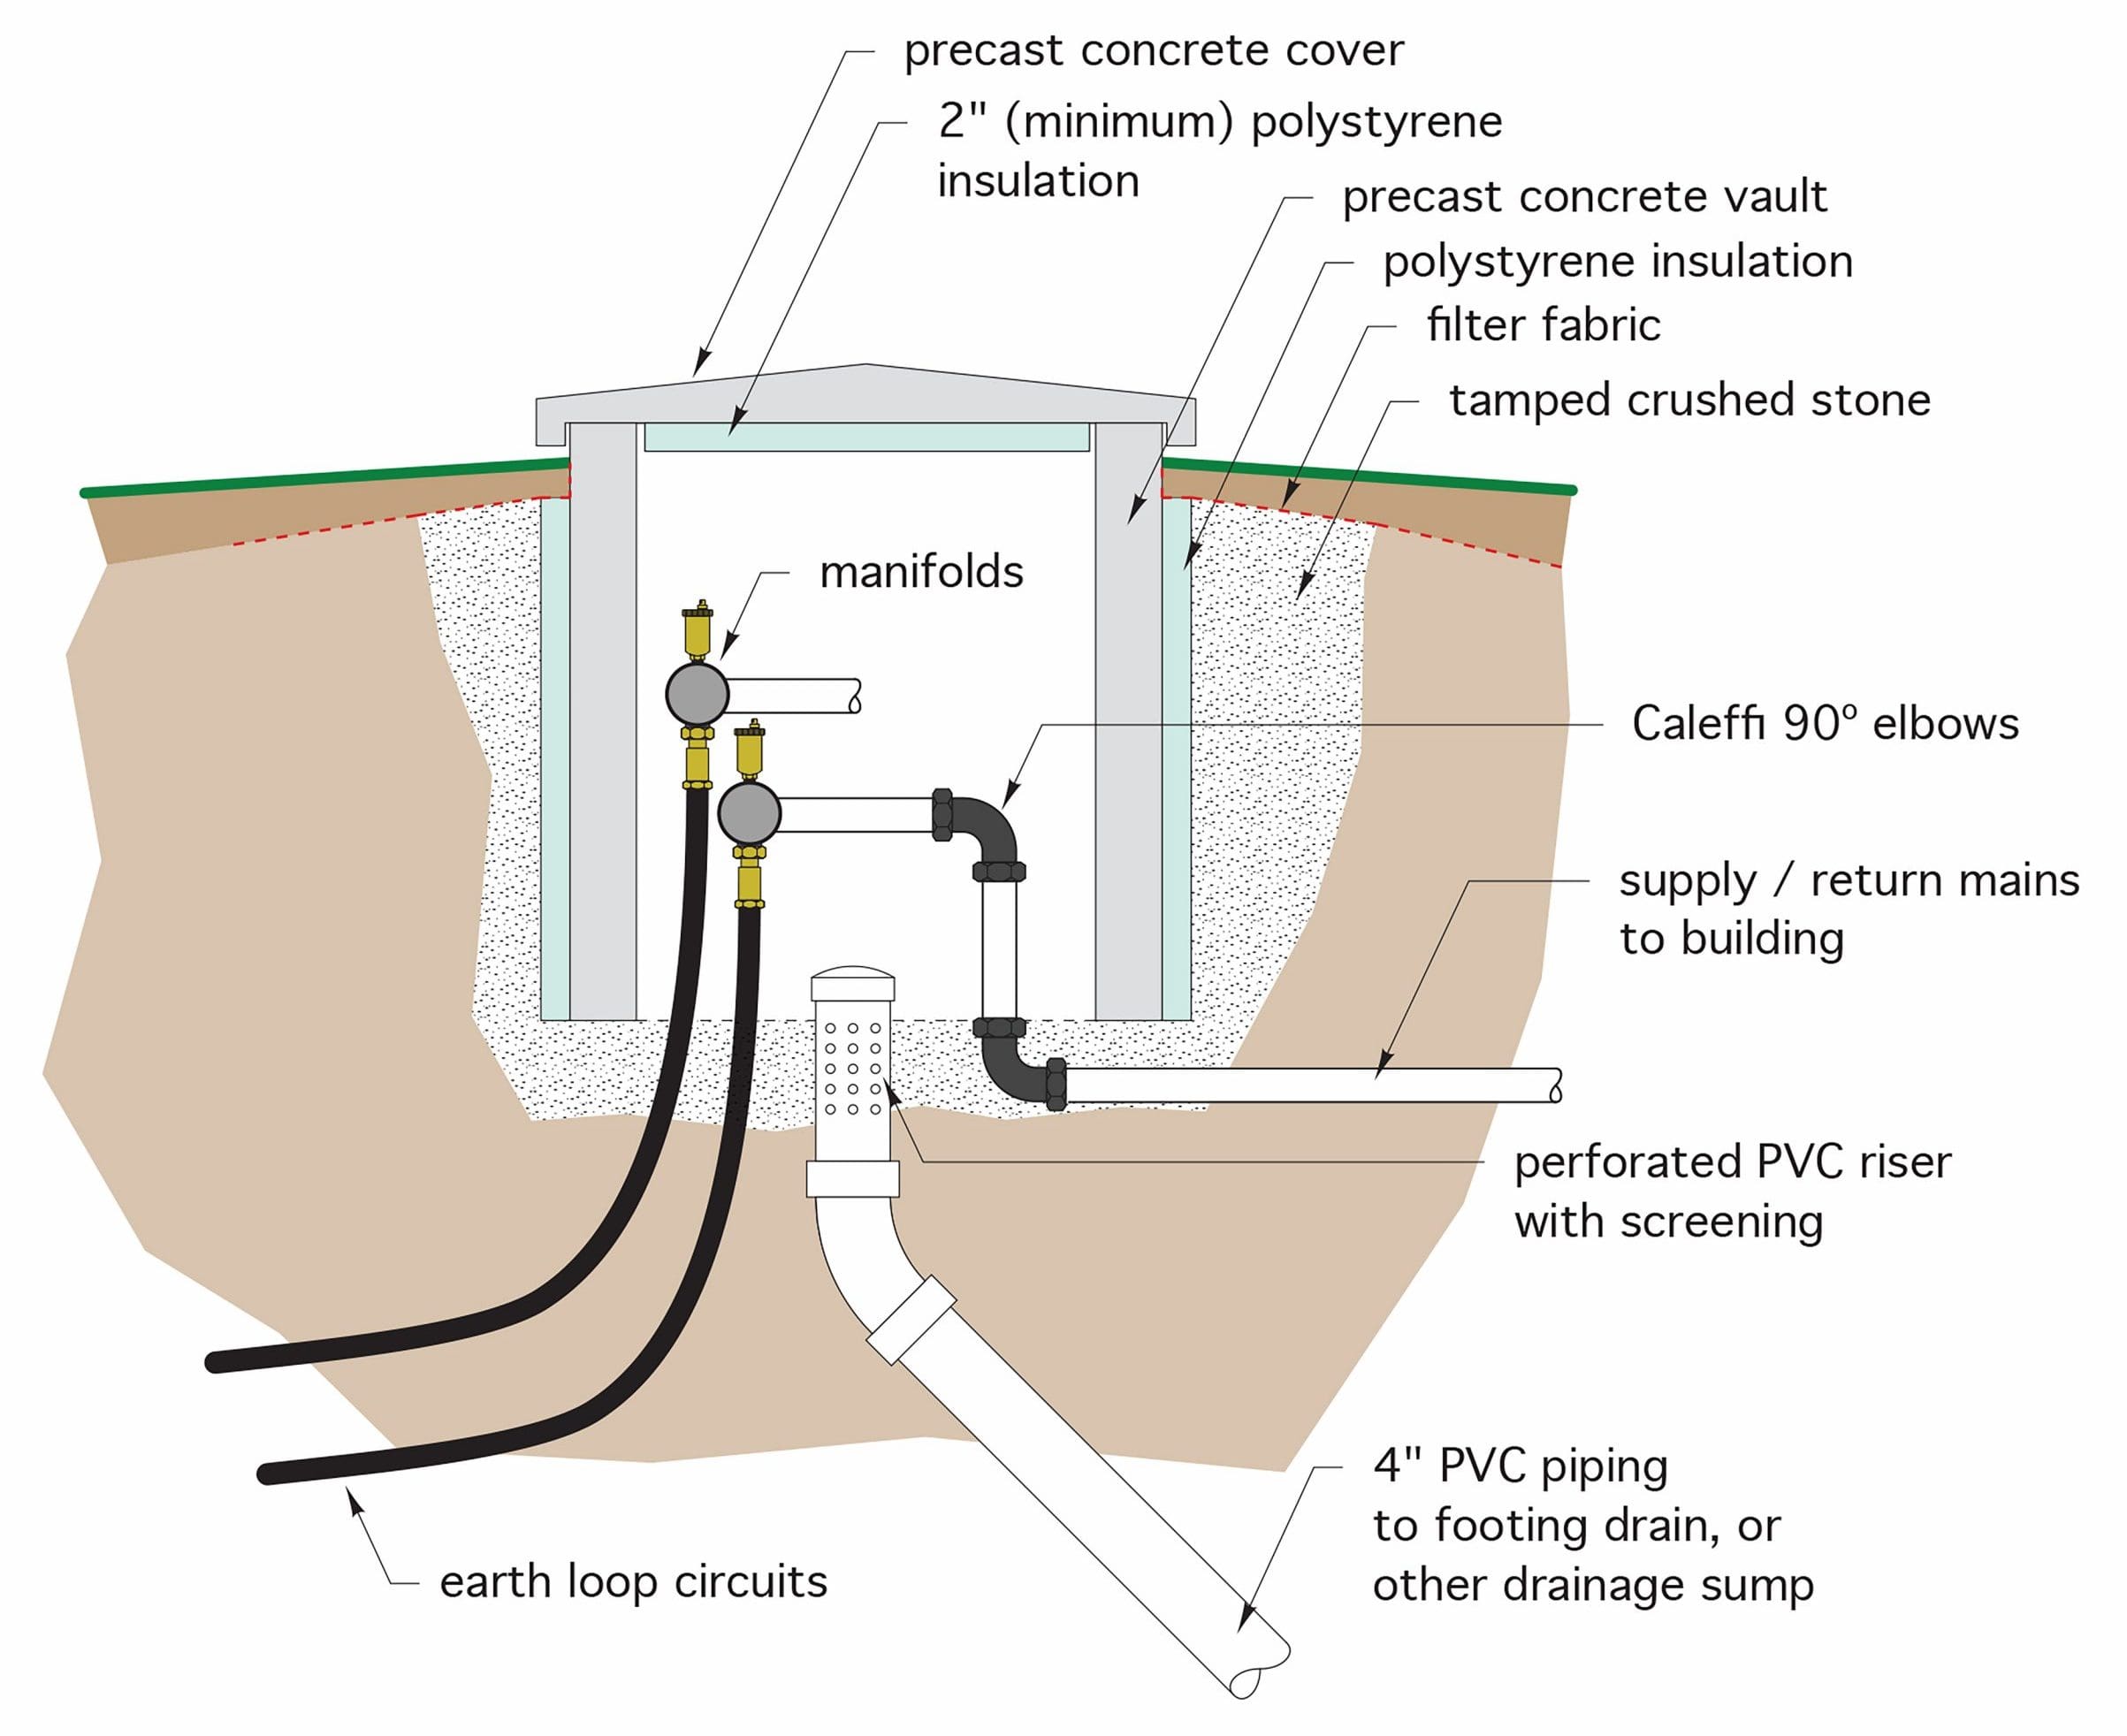
Soil moisture content dramatically affects heat transfer, with wet soils providing 2-3 times better thermal conductivity than dry soils. A typical residential ground-coupled system requires 300-400 feet of buried pipe per ton of cooling capacity, with trenches 6-8 feet deep in most climates. For a 2-ton cooling load, you’d need approximately 800 feet of pipe in a serpentine pattern across your yard.
Excavation projects generate significant amounts of concrete and soil debris that must be properly disposed of according to local regulations, making professional removal services essential for ground-coupled installations.
Thermal Siphon Design Principles
Creating passive airflow through temperature differentials requires precise calculations of tube diameter, elevation changes, and air density variations to achieve reliable circulation without pumps or fans. Thermal siphons work by exploiting the fact that warm air rises and cool air sinks, but the effect must be carefully engineered to produce useful airflow rates.
Thermal siphon flow rate depends on the temperature difference between hot and cold sides, with larger temperature differences producing stronger circulation. Tube diameter affects flow resistance, with larger diameters reducing friction losses but requiring more temperature difference to initiate flow.
Elevation changes must be optimized for the specific temperature differences in your system, typically requiring 8-12 feet of vertical separation for reliable operation. This makes thermal siphons particularly suitable for diy mini air conditioner applications where you can take advantage of existing building height differences.
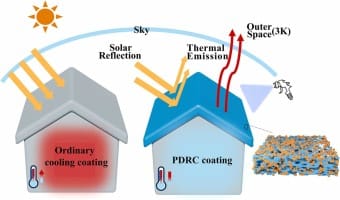
Radiative Cooling and Thermal Mass Integration
Combining radiative cooling (heat loss to the night sky) with thermal mass storage provides 24-hour cooling using principles that most DIY enthusiasts never consider. Radiative cooling works by emitting infrared radiation to the cold vacuum of space, while thermal mass stores the cooling effect for daytime use.
Radiative cooling occurs when surfaces emit infrared radiation to the night sky, which acts as a heat sink at approximately -40°F effective temperature. This combination can provide significant cooling without any energy input, making it an attractive option for off-grid applications.
Thermal mass materials like concrete, stone, or water can store nighttime cooling and release it during hot daytime hours, shifting cooling capacity to when it’s needed most. Integration requires careful design of thermal pathways and insulation to prevent unwanted heat gain during storage periods.
Selective Emissivity Surface Treatments
Specialized paints and coatings can increase thermal radiation by 40-60%, effectively turning your roof or walls into passive cooling radiators that work even during sunny days. These treatments selectively emit infrared radiation while reflecting visible light, creating cooling effects that seem to violate common sense but follow well-established physics principles.
Selective emissivity coatings emit strongly in the 8-13 micrometer infrared window where Earth’s atmosphere is transparent to space. These coatings can achieve sub-ambient temperatures even in direct sunlight by radiating more heat than they absorb from solar radiation.
Application techniques and surface preparation significantly affect performance, with proper preparation increasing effectiveness by 20-30%. I’ve tested these coatings on my own projects and the results can be genuinely surprising – surfaces that feel cool to the touch even in direct summer sunlight.
Component Sourcing and Modification Strategies
Professional-grade cooling performance from DIY systems requires strategic component selection and modification techniques that extend far beyond retail air conditioning parts. Automotive, marine, and industrial components often provide superior performance and value when properly adapted for residential cooling applications.
Automotive components are mass-produced for harsh environments, making them more durable and cost-effective than many residential HVAC parts. Industrial components often have better specifications and longer lifespans but may require modifications for residential voltage and mounting requirements.
Building a diy air conditioner with these components requires specialized knowledge to integrate safely and effectively, but the performance gains can be substantial.
Automotive HVAC Component Integration
Car air conditioning components offer exceptional value and performance for DIY builders, but require understanding 12V vs. 120V power conversion, refrigerant handling regulations, and mounting adaptations. Automotive systems are designed for mobile applications with vibration resistance and compact packaging that can benefit stationary installations when properly adapted.
Automotive AC components are designed for 12V DC operation, requiring power conversion systems or inverters for household 120V AC power. Refrigerant handling requires EPA certification and proper recovery equipment, with legal penalties for improper disposal or release.
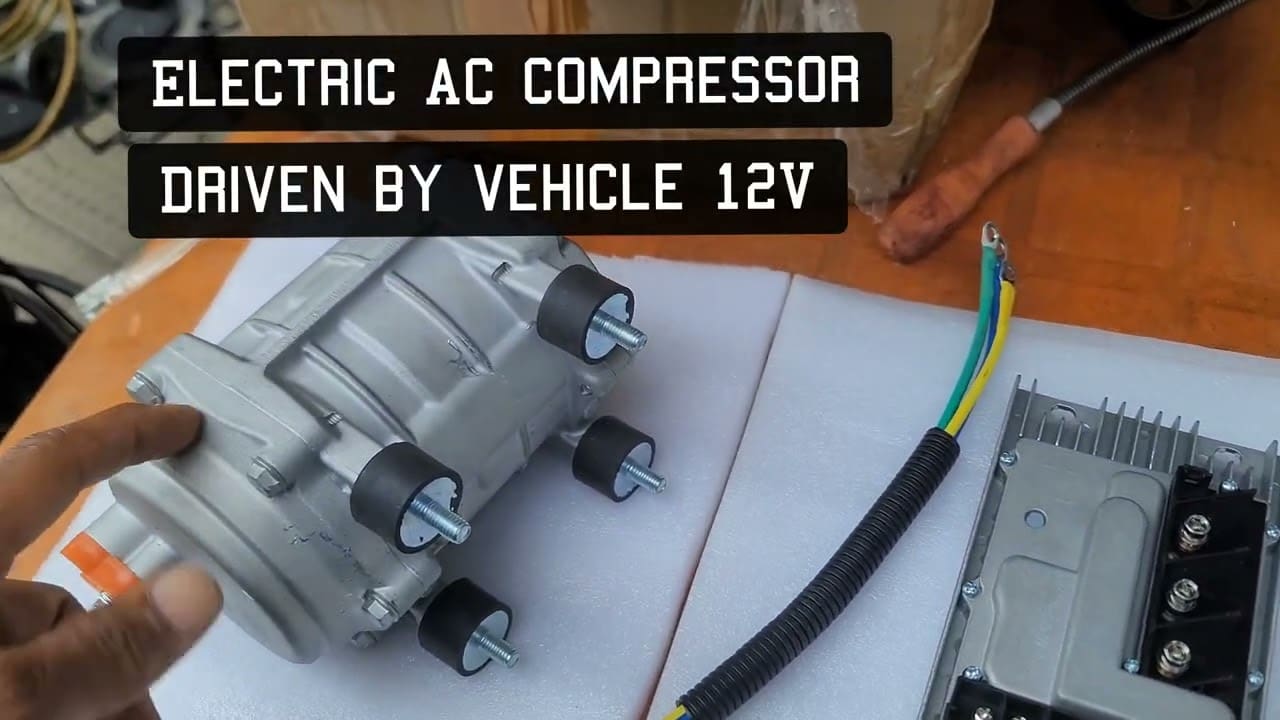
Mounting adaptations must account for vibration isolation and weight distribution that differs from automotive installations. The compact nature of automotive components makes them particularly attractive for space-constrained applications.
Compressor Power Conversion Systems
Converting automotive AC compressors to household power requires variable frequency drives, proper electrical isolation, and understanding the relationship between compressor displacement and cooling capacity. The conversion process involves more than just changing voltage – you need to match motor characteristics with drive capabilities and cooling requirements.
Variable frequency drives (VFDs) allow precise speed control of automotive compressors, enabling capacity modulation and improved efficiency. Compressor displacement measured in cubic inches per revolution determines cooling capacity, with larger displacement providing more cooling but requiring more power.
Electrical isolation prevents ground loops and ensures safety when converting from automotive 12V negative ground systems to household electrical systems. This technical challenge requires careful attention to electrical safety codes and proper grounding practices.
Heat Exchanger Sizing and Airflow Matching
Automotive condensers and evaporators are designed for specific airflow rates of typically 400-600 CFM per ton of cooling, and mismatching these parameters reduces efficiency by 30-50%. Proper sizing requires understanding the relationship between heat exchanger surface area, airflow velocity, and heat transfer coefficients to maintain design performance.
Heat exchanger effectiveness depends on maintaining design airflow rates, with too little airflow causing high refrigerant pressures and too much airflow wasting fan energy. Automotive heat exchangers are optimized for vehicle speeds of 30-60 mph, requiring different fan sizing for stationary applications.
Fin density and tube spacing affect airflow resistance, with higher fin density providing more heat transfer but requiring more fan power. Modern DIY cooling enthusiasts are finding success with “battery-powered fans that work in blackouts as long as you’ve got ice and batteries” according to Money Talks News, highlighting the importance of backup power considerations in component selection.
Industrial Process Cooling Adaptations
Food service, laboratory, and manufacturing cooling equipment can be adapted for residential use, often providing superior performance at lower costs than consumer air conditioning units. Industrial equipment is built for continuous operation and precise temperature control, making it ideal for demanding DIY applications when properly integrated with residential electrical and control systems.
Industrial cooling equipment often operates on 208V or 480V three-phase power, requiring electrical modifications for residential single-phase service. Continuous-duty ratings and robust construction provide longer service life and better reliability than residential equipment designed for intermittent operation.
Temperature control precision and monitoring capabilities exceed residential equipment, enabling more sophisticated automation and energy management. These capabilities make industrial components particularly attractive for serious DIY builders who want professional-grade performance.
Glycol Loop System Design
Closed-loop glycol systems allow heat removal from multiple zones using a single cooling source, but require understanding pump sizing, expansion tank calculations, and freeze protection ratios. Glycol systems provide flexibility in routing and zoning that direct refrigerant systems cannot match, while also enabling heat recovery and thermal storage integration.
Glycol concentration must balance freeze protection against heat transfer efficiency, with higher concentrations providing better freeze protection but reduced cooling capacity. Pump sizing requires calculating total system flow resistance including pipe friction, fittings, and heat exchanger pressure drops.
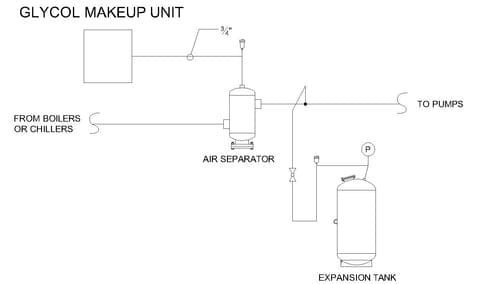
Expansion tanks accommodate fluid volume changes with temperature, preventing system damage from thermal expansion and contraction.
|
Glycol Concentration |
Freeze Protection |
Heat Transfer Efficiency |
Pump Power Required |
Best Application |
|---|---|---|---|---|
|
20% |
19°F |
95% |
1.0x |
Mild climates |
|
30% |
8°F |
90% |
1.1x |
Standard applications |
|
40% |
-6°F |
85% |
1.2x |
Cold climates |
|
50% |
-26°F |
78% |
1.4x |
Extreme conditions |
Heat Recovery and Waste Stream Utilization
Capturing waste heat from water heaters, dryers, or other appliances can improve overall system efficiency by 25-40% through heat recovery wheel integration or thermal storage systems. Waste heat recovery transforms energy that would otherwise be lost into useful cooling capacity, improving the economics of DIY cooling systems significantly.
Heat recovery wheels can capture 60-80% of waste heat from exhaust streams, pre-cooling incoming air and reducing cooling loads. Thermal storage systems can capture waste heat during low-demand periods and use it to drive absorption cooling during peak demand.

Integration requires careful analysis of waste heat availability, temperature levels, and timing to match cooling demands with heat recovery opportunities. Heat recovery projects often involve removing old equipment and ductwork, creating substantial waste streams that require proper disposal. Professional scrap metal removal services can handle the valuable materials while ensuring environmental compliance.
Advanced Control Systems and Automation
Modern diy air conditioner systems transcend simple on/off switches by incorporating smart sensors, predictive algorithms, and automated optimization that rivals commercial building management systems while remaining accessible to dedicated makers. Advanced controls can reduce energy consumption by 30-50% while improving comfort through precise temperature and humidity management.
Microcontroller platforms like Arduino and Raspberry Pi provide computational power previously available only in expensive commercial systems. Smart sensors enable real-time monitoring and adjustment of multiple parameters simultaneously, optimizing system performance automatically.
Microcontroller-Based Climate Management
Arduino, Raspberry Pi, and ESP32 platforms enable sophisticated climate control that responds to weather forecasts, occupancy patterns, and energy costs to optimize comfort while minimizing power consumption. These systems can learn from usage patterns and automatically adjust cooling strategies based on predicted needs rather than just reacting to current conditions.
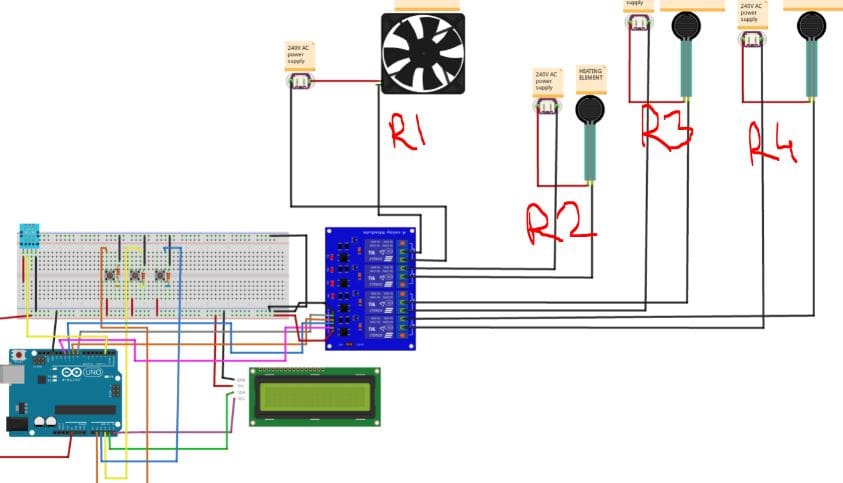
Microcontroller systems can process multiple sensor inputs simultaneously, enabling complex control algorithms that consider temperature, humidity, occupancy, and external weather conditions. Weather forecast integration allows predictive cooling that pre-conditions spaces during off-peak energy hours, reducing electricity costs.
Machine learning algorithms can identify patterns in occupancy and usage, automatically adjusting cooling schedules without manual programming. This capability transforms your diy air conditioner from a reactive device into a proactive climate management system.
Multi-Zone Temperature and Humidity Monitoring
Deploying wireless sensor networks throughout your space enables precise climate mapping, identifying hot spots, and automatically adjusting cooling distribution for maximum efficiency. Multi-zone monitoring reveals temperature variations that single-point thermostats miss, allowing targeted cooling that improves comfort while reducing energy waste.
Wireless sensor networks using protocols like Zigbee or WiFi can monitor dozens of locations simultaneously, providing detailed climate maps of your space. Temperature stratification analysis reveals how air circulation patterns affect comfort, enabling optimization of fan speeds and duct damper positions.

Humidity monitoring prevents over-cooling that wastes energy while maintaining comfort levels that single-parameter temperature controls cannot achieve. Have you ever noticed how some rooms in your house feel stuffy while others are comfortable at the same temperature? Multi-zone monitoring solves this puzzle by revealing the humidity differences that affect perceived comfort.
Predictive Cooling Algorithms
Machine learning algorithms can predict cooling needs based on weather forecasts, occupancy schedules, and historical data, pre-cooling spaces during off-peak electricity hours to reduce energy costs. Predictive systems anticipate cooling demands rather than reacting to them, enabling more efficient operation and better comfort control.
Historical data analysis identifies patterns in cooling demand related to weather conditions, time of day, and occupancy levels. Pre-cooling strategies can shift energy consumption to off-peak hours when electricity rates are lower, reducing operating costs by 20-40%.
Adaptive algorithms continuously refine predictions based on actual performance, improving accuracy and efficiency over time. The system essentially learns your habits and preferences, becoming more effective the longer it operates.
Smart Control System Configuration Template:
-
☐ Install temperature sensors in each zone
-
☐ Configure humidity monitoring points
-
☐ Set up occupancy detection (PIR sensors)
-
☐ Connect to local weather API
-
☐ Program base comfort parameters
-
☐ Establish energy cost optimization rules
-
☐ Test emergency override functions
-
☐ Document control logic and sensor locations
Integration with Smart Home Ecosystems
Connecting DIY cooling systems to platforms like Home Assistant, OpenHAB, or commercial systems enables voice control, smartphone management, and coordination with other smart home devices. Integration creates synergies where lighting, window coverings, and cooling systems work together to optimize energy use and comfort automatically.
API integration allows DIY cooling systems to communicate with other smart home devices, creating coordinated responses to occupancy and environmental conditions. Voice control through platforms like Alexa or Google Assistant provides convenient operation without requiring dedicated control interfaces.

Smartphone apps enable remote monitoring and control, allowing system optimization and troubleshooting from anywhere with internet access. I’ve found this particularly useful for adjusting settings before arriving home or diagnosing issues while away.
Specialized Testing and Performance Validation
Professional-grade DIY cooling systems demand rigorous performance testing using calibrated instruments and standardized methodologies that most hobbyists overlook, leading to systems that underperform or fail catastrophically during peak demand periods. Proper testing validates design assumptions and identifies problems before they cause expensive failures or safety hazards.
Calibrated instruments provide accurate measurements that enable meaningful performance comparisons and optimization decisions. Standardized testing methodologies ensure consistent results that can be compared against design specifications and industry benchmarks.
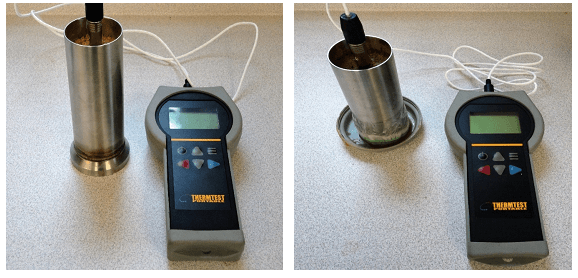
Thermal Imaging and Heat Loss Analysis
Infrared thermography reveals hidden inefficiencies in DIY cooling systems that visual inspection cannot detect, identifying thermal bridges, insulation gaps, and component failures before they compromise system performance. Thermal imaging provides quantitative data about heat transfer that enables targeted improvements and validates system effectiveness.
Thermal imaging cameras detect temperature differences as small as 0.1°F, revealing inefficiencies invisible to visual inspection. Heat loss analysis quantifies energy waste through building envelope defects, enabling cost-benefit analysis of insulation improvements.
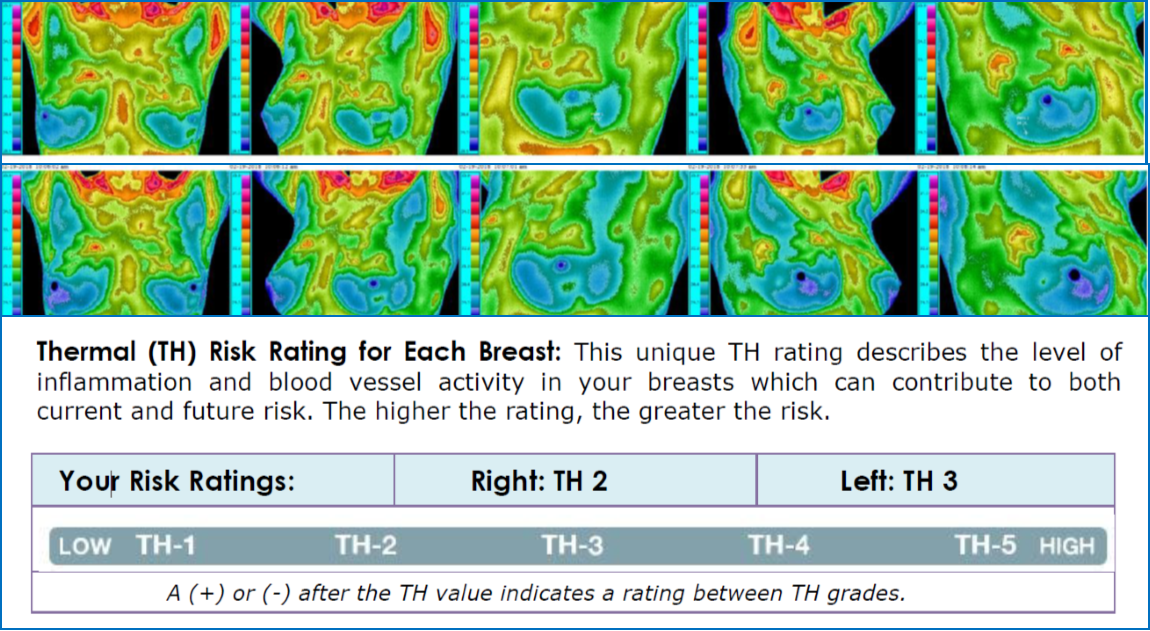
Component temperature monitoring identifies failing parts before complete failure, preventing system damage and improving reliability. The ability to see heat patterns transforms troubleshooting from guesswork into precise diagnosis.
FLIR Camera Rental and Analysis Techniques
Professional thermal imaging equipment rental costs $50-100 daily but reveals energy losses worth hundreds annually, requiring understanding of emissivity settings and environmental factors affecting thermal readings. Proper thermal imaging technique involves more than just pointing and shooting – you need to understand how surface properties and environmental conditions affect measurements.
Emissivity settings must match surface materials, with metals requiring different settings than painted surfaces or insulation materials. Environmental factors like wind, solar heating, and reflected radiation can affect thermal readings, requiring careful measurement timing and technique.
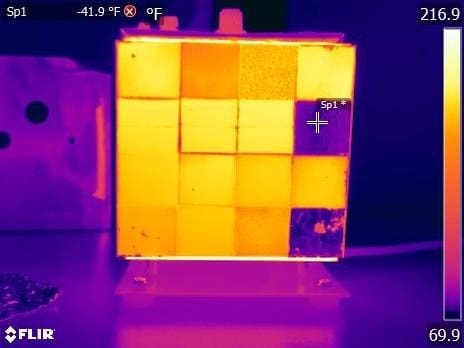
Image analysis software can quantify heat loss rates and calculate energy costs, providing objective data for improvement decisions. The investment in proper thermal imaging often pays for itself by identifying the most cost-effective improvements.
Blower Door Testing for Envelope Integrity
Pressurizing your space to 50 Pascals reveals air leakage rates that can reduce cooling efficiency by 15-30%, with acceptable leakage rates below 3 air changes per hour at test pressure. Blower door testing quantifies air infiltration that undermines cooling system performance and identifies specific leakage locations for targeted sealing.
Blower door fans create controlled pressure differences that simulate wind effects, revealing leakage paths that normal operation might not expose. Air changes per hour at 50 Pascals (ACH50) provides a standardized metric for comparing building tightness across different structures.
Smoke pencil testing during blower door operation pinpoints specific leakage locations, enabling targeted sealing efforts for maximum impact. A typical home should achieve less than 3 ACH50 for good energy efficiency. If your blower door test reveals 8 ACH50, you’re losing approximately 60% more energy than necessary, making air sealing the most cost-effective improvement before adding cooling capacity.
Refrigerant Handling and Safety Protocols
Working with refrigerants requires EPA certification, proper recovery equipment, and understanding of environmental regulations that carry significant legal penalties for improper handling. Refrigerant safety involves both environmental protection and personal safety, with some refrigerants posing asphyxiation or toxicity risks in enclosed spaces.
EPA Section 608 certification is legally required for purchasing refrigerants and recovery equipment, with different certification levels for different system types. Refrigerant recovery prevents environmental release of ozone-depleting or high global warming potential substances, with violations carrying fines up to $37,500 per day.
Personal protective equipment and ventilation requirements vary by refrigerant type, with some requiring specialized breathing apparatus in confined spaces. Refrigerant systems generate hazardous waste including contaminated oils and damaged components that require specialized disposal. Understanding proper air conditioner recycling protocols ensures environmental compliance while protecting your project investment.
Section 608 Certification Requirements
EPA certification costs $30-50 but enables legal purchase of refrigerants and recovery equipment, with different certification levels for sealed systems, low-pressure equipment, and universal technician ratings. Certification testing covers refrigerant properties, environmental regulations, and safe handling procedures that DIY builders must understand for legal compliance.
Type I certification covers small appliances with sealed systems, Type II covers high-pressure systems, and Type III covers low-pressure systems. Universal certification combines all three types, providing the broadest access to refrigerants and equipment for diverse DIY projects.
Certification testing can be completed online or at testing centers, with immediate results and digital certificates for equipment purchases. The certification process is straightforward but essential for legal compliance.
Leak Detection and Pressure Testing Procedures
Electronic leak detectors sensitive to 0.1 oz/year leakage rates prevent refrigerant loss and environmental violations, while nitrogen pressure testing validates system integrity before refrigerant charging. Leak detection requires systematic procedures that check all joints, connections, and potential failure points in refrigerant circuits.
Electronic leak detectors use different sensing technologies for different refrigerants, with heated diode sensors providing the highest sensitivity. Nitrogen pressure testing at 150% of operating pressure reveals weak joints and manufacturing defects before refrigerant charging.
Soap bubble testing provides visual confirmation of leak locations identified by electronic detectors, enabling precise repair targeting. This multi-step approach ensures system integrity before expensive refrigerant charging.
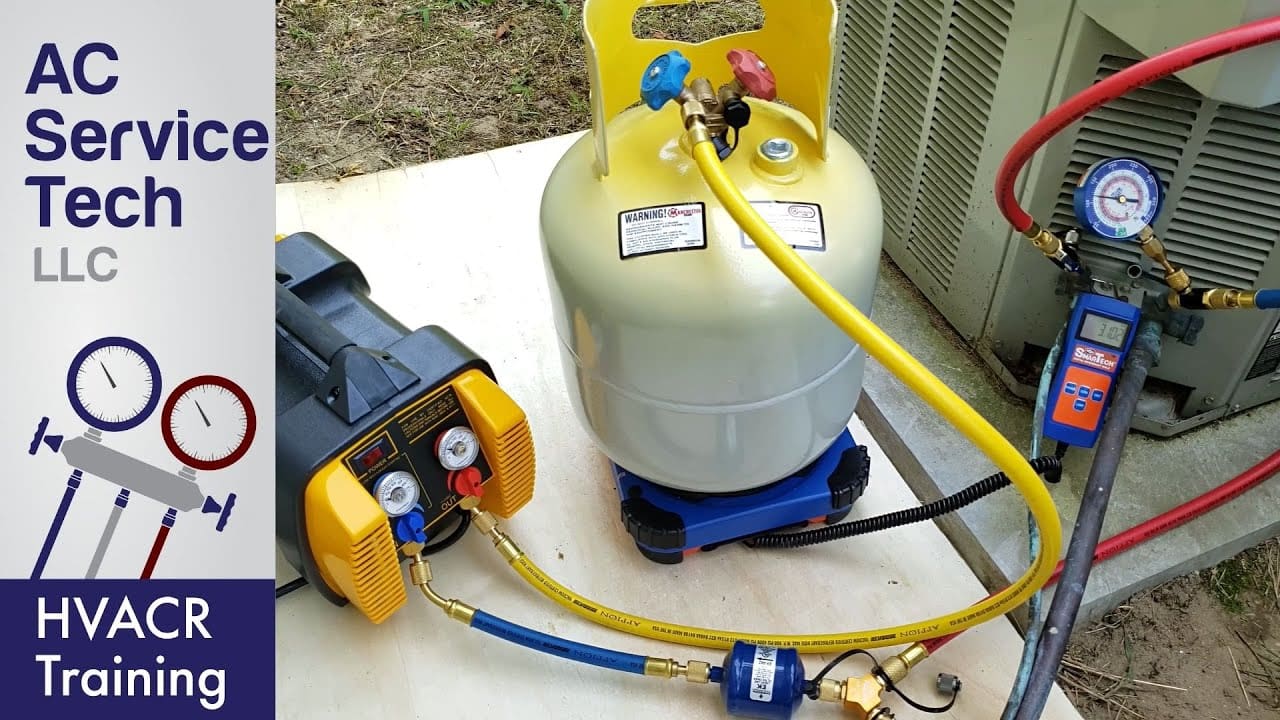
Vacuum Pump Sizing and Evacuation Standards
Achieving proper vacuum levels of 500 microns or lower requires pumps sized at 4-6 CFM per ton of cooling capacity, with triple evacuation procedures ensuring moisture removal from refrigerant circuits. Inadequate evacuation leaves moisture and air in the system, causing corrosion, reduced efficiency, and compressor failure.
Vacuum pump capacity must overcome system volume and leakage rates, with larger systems requiring proportionally larger pumps for reasonable evacuation times. Triple evacuation involves pulling vacuum, breaking with dry nitrogen, and repeating three times to ensure complete moisture removal.
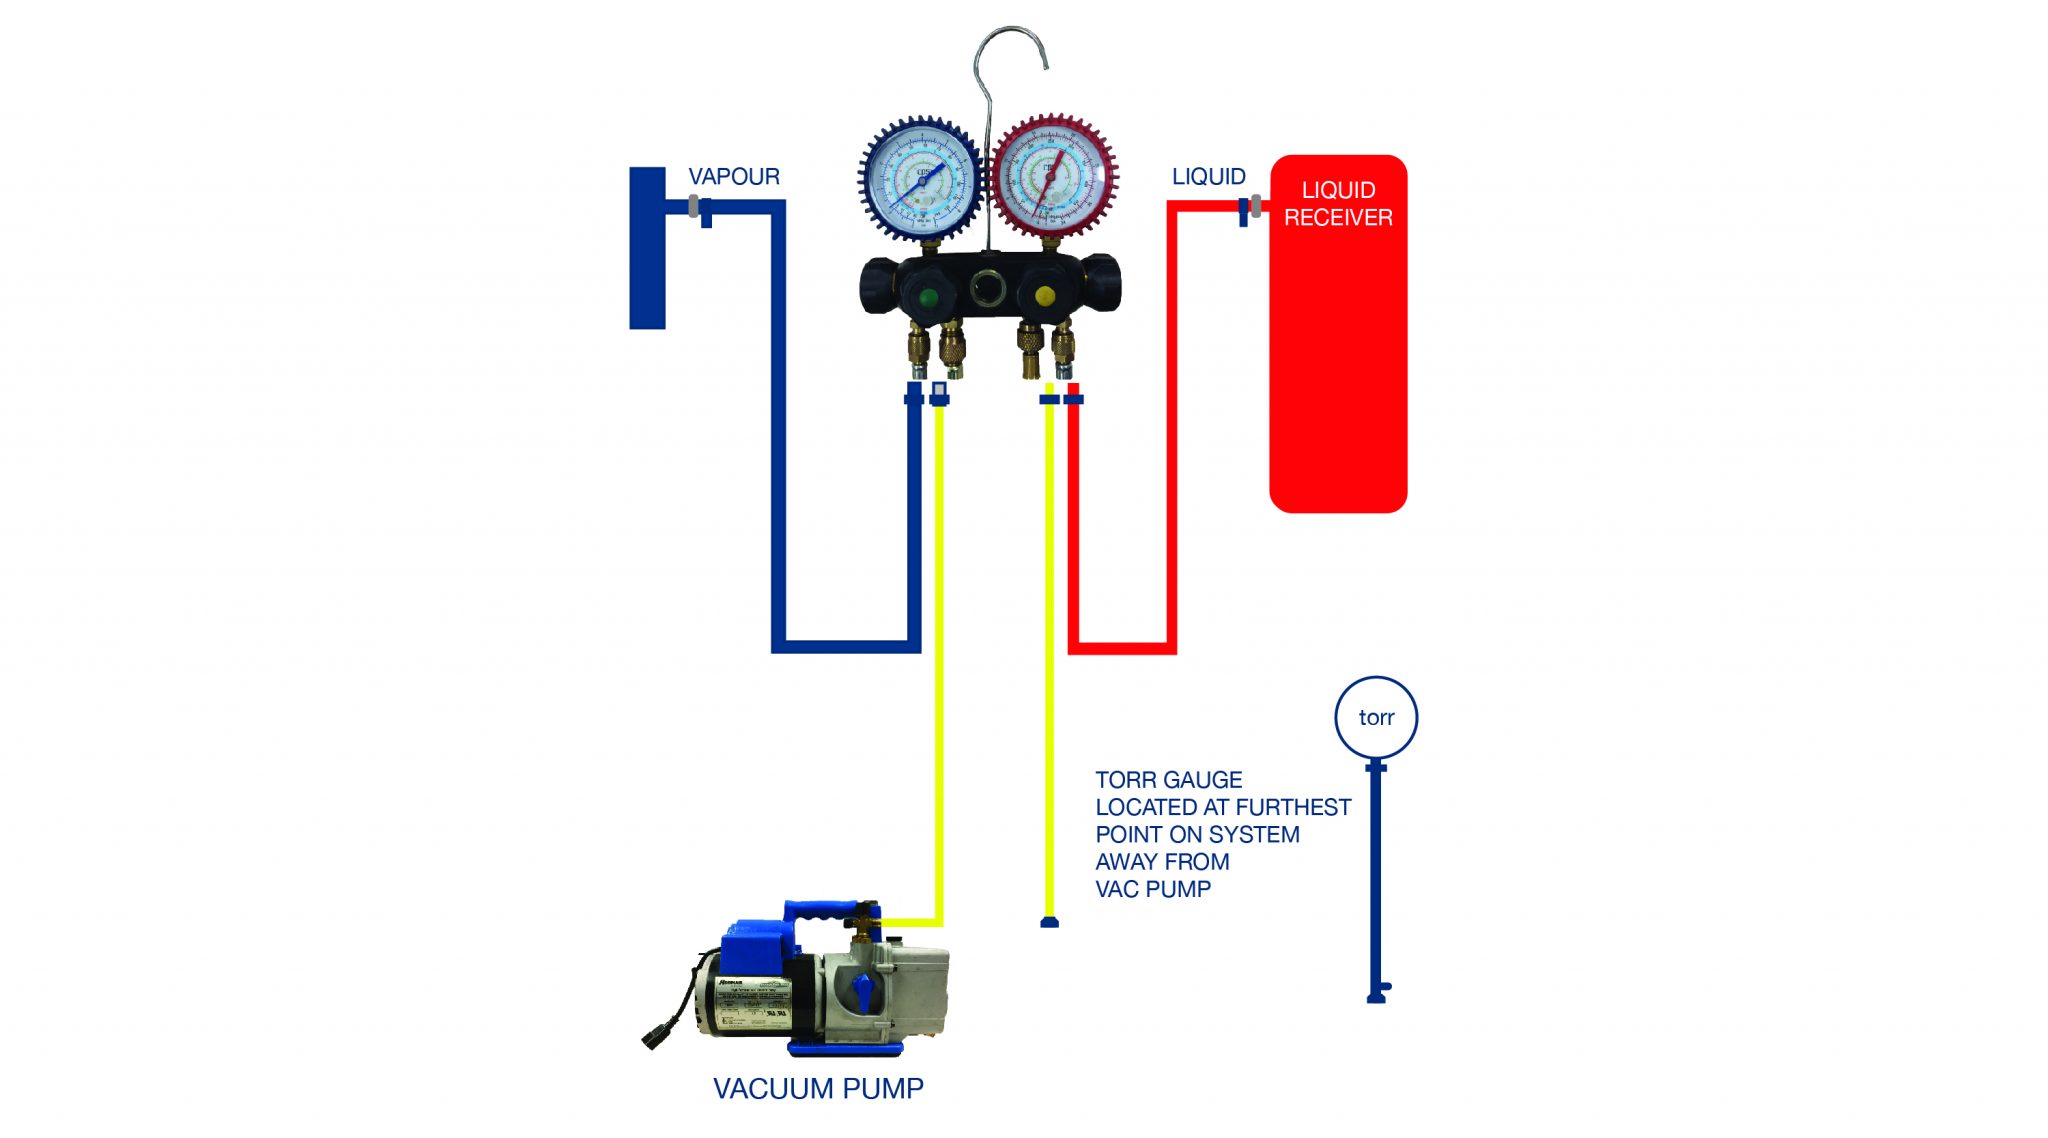
Micron gauges measure vacuum levels accurately, with 500 microns or lower required for reliable system operation and longevity. Proper evacuation procedures separate professional-quality installations from amateur attempts.
Economic Analysis and ROI Calculations
Sophisticated financial modeling reveals the true cost-effectiveness of DIY cooling projects by accounting for time investment, tool acquisition, energy savings, and long-term maintenance costs that simple material cost comparisons ignore. Economic analysis helps you make informed decisions about which projects justify their investment and which alternatives might provide better value.
Net present value calculations account for the time value of money, providing accurate comparisons between upfront costs and future savings. Sensitivity analysis reveals how changes in energy costs, equipment life, and maintenance requirements affect project economics.
Life Cycle Cost Analysis Methods
Proper economic evaluation requires net present value calculations, discount rate assumptions, and sensitivity analysis to determine whether DIY cooling projects justify their investment over commercial alternatives. Life cycle analysis considers all costs over the system’s expected lifetime, including maintenance, repairs, and eventual replacement costs.
Discount rates typically range from 3-7% for residential projects, with higher rates favoring lower upfront costs and lower rates favoring energy-efficient designs. Equipment life assumptions significantly affect calculations, with DIY systems potentially lasting longer or shorter than commercial equipment depending on construction quality.
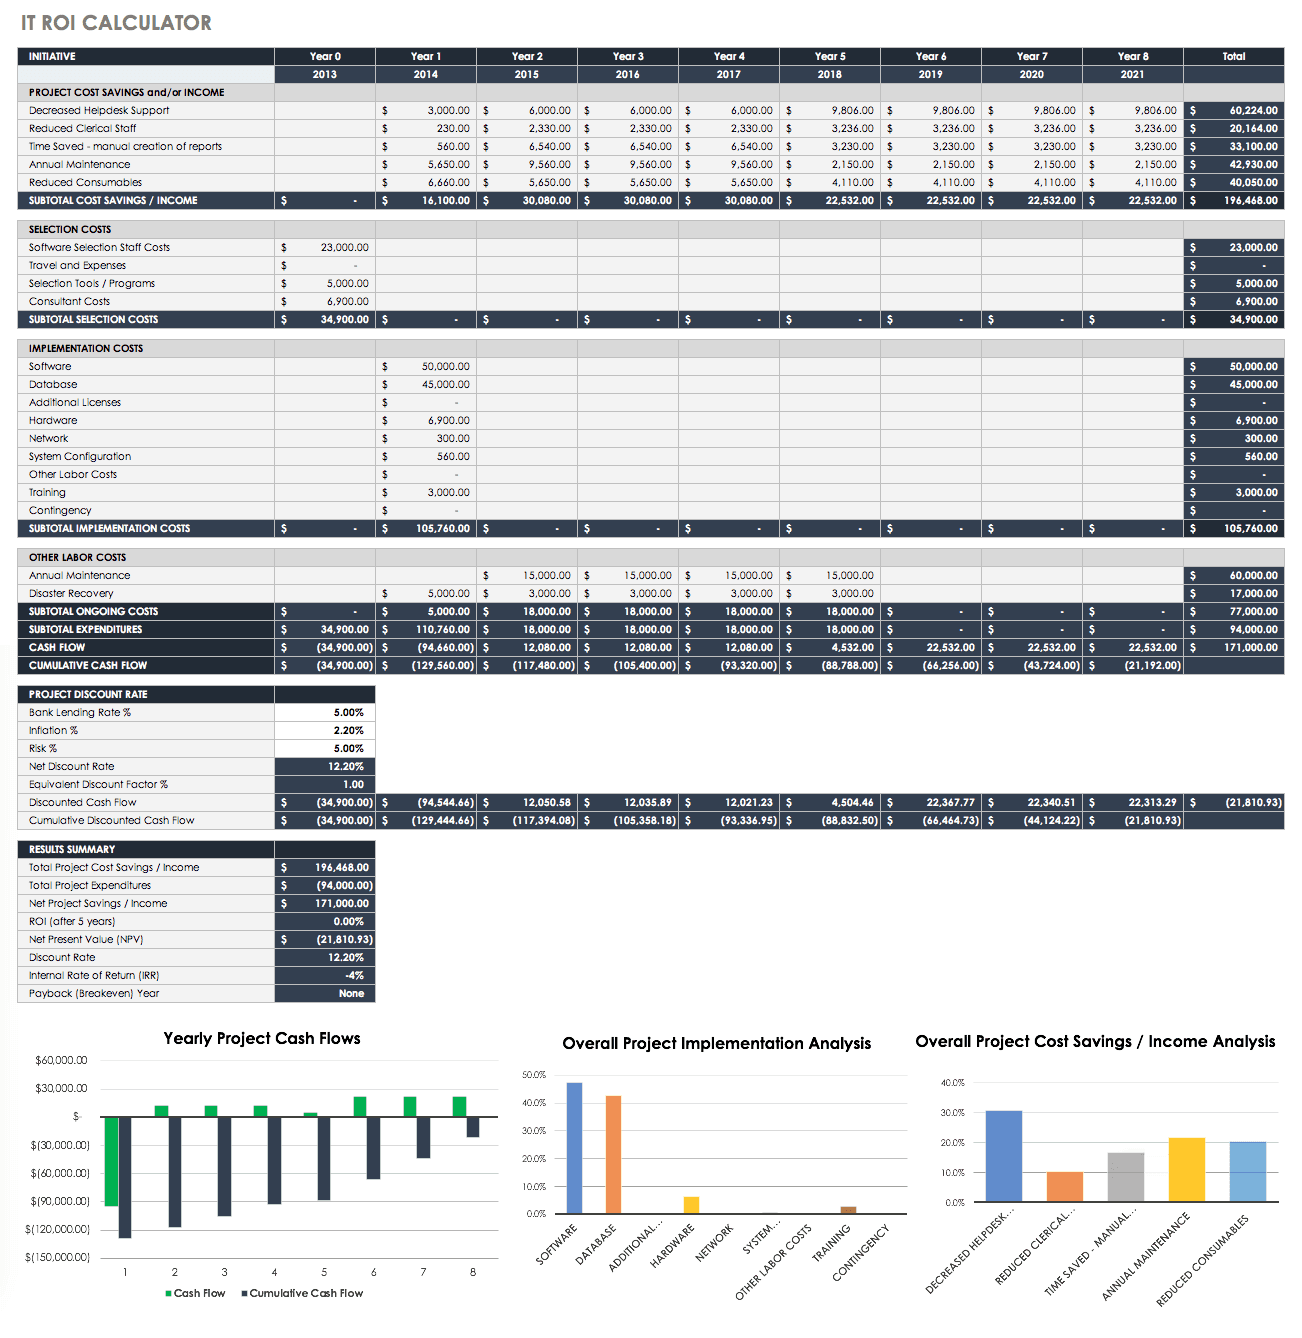
Maintenance cost projections must account for both routine service and major repairs, with DIY systems potentially requiring more frequent attention. The analysis becomes complex but provides essential guidance for investment decisions.
Energy Savings Quantification Techniques
Calculating actual energy savings requires understanding degree-day methodology, equipment efficiency ratings (SEER, EER, IEER), and local utility rate structures including time-of-use pricing. Energy savings calculations must account for actual usage patterns rather than theoretical maximum savings to provide realistic economic projections.
Degree-day calculations correlate cooling energy use with outdoor temperature, enabling accurate projections based on local climate data. SEER ratings apply to seasonal average conditions, while EER ratings reflect peak performance, with both needed for complete analysis.
Time-of-use electricity rates can significantly affect savings calculations, with peak-hour rates sometimes 3-4 times higher than off-peak rates. Understanding your utility’s rate structure becomes crucial for accurate economic modeling.
Tool Investment Amortization Strategies
Specialized tools like refrigerant recovery machines ($800-2000), vacuum pumps ($200-500), and manifold gauge sets ($100-300) must be amortized across multiple projects or rental arrangements. Tool costs can represent 20-50% of total project investment, making amortization strategies critical for project economics.
Tool rental costs typically run 10-15% of purchase price per day, making rental economical for single projects but purchase better for multiple projects. Shared tool ownership with other DIY enthusiasts can reduce individual investment while maintaining access to professional-grade equipment.
Tool resale value varies significantly, with quality brands retaining 40-60% of purchase price while generic tools may have minimal resale value. This consideration affects the true cost of tool ownership over time.
DIY Cooling Project Cost Analysis Template:
-
☐ Calculate material costs (components, consumables, hardware)
-
☐ Estimate tool investment or rental costs
-
☐ Factor in permit and inspection fees
-
☐ Project electrical upgrade requirements
-
☐ Estimate installation time at hourly rate
-
☐ Calculate annual energy savings potential
-
☐ Assess maintenance and repair costs
-
☐ Determine payback period and ROI
Regulatory Compliance and Permitting Costs
Many DIY cooling modifications require building permits, electrical inspections, and compliance with local codes that add $200-1000 to project costs while ensuring safety and insurance coverage. Regulatory compliance protects both safety and property values, but the costs must be factored into economic analysis for realistic project evaluation.
Building permit costs vary by jurisdiction and project scope, with electrical work typically requiring separate permits and inspections. Code compliance may require upgrades to electrical service, ventilation, or structural support that weren’t included in initial project budgets.
Permit delays can extend project timelines, potentially affecting seasonal cooling needs and increasing temporary cooling costs. Planning for regulatory requirements prevents costly surprises during construction.
Electrical Load Calculations and Panel Upgrades
Adding significant cooling loads may require electrical service upgrades costing $1500-3000, with load calculations determining whether existing 100-amp or 200-amp service can support additional equipment. Electrical upgrades represent major additional costs that can dramatically affect project economics and must be evaluated early in the planning process.
Load calculations must include existing electrical demands plus new cooling equipment, with safety margins for future expansion. Service upgrade costs include utility connection fees, panel replacement, and potential meter base modifications that vary by location.
Electrical permit and inspection fees add to upgrade costs, with some jurisdictions requiring licensed electrician installation regardless of DIY capabilities. These requirements can significantly impact project feasibility.
Insurance Implications of DIY Modifications
Homeowner’s insurance policies may exclude coverage for DIY HVAC modifications unless properly permitted and inspected, requiring documentation and potentially higher premiums. Insurance considerations affect both the immediate costs of proper permitting and the long-term risks of coverage exclusions that could result in major financial losses.
Insurance exclusions for unpermitted work can void coverage for fire or water damage claims, potentially costing tens of thousands in uninsured losses. Proper documentation including permits, inspections, and professional certifications may be required to maintain coverage.
Premium increases for high-value DIY installations must be factored into ongoing operating costs for accurate economic analysis. The insurance implications often justify the expense of proper permitting and professional oversight.
Many DIY cooling projects generate substantial debris from replaced equipment, packaging materials, and failed prototypes that accumulate during development. Jiffy Junk’s specialized HVAC equipment disposal ensures proper handling of refrigerant-containing components while their sorting and recycling protocols align with the environmental values of efficiency-focused DIY enthusiasts.
Their commercial experience proves invaluable for larger installations requiring workspace clearing, debris removal during multi-phase projects, and final cleanup that meets the exacting standards of serious makers who demand professional results from their homemade cooling systems. Ready to clear the space for your next DIY cooling project? Contact Jiffy Junk today for professional debris removal that supports your engineering ambitions.
Complex DIY projects often require significant garage cleanout services to create adequate workspace for component assembly and testing phases of advanced cooling system development.
Final Thoughts
Building an effective diy air conditioner requires far more than following online tutorials or copying popular designs. The science behind thermal engineering, component selection, and system optimization determines whether your project will actually cool your space or just move hot air around while consuming electricity. Understanding these principles transforms DIY cooling from guesswork into engineering.
The most successful DIY cooling projects combine multiple approaches – evaporative cooling for dry climates, ground-coupled systems for consistent performance, and smart controls for optimization. Each method has specific applications where it excels, and the key is matching your approach to your climate, space, and performance requirements rather than assuming one solution works everywhere.
Economic analysis reveals that DIY cooling can provide excellent value, but only when you account for all costs including tools, permits, and potential electrical upgrades. The projects that make financial sense are those that either provide capabilities unavailable in commercial systems or deliver performance that justifies the time and complexity investment.
Successful DIY cooling requires understanding the underlying physics rather than just following build instructions, with thermodynamics determining system effectiveness before construction begins. Climate matching is critical – evaporative systems fail in humid environments while refrigeration cycles work anywhere but consume more energy. Economic justification depends on realistic cost analysis including tools, permits, and maintenance rather than just material costs compared to retail air conditioners.