DIY Pool Construction: The Underground Secrets That Make or Break Your Backyard Project
The DIY pool construction industry has exploded in recent years, with over 10.7 million swimming pools in the U.S., where 59% are in-ground and 41% are above ground according to Pool & Hot Tub Alliance data. Yet despite this popularity, most DIY builders focus exclusively on the visible construction aspects while completely ignoring the complex underground systems that actually determine project success or failure.
I’ve seen countless DIY pool projects fail spectacularly because builders got caught up in the exciting parts – choosing tiles, planning decking, picking out pool lights – while completely overlooking the foundation work that makes everything else possible. The truth is, what happens below ground determines whether you’ll be swimming in your dream pool or dealing with a backyard nightmare that costs twice what you budgeted.
Table of Contents
-
The Underground Infrastructure Revolution
-
Advanced Pool Kit Modification and Customization
-
Long-term Maintenance Engineering
-
Project Waste Stream Management
-
The Seasonal Construction Window Strategy
TL;DR
-
Underground soil analysis and utility mapping prevent 90% of DIY pool failures before construction begins
-
Material logistics and waste management represent 30-40% of total project costs but receive minimal planning attention
-
Pool kit modifications require structural engineering knowledge to maintain safety while achieving customization
-
Equipment accessibility planning during installation prevents expensive reconstruction during future maintenance
-
Seasonal timing strategies can reduce construction costs by 25-40% through strategic scheduling
-
Professional waste removal services eliminate the logistical nightmare of managing tons of excavation debris
The Underground Infrastructure Revolution

Most DIY pool builders focus on the visible construction aspects while ignoring the complex underground systems that determine project success. Understanding soil composition, utility networks, and drainage integration prevents the majority of pool failures and cost overruns. This foundation work requires systematic testing and planning that goes far beyond basic excavation.
Underground infrastructure failures account for over 60% of DIY pool project abandonment, with soil instability and utility conflicts being the primary causes. I can’t stress this enough – you’re essentially building a massive concrete box that will hold thousands of gallons of water, and if the ground beneath it isn’t properly prepared, physics will win every time.
Professional soil analysis costs $500-1500 but prevents $15,000-50,000 in structural repairs from inadequate foundation preparation. When you consider that swimming pools can boost home value by up to 7%, with a $400,000 home potentially gaining $28,000 in value from pool installation according to Raleigh Realty market analysis, protecting that investment becomes crucial.
The reality is that building a pool successfully requires understanding what’s happening in the first six feet below your backyard. Most DIY builders dig a hole and hope for the best, but smart builders investigate first and build second.
Soil Composition and Load-Bearing Analysis
Your pool’s structural integrity depends entirely on understanding what exists beneath your property. Different soil types create dramatically different foundation requirements, and conducting proper analysis using accessible tools prevents the catastrophic failures that plague unprepared DIY builders.
Clay soils expand and contract with moisture changes, requiring specialized drainage systems and flexible pool wall designs to prevent cracking. I’ve watched DIY inground pool projects crack within the first year because builders didn’t account for clay movement. The soil literally pushes and pulls your pool walls as seasons change.
Sandy soils drain quickly but may lack load-bearing capacity, necessitating wider footings and reinforced wall systems. Sandy soil feels great when you’re digging, but it can shift and settle in ways that spell disaster for rigid pool structures.
Soil composition testing using simple jar tests and percolation measurements provides 80% of the data needed for foundation design decisions. You don’t need expensive equipment to get the information that matters most.
Geotechnical Testing Without Professional Equipment
You can conduct essential soil analysis using basic tools and systematic observation techniques. These DIY testing methods provide the critical data needed to design appropriate foundation systems while avoiding the expense of professional geotechnical surveys.
Test hole excavation at 3-foot intervals reveals soil layer variations that affect foundation design and drainage requirements. I recommend digging these test holes before you commit to your final pool location – you might discover that moving your pool just five feet avoids a layer of problematic clay or rock.
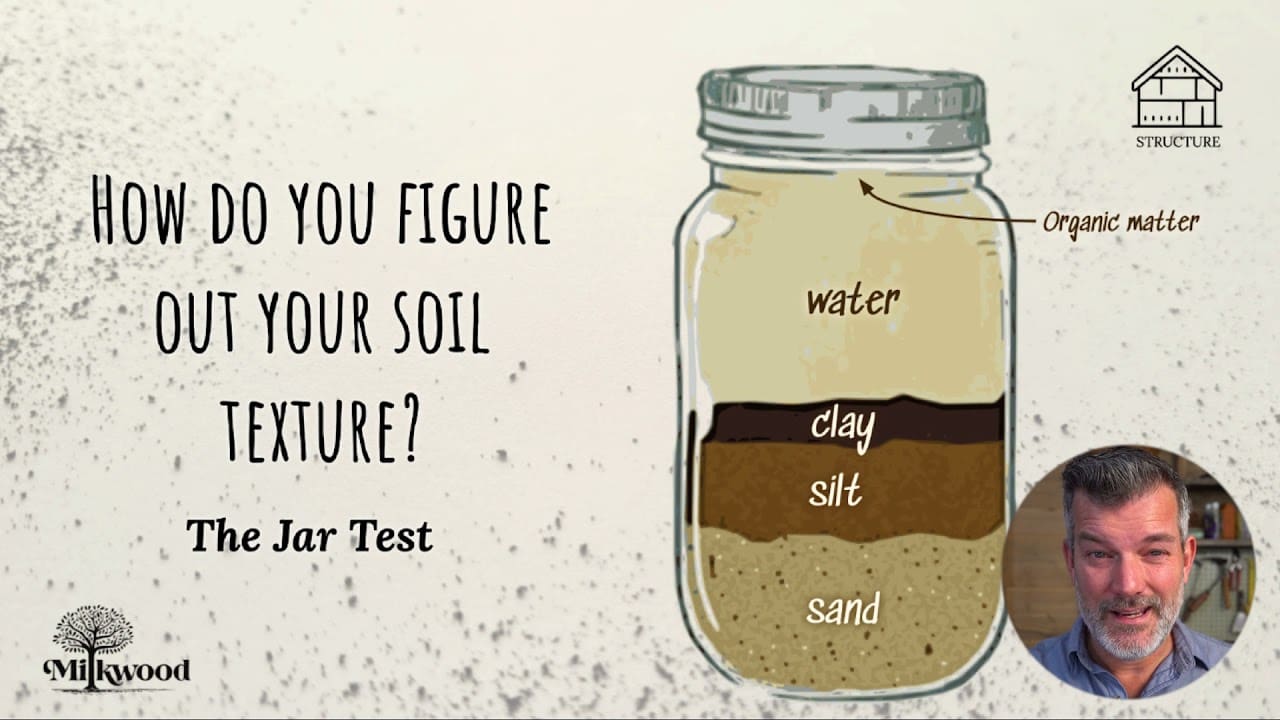
Jar testing separates soil components by particle size, showing clay content that determines expansion potential and drainage characteristics. Fill a mason jar one-third full with soil, add water, shake vigorously, and watch the layers settle. The bottom layer is sand, middle is silt, and top is clay. If clay makes up more than 30% of your soil, you need special drainage planning.
Percolation testing measures drainage rates that determine whether French drains or more extensive drainage systems are necessary. Dig a hole 12 inches deep and 6 inches wide, fill it with water, and time how long it takes to drain. If water sits for more than 24 hours, you have drainage problems that need addressing.
DIY Soil Analysis Checklist:
-
☐ Dig test holes every 10 feet along pool perimeter
-
☐ Document soil layer changes with photos and measurements
-
☐ Collect samples from each distinct soil layer
-
☐ Perform jar test on each sample type
-
☐ Conduct percolation test at deepest excavation point
-
☐ Record seasonal groundwater levels
-
☐ Test for contamination if site has industrial history
-
☐ Document rock formations or hardpan layers
A DIY builder in Texas discovered expansive clay soil during testing that would have caused $25,000 in structural damage. By investing $800 in proper drainage and flexible wall systems during initial construction, they prevented future foundation failure and maintained their pool’s structural integrity through multiple wet-dry cycles.
Underground Utility Mapping and Avoidance Systems
Beyond the basic 811 utility marking service, you need comprehensive utility mapping that identifies potential conflicts and creates safe working zones. This detailed mapping prevents expensive utility strikes and ensures adequate clearance for pool installation.
Utility locator rental equipment traces lines between marked points, revealing exact routing that 811 marking may miss. The 811 service gives you general locations, but rental locators show you exactly where lines run and how deep they’re buried.
Five-foot buffer zones around all utilities provide safety margins for excavation equipment and prevent accidental damage during construction. I’ve seen too many projects where builders thought they could squeeze past a utility line with just two feet of clearance – until the excavator bucket caught the line.
Septic system and well conflicts require specialized routing that may affect pool placement and plumbing design. These systems often have extensive underground components that aren’t marked by 811 services.
Recent community projects demonstrate how proper site preparation and utility coordination enable successful water feature projects even in challenging locations, as seen in Nenana’s DIY swimming hole construction by News Miner.
Drainage Integration and Water Management
Pool drainage extends far beyond the pool structure itself, encompassing groundwater management, surface runoff control, and seasonal flooding prevention. Comprehensive drainage planning protects your investment from water damage and structural failure.
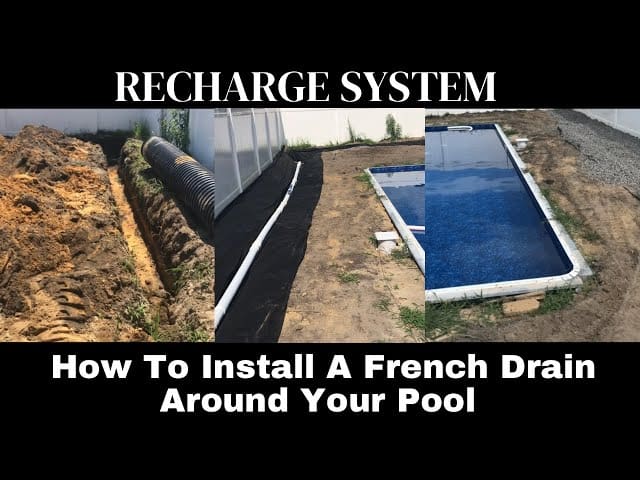
French drain installation around pool perimeters intercepts groundwater before it can create hydrostatic pressure against pool walls. Think of groundwater as a constant enemy trying to push your pool out of the ground – French drains give that water somewhere else to go.
Site drainage planning directs surface water away from the pool area, preventing erosion and foundation undermining. Every rainstorm becomes a test of your drainage design, and failure means watching your carefully graded pool area wash away.
Groundwater monitoring wells track seasonal water table changes that affect pool buoyancy and structural loading. In areas with high water tables, your empty pool can literally float out of the ground during wet seasons.
|
Soil Type |
Drainage Requirements |
Foundation Depth |
Special Considerations |
|---|---|---|---|
|
Clay |
Extensive French drains, vapor barriers |
18-24 inches below frost line |
Expansion joints, flexible connections |
|
Sand |
Minimal drainage, compaction critical |
12-18 inches below frost line |
Wide footings, reinforced walls |
|
Loam |
Moderate drainage, standard systems |
18 inches below frost line |
Balanced approach, monitor seasonally |
|
Rock/Hardpan |
Blasting/breaking required |
Variable based on rock depth |
Specialized equipment, higher costs |
The Hidden Costs of Material Logistics
Material delivery, storage, and waste management create substantial hidden costs that can derail project budgets. Strategic planning of these logistics reduces expenses while maintaining construction workflow and preventing material damage from improper storage.
Material logistics typically account for 30-40% of total project costs through delivery fees, storage requirements, and waste disposal expenses. Most homemade swimming pools fail financially because builders focus on material costs while ignoring logistics expenses.
Coordinated delivery scheduling minimizes storage time and prevents material degradation while maintaining construction momentum. Having materials arrive exactly when you need them requires planning, but it saves money and prevents damage.
Waste volume calculations for excavation and construction debris enable accurate disposal planning and cost estimation. You’ll generate far more waste than you expect, and disposal costs can quickly spiral out of control without proper planning.
With average pool construction costs around $35,000 according to industry data from Raleigh Realty, proper logistics planning can save $8,000-12,000 in material handling and waste disposal expenses. These aren’t small numbers – they represent the difference between a successful project and a financial disaster.
Strategic Material Sequencing and Storage
Coordinating material deliveries with construction phases minimizes storage requirements while preventing damage and maintaining workflow efficiency. This sequencing requires understanding both construction timelines and material storage limitations.
Just-in-time delivery scheduling reduces storage space requirements and prevents material exposure to weather damage. Concrete blocks sitting in your driveway for three months will absorb moisture and potentially crack during freeze cycles.
Material storage planning considers weight distribution, access requirements, and protection from environmental conditions. A pallet of pool coping stones weighs several tons – make sure your driveway can handle it and that delivery trucks can actually reach your storage area.
Delivery coordination with excavation schedules ensures materials arrive when needed without interfering with equipment access. Nothing stops progress faster than having your excavator blocked by a delivery truck that arrived at the wrong time.
Material Delivery Sequence Checklist:
-
☐ Schedule excavation equipment delivery first
-
☐ Coordinate soil removal before material deliveries
-
☐ Plan foundation materials for immediate use
-
☐ Schedule pool kit delivery after foundation prep
-
☐ Time electrical/plumbing materials with installation phases
-
☐ Plan finishing materials for final construction phase
-
☐ Arrange equipment delivery after pool completion
Construction Waste Volume Calculations
Accurate waste volume estimation enables efficient removal planning and cost control. Understanding the different waste streams from excavation, packaging, and construction debris allows for appropriate disposal method selection.
Excavation waste volumes typically exceed pool volume by 20-30% due to soil expansion and access requirements. A 20,000-gallon pool requires removing about 26,000 gallons worth of soil – that’s roughly 35 cubic yards of material that needs to go somewhere.
Construction packaging waste requires separate disposal planning due to material type restrictions at disposal facilities. Pool equipment comes wrapped in enough cardboard and plastic to fill a small dumpster, and mixing it with soil creates disposal headaches.
Debris sorting during construction reduces disposal costs and enables recycling of valuable materials. Separating metal, concrete, and clean wood as you work saves money and reduces environmental impact.
Continue reading to learn about permit navigation and code compliance strategies that can make or break your DIY pool project…
Permit Navigation and Code Compliance Strategies
Building codes vary significantly by location, and many DIY builders underestimate compliance complexity. Understanding inspection processes and common failure points prevents costly rework while ensuring safety and legal compliance.
Local code variations affect everything from setback requirements to electrical specifications, requiring location-specific research. What works in Florida won’t necessarily meet requirements in Minnesota, and even neighboring counties can have drastically different rules.
Inspection failure rates for DIY pool projects exceed 40% on first attempts, primarily due to inadequate preparation and documentation. Failing an inspection doesn’t just mean scheduling another visit – it often means tearing out completed work and starting over.
Self-inspection protocols using official checklists identify problems before inspectors arrive, reducing delays and rework costs. Smart builders inspect their own work using the same criteria inspectors will use, catching issues while they’re still easy to fix.
Self-Inspection Protocols Before Official Reviews
Developing systematic inspection checklists that mirror official requirements allows you to identify and correct issues before inspectors arrive. This preparation dramatically improves first-pass approval rates while demonstrating professionalism.
Official inspection checklists are typically available from building departments and provide exact criteria inspectors will evaluate. Most departments publish these online or provide them during permit application – use them as your construction roadmap.
Photographic documentation of completed work phases provides evidence of proper installation and facilitates inspector review. Take photos of everything before it gets covered up, especially electrical connections and plumbing installations.
Common failure points include inadequate bonding connections, improper equipment clearances, and missing safety features. These issues account for most inspection failures and are completely preventable with proper preparation.
Advanced Pool Kit Modification and Customization
Standard pool kits provide a foundation for customization, but modifications require understanding structural engineering principles and equipment compatibility. Successful customization balances design goals with structural integrity while maintaining warranty coverage and code compliance.
Pool kit modifications void manufacturer warranties unless performed according to approved engineering specifications. Before you start cutting or welding, understand exactly what changes will invalidate your warranty protection.
Structural modifications affect load distribution and may require additional reinforcement to maintain safety margins. Every change you make to a swimming pool kit alters how forces distribute through the structure.
When you build your own pool using kit components, you’re working with engineered systems designed for specific applications. Modifications require understanding why those engineering decisions were made in the first place.
Structural Modification Principles
Pool kits are engineered for standard installations, but site conditions often require modifications. Understanding load distribution, reinforcement techniques, and structural integrity principles enables safe customization while maintaining structural performance.
Load distribution calculations determine how modifications affect structural integrity and identify reinforcement requirements. Water weighs 8.34 pounds per gallon, so a 20,000-gallon pool contains over 166,000 pounds of water pressing against your walls.
Wall modifications require understanding of hydrostatic pressure distribution and may necessitate additional bracing or thicker materials. Pressure increases with depth, meaning the bottom of your pool walls experience much higher forces than the top.
Foundation modifications must account for soil conditions and may require expanded footings or additional drainage systems. Changing the foundation design affects how your entire pool system interacts with the surrounding soil.
Load Distribution and Reinforcement Strategies
Calculating how modifications affect structural integrity requires understanding basic engineering principles. Implementing appropriate reinforcement techniques ensures modifications maintain safety while achieving design goals.
Hydrostatic pressure increases exponentially with depth, requiring stronger reinforcement for deeper pool modifications. Adding just two feet of depth significantly increases the forces your walls must withstand.
Wall opening modifications concentrate stress at corners and require additional reinforcement to prevent cracking. Every skimmer opening, return fitting, and light niche creates a weak point that needs proper reinforcement.
Reinforcement materials must be compatible with existing pool materials to prevent galvanic corrosion and structural failure. Mixing different metals in wet environments creates electrochemical reactions that destroy structural integrity over time.
A DIY builder in Florida wanted to add a spa spillover feature to their rectangular pool kit. By calculating the additional structural load and adding steel reinforcement at the connection point, they created a custom feature that maintained structural integrity while adding $15,000 in property value.
Equipment Integration Beyond Standard Specifications
Modifying pool kits to accommodate upgraded filtration, heating, and automation systems requires understanding equipment compatibility and installation requirements. These modifications often provide the greatest value enhancement for DIY builders.
Upgraded filtration systems may require larger plumbing connections and additional electrical capacity beyond kit specifications. Standard pool kits assume basic equipment – upgrading to high-performance systems means upgrading infrastructure too.
Heating system integration requires understanding heat exchanger placement, circulation requirements, and safety shutoff systems. Heat pumps and gas heaters have specific installation requirements that affect plumbing design and equipment placement.
Automation system retrofits need compatible sensors and actuators that may require additional wiring and control panel modifications. Smart pool systems cost between $1,500 and $3,500 to install, with the Global Smart Pool Systems market projected to grow from $15 million in 2024 to nearly $50 million by 2031 according to Verified Market Reports data.
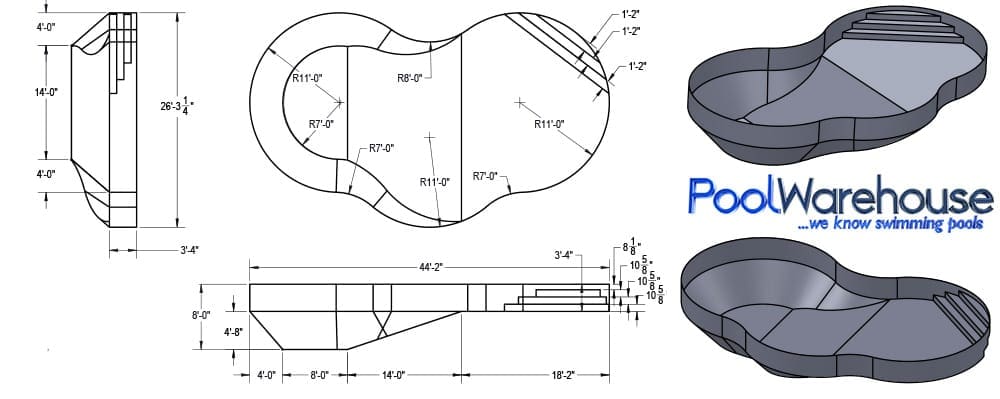
Custom Shape Adaptations Using Kit Components
Transforming rectangular kits into custom shapes requires cutting, joining, and reinforcement techniques that maintain structural integrity. These modifications offer significant aesthetic improvement while utilizing existing kit components.
Shape modifications require understanding of structural stress concentration at corners and curves. Sharp corners create stress concentration points, while gradual curves distribute forces more evenly throughout the structure.
Joining techniques must maintain watertight seals while providing adequate structural strength. Every joint you create becomes a potential failure point that must be properly sealed and reinforced.
Custom shapes may require additional reinforcement at stress concentration points to prevent failure. Homemade swimming pools with complex shapes need engineering analysis to ensure structural adequacy.
Mechanical Systems Integration
Pool equipment represents the most complex installation aspect, requiring understanding of hydraulics, electrical systems, and automation integration. Proper system design maximizes efficiency while minimizing maintenance requirements and energy consumption.
Hydraulic system design affects energy consumption, with poor design increasing operating costs by 50-100% annually. Getting the plumbing wrong doesn’t just affect performance – it costs you money every month in higher electric bills.
Electrical integration must meet strict safety codes while providing flexibility for future equipment upgrades. Pool electrical systems have unique safety requirements that go far beyond typical residential wiring.
Automation systems reduce maintenance workload but require proper integration with existing equipment to function reliably. A do-it-yourself swimming pool with smart controls can practically run itself, but only if the integration is done correctly.
Hydraulic Design and Flow Optimization
Designing plumbing systems that maximize efficiency requires understanding flow dynamics, pressure losses, and equipment sizing. Optimized hydraulic design reduces energy consumption while improving filtration effectiveness.
Pipe sizing affects flow velocity and pressure losses, with undersized pipes dramatically increasing pump energy requirements. Using 1.5-inch pipe where you need 2-inch pipe can double your pump’s energy consumption.
Equipment placement relative to pool location affects head pressure and pump sizing requirements. Every foot of elevation change and every foot of pipe length adds resistance that your pump must overcome.
Flow optimization through proper valve placement and pipe routing can reduce energy consumption by 30-50%. Strategic valve placement allows you to control flow patterns and optimize system performance.
|
Pipe Size |
Maximum Flow Rate (GPM) |
Recommended Pool Size |
Pressure Loss per 100ft |
|---|---|---|---|
|
1.5″ |
45 GPM |
Up to 15,000 gallons |
8-12 PSI |
|
2″ |
75 GPM |
15,000-25,000 gallons |
4-6 PSI |
|
2.5″ |
120 GPM |
25,000-40,000 gallons |
2-3 PSI |
|
3″ |
180 GPM |
40,000+ gallons |
1-2 PSI |
Electrical Integration and Safety Systems

Planning and installing electrical systems requires understanding code requirements, safety systems, and future upgrade flexibility. Proper electrical design ensures safety while accommodating equipment additions and modifications.
GFCI protection requirements for pool equipment exceed standard residential applications and require specialized breakers and outlets. Pool electrical systems operate in wet environments where electrical faults can be deadly.
Bonding requirements connect all metal components to prevent electrical shock hazards and require specific wire sizes and connection methods. Every metal component within 10 feet of your pool must be electrically connected to prevent potential differences that could cause shock.
Future upgrade planning requires oversized conduits and additional circuit capacity beyond current equipment requirements. Installing extra capacity during initial construction costs little but saves thousands during future upgrades.
Long-term Maintenance Engineering
Successful DIY pools require designing for maintenance from the initial installation. Understanding equipment lifecycles, accessibility requirements, and preventive maintenance systems determines whether your pool becomes a long-term asset or an expensive burden.
Equipment accessibility planning during installation prevents expensive reconstruction during future maintenance and repairs. What seems convenient during construction might become a nightmare when you need to replace a pump motor in five years.
Component lifecycle planning enables staged upgrades without complete system shutdowns and major reconstruction. Planning for equipment replacement from the beginning saves money and prevents major disruptions.
Building homemade swimming pools means taking responsibility for long-term performance, which requires thinking beyond the initial construction phase.
Equipment Accessibility and Service Planning
Designing your installation with 20-year maintenance cycles in mind ensures major components can be serviced or replaced without major excavation or reconstruction. This forward-thinking approach prevents future accessibility problems that plague many DIY installations.
Service access design must accommodate equipment removal and replacement, not just routine maintenance procedures. Cleaning a filter is different from replacing a pump – make sure you can do both without major reconstruction.
Equipment placement affects both aesthetic integration and long-term serviceability, requiring balance between appearance and function. Hiding equipment completely often makes service impossible, while exposed equipment looks unprofessional.
Documentation of installation details becomes critical for future service technicians who weren’t involved in original construction. Take detailed photos and create diagrams showing exactly how everything connects.
Service Access Design Principles
Planning equipment placement and access routes accommodates future service needs without compromising aesthetics or functionality. This planning prevents the common problem of inaccessible equipment that requires expensive reconstruction for service.
Equipment clearance requirements exceed operating space and must accommodate removal of major components for replacement. A pump needs three feet of clearance on all sides for removal, not just enough space to check the strainer basket.
Access route planning considers equipment weight and size for future replacement with potentially larger or different equipment. Today’s compact equipment might be replaced with larger units that won’t fit through your carefully planned access routes.
Removable access panels and hatches provide concealed access while maintaining aesthetic integration with landscaping. Well-designed access points look intentional rather than like afterthoughts.
Equipment Access Planning Checklist:
-
☐ Measure equipment dimensions including removal clearances
-
☐ Plan access routes for heaviest components
-
☐ Design removable landscaping elements around equipment
-
☐ Install permanent access panels where needed
-
☐ Document all underground utility locations
-
☐ Create equipment replacement timeline and procedures
-
☐ Plan for larger replacement equipment dimensions
-
☐ Ensure electrical disconnect accessibility
Component Lifecycle Planning
Understanding replacement schedules for major components enables system design that allows staged upgrades without complete system shutdown. This planning prevents the all-or-nothing replacement scenarios that create major expense events.
Pool equipment has predictable lifecycles ranging from 5-15 years depending on component type and usage patterns. Pumps typically last 8-12 years, heaters 10-15 years, and automation systems 5-8 years.
Staged replacement planning allows upgrading individual components without affecting entire system operation. Designing systems with isolation valves and disconnect points enables component replacement without draining the pool.
Compatibility planning ensures future equipment options remain available and don’t require complete system redesign. Equipment manufacturers change specifications over time, and your system design should accommodate reasonable variations.
Modern DIY approaches are expanding beyond traditional pools, as seen in projects demonstrating how component planning principles apply to various water feature projects, including DIY dog pool construction from Dogster.
Predictive Maintenance System Design
Implementing monitoring systems provides early warning of potential failures, enabling planned maintenance rather than emergency repairs. These systems reduce long-term costs while preventing unexpected pool downtime.
Monitoring systems track equipment performance parameters that indicate developing problems before failure occurs. Pump amperage draw, filter pressure differential, and water chemistry trends all provide early warning signs.
Early warning systems enable scheduling maintenance during convenient times rather than responding to emergency failures. Replacing a pump motor during the week costs less than emergency weekend service calls.
Predictive maintenance reduces total lifecycle costs by preventing secondary damage from equipment failures. A failed pump can damage other system components if not caught quickly.
Homemade swimming pools benefit significantly from monitoring systems because DIY builders often lack the experience to recognize subtle signs of developing problems. Automated monitoring fills this knowledge gap effectively.
Project Waste Stream Management
DIY pool construction generates massive waste volumes requiring professional management strategies. From excavated soil to construction debris, efficient waste handling saves thousands while ensuring environmental compliance and maintaining construction workflow.
Pool construction waste streams include excavated soil, construction debris, and packaging materials, each requiring different disposal methods. You can’t just throw everything in one dumpster and hope for the best.
Professional waste management strategies transform disposal costs from project budget killers into manageable, predictable expenses. Planning waste handling from the beginning prevents costly surprises and project delays.
Excavation Waste Optimization
Soil removal represents one of the largest waste streams and costs in pool construction. Strategic planning transforms waste into valuable resources while minimizing disposal costs through reuse and redistribution strategies.
Excavated soil volumes typically exceed pool volume by 20-30% due to expansion and access requirements. Soil expands when disturbed, so you’ll have more material to handle than you initially calculated.
Soil quality testing determines reuse potential and identifies contamination that affects disposal options. Clean soil has value for landscaping projects, while contaminated soil requires expensive special disposal.
On-site reuse planning can eliminate disposal costs while improving property grading and landscaping. Strategic soil placement can solve drainage problems and create attractive landscape features.
A DIY builder in Colorado excavated 45 cubic yards of soil for their 18×36 foot pool. By testing the soil quality and using it to create raised garden beds and improve drainage around their property, they eliminated $2,200 in disposal costs while adding landscaping value worth $4,500.
Soil Reuse and Redistribution Planning
Analyzing excavated soil for reuse potential in landscaping, grading, or other property improvements eliminates disposal costs while adding value to your property. This planning requires understanding soil quality and identifying reuse opportunities.
Soil contamination testing identifies materials suitable for reuse versus those requiring special disposal procedures. Simple soil tests can reveal contamination that makes reuse impossible and disposal expensive.
Property improvement opportunities such as regrading, raised beds, or drainage improvements can utilize excess soil productively. Every cubic yard you reuse on-site saves disposal costs and trucking expenses.
Neighbor coordination for soil sharing reduces disposal costs while building community relationships. Clean fill dirt has value, and neighbors often appreciate free soil for their own projects.
Construction Debris Management Systems

Pool construction generates diverse waste streams requiring different disposal methods. Efficient sorting and disposal planning prevents site congestion while minimizing costs through appropriate disposal method selection.
Construction debris sorting enables recycling of valuable materials and reduces landfill disposal costs. Metal, concrete, and clean wood all have recycling value that can offset disposal expenses.
Material-specific disposal requirements affect cost and scheduling, requiring advance planning for efficient removal. Hazardous materials need special handling, while recyclables can often be disposed of for free.
Site organization during construction prevents waste accumulation that interferes with work progress and safety. Keeping debris sorted and contained maintains a professional work environment.
Material Sorting and Recovery Protocols
Implementing systematic sorting maximizes recycling opportunities while minimizing landfill waste. This organization maintains site cleanliness while reducing disposal costs through material recovery.
Material separation during construction is more efficient than post-construction sorting and enables better recycling rates. Separating materials as you work prevents contamination that makes recycling impossible.
Valuable materials such as metals, concrete, and clean wood have recycling value that offsets disposal costs. Scrap metal dealers often pay for clean metal, while concrete can be recycled into aggregate.
Contaminated materials require special handling and disposal, making prevention through proper storage important. Oil-soaked materials and chemical containers need hazardous waste disposal.
Packaging Waste Minimization Strategies
Coordinating with suppliers to minimize packaging waste and planning efficient disposal of unavoidable packaging materials reduces waste volume while maintaining site organization.
Supplier coordination can reduce packaging through bulk deliveries and returnable packaging programs. Many suppliers will take back pallets and packaging materials if you arrange it in advance.
Packaging material separation enables recycling of cardboard, plastic, and metal components. Clean packaging materials are easily recyclable if properly separated.
Timing of packaging disposal prevents site accumulation while maintaining access for construction equipment. Regular removal prevents packaging from becoming a safety hazard or work impediment.
When you’re dealing with tons of excavated soil, construction debris, and packaging waste, the logistics can quickly overwhelm your DIY pool project. Jiffy Junk’s comprehensive waste removal service eliminates this challenge, allowing you to focus on the skilled construction work rather than managing multiple dump runs and disposal logistics. Their environmentally responsible approach ensures your excavated soil and construction materials are properly sorted for recycling and reuse, while their flexible scheduling accommodates the unpredictable timeline of DIY construction projects.
For homemade swimming pools projects, proper construction debris removal planning becomes essential as excavation generates massive amounts of soil and construction waste that requires professional handling.
Ready to eliminate the waste management headache from your pool project? Contact Jiffy Junk today for a consultation on handling your construction debris professionally and efficiently.
The Seasonal Construction Window Strategy
Pool construction timing affects everything from soil conditions to equipment availability, yet seasonal variables receive minimal attention in most planning. Understanding weather patterns, ground conditions, and supply chain fluctuations reduces costs significantly while improving installation success rates.
Seasonal timing strategies can reduce construction costs by 25-40% through strategic scheduling of different construction phases. Most builders start in spring when everyone else does, driving up costs and reducing equipment availability.
Weather-dependent construction phases have optimal windows that dramatically affect both quality and efficiency of installation work. Concrete work in freezing weather creates problems that last for decades, while excavation in saturated soil creates access nightmares.
Weather-Dependent Construction Phases
Different construction phases have optimal weather windows that dramatically affect both quality and efficiency. Timing excavation, concrete work, and finishing phases according to seasonal conditions prevents costly delays and rework while optimizing working conditions.
Soil moisture content affects excavation difficulty, equipment access, and structural stability, making timing critical for efficient work. Dry soil excavates easily but may require water for compaction, while wet soil creates equipment access problems.
Concrete work requires specific temperature ranges for proper curing, with extreme temperatures causing strength and durability problems. Concrete poured in freezing weather never achieves full strength, while hot weather causes rapid curing that creates cracking.
Equipment rental rates fluctuate seasonally with peak demand periods driving prices up significantly during busy construction seasons. Spring and summer equipment rental can cost twice as much as fall and winter rates.
Ground Condition Optimization Timing
Soil moisture content affects excavation difficulty, equipment access, and structural stability. Understanding seasonal moisture patterns enables strategic timing that optimizes working conditions while preventing equipment problems.
Dry soil conditions enable efficient excavation but may require water addition for compaction during backfilling operations. Overly dry soil doesn’t compact properly and can settle after construction.
Wet soil creates equipment access problems and may require dewatering systems that add cost and complexity to excavation. Saturated soil also creates unstable excavation walls that can collapse.
Frozen ground prevents excavation entirely and may delay projects for months in northern climates. Planning around freeze dates becomes critical for project completion.
Equipment Rental Market Dynamics
Construction equipment rental rates fluctuate seasonally, with peak demand periods driving prices up significantly. Understanding these market dynamics enables cost savings through strategic timing of equipment-intensive phases.
Spring and summer peak demand can double equipment rental rates compared to off-season availability. Everyone wants to rent excavators in April, but few people need them in November.
Equipment availability becomes limited during peak seasons, potentially delaying projects that lack advance reservations. Popular equipment gets booked months in advance during busy seasons.
Off-season rentals often include better terms and longer rental periods at reduced daily rates. Rental companies prefer steady off-season income to idle equipment.
Material Price Fluctuation Strategies
Construction materials follow seasonal pricing patterns influenced by demand, shipping costs, and manufacturing schedules. Strategic purchasing timing can achieve significant cost savings on major material purchases.
Material prices typically peak during spring construction season and decline during fall and winter months. Buying materials in January for spring installation can save 15-25% compared to peak season pricing.
Shipping costs fluctuate with fuel prices and seasonal demand, affecting delivered material costs significantly. Winter shipping often costs less due to reduced demand for trucking services.
Advance purchasing during low-demand periods requires storage planning but can achieve substantial cost savings. Proper storage prevents material degradation while capturing off-season pricing.
Regional Code Variation Navigation
Building codes, permit requirements, and inspection procedures vary significantly between jurisdictions. Understanding local nuances prevents permit delays while ensuring first-pass inspection approval through proper preparation.
Local code variations affect setback requirements, electrical specifications, and safety features beyond state-level building codes. Municipal codes often add requirements that state codes don’t address.
Inspection procedures and inspector expectations vary significantly between jurisdictions, requiring location-specific preparation strategies. What passes inspection in one county might fail in the neighboring county.
Micro-Climate Considerations for Pool Design

Local environmental factors including freeze depth, wind patterns, and sun exposure affect pool design requirements beyond standard building codes. Understanding these factors prevents problems while optimizing pool performance.
Historical freeze depth data determines winterization requirements and affects plumbing depth specifications for year-round operation. Pipes that freeze and burst create expensive damage and extended downtime.
Property-specific sun and shade patterns affect heating requirements and equipment sizing for energy-efficient operation. A pool in full shade needs different heating capacity than one in full sun.
Prevailing wind directions influence pool heating efficiency and debris accumulation patterns that affect maintenance requirements. Wind patterns affect both heat loss and cleaning requirements.
Inspector Relationship Building Techniques
Building positive relationships with local inspectors through preparation, communication, and professionalism accelerates the approval process while reducing stress and delays associated with inspection failures.
Pre-construction meetings with inspectors clarify expectations and identify potential issues before construction begins. Most inspectors appreciate builders who ask questions before problems develop.
Detailed documentation packages that exceed minimum requirements demonstrate professionalism and preparation. Well-organized permit applications and construction documents create positive first impressions.
Organized job sites and safety compliance show respect for inspector expertise while facilitating thorough inspections. Clean, safe job sites make inspections easier and more pleasant for everyone involved.
Final Thoughts
DIY pool construction success depends on understanding the complex systems that exist beneath the surface – both literally and figuratively. The underground infrastructure, waste management logistics, and seasonal timing strategies covered in this guide represent the difference between a successful project and an expensive learning experience.
Your pool project will generate challenges that extend far beyond the installation itself. From managing tons of excavated soil to coordinating equipment rentals during peak season, these logistical elements can quickly overwhelm even well-prepared DIY builders. The key lies in recognizing these challenges early and planning comprehensive solutions that address both the technical and practical aspects of construction.
Remember that professional assistance in specific areas – particularly waste management and specialized testing – often provides better value than attempting to handle every aspect independently. The goal isn’t to prove you can do everything yourself, but to create a successful pool that provides years of enjoyment without ongoing problems.
Underground infrastructure planning prevents 90% of DIY pool failures while adding minimal cost to overall project budgets. Spending $2,000 on proper soil analysis and drainage design prevents $20,000 in structural repairs later.
Waste management logistics represent a major project component that benefits significantly from professional handling rather than DIY approaches. When dealing with large volumes of excavated soil, understanding yard waste removal options helps manage the organic debris and landscaping materials that accumulate during site preparation.
Seasonal timing strategies and local code compliance require location-specific research that can’t be generalized from standard construction guides. What works in Arizona won’t work in Michigan, and successful builders adapt their approach accordingly.
For homemade swimming pools, planning for future appliance removal needs becomes crucial when pool equipment reaches end-of-life and requires professional disposal services. Effective scrap metal pick up becomes valuable during pool construction as electrical conduit, reinforcement materials, and equipment generate significant recyclable metal waste.
The difference between a successful DIY pool project and a costly disaster often comes down to planning for the unglamorous aspects that most builders ignore. Focus on getting the foundation right, plan for the logistics that will challenge you, and don’t hesitate to bring in professionals for the specialized work that can make or break your project.
Your backyard pool should be a source of enjoyment, not a constant reminder of shortcuts taken during construction. Invest the time and effort in proper planning, and you’ll be swimming in success rather than drowning in problems.