
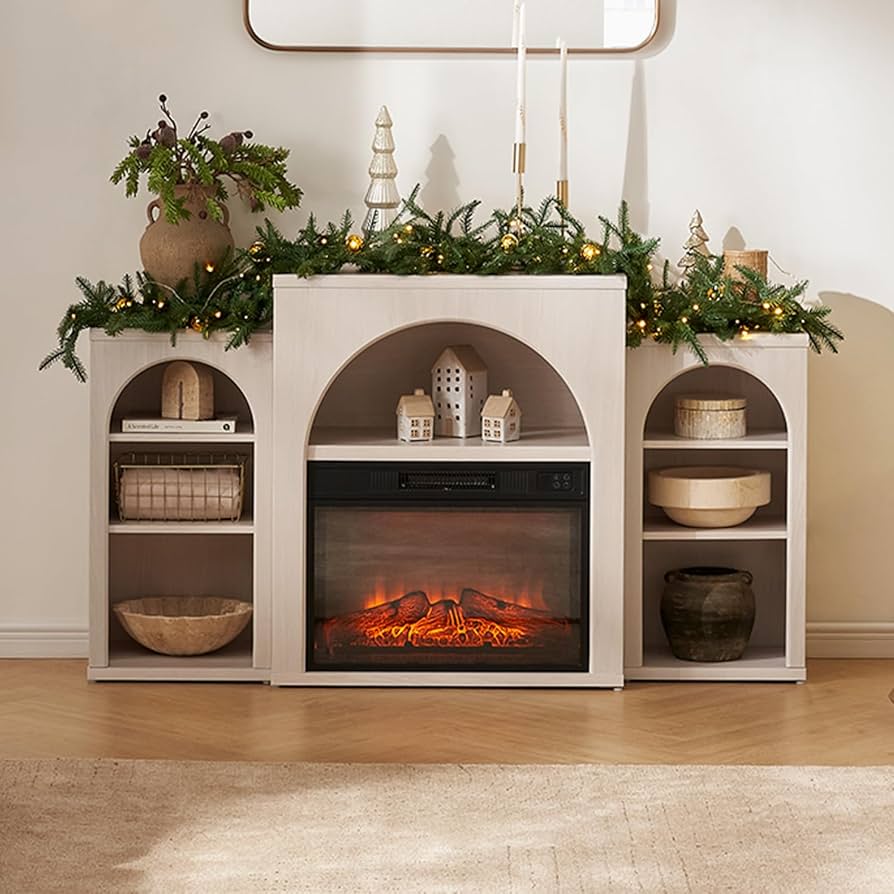
DIY Fireplace Mantel Construction That Actually Lasts: The Hidden Techniques Pros Don’t Want You to Know
Most DIY fireplace mantel projects fail within a few years because we skip the fundamentals that professionals never talk about. I’ve seen countless beautiful mantels that looked perfect on installation day, only to develop cracks, sag, or pull away from the wall after one heating season. The difference between amateur attempts and professional-quality installations isn’t just craftsmanship – it’s understanding the hidden infrastructure and material treatments that make mantels last decades.
While standard mantel heights typically range from 54 to 60 inches above the floor, the real secret lies in what you can’t see. The mounting system, material preparation, and thermal considerations determine whether your investment becomes a lasting architectural feature or an expensive mistake.
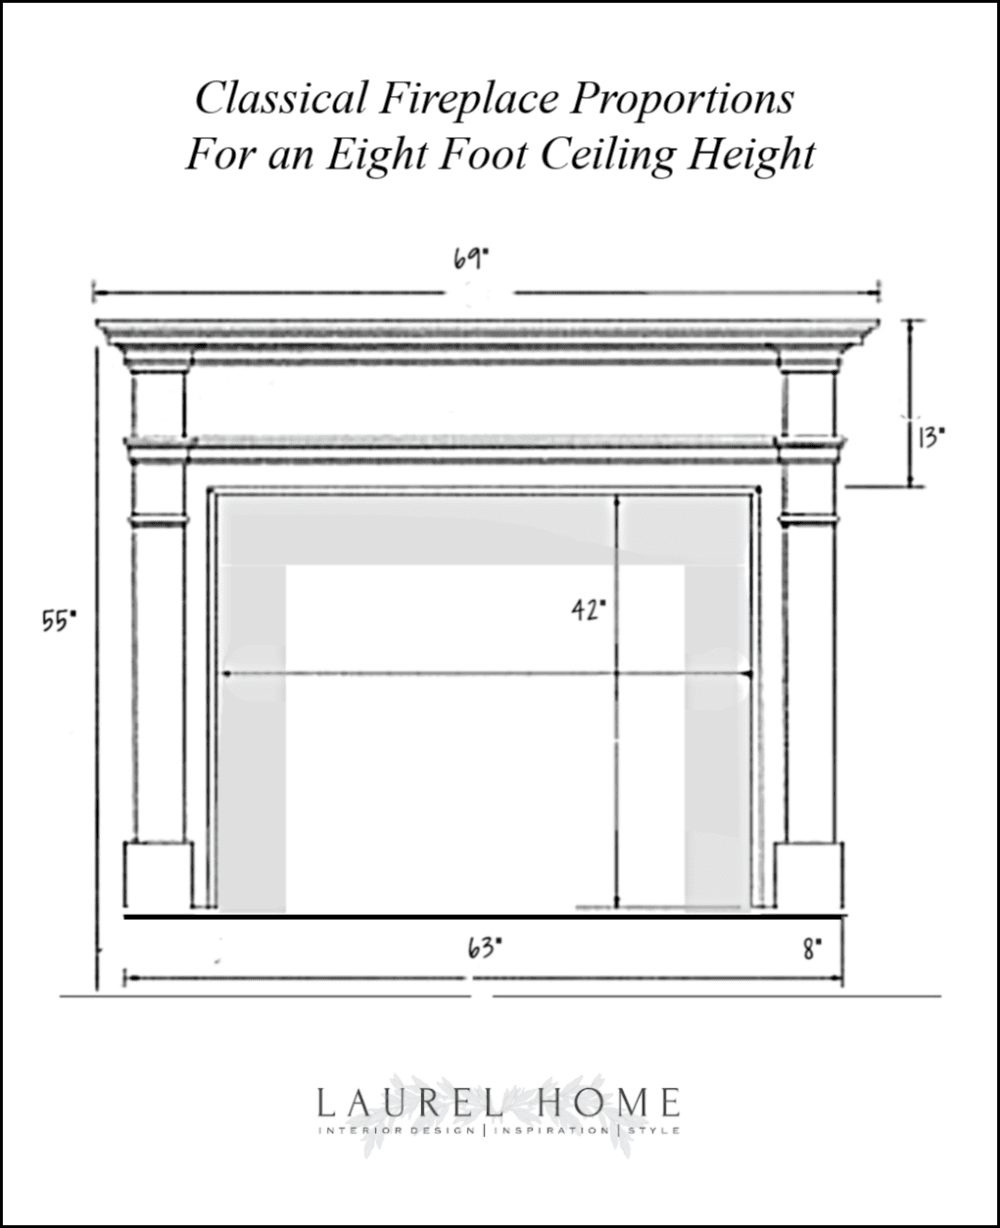
Table of Contents
- The Psychology Behind Mantel Placement and Room Dynamics
- Hidden Infrastructure: Building the Foundation Most DIYers Skip
- Material Alchemy: Transforming Basic Wood into Architectural Masterpieces
- Installation Choreography: Sequencing Your Build for Success
- Seasonal Adaptation and Long-Term Evolution Planning
- Final Thoughts
TL;DR
- Your mantel’s psychological impact on room dynamics matters more than basic construction techniques – understanding visual weight distribution prevents design disasters
- Hidden infrastructure work determines whether your mantel lasts decades or fails within years – wall assessment and advanced mounting systems are non-negotiable
- Professional-grade material treatments transform ordinary lumber into custom millwork through grain matching, surface texturing, and advanced joinery techniques
- Installation success depends on careful sequencing, pre-installation mock-ups, and systematic dry-fitting before permanent assembly
- Climate-responsive design elements and modular components ensure your mantel adapts to changing needs and environmental conditions over time
The Psychology Behind Mantel Placement and Room Dynamics
Your fireplace mantel fundamentally shapes how people interact with your living space through visual weight distribution and spatial psychology. Most DIY guides ignore these psychological factors, focusing only on construction basics, but understanding how mantel proportions influence perceived room balance determines whether your finished project feels harmonious or jarring within your space.
Visual weight depends on color, texture, size, and positioning relative to other room elements – not physical weight. Before you cut a single board for your DIY fireplace mantel, you need to map every visual anchor in your room and number them 1-10 based on dominance. This assessment guides your design decisions and prevents the common mistake of creating a mantel that competes randomly for attention.
The 60-30-10 proportion rule applies directly to mantel materials: 60% dominant material, 30% secondary element, 10% accent details. When I plan a DIY mantel project, I use this rule to ensure the finished piece feels intentional rather than chaotic.
According to Elle Decor’s latest fireplace design trends, designers are seeing mantels trend bolder than ever before, with ELLE DECOR A-List designer Rayman Boozer noting that “many of our clients don’t want traditional mantels anymore” and instead “opt for a flatter profile with nothing distracting from the hearth and surround; this allows the fire to be the focus.”
Understanding Visual Weight Distribution in Your Space
Visual weight distribution determines room balance through careful analysis of competing elements and strategic mantel positioning. You need to identify every visual anchor in your room – large furniture, artwork, windows, architectural features – then design your DIY fireplace mantel to either complement the strongest anchor or create intentional dramatic contrast.
Create a simple floor plan marking each visual anchor with dominance ratings to guide mantel design decisions. Your mantel must work with existing visual hierarchy rather than competing randomly for attention. Strategic contrast can create dramatic focal points when executed with proper understanding of room dynamics.
| Room Element | Visual Weight Rating (1-10) | Mantel Design Response |
|---|---|---|
| Large Windows | 8-9 | Complement with horizontal lines |
| Built-in Bookcases | 7-8 | Match proportions and materials |
| Artwork Gallery | 6-7 | Create visual breathing space |
| Statement Furniture | 5-6 | Balance with similar mass |
| Architectural Details | 4-5 | Echo existing trim profiles |
Micro-Climate Considerations for Smart Material Selection
The fireplace area experiences constant temperature fluctuations that most DIYers completely overlook during material selection. Understanding these micro-climate effects prevents costly repairs and ensures your DIY mantel ages gracefully through seasonal heating cycles and moisture changes.
Different wood species expand and contract at varying rates – quartersawn lumber moves less than plain-sawn. When building your DIY wood mantel, this difference becomes critical for long-term stability. Hidden expansion joints every 36 inches prevent cracking on mantels longer than 6 feet.
Slotted mounting holes allow thermal movement without creating structural stress points. Research shows that mantels typically range between 1.5 to 3 inches thick, with most installations falling within this standard range for optimal visual proportion and structural stability.
Wood Movement Patterns in Heat Zones
Wood grain direction and species selection directly impact how your mantel responds to thermal cycling near the fireplace. Position grain direction to work with thermal movement rather than against it, and choose lumber cuts that minimize seasonal expansion and contraction.
Quartersawn lumber provides superior stability for horizontal mantel shelves where movement matters most. Grain direction positioning prevents splitting and warping during heating seasons.
Strategic Fastener Placement for Thermal Movement
Proper fastener placement allows materials to expand and contract naturally without compromising structural integrity. Use slotted mounting holes rather than round ones for all but primary structural connections to prevent stress concentration points.
Primary structural connections remain fixed while secondary attachment points accommodate movement. Stress point prevention through strategic fastener design extends mantel lifespan significantly. Stone mantels with standard thickness of 2-6 inches can usually be positioned higher as the weight will not substantially impact the structure, while mantels over 6 inches thick generally require lower mounting to prevent leverage issues that could potentially dislodge the mantel.
A 60-inch mantel experiencing 1/4-inch seasonal movement requires slotted mounting holes at 18-inch intervals, with only the center connection using round holes for primary structural support. This allows natural expansion while maintaining secure attachment.
Hidden Infrastructure: Building the Foundation Most DIYers Skip
Professional mantel longevity depends more on invisible infrastructure than visible craftsmanship. This foundation work – often completely skipped in typical DIY approaches – determines whether your investment lasts decades or requires replacement within years through proper wall assessment, load distribution, and advanced mounting systems.
Wall condition assessment and remediation must happen before any construction begins. I’ve seen too many DIY fireplace mantel projects fail because builders assumed their walls were ready for mounting. Advanced mounting systems beyond basic brackets provide superior security while remaining invisible.
Integrated planning for future electrical and cable runs prevents costly wall damage later. When you’re opening walls for mounting reinforcement, it’s the perfect time to add conduit for future lighting or smart home integration.

Wall Condition Assessment and Structural Reinforcement
Most walls aren’t ready for mantel installation without proper preparation and reinforcement. Thorough assessment prevents future failures by identifying weak mounting surfaces and implementing strategic reinforcement before installation begins.
Stud location verification through pilot holes confirms load distribution calculations. Don’t trust your stud finder completely – drill small pilot holes to verify actual framing locations. Drywall removal and plywood backing plate installation distributes weight across multiple studs.
Load calculations must account for final mantel weight plus decorative items and seasonal additions. When learning how to build a fireplace mantel, this step separates successful projects from failures. Building codes typically mandate that mantels must have at least a 6-inch clearance from the fireplace opening for every 1/2 inch that the mantel protrudes, with clearances increasing proportionally for deeper shelves.
Stud Location and Load Distribution Analysis
Accurate stud location and proper load distribution analysis form the foundation of secure mantel mounting. Verify stud finder results with pilot holes, then calculate weight distribution based on your complete mantel design including decorative elements.
High-quality stud finders require verification through small pilot hole testing. Install blocking between studs when design requires mounting points that don’t align with existing framing.

Drywall Integrity and Reinforcement Strategies
Drywall reinforcement through backing plates creates solid mounting surfaces for heavy mantel installations. Remove drywall in mounting areas and install 3/4-inch plywood backing that spans at least three studs for proper weight distribution.
Plywood backing plates distribute weight more evenly than direct drywall mounting. Re-drywalling over plywood maintains clean finished appearance while providing structural support.
Advanced Mounting Systems Beyond Basic Brackets
Sophisticated mantel installations require robust mounting systems that remain completely invisible while providing superior holding power. Standard L-brackets work for lightweight projects, but heavy or removable mantels need professional-grade attachment methods.
French cleat systems provide removable yet secure mounting for DIY mantel projects over 50 pounds. Continuous cleat installation requires perfect leveling and secure fastening to at least three studs. Wire management planning during construction prevents future wall damage and maintains clean aesthetics.
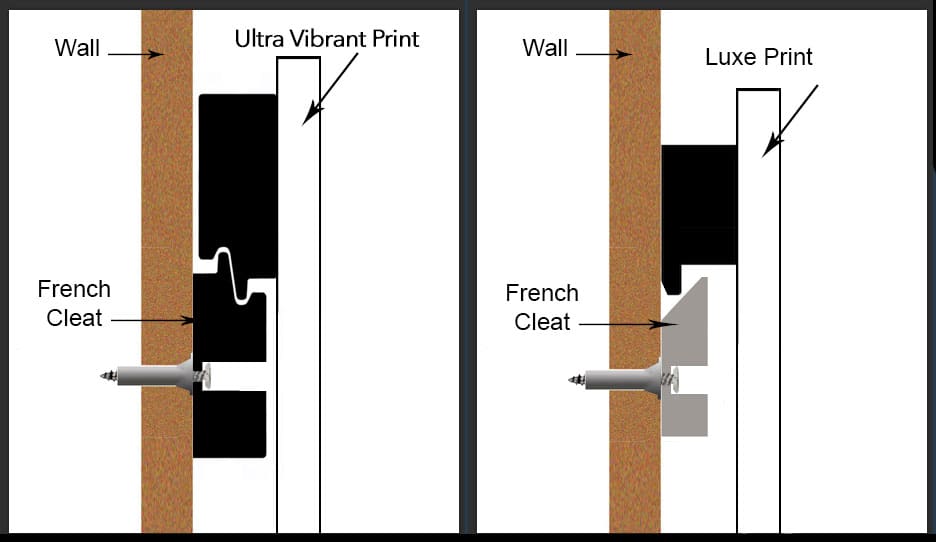
French Cleat Systems for Heavy Mantels
French cleat mounting systems offer superior security for heavy mantels while maintaining removability for maintenance access. Install continuous cleats with 45-degree bevels on both wall and mantel components, ensuring perfect level alignment.
45-degree bevel cuts on both wall and mantel cleats create interlocking security. Perfect level installation on wall cleat ensures proper mantel alignment and weight distribution.
Integrated Wire Management Planning
Future electrical needs require planning during initial construction to avoid costly wall damage later. Install conduit runs within wall cavities before closing up mounting areas, including outlets for seasonal lighting and charging stations.
Conduit installation during construction prevents future wall opening and repair costs. Multiple outlet planning accommodates seasonal lighting, charging stations, and media equipment needs.
Material Alchemy: Transforming Basic Wood into Architectural Masterpieces
The gap between amateur and professional results lies in sophisticated treatment techniques that transform ordinary lumber into architectural elements. Advanced grain matching, surface texturing, and joinery methods elevate common materials to custom millwork quality without expensive specialty lumber.
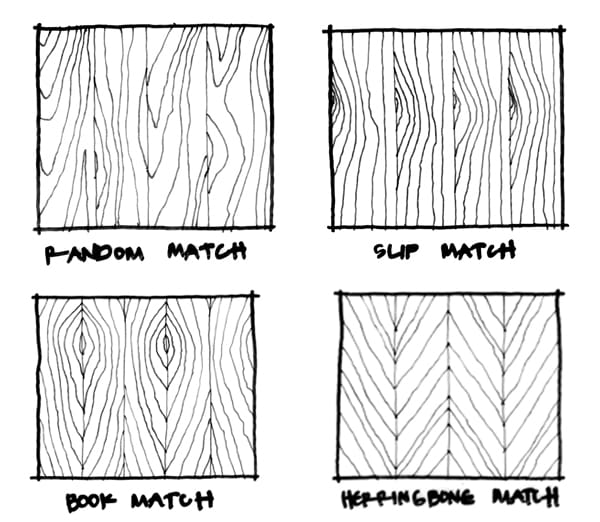
Grain matching and book-matching strategies create seamless visual flow across multiple boards. When I build a mantel, I spend as much time selecting and arranging lumber as I do on actual construction. Surface texturing techniques add authentic character through controlled distressing and aging methods.
Advanced joinery creates invisible connections that appear carved from single pieces. These techniques separate DIY fireplace mantel projects that look homemade from those that rival professional installations.
Recent trends show homeowners are embracing bold color choices for fireplace mantels, with House Beautiful reporting that “few features are more attractive than painted fireplaces” and that “the color of paint you choose to paint your fireplace can even transform the entire room.”
Grain Matching and Book-Matching Strategies
Professional millworkers understand that wood grain patterns make or break visual impact in mantel construction. Sequential board selection and book-matching techniques create continuous grain flow and dramatic symmetrical patterns that elevate DIY projects to custom millwork quality.
Sequential board selection from the same log creates continuous grain patterns across mantel width. Book-matching involves resawing thick boards and rejoining them for mirror-image grain symmetry. Careful edge jointing and invisible glue lines maintain professional appearance in rejoined boards.
When planning your DIY fireplace mantel, grain selection deserves as much attention as joinery techniques.
Sequential Board Selection for Continuous Patterns
Choosing boards cut from the same log creates seamless grain flow across your mantel’s width. Look for sequential board numbers or examine end grain patterns to identify adjacent boards from the tree, then arrange them for optimal visual continuity.
Sequential board numbers or end grain pattern examination identifies boards from the same log section. Proper board arrangement creates continuous grain flow rather than random pattern interruptions.

Creating Dramatic Book-Matched Panels
Book-matching creates striking mirror-image grain patterns by resawing thick boards down the middle and opening them for symmetrical rejoining. This technique works best with boards showing cathedral patterns or interesting figure characteristics.
Resawing thick boards creates mirror-image halves for dramatic symmetrical patterns. Cathedral grain patterns and figured wood show the most striking book-matched results.
Surface Texturing Techniques for Character Development
Controlled surface texturing adds authentic age and character to new lumber through wire brushing, strategic distressing, and burn techniques. These methods create subtle texture variations that enhance stain penetration and light reflection for natural-looking character development.
Wire brush texturing raises soft wood fibers while preserving hard grain lines for enhanced stain penetration. Strategic wear pattern placement in corners, edges, and high-touch areas creates authentic aging appearance. Controlled charring with torch application creates varied color tones when integrated with proper staining.
Your DIY mantel can achieve the character of antique millwork through these professional texturing techniques. The key is subtlety – overdoing distressing reveals artificial treatment immediately.
| Texturing Technique | Best Wood Species | Tool Required | Finish Compatibility |
|---|---|---|---|
| Wire Brushing | Pine, Oak, Ash | Brass wire brush | All stains and finishes |
| Strategic Distressing | Softwoods | Chains, hammers, awls | Oil-based stains preferred |
| Controlled Charring | Cedar, Pine | Propane torch | Clear finishes only |
| Hand Planing | Hardwoods | Hand plane | Natural oil finishes |
| Sandblasting | All species | Sandblaster | Requires sealing |
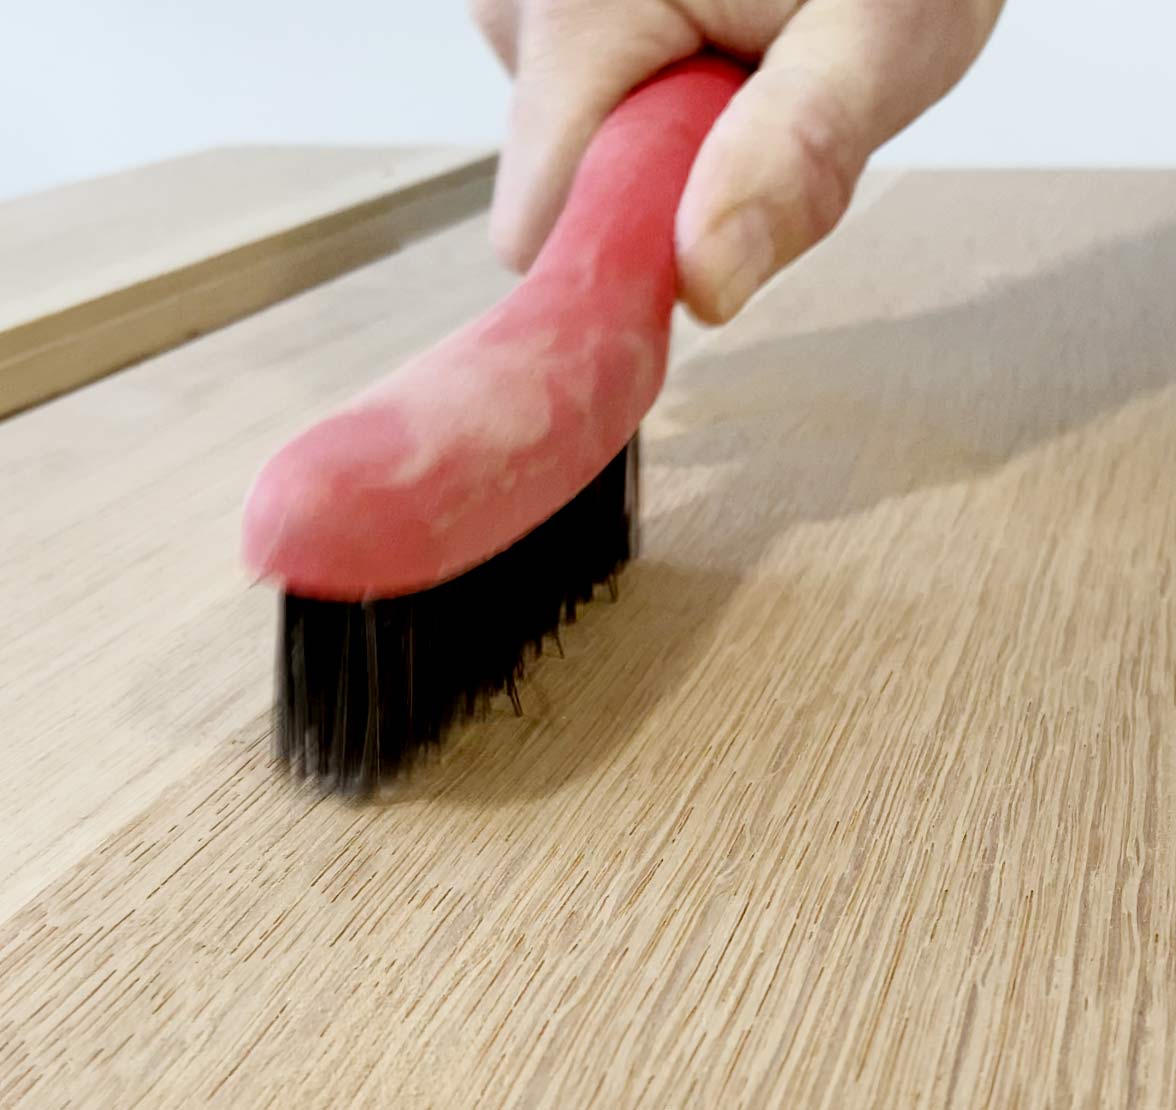
Wire Brush Texturing for Raised Grain Effects
Brass wire brush texturing along grain direction creates subtle raised grain effects that catch light beautifully and allow uneven stain penetration. This cerusing technique adds texture without obvious artificial appearance.
Brass wire brushes raise soft fibers while leaving hard grain lines intact for natural texture variation. Along-grain brushing direction prevents cross-grain scratching that reveals artificial treatment.
Strategic Dent and Ding Placement
Authentic wear patterns require studying antique mantels to understand natural aging locations. Use various tools for realistic distressing in corners, edges, and high-touch areas while avoiding obvious over-distressing that reveals artificial aging.
Natural wear occurs in predictable locations – corners, edges, and frequently touched surfaces. Subtle distressing with varied tools creates realistic wear without obvious artificial appearance.
To create authentic aging on a new oak mantel, focus distressing on the front corners where hands naturally grip, the top center where decorative items are placed, and the bottom edges where feet might kick. Use a chain for random dents, an awl for small scratches, and a hammer for corner rounding.
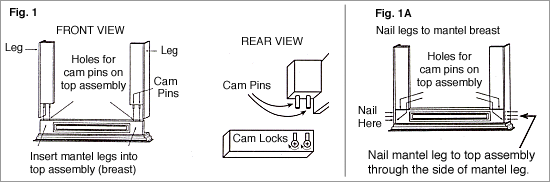
Advanced Joinery for Invisible Connections
Seamless mantel assemblies require advanced joinery techniques that create connections appearing carved from single pieces. Domino joints, biscuit connections, and mitered returns strengthen assemblies while maintaining clean visual lines.
Domino and biscuit joints prevent seasonal gap opening while adding significant glue surface area. Mitered return techniques on crown moldings eliminate end grain exposure for professional corner transitions. Hidden joinery provides structural strength without visible fasteners or connection points.
These techniques transform your DIY fireplace mantel from obviously assembled pieces into what appears to be carved architectural millwork.
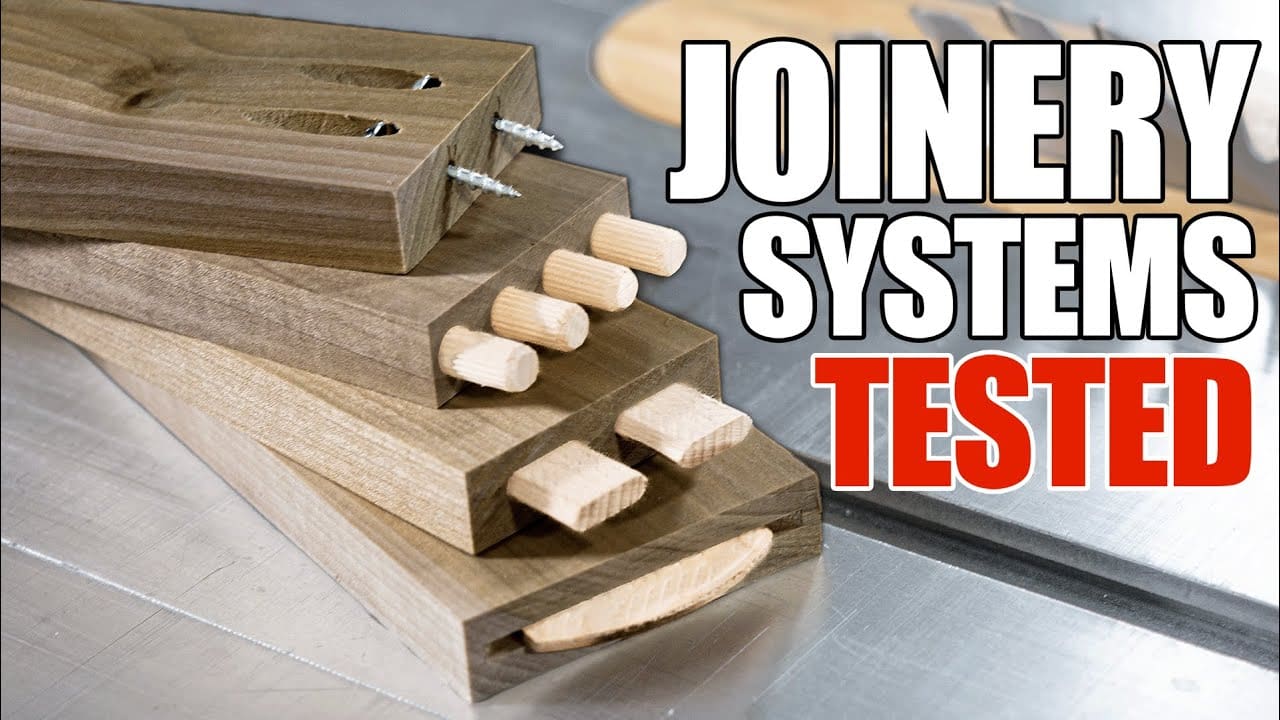
Domino and Biscuit Joint Applications
Domino or biscuit joints strengthen all major connections even when screws provide primary structural support. These joints prevent seasonal movement from opening visible gaps while significantly increasing glue surface area for stronger bonds.
Joint reinforcement prevents seasonal gap opening in visible connection areas. Increased glue surface area provides superior bond strength compared to simple butt joints.
Mitered Return Techniques for Crown Moldings
Mitered returns on complex crown molding profiles create seamless corner transitions by wrapping profiles around corners rather than using butt joints. This technique eliminates end grain exposure for professional-looking installations.
Profile wrapping around corners creates seamless transitions without visible end grain. Mitered returns maintain consistent molding profile appearance through corner transitions.
Installation Choreography: Sequencing Your Build for Success
Professional installations succeed through carefully planned sequences that account for access, adjustment, and finishing requirements. Understanding proper installation choreography prevents the frustration of disassembling completed work when sequencing errors create access or fitting problems.
Pre-installation mock-up strategies test fit and proportions before cutting expensive materials. I’ve learned this lesson the hard way – spending time on cardboard templates saves money and frustration later. Systematic dry-fit assembly protocols verify all connections and identify needed adjustments.
Finish application planning addresses challenging installation environments and protection requirements. When you’re working around an active fireplace, dust control and masking become critical for professional results.
Your DIY fireplace mantel project deserves the same systematic approach professionals use. The extra planning time pays dividends in smoother installation and better final results.
Pre-Installation Mock-Up Strategies
Full-scale testing prevents costly mistakes through cardboard templates and complete dry-fit assemblies before permanent installation. This process allows proportion testing, clearance verification, and issue identification while materials can still be easily modified.
Cardboard template development creates full-scale patterns for precise fitting and proportion testing. Living with taped templates for several days confirms proportions feel right in your space. Dry-fit assembly protocols systematically test all connections before applying finishes.
Living in a 1,000 square foot home demonstrates the importance of maximizing every inch of space, which is why incorporating storage into mantel design has become increasingly popular among space-conscious homeowners.
When planning your DIY mantel, templates reveal issues that drawings can’t capture.
Cardboard Template Development
Full-scale cardboard templates allow proportion testing and clearance checking before cutting expensive lumber. Tape templates to your wall and live with them for several days to ensure proportions feel appropriate in your specific space.
Full-scale templates reveal proportion issues before expensive material cutting begins. Several days of living with templates confirms size and positioning decisions feel right.
Pre-Installation Template Checklist:
- Create full-scale cardboard template
- Test template positioning at various heights
- Live with taped template for 3-7 days
- Check clearances for all decorative items
- Verify proportions with room furniture
- Confirm electrical outlet positioning
- Document final measurements and positioning
Dry-Fit Assembly Protocols
Complete dry-fit assemblies before finish application verify square, level, and proper joint alignment. Use this opportunity to number all joints and create written assembly sequences based on actual fitting experience.
Joint numbering during dry-fit prevents confusion during final assembly with finishes applied. Written assembly sequences based on dry-fit experience prevent sequencing errors during installation.
During dry-fit assembly of a 72-inch mantel with decorative corbels, number each joint (1-8), photograph the assembly sequence, and create a written checklist noting that the left corbel must be installed before the crown molding due to access limitations. This prevents having to remove finished pieces during final installation.
Finish Application in Challenging Environments
Achieving professional finish results despite installation constraints requires comprehensive masking systems and immediate touch-up strategies. Plan for installation damage by keeping finish materials and tools readily available throughout the process.
Comprehensive masking systems protect fireplace surrounds and flooring during finish application. Touch-up material availability allows immediate repair of installation damage before dust contamination. Masking removal timing while finishes remain slightly tacky prevents edge buildup problems.
Working around fireplaces creates unique finishing challenges that require adapted techniques for your DIY fireplace mantel project.
Masking and Protection Systems
High-quality masking systems using painter’s tape and plastic sheeting protect surrounding surfaces during finishing work. Pay special attention to fireplace surrounds and flooring, removing masking while finishes remain slightly tacky.
High-quality painter’s tape and plastic sheeting provide comprehensive surface protection. Masking removal timing prevents edge buildup while maintaining clean finish lines.
Finish Protection Checklist:
- Apply high-quality painter’s tape to all adjacent surfaces
- Install plastic sheeting over flooring and furniture
- Protect fireplace surround with cardboard and tape
- Cover electrical outlets and switches
- Prepare touch-up materials and brushes
- Set timer for masking removal while finish is tacky
- Have clean rags ready for immediate cleanup
Touch-Up and Repair Strategies
Installation stress inevitably creates finish damage that requires immediate attention. Keep finish materials and application tools readily available, addressing scratches and dings before dust or debris complicates repair work.
Immediate damage repair prevents dust contamination that complicates touch-up work. Ready availability of finish materials and tools enables quick response to installation damage.
When your DIY mantel project generates substantial debris – from old mantel removal to construction waste and material packaging – proper cleanup becomes essential. Rather than interrupting your creative flow with multiple dump runs, professional debris removal services can handle the heavy lifting while you focus on craftsmanship.
Seasonal Adaptation and Long-Term Evolution Planning
Sophisticated mantel design accounts for changing seasonal requirements and evolving household needs over decades of use. Climate-responsive elements and modular components ensure your mantel adapts to extreme weather patterns while accommodating future modifications and technology upgrades.
Climate-responsive design elements engineer flexibility for humidity changes and thermal cycling. Modular component philosophy enables future modifications without complete reconstruction. Progressive enhancement planning accommodates evolving technology and changing household needs.
Your DIY fireplace mantel should grow with your family and adapt to changing needs. Building with future modifications in mind prevents costly reconstruction later.
Climate-Responsive Design Elements
Strategic ventilation and thermal break integration protect both mantel and wall structure while improving energy efficiency. Discrete airflow channels and thermal barriers prevent moisture buildup and heat loss through mantel assemblies.
Ventilation channels using spacer blocks create airflow patterns that prevent moisture buildup. Thermal break integration using closed-cell foam gaskets prevents heat loss through mantel assemblies. Natural convection design with floor inlets and ceiling outlets maintains proper air circulation.
Planning your DIY mantel with climate considerations prevents moisture damage and improves energy efficiency. These details separate professional installations from amateur attempts.
Humidity Buffer Zones Through Strategic Ventilation
Discrete ventilation channels behind mantel assemblies allow moisture circulation during humid summers while preventing condensation damage. Install spacer blocks creating 1/4-inch air gaps with inlet and outlet points for natural convection.
1/4-inch air gaps created by spacer blocks allow proper moisture circulation behind mantel assemblies. Natural convection through floor inlet and ceiling outlet positioning maintains airflow without mechanical systems.
Thermal Break Integration for Energy Efficiency
Closed-cell foam gaskets between mantel and wall assemblies prevent thermal bridging that conducts heat away from living spaces. Pay special attention to metal components that create significant thermal bridging paths.
Closed-cell foam gaskets eliminate thermal bridging through mantel-to-wall connections. Metal component attention prevents significant heat loss through brackets and decorative elements.
Modular Component Philosophy
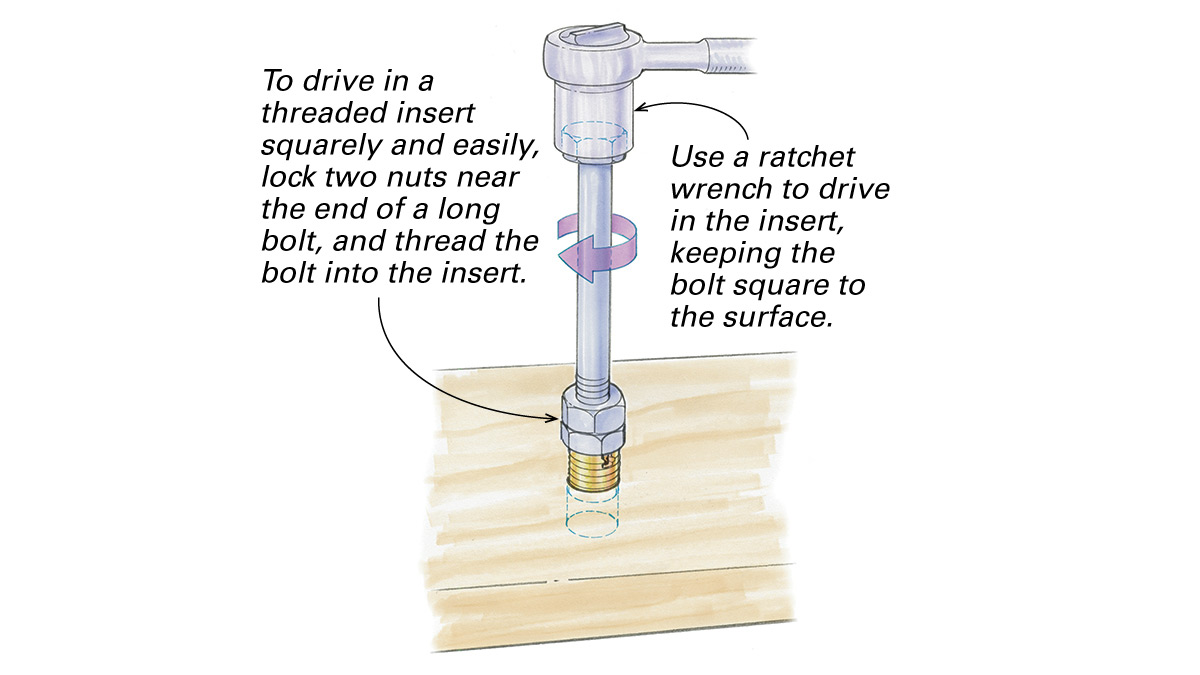
Building with standardized mounting points and interchangeable elements enables dramatic style changes without reconstruction. Threaded inserts and machine screws create removable connections for seasonal variety and future upgrades.
Standardized mounting points accept interchangeable decorative panels and trim elements for seasonal changes. Oversized conduit runs and junction boxes accommodate future lighting and smart home technology upgrades. Embedded threaded inserts create hidden mounting opportunities for progressive enhancements.
Your DIY fireplace mantel becomes a platform for evolution rather than a static installation. This approach maximizes your initial investment while providing flexibility for changing tastes.
Interchangeable Decorative Elements
Engineering mantels with standardized mounting points enables seasonal decorative changes through removable panels, corbels, and trim elements. Use threaded inserts and machine screws rather than wood screws for components requiring regular changes.
Threaded inserts and machine screws provide removable connections that maintain strength through repeated use. Standardized mounting patterns enable component interchangeability for seasonal variety.
Modular Design Planning Checklist:
- Design standardized mounting hole patterns
- Install threaded inserts for removable components
- Create template for interchangeable elements
- Plan seasonal storage for alternate components
- Document mounting specifications for future elements
- Test component removal and installation procedures
- Prepare spare hardware for regular changes
Expandable Lighting Integration Systems
Future-proofing electrical systems through oversized conduit runs and junction boxes accommodates evolving lighting technology and smart home integration. Include low-voltage runs and removable access panels disguised as decorative elements.
Oversized electrical infrastructure accommodates future technology upgrades without wall modification. Low-voltage runs enable LED strip lighting and accent lighting additions without major electrical work.

Final Thoughts
Your DIY fireplace mantel project represents more than basic construction – it’s an opportunity to create architectural elements that enhance your living space for decades. The techniques I’ve shared here bridge the gap between amateur results and professional-quality installations through understanding psychological impact, building proper infrastructure, and planning for long-term adaptation.
Success depends on recognizing that visible craftsmanship represents only half the equation. Hidden infrastructure, material treatment sophistication, and installation sequencing determine whether your investment becomes a lasting architectural feature or requires costly replacement within years.
The modular approach and climate-responsive design elements ensure your DIY mantel evolves with changing needs while maintaining structural integrity through seasonal cycles. This forward-thinking approach transforms your project from a one-time construction effort into a flexible architectural system that adapts to your household’s changing requirements.
Professional-quality results require equal attention to visible craftsmanship and hidden infrastructure development. Long-term success depends on understanding material behavior, thermal cycling, and moisture management in fireplace environments. Modular design philosophy and progressive enhancement planning create adaptable systems rather than static installations.
When planning your mantel construction project, consider the debris removal needs early in the process, as construction debris removal becomes essential for maintaining a safe and organized workspace throughout your renovation. Professional results often require proper workspace organization, and garage cleanout services can help create the organized workshop space necessary for precision mantel construction work.
When working with reclaimed or salvaged materials for your mantel project, scrap metal removal services can help clear away unusable hardware and metal components while you focus on selecting the best materials for your build. During major mantel installation projects, accumulated debris and old materials need proper disposal, making construction waste disposal services essential for maintaining an organized and safe work environment.
When renovation projects generate significant debris from old mantel removal and material preparation, remodeling scrap removal services help maintain a clean and organized workspace throughout the construction process. As your home evolves and mantel needs change, furniture pickup services can help remove old decorative elements and seasonal items that no longer fit your updated design vision.
Annual mantel updates often require removing outdated decorative elements, and decluttering services can help manage the accumulated seasonal items that no longer serve your evolving design aesthetic. For comprehensive project cleanup that goes beyond basic debris removal, demolition waste removal services ensure your mantel construction site remains safe and organized throughout the entire build process.