DIY Sauna Plans: The Hidden Engineering Secrets That Transform Basic Builds Into Professional Wellness Sanctuaries
Building a therapeutic sauna requires precision engineering that goes far beyond basic wood and heat generation. According to studies, 10- to 15-minute sessions in a traditional wood-burning sauna can improve blood flow and release endorphins, benefiting both heart and mental health. However, most DIY builders focus solely on achieving target temperatures while ignoring the micro-environmental factors that determine whether their sauna promotes wellness or creates hidden health stressors.
Table of Contents
- The Micro-Environment Engineering Approach
- The Thermal Mass and Heat Recovery Revolution
- Advanced Material Science and Longevity Engineering
- The Wellness Integration and Biohacking Approach
- DIY Sauna Kit Optimization and Customization Strategies
- Home Integration and Space Optimization Techniques
TL;DR
Building a therapeutic DIY sauna requires precise environmental control beyond basic wood and heat – focusing on vapor pressure dynamics, electromagnetic field mitigation, and acoustic engineering. Strategic thermal mass systems and heat recovery integration can reduce energy consumption by 40% while creating superior heat distribution patterns.
Material selection based on thermal expansion coefficients and proper fastener metallurgy prevents structural failures and extends sauna lifespan by decades. Advanced wellness features including chromotherapy, air quality management, and aromatherapy systems transform basic hot rooms into therapeutic devices.
Commercial DIY sauna kits require systematic upgrades to achieve professional-grade performance and long-term reliability. Successful home integration demands careful structural analysis, utility coordination, and code compliance planning that ensures your DIY sauna investment delivers decades of therapeutic benefits.
The Micro-Environment Engineering Approach
Building an effective DIY sauna requires understanding the complex environmental factors that most builders overlook. When I started researching how to build a sauna, I discovered that creating precisely controlled conditions affects air quality, electromagnetic fields, and acoustic properties in ways that separate amateur builds from professional wellness spaces.
Successful sauna construction depends on controlling multiple environmental variables simultaneously – temperature, humidity, air circulation, electromagnetic fields, and acoustic properties all interact to create the therapeutic experience. Most DIY sauna builders focus only on achieving target temperatures while ignoring the micro-environmental factors that determine whether their sauna promotes wellness or creates hidden health stressors.

Vapor Pressure Dynamics and Moisture Migration
Understanding how water vapor moves through your sauna structure determines whether you’ll create a therapeutic sanctuary or face structural deterioration within two years. Water vapor behavior follows predictable physics – calculating absolute humidity using the formula (Relative Humidity × Saturation Vapor Pressure) ÷ 100 allows you to map moisture movement across temperature gradient zones.
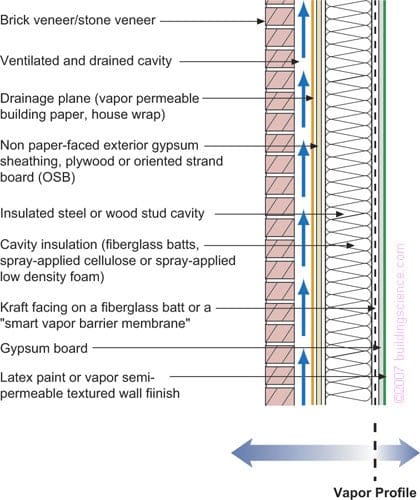
Vapor barrier placement must account for climate conditions – positioning on the warm side in cold climates while creating strategic vapor-permeable zones in mixed climates prevents moisture accumulation. Your DIY sauna success depends on getting this right from the start.
Proper ventilation requires mathematical precision – using CFM = (Sauna Volume × 6) ÷ 60 ensures optimal air exchange while positioning intake vents 6 inches above heater level and exhaust vents at floor level creates effective convection currents.
Psychrometric Calculations for Optimal Humidity Control
Learning to calculate the exact moisture-holding capacity of air at different temperatures prevents condensation problems that destroy sauna structures. Psychrometric calculations reveal the precise relationship between temperature and moisture-holding capacity – this data drives all vapor management decisions in your sauna design.
Temperature gradient mapping shows how moisture behavior changes from floor to ceiling – understanding these variations prevents condensation in unexpected locations. Absolute humidity calculations must account for seasonal variations in ambient conditions – your vapor management system needs to handle both summer and winter operating scenarios.
| Temperature (°F) | Max Humidity (gr/ft³) | Condensation Risk | Vapor Barrier Strategy |
|---|---|---|---|
| 70 | 8.1 | Low | Standard placement |
| 100 | 19.4 | Moderate | Enhanced sealing |
| 140 | 51.9 | High | Multi-layer system |
| 180 | 122.7 | Very High | Professional grade |
| 200 | 173.4 | Critical | Engineered solution |
Vapor Barrier Placement Strategy
Strategic vapor barrier positioning prevents moisture infiltration while allowing necessary vapor permeability in specific zones. Vapor barrier effectiveness depends on continuous installation – any gaps or tears create moisture infiltration points that compromise the entire system.
Climate-specific placement strategies account for seasonal vapor drive direction – cold climates require different approaches than mixed or warm climates. I’ve learned that sealing materials matter significantly – acoustical sealant maintains flexibility under thermal cycling while standard caulk fails and creates leak points.
You’ll install 6-mil polyethylene with 50% overlap at seams, sealed with acoustical sealant rather than standard caulk. The placement strategy varies by climate, requiring warm-side positioning in cold climates and strategic vapor-permeable zones in mixed climates.
Controlled Ventilation Mathematics
Calculating precise air exchange rates ensures optimal fresh air circulation without compromising heating efficiency. Ventilation calculations must balance fresh air requirements with energy efficiency – too little ventilation creates stale air while too much wastes heating energy.
Vent positioning creates convection patterns that distribute fresh air throughout the space – improper placement results in dead air zones and uneven temperature distribution. Air exchange timing can be optimized for different session phases – higher rates during initial heating and lower rates during therapeutic sessions maximize both comfort and efficiency.
For a 7×7 foot sauna with 8-foot ceilings (392 cubic feet), the ventilation requirement would be: CFM = (392 × 6) ÷ 60 = 39.2 CFM. Install a 6-inch intake vent above the heater and a 4-inch exhaust vent at floor level on the opposite wall to achieve this air exchange rate while maintaining proper convection patterns.
Electromagnetic Field Mitigation in Heating Systems
Electric sauna heaters generate electromagnetic fields that can interfere with the relaxation response your body seeks during sauna sessions. EMF exposure in confined spaces reaches levels that interfere with cellular processes – mitigation strategies reduce exposure to levels below 2 milligauss in seating areas.
Electrical isolation through dedicated subpanels and proper grounding prevents voltage differences that could affect the body’s natural bioelectric field. Shielding effectiveness requires proper installation techniques – mu-metal shielding and MC cable provide measurable EMF reduction when installed correctly.
EMF Shielding Techniques
Installing mu-metal shielding around electric heater elements and using shielded electrical cable reduces electromagnetic field exposure during sauna sessions. Mu-metal provides superior magnetic field shielding compared to standard materials – its high permeability redirects magnetic fields away from occupied spaces.
Distance relationships follow inverse square law – doubling the distance from EMF sources reduces exposure by 75%, making heater positioning critical. You’ll position heaters at least 3 feet from primary seating areas to achieve exposure levels below 2 milligauss.
Shielded cable installation requires proper grounding techniques – the shield must be grounded at one end only to prevent ground loops that can actually increase EMF levels.
Grounding and Electrical Isolation
Creating a dedicated electrical subpanel with isolated ground for sauna circuits establishes clean electrical power that won’t interfere with your body’s bioelectric field. Isolated grounding systems prevent electrical noise from other household circuits from entering the sauna environment – this creates cleaner power that reduces EMF generation.
Surge protection at the subpanel level provides better protection than individual circuit protection – whole-system protection prevents voltage spikes that can increase EMF emissions. You’ll install whole-sauna surge protection and ensure all metal components are properly bonded to prevent voltage differences.
Metal component bonding eliminates potential differences that could create stray currents – proper bonding ensures all metal surfaces remain at the same electrical potential.
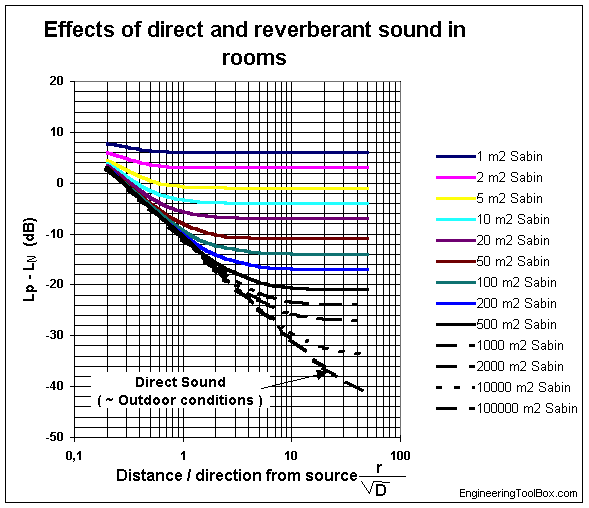
Acoustic Resonance and Sound Dampening
The acoustic properties of your sauna directly affect stress hormone levels and meditation depth, yet most DIY plans completely ignore sound engineering. When you build a sauna, acoustic resonance in small spaces can create standing waves that interfere with relaxation – frequencies in the 40-80 Hz range specifically trigger stress responses.
Natural frequency calculations using room dimensions reveal potential acoustic problems before construction – small dimensional adjustments can eliminate problematic resonances. Sound dampening materials and techniques must withstand high temperature and humidity conditions while maintaining acoustic effectiveness.
Natural Frequency Calculations
Calculating your sauna’s natural resonant frequency using length, width, and height dimensions helps you avoid frequencies that create standing waves in the 40-80 Hz range. Room resonance calculations use the formula f = c/(2L) where c is the speed of sound and L is the room dimension – this reveals the fundamental resonant frequencies for each dimension.
Standing wave patterns create acoustic hot spots and dead zones that affect the uniformity of the therapeutic experience – proper dimensional planning eliminates these issues. Cortisol response to specific frequencies is measurable – avoiding the 40-80 Hz range prevents acoustic stress that counteracts sauna therapy benefits.
You’ll adjust dimensions by 6-12 inches if calculations reveal problematic resonances, ensuring your sauna promotes rather than hinders stress reduction.
Recent DIY sauna builds are incorporating advanced acoustic engineering principles. As “How to Build a DIY Sauna” Field Mag reports, builder Andrew Szeto notes that in A-frame style roofs, “warm air collects at the ridge and that’s generally sort of no-man’s land. There can be a delta of about 15 degrees Celsius between where we’re sitting and the ridge.” This temperature differential creates acoustic variations that affect the therapeutic environment.
The Thermal Mass and Heat Recovery Revolution
Modern DIY sauna approaches waste enormous amounts of energy while creating uneven heating patterns that compromise therapeutic effectiveness. When I researched how to build a sauna efficiently, I discovered that thermal mass systems fundamentally change how saunas heat and maintain temperature – instead of constantly burning energy to maintain heat, thermal mass stores energy during heating cycles and releases it gradually.
Heat recovery integration captures 70-80% of exhaust heat that would otherwise be wasted – this recovered energy preheats incoming fresh air, dramatically reducing operating costs. For builders looking to maximize energy efficiency in their construction projects, understanding proper construction debris removal during renovation phases ensures optimal thermal mass installation without compromising structural integrity.
Strategic placement of thermal mass materials can reduce energy consumption by 40% while improving heat distribution uniformity. You’ll discover heat recovery techniques that capture exhaust heat to preheat incoming fresh air, creating a DIY sauna that operates with professional-level efficiency.
Stone and Ceramic Thermal Banking Systems
Strategic placement of thermal mass materials transforms energy-hungry sauna operations into efficient heat storage systems. Thermal mass calculations determine the exact amount of stone needed to store sufficient heat energy – undersized thermal mass systems fail to maintain temperature while oversized systems waste energy and space.
Stone sizing affects heat transfer efficiency – 4-6 inch diameter stones provide optimal surface area for heat absorption and release while allowing proper air circulation. You’ll calculate thermal mass requirements using the formula: Thermal Mass (BTU) = Sauna Volume (ft³) × 12 × Temperature Rise (°F) to determine optimal stone quantities.
Steel basket positioning above heaters maximizes thermal mass effectiveness – this placement ensures stones receive maximum heat input while distributing stored energy through natural convection. Installing 2-3 tons of properly sized sauna stones in steel basket systems above your heater creates a thermal battery that maintains consistent temperatures with minimal energy input.
According to Road to Ridge’s DIY sauna cost breakdown, a quality heater system represents a significant investment, with their HUUM Hive Heat 12 Wood-Burning Sauna Stove costing $2,700 CAD and accounting for nearly 40% of their entire $5,581 USD project budget. This substantial investment in proper heating equipment demonstrates the importance of maximizing thermal efficiency through strategic thermal mass integration.
Calculating Thermal Mass Requirements
Using precise calculations to determine thermal mass needs ensures your stone system stores enough energy to maintain therapeutic temperatures efficiently. BTU calculations account for the specific heat capacity of stone materials and the energy required to maintain temperature differentials – this mathematical approach eliminates guesswork in thermal mass sizing.
Steel basket design must support substantial weight loads while allowing maximum air circulation around stones – proper basket construction ensures even heating and prevents hot spots. Stone placement geometry affects heat distribution patterns – layered arrangements with varying stone sizes create optimal thermal mass performance.
The formula Thermal Mass (BTU) = Sauna Volume (ft³) × 12 × Temperature Rise (°F) provides the foundation for sizing your thermal storage system. You’ll install the calculated stone mass in properly designed steel baskets that maximize heat transfer while ensuring safe operation.
Heat Recovery Ventilation Integration
Installing small heat recovery ventilators captures 70-80% of exhaust heat to preheat incoming fresh air, maintaining air quality while reducing heating costs and startup times. Heat recovery efficiency depends on proper heat exchanger sizing and airflow balancing – undersized units fail to capture available thermal energy while oversized units create excessive pressure drops.
Air stream separation prevents contamination while maximizing thermal transfer – effective heat exchangers maintain complete separation between exhaust and supply air streams. These systems transfer thermal energy from outgoing air to incoming air without mixing the air streams.
High-temperature operation requires specialized HRV components – standard residential units fail in sauna environments, necessitating commercial-grade heat recovery systems. You’ll integrate HRV systems that operate efficiently in high-temperature environments while providing the fresh air circulation necessary for therapeutic sessions.
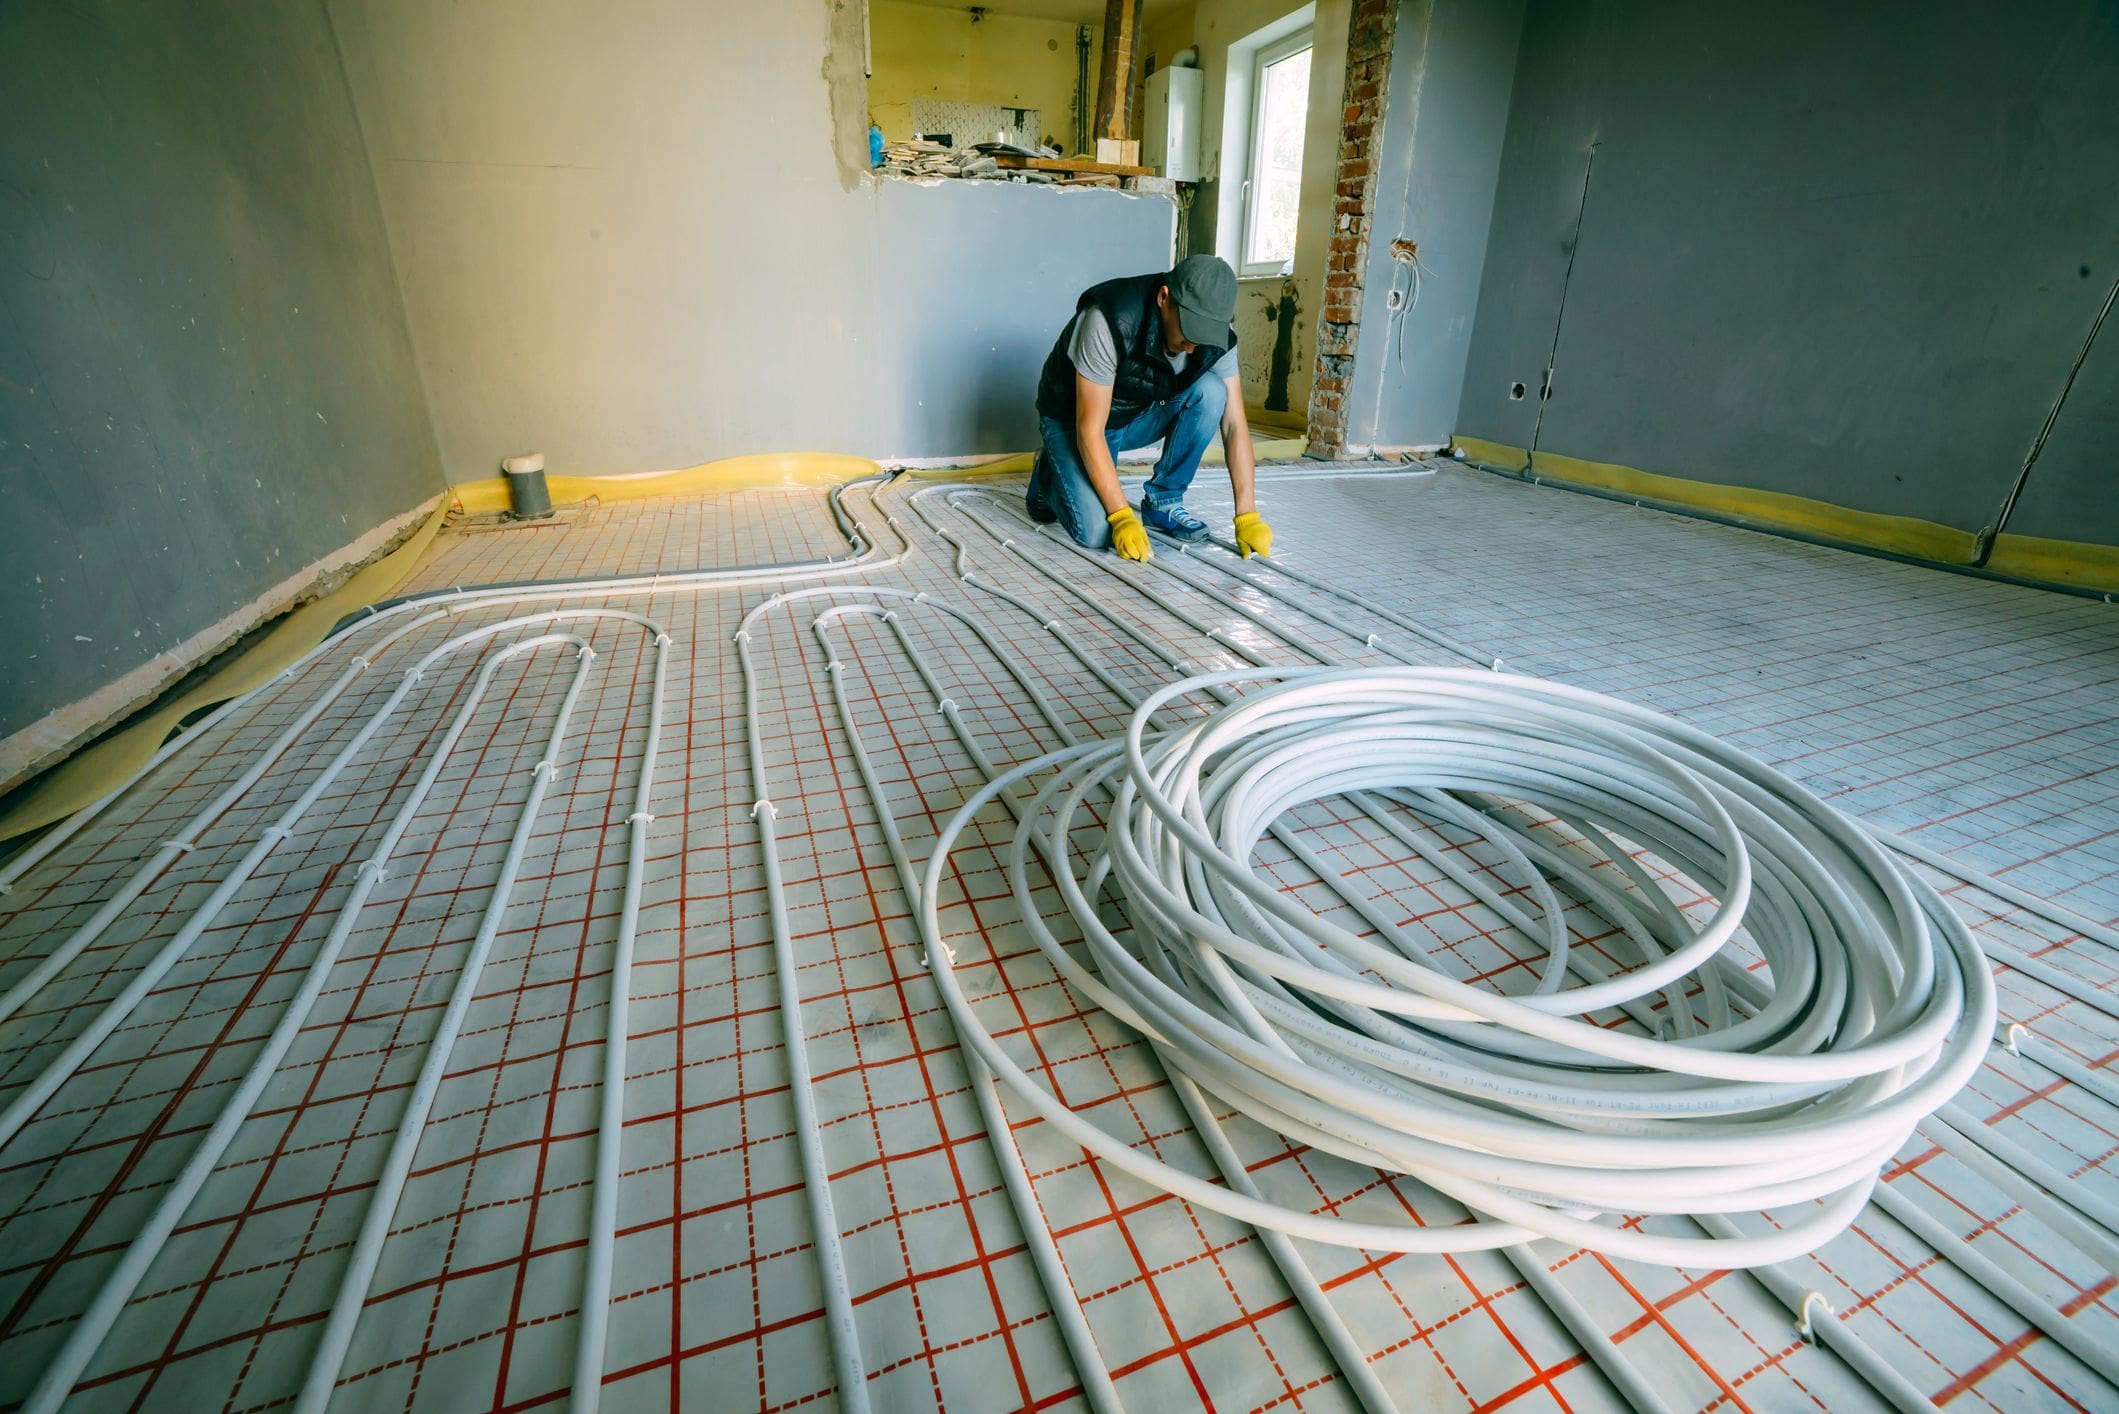
Radiant Floor Heating Integration
Adding low-temperature radiant floor heating creates more comfortable environments while reducing the workload on primary heater systems. Radiant floor systems create thermal comfort through direct heat transfer to the body rather than heating air – this approach provides warmth sensation at lower air temperatures.
Power density calculations ensure adequate heating without overheating – 15-20 watts per square foot provides optimal floor temperatures for sauna applications. You’ll install electric radiant mats rated for 15-20 watts per square foot under tile or stone flooring, maintaining floor temperatures at 85-95°F.
Temperature differential reduction improves thermal comfort – warm floors eliminate the cold shock that occurs when feet contact cold surfaces in heated environments. This gentle warmth reduces the temperature differential your body experiences while providing consistent comfort from the ground up.
Hydronic vs. Electric Radiant Systems
Electric radiant systems offer simpler installation and more precise control compared to hydronic systems in sauna applications. Electric systems eliminate water-related complications in high-temperature environments – no risk of freezing, boiling, or pressure problems that can occur with hydronic systems.
Installation complexity favors electric systems for DIY builders – mat-based electric systems require only electrical connections while hydronic systems need plumbing expertise. Response time differences affect user experience – electric systems heat floors within minutes while hydronic systems require longer warm-up periods.
You’ll install electric radiant mats designed for high-temperature environments, avoiding the complexity of water-based systems that require pumps, boilers, and freeze protection. Electric systems provide zone control and rapid response times that match sauna heating patterns.
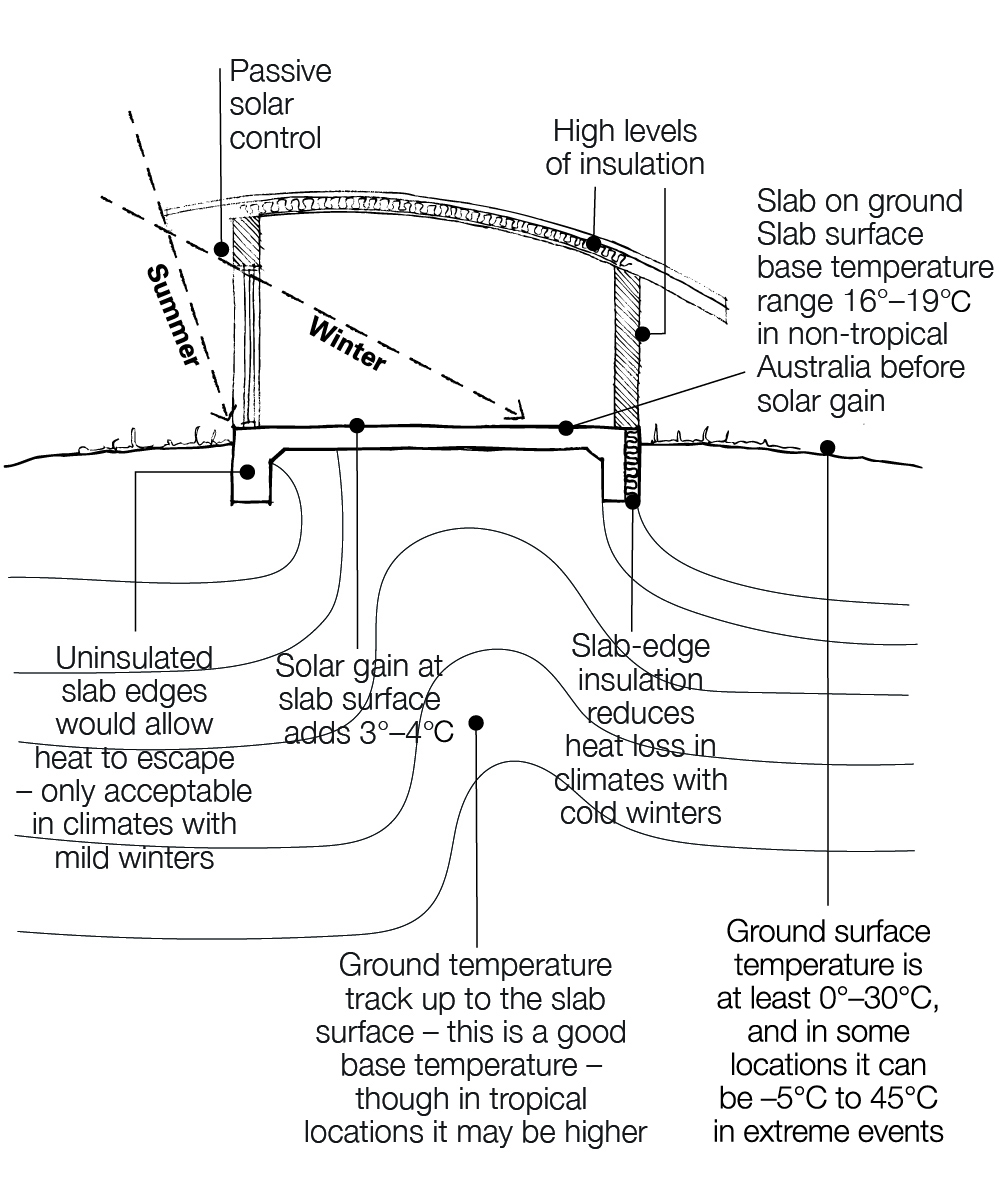
Thermal Break Installation
Installing 2-inch rigid foam insulation with thermal breaks every 16 inches under radiant systems prevents heat loss to the ground while maintaining structural integrity. Thermal breaks interrupt conductive heat paths that would otherwise transfer radiant heat directly to the ground – without thermal breaks, radiant systems heat the earth instead of the sauna.
High-temperature insulation ratings ensure long-term performance – standard foam insulation degrades under continuous high-temperature exposure. You’ll use closed-cell foam rated for continuous 200°F operation to ensure insulation performance under extreme conditions.
Structural considerations require thermal breaks that maintain load-bearing capacity – insulation systems must support floor loads while providing thermal isolation. Proper thermal break installation maximizes radiant system efficiency while preventing ground heat loss that wastes energy.
Advanced Material Science and Longevity Engineering
Most DIY sauna builders select materials based on cost or availability without understanding how different wood species, treatments, and fasteners perform under extreme thermal cycling conditions. Material performance under thermal cycling determines long-term structural integrity – materials that seem adequate at room temperature may fail catastrophically under repeated heating and cooling cycles.
Cost-based material selection often results in premature failure and expensive repairs – investing in proper materials initially prevents costly reconstruction projects. When planning your sauna construction, proper material disposal becomes crucial. Professional construction waste disposal services ensure that substandard materials are removed efficiently, allowing you to focus on installing only the highest-quality components that will withstand thermal cycling.
When you build a sauna with engineering principles, material selection ensures decades of trouble-free operation through understanding thermal expansion coefficients, moisture content optimization, and fastener metallurgy. You’ll learn to match materials based on performance characteristics rather than price, creating structures that withstand thermal stress cycling.
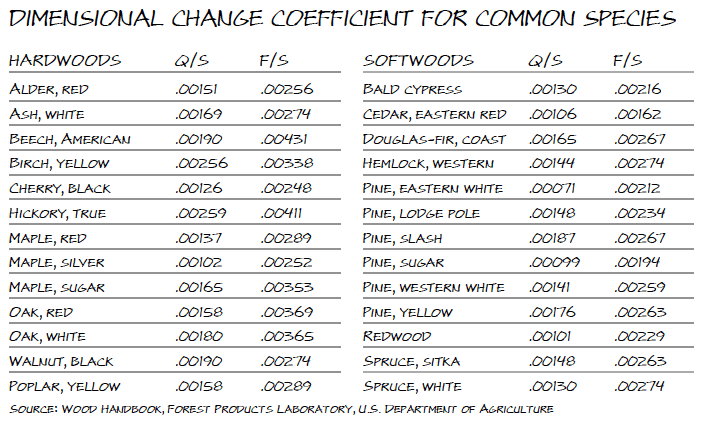
Wood Species Performance Under Thermal Stress
Different wood species expand and contract at dramatically different rates, creating stress points that lead to cracking, warping, and joint failure over time. Thermal expansion coefficient matching prevents differential movement that creates joint stress – mismatched wood species create internal forces that cause splitting and warping.
Moisture content optimization requires controlled drying and acclimatization – improper moisture levels cause excessive movement during initial operation cycles. Species selection affects both structural performance and aesthetic longevity – some woods maintain appearance under thermal stress while others develop unsightly checking and discoloration.
You’ll learn to select wood species with compatible thermal expansion rates and optimize moisture content for long-term stability. Understanding these material science principles prevents the structural problems that plague many DIY sauna builds after their first year of operation.
Thermal Expansion Coefficient Matching
Selecting wood species with similar thermal expansion rates prevents joint failures and structural problems caused by differential movement. Expansion coefficient differences create predictable stress patterns – understanding these forces allows builders to design joints that accommodate movement without failure.
Species compatibility extends beyond structural considerations to include appearance changes – matched species age and weather consistently while mismatched species create visual inconsistencies. Western Red Cedar (0.00000032 per °F), Hemlock (0.00000037 per °F), and Aspen (0.00000041 per °F) work well together because their expansion rates differ by less than 20%.
Joint design must accommodate the maximum expansion differential between species – proper joint spacing and fastening techniques prevent stress concentration. Mixing species with significantly different expansion coefficients creates internal stresses that cause cracking and joint separation.
| Wood Species | Expansion Coefficient | Moisture Resistance | Cost Factor | Thermal Conductivity |
|---|---|---|---|---|
| Western Red Cedar | 0.00000032 | Excellent | High | Low |
| Hemlock | 0.00000037 | Good | Medium | Medium |
| Aspen | 0.00000041 | Fair | Low | Low |
| Pine | 0.00000054 | Poor | Low | High |
| Basswood | 0.00000039 | Good | Medium | Low |
Moisture Content Optimization
Purchasing lumber kiln-dried to 8-12% moisture content and storing it in your build location for 30 days before construction prevents excessive movement during the first year of operation. Equilibrium moisture content varies by geographic location and season – wood must be conditioned to local conditions rather than relying on kiln-drying alone.
Acclimatization timing affects construction scheduling – rushing construction with unconditioned lumber guarantees dimensional stability problems. This acclimatization process allows wood to reach equilibrium with local humidity conditions before installation.
Moisture content measurement requires calibrated meters – visual assessment cannot determine internal moisture levels that drive dimensional changes. Proper moisture content management eliminates the dimensional changes that cause joint problems and surface irregularities.
According to Road to Ridge’s cost breakdown, cedar materials represented $2,300 of their total $7,323 material cost, highlighting the significant investment in quality wood species. Their builder notes that “cedar I wanted cost up to triple the cost from local sources, so I bought a load from a place in Oregon when I was on a trip to the area,” demonstrating how proper material selection requires strategic sourcing for optimal performance.
Fastener and Hardware Metallurgy
Standard galvanized fasteners fail in sauna environments due to thermal cycling and humidity exposure, leading to structural problems and unsightly staining that compromise both safety and appearance. Metallurgical properties determine fastener performance in extreme environments – galvanized coatings fail under thermal cycling while stainless steel alloys maintain integrity.
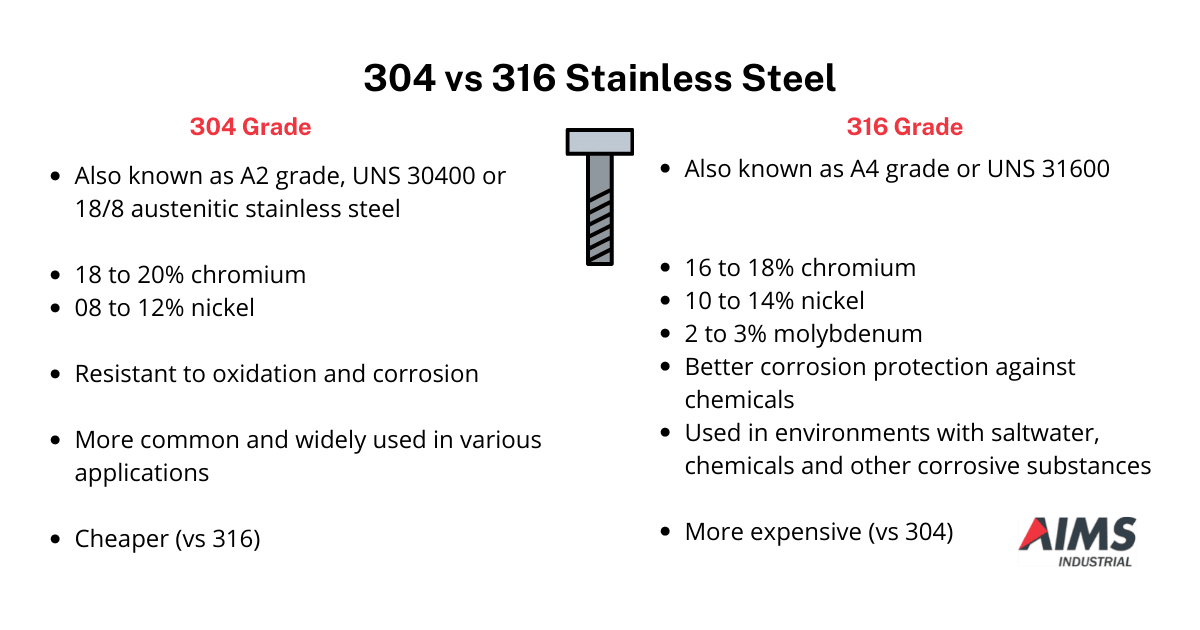
Fastener failure modes include corrosion, thermal fatigue, and stress concentration – proper selection and installation techniques prevent all three failure mechanisms. You’ll learn to select 316 stainless steel fasteners that provide superior corrosion resistance and design thermal expansion joints that accommodate movement without creating stress concentrations.
Cost considerations must account for replacement expenses – premium fasteners cost more initially but eliminate expensive repair and replacement cycles. Proper fastener metallurgy extends structural life by decades while maintaining aesthetic quality in your DIY sauna.
Stainless Steel Grade Selection
Using 316 stainless steel fasteners instead of 304 grade provides superior corrosion resistance in high-humidity, high-temperature environments through molybdenum content that prevents pitting and crevice corrosion. Molybdenum content in 316 stainless steel creates superior pitting resistance compared to 304 grade – this difference becomes critical in chloride-rich sauna environments.
Corrosion resistance testing shows dramatic performance differences between fastener grades – 316 stainless maintains integrity while other materials fail within years. While 316 fasteners cost 3-4 times more than galvanized alternatives, they provide 20+ years of additional service life without staining or structural degradation.
Life cycle cost analysis favors premium fasteners – initial cost premiums are recovered through eliminated replacement and maintenance expenses. This investment in proper metallurgy eliminates maintenance headaches and preserves sauna appearance.
Thermal Expansion Joint Design
Installing expansion joints every 8 feet in long paneling runs using slotted holes and oversized washers allows 1/8 inch of movement per 8 feet of length without creating stress concentrations. Movement calculations predict thermal expansion based on temperature differentials and material properties – joints must accommodate maximum expected movement plus safety factors.
Slotted hole geometry allows controlled movement while maintaining fastener engagement – improper slot sizing either restricts movement or allows excessive play. These joints accommodate thermal expansion while maintaining structural integrity and visual continuity.
Visual design considerations integrate expansion joints into aesthetic patterns – well-designed joints enhance rather than detract from sauna appearance. Proper expansion joint design prevents the buckling and warping that occurs when thermal movement is constrained by rigid fastening systems.
For a 16-foot cedar wall panel installation, thermal expansion at 180°F could reach 0.25 inches. Install expansion joints at 8-foot intervals using 3/8-inch slotted holes with 1/2-inch washers, allowing 1/8-inch movement per section. This prevents stress concentration while maintaining structural integrity across temperature cycling.
The Wellness Integration and Biohacking Approach
This perspective treats your DIY sauna as a therapeutic device that can be optimized for specific health outcomes through precise environmental control, lighting therapy, and air quality management. Therapeutic optimization requires treating the sauna as a medical device rather than recreational equipment – precise environmental controls trigger specific physiological responses that enhance health outcomes.
Biohacking integration combines multiple therapeutic modalities in a single session – chromotherapy, aromatherapy, and air quality enhancement work synergistically to amplify wellness benefits. When you’re learning how to build a sauna with therapeutic intent, these modifications transform basic hot rooms into sophisticated wellness platforms.
You’ll discover DIY sauna integration of chromotherapy systems that support circadian rhythms, implement air quality enhancement through negative ion generation, and create aromatherapy delivery systems that maintain therapeutic potency under extreme heat conditions.
Chromotherapy and Circadian Lighting Systems
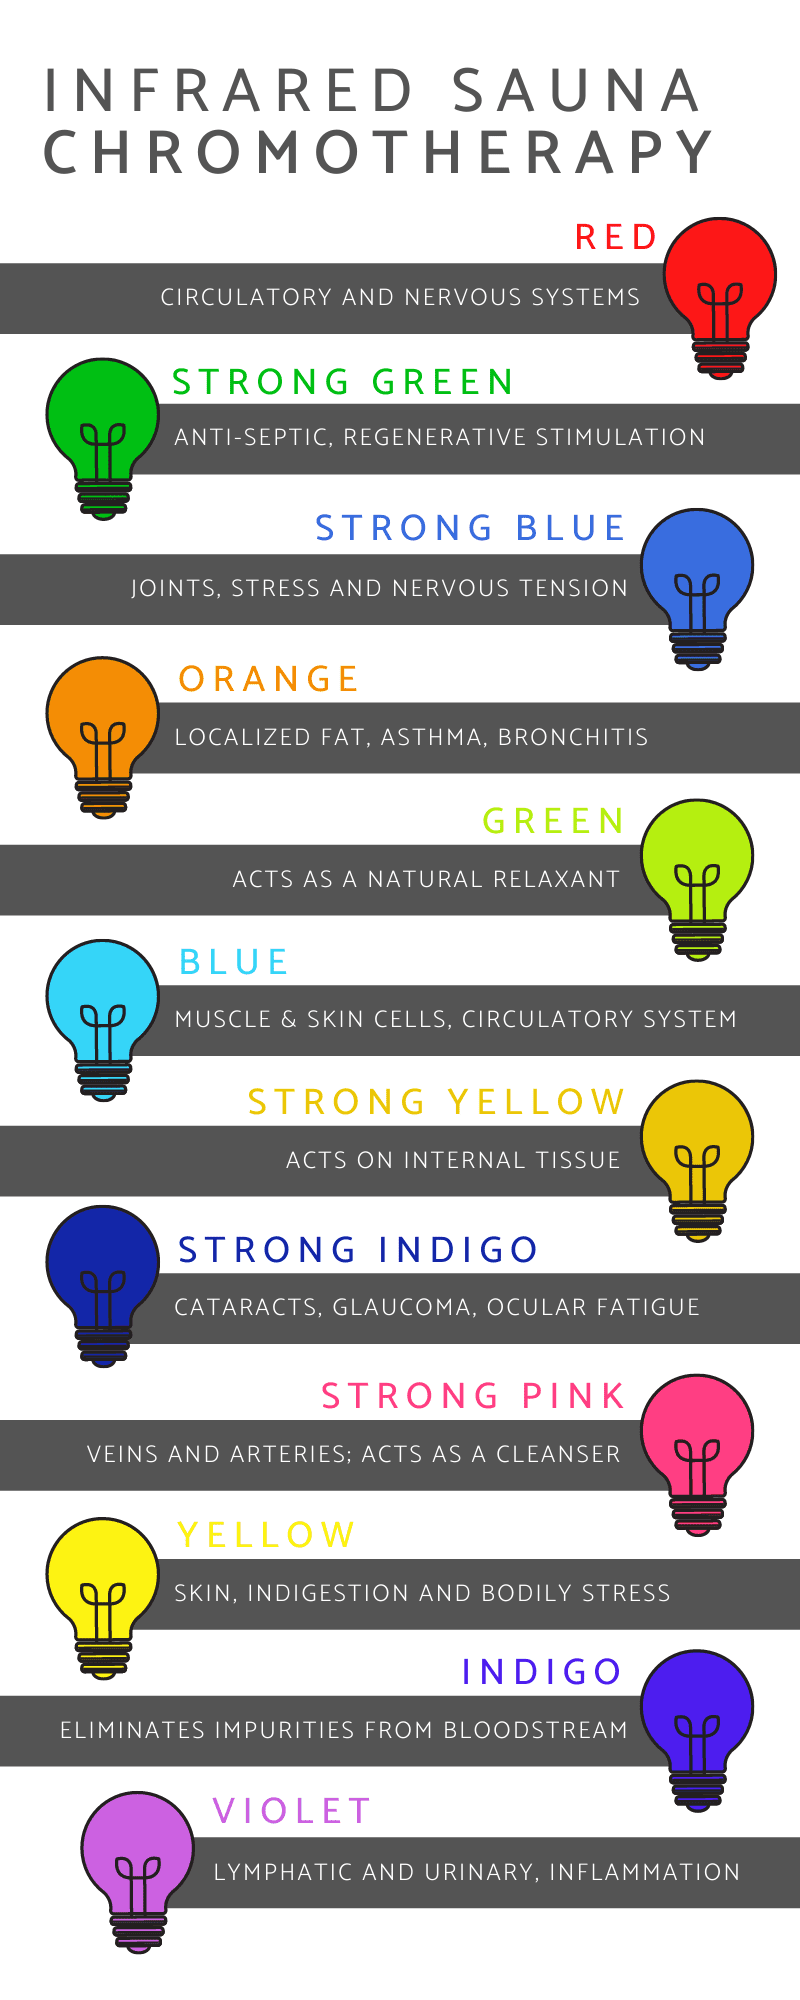
Strategic lighting design enhances therapeutic benefits by supporting natural circadian rhythms and triggering specific physiological responses through targeted wavelengths. Wavelength-specific physiological responses are scientifically documented – different light frequencies trigger distinct cellular processes that can be leveraged for therapeutic benefit.
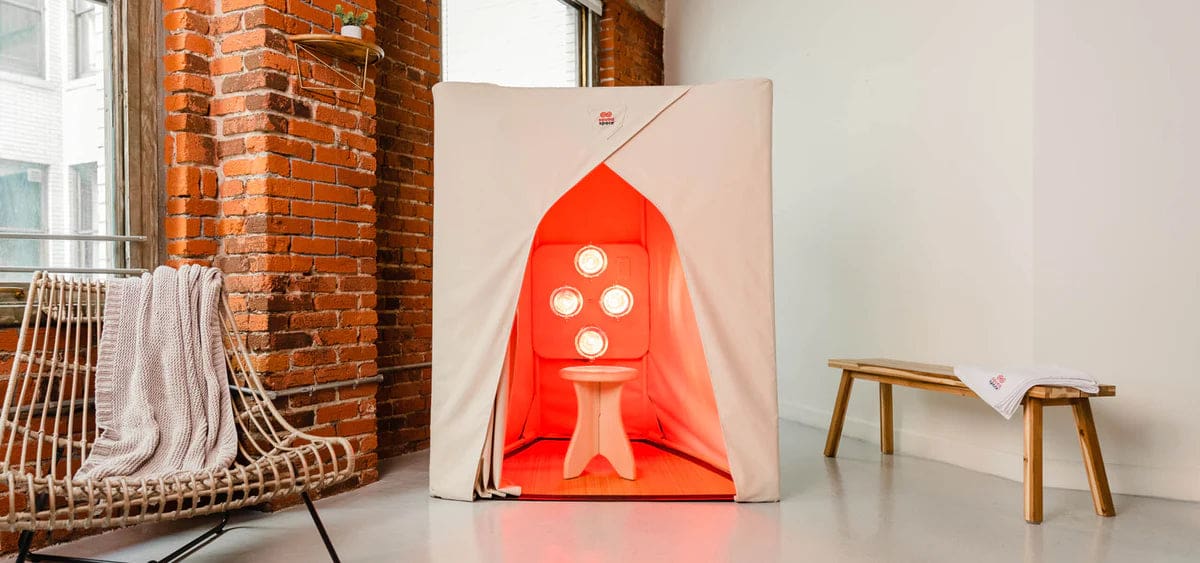
Circadian rhythm support through timed light exposure helps regulate sleep-wake cycles – strategic lighting protocols can enhance or complement sauna therapy timing. You’ll install programmable LED strips that produce red light (660nm) for tissue repair, near-infrared (850nm) for deep tissue penetration, and blue light (480nm) for alertness.
LED programming flexibility allows customized protocols for different therapeutic goals – morning sessions might emphasize alertness while evening sessions focus on relaxation. Programming sessions to transition from blue light during startup to red during heating and amber for relaxation maximizes therapeutic impact.
LED Spectrum Programming
Installing programmable LED strips with specific therapeutic wavelengths creates a customizable light therapy platform within your sauna. Wavelength precision affects therapeutic efficacy – LED systems must produce specific frequencies within narrow bandwidths to trigger intended physiological responses.
Power density calculations ensure adequate photon delivery for therapeutic effect – insufficient light intensity fails to produce measurable biological responses. Red light at 660nm stimulates cellular repair processes, near-infrared at 850nm penetrates deep tissues for enhanced circulation, and blue light at 480nm promotes alertness and mood enhancement.
Programming sequences can be customized for individual needs – athletes might emphasize tissue repair wavelengths while others focus on mood enhancement frequencies. You’ll program these wavelengths in sequences that complement your sauna session goals and timing.
Air Quality and Negative Ion Generation
Air quality inside your sauna affects both therapeutic benefits and long-term health impacts of regular use. Negative ion concentrations in natural environments provide measurable health benefits – replicating these conditions in saunas enhances therapeutic effectiveness.
VOC elimination prevents off-gassing from construction materials that could compromise air quality during high-temperature operation. Air quality monitoring allows objective assessment of environmental conditions – regular testing ensures therapeutic air quality standards are maintained.
You’ll implement natural negative ion enhancement through water features or salt walls that improve mood and respiratory function, plus install VOC elimination strategies using zero-VOC finishes and activated carbon filtration. These air quality improvements create a cleaner therapeutic environment that enhances rather than compromises health outcomes.
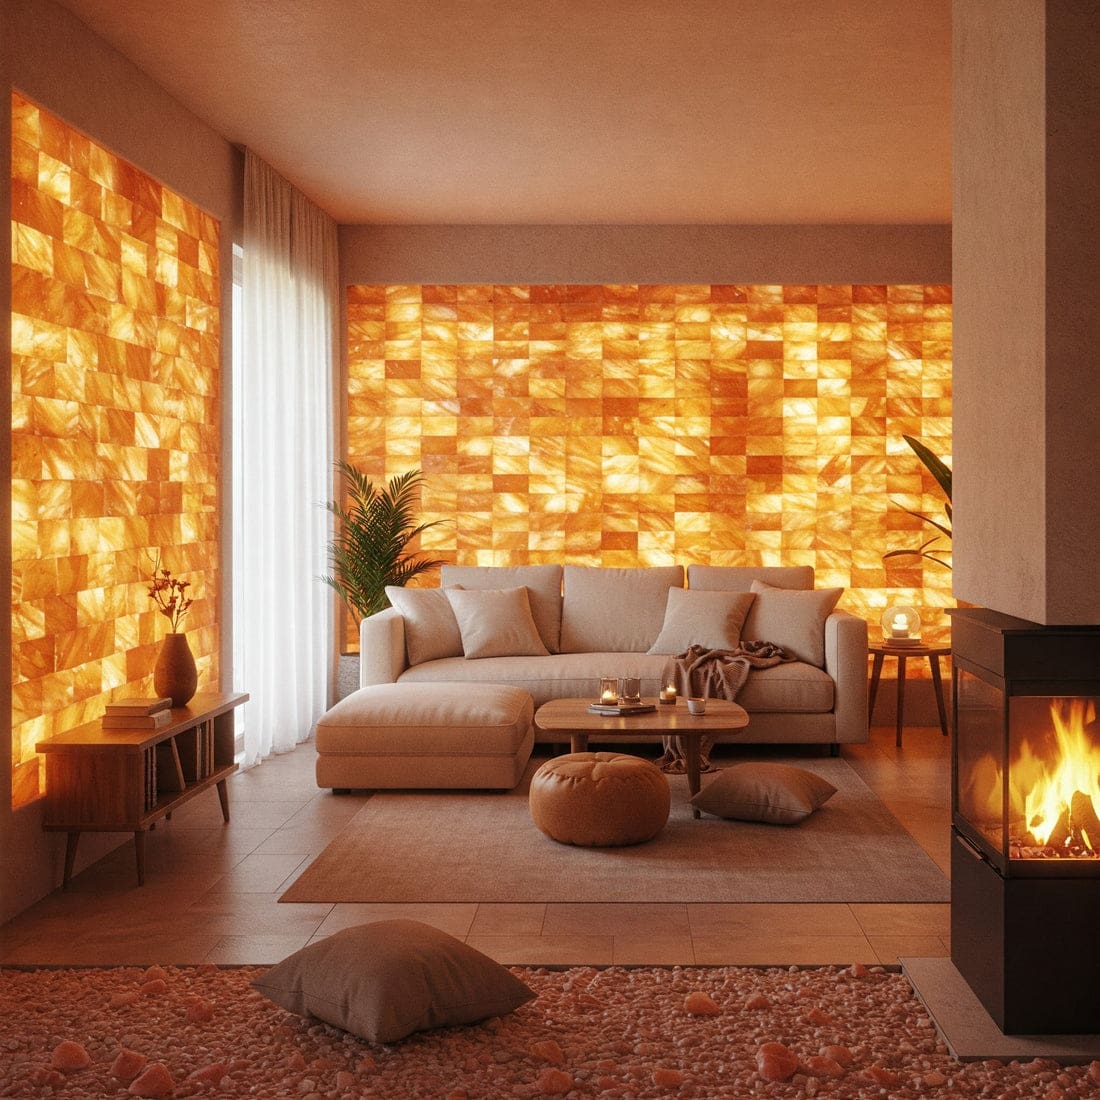
Natural Negative Ion Enhancement
Installing small water features or salt walls near your heater naturally generates negative ions through thermal convection, improving mood and respiratory function during sauna sessions. Natural ion generation through evaporation and thermal effects produces sustained ion concentrations without electrical systems that could introduce EMF concerns.
Salt panel positioning affects ion distribution patterns – placement near heat sources maximizes thermal convection that disperses ions throughout the sauna volume. Himalayan salt panels positioned where heat creates air circulation disperse ions throughout the space without requiring electrical generation systems.
Ion concentration measurement validates system effectiveness – natural generation should produce 1000-5000 ions per cubic centimeter for therapeutic benefit. These natural approaches create ion concentrations similar to forest environments.
VOC Elimination Strategies
Using only zero-VOC finishes and sealers prevents off-gassing that becomes concentrated in enclosed sauna environments during high-temperature operation. High-temperature operation concentrates VOCs that might be negligible at room temperature – sauna conditions amplify off-gassing from materials that seem safe in normal applications.
Activated carbon filtration provides continuous VOC removal without affecting beneficial humidity levels – properly sized filters maintain air quality without over-drying. You’ll install small activated carbon filters in ventilation systems to remove any residual off-gassing from construction materials and test air quality with VOC meters before first use and quarterly thereafter.
Regular testing protocols detect VOC accumulation before it reaches harmful levels – quarterly monitoring ensures long-term air quality maintenance. This proactive approach ensures your therapeutic environment doesn’t introduce harmful compounds.
Aromatherapy Integration and Essential Oil Delivery Systems
Professional-grade aromatherapy systems require precise delivery mechanisms that won’t degrade under extreme heat while maintaining therapeutic potency of essential oils. Heat-resistant delivery systems preserve volatile therapeutic compounds that would be destroyed by direct heat exposure – convection-based distribution maintains oil integrity.
Dosage calculations ensure therapeutic concentrations without overwhelming sensitive individuals – 2-3 drops per 100 cubic feet provides effective aromatherapy. You’ll install stainless steel essential oil reservoir systems connected to ventilation intake that use convection rather than direct heat contact, positioning reservoirs where temperatures stay below 140°F to prevent oil degradation while ensuring even distribution through natural air circulation.
Terpene preservation techniques maintain oil potency during storage and use – proper storage and handling prevent degradation of active compounds in your DIY sauna aromatherapy system.
Heat-Resistant Essential Oil Diffusion
Installing stainless steel essential oil reservoir systems that use convection rather than direct heat contact preserves therapeutic compounds while ensuring even distribution. Temperature thresholds for essential oil degradation vary by compound – most therapeutic terpenes begin breaking down above 140°F, requiring careful thermal management.
Convection distribution creates even aromatic coverage without hot spots that could cause overwhelming scent concentrations in specific areas. You’ll position reservoirs in temperature zones below 140°F where oils maintain potency while thermal air circulation carries aromatic compounds throughout the sauna space.
Stainless steel construction prevents corrosion and contamination that could affect oil purity and introduce unwanted flavors or odors. This approach delivers consistent aromatherapy without degrading valuable essential oil components.

Terpene Preservation Techniques
Using dark glass containers with nitrogen flushing preserves volatile terpenes in essential oils while calculating dosage at 2-3 drops per 100 cubic feet of sauna volume. Nitrogen flushing removes oxygen that causes terpene oxidation – inert atmosphere storage dramatically extends essential oil shelf life and therapeutic potency.
Light protection prevents photodegradation of sensitive aromatic compounds – dark glass containers block UV radiation that breaks down therapeutic molecules. You’ll adjust concentrations for individual sensitivity and desired therapeutic intensity while protecting oils from oxidation and light degradation.
Dosage precision prevents both under-dosing that fails to provide therapeutic benefit and over-dosing that could cause sensitivity reactions. These preservation techniques maintain therapeutic potency throughout extended storage periods.
Modern DIY sauna builders are increasingly incorporating biohacking elements into their designs. As “How to Build a DIY Sauna” Field Mag notes, builder Andrew Szeto’s partner “loves sauna accessories and her essential oils, and brought in some eucalyptus, lavender, and peppermint oils. A drop or two on the water ladle just before going onto the hot rocks is a game changer!” This trend toward therapeutic enhancement demonstrates the growing sophistication of DIY sauna wellness integration.
DIY Sauna Kit Optimization and Customization Strategies
Commercial sauna kits offer convenience but often compromise on advanced features that separate therapeutic spaces from basic hot rooms. Kit optimization provides a middle path between complete custom construction and accepting basic performance – strategic upgrades deliver professional results with reduced complexity.
Component upgrade pathways allow phased improvements that spread costs over time while immediately improving performance in critical areas. When working with sauna kit installations, efficient garage cleanout services can help clear workspace areas, ensuring you have adequate room to properly assemble and customize your kit components without obstruction.
You’ll discover systematic approaches to enhance prefabricated systems with professional-grade modifications including dual-zone heater upgrades, insulation performance enhancement, and control system integration. These optimization strategies transform basic DIY sauna kit packages into premium therapeutic environments while maintaining the convenience of kit construction.
Kit Component Upgrade Pathways
Systematic replacement of inferior kit components with professional-grade alternatives transforms basic packages into premium therapeutic environments. Dual-zone heating systems create optimal temperature stratification that single-zone heaters cannot achieve – separate control of upper and lower heating elements provides superior comfort.
Insulation upgrades deliver immediate energy savings and improved temperature stability – R-19 mineral wool with reflective barriers significantly outperforms standard kit insulation. You’ll upgrade standard DIY sauna kit heaters with dual-zone systems providing separate temperature control for upper and lower areas, enhance insulation from R-13 to R-19 mineral wool, and replace mechanical controls with programmable digital systems offering smartphone connectivity.
Digital control integration enables remote operation and energy monitoring that mechanical systems cannot provide – smartphone connectivity adds convenience and efficiency tracking. These upgrades address the most common performance limitations in commercial sauna kits.
According to Architectural Digest’s DIY sauna guide, the cost for a DIY sauna can range anywhere between $3,000 and upwards of $20,000, with experts noting that “with DIY, you can save 30 to 40% over a prefab, but only if you know what you’re doing.” This cost differential makes strategic kit optimization an attractive middle ground for achieving professional performance.
Heater System Modifications
Replacing standard kit heaters with dual-zone systems provides separate temperature control for upper and lower areas through a 6kW primary heater combined with a 3kW supplemental unit positioned 18 inches lower. Temperature stratification improves therapeutic effectiveness by creating comfortable gradients from floor to ceiling – single-zone heaters often create uncomfortable hot spots or cold zones.
Power distribution between heating zones allows optimization for different session types – relaxation sessions might emphasize lower zone heating while detox sessions use full power. This configuration creates optimal temperature stratification that enhances comfort while reducing energy consumption.
Installation complexity increases moderately while performance benefits are substantial – dual-zone systems require additional electrical circuits but provide dramatically improved control. Dual-zone control allows fine-tuning of thermal gradients that single-zone systems cannot achieve.

Insulation Performance Enhancement
Upgrading kit insulation from standard R-13 to R-19 mineral wool specifically designed for high-temperature applications dramatically improves energy efficiency and temperature stability. High-temperature mineral wool maintains insulating properties under extreme conditions where standard insulation degrades – specialized materials ensure long-term thermal performance.
Reflective barriers redirect radiant energy that would otherwise be absorbed by insulation materials – this dual approach addresses both conductive and radiant heat transfer. Adding reflective barrier facing toward the interior reflects radiant heat back into the space rather than allowing migration through wall assemblies.
R-value improvements provide measurable energy savings that offset upgrade costs – better insulation reduces heating time and maintains temperature with less energy input. These insulation improvements reduce energy consumption while creating more consistent internal temperatures.
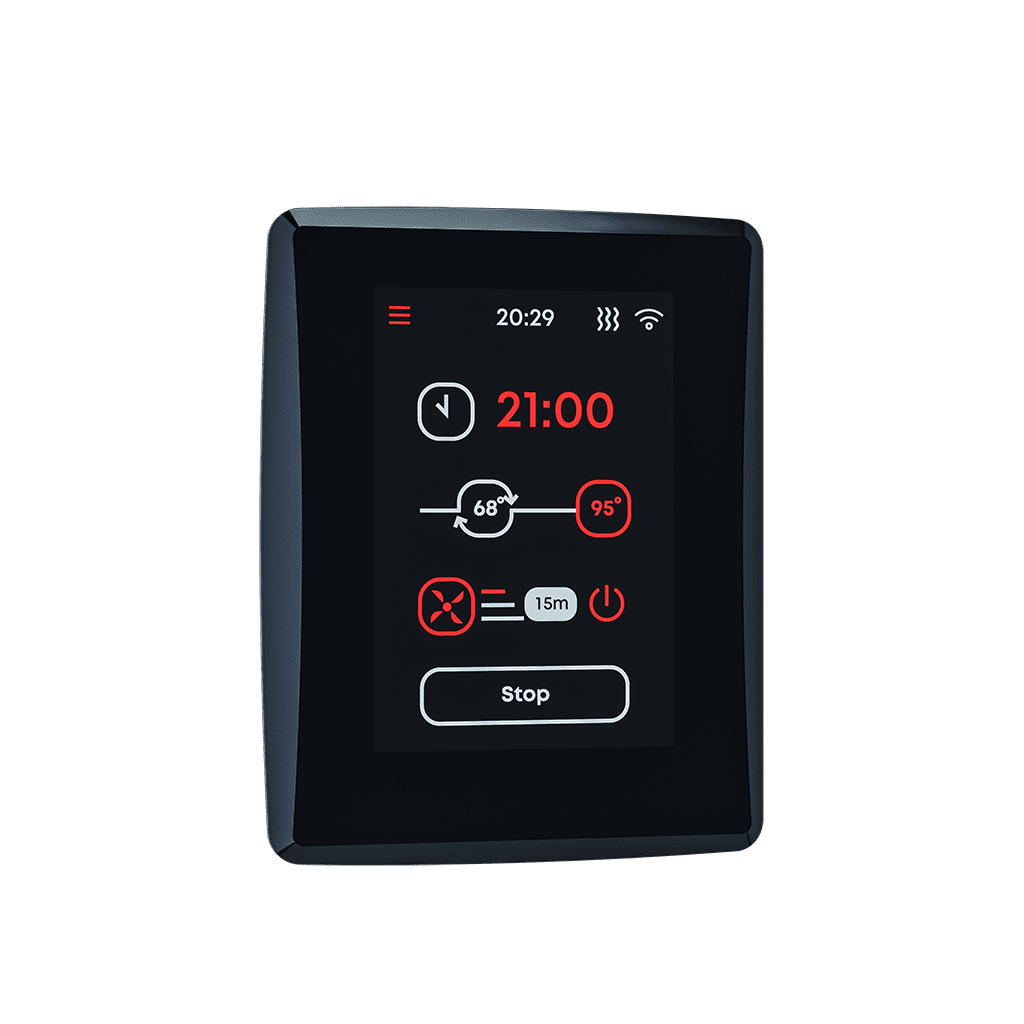
Control System Integration
Replacing basic mechanical controls with programmable digital systems enables management of temperature ramp rates, humidity levels, and session timing through smartphone connectivity for remote preheating and energy monitoring capabilities. Digital precision eliminates temperature swings common with mechanical controls – programmable systems maintain setpoints within 1-2 degrees rather than 5-10 degree variations.
Remote connectivity allows preheating before arrival and monitoring energy consumption patterns – smartphone integration adds convenience while providing usage data. These advanced control systems provide precision that mechanical thermostats cannot achieve while adding convenience features that enhance the user experience.
Multi-parameter control manages temperature, humidity, and ventilation simultaneously – integrated systems optimize multiple variables that mechanical controls handle independently.
Structural Reinforcement for Kit Assemblies
Prefabricated kits often use minimal fastening systems that can fail under thermal stress cycling, requiring strategic reinforcement to ensure long-term structural integrity. Thermal stress cycling creates forces that exceed the capacity of standard kit fastening systems – reinforcement prevents failures that occur after months or years of operation.
Foundation anchoring systems must accommodate thermal movement while preventing structural shifting – rigid connections fail while properly designed flexible connections maintain integrity. You’ll add structural adhesive to tongue-and-groove joints before assembly and secure kit structures to foundations using adjustable stainless steel brackets with vibration isolation pads.
Vibration isolation prevents thermal bridge formation that reduces energy efficiency – isolation pads maintain structural connection while blocking heat transfer paths. These reinforcement techniques prevent the joint separation and structural movement that commonly affect kit constructions.
Joint Strengthening Protocols
Adding structural adhesive (polyurethane-based) to all tongue-and-groove joints before assembly creates continuous bonds that prevent separation during thermal expansion while maintaining wood’s natural movement characteristics. Polyurethane adhesives maintain flexibility under thermal cycling while providing structural strength – rigid adhesives crack while flexible formulations accommodate movement.
Continuous bonding distributes stress across entire joint surfaces rather than concentrating forces at fastener points – this approach prevents the splitting common with mechanical fasteners alone. This reinforcement technique addresses the primary failure mode in kit construction where mechanical fasteners alone cannot maintain joint integrity under repeated thermal cycling.
Application timing affects bond strength – adhesive must be applied during assembly rather than attempting to retrofit existing joints.
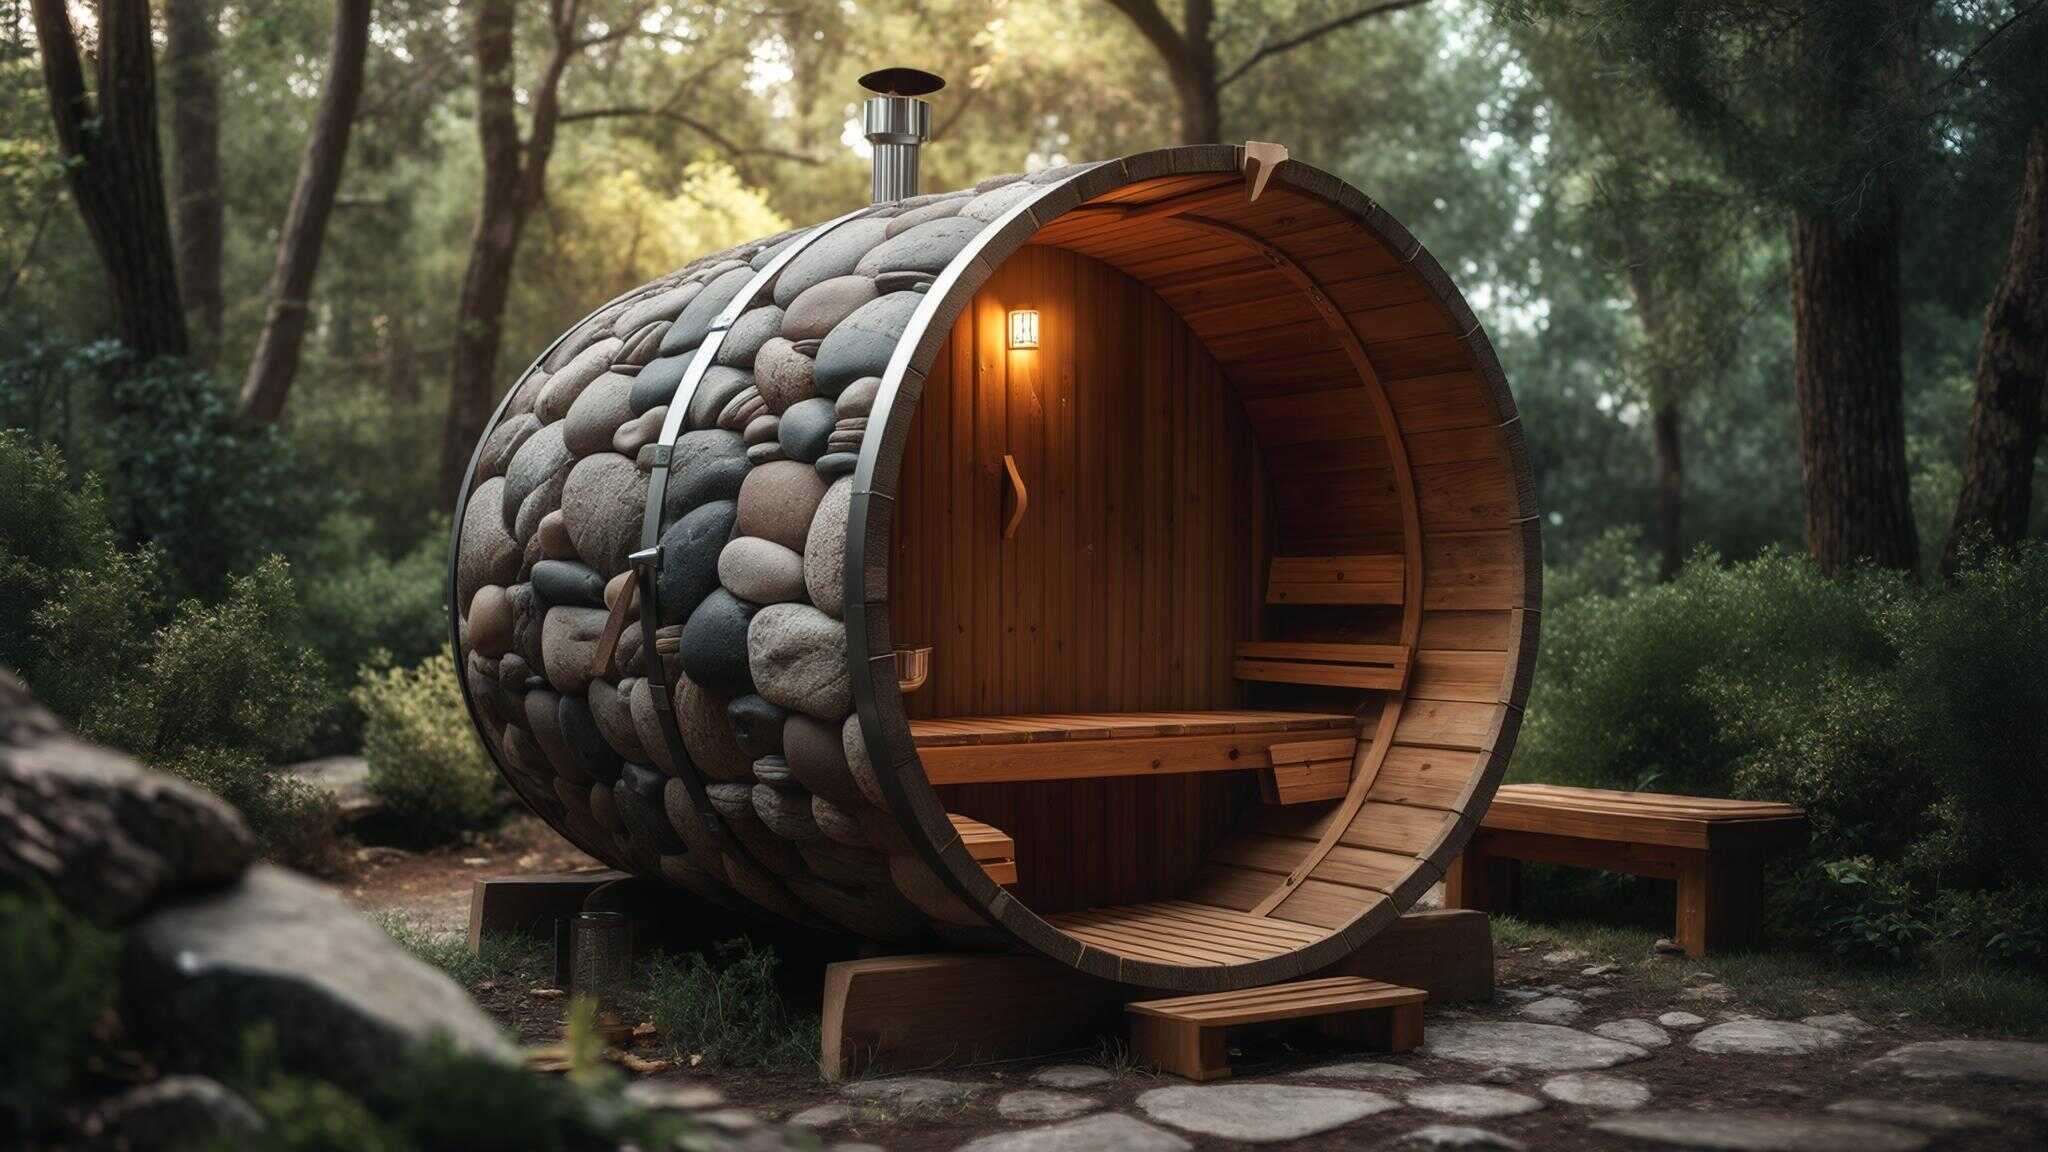
When assembling a barrel sauna kit, apply a 1/8-inch bead of polyurethane structural adhesive to each tongue-and-groove joint before assembly. This creates a continuous bond that prevents the joint separation that commonly occurs after 6-12 months of thermal cycling, extending structural life by 10-15 years while maintaining the kit’s convenience advantages.
Foundation Anchoring Systems
Securing kit structures to concrete foundations using adjustable stainless steel brackets accommodates thermal movement while preventing shifting, with vibration isolation pads between sauna structure and foundation preventing thermal bridge formation. Adjustable brackets accommodate seasonal movement and settling while maintaining structural connection – fixed anchors create stress concentrations that cause cracking.
Vibration isolation pads prevent conductive heat transfer to foundations while maintaining structural integrity – thermal bridges waste energy and can cause moisture problems. These anchoring systems provide structural stability while allowing the thermal expansion necessary for long-term integrity.
Stainless steel construction ensures long-term corrosion resistance in high-humidity environments – galvanized anchors fail prematurely in sauna conditions.
Home Integration and Space Optimization Techniques
Installing a sauna within existing home structures requires sophisticated planning to address structural loads, utility integration, and spatial harmony without compromising either the home’s integrity or the sauna’s performance. Home integration complexity varies dramatically based on installation location and existing structural conditions – basement installations face different challenges than ground-floor or upper-level locations.
Code compliance requirements often exceed standard residential construction standards – sauna installations must meet specialized requirements for high-temperature applications. Before beginning your DIY home sauna installation, consider professional basement cleanout services to clear the installation area, ensuring optimal space utilization and preventing construction delays caused by accumulated items and debris.
You’ll learn load-bearing analysis techniques, utility integration strategies, and code compliance requirements that ensure successful installation. These integration approaches allow DIY sauna at home installation in basements, spare rooms, and other existing spaces while maintaining structural safety and operational efficiency.
Load-Bearing Analysis and Structural Modifications
Sauna installations often exceed standard residential floor loading requirements due to structural weight, stone mass, and occupancy loads, necessitating structural evaluation and potential reinforcement. Load calculations must account for concentrated loads from stone masses and structural elements – distributed loads may be acceptable while point loads exceed structural capacity.
Existing floor systems in older homes may not meet current loading standards – structural evaluation prevents costly failures and safety hazards. When you build a sauna in existing structures, you’ll calculate total dead loads including structure (15-20 lbs/sq ft), stone mass (40-60 lbs/sq ft), and live loads (40 lbs/sq ft minimum) to determine if supplemental support is required.
Reinforcement techniques vary based on existing construction and access limitations – some situations allow joist sistering while others require beam installation. Installations exceeding 120 lbs/sq ft require additional floor joists or steel beam reinforcement.
Floor Load Distribution Calculations
Calculating total dead load including structure (15-20 lbs/sq ft), stone mass (40-60 lbs/sq ft), and live load (40 lbs/sq ft minimum) determines whether existing floor systems can support sauna installations. Dead load calculations include all permanent installation components – structure, insulation, stone mass, and mechanical systems contribute to total loading.
Live load requirements account for occupancy and dynamic forces – sauna use creates higher live loads than typical residential applications. When totals exceed 120 lbs/sq ft, you’ll install supplemental floor joists or steel beam reinforcement beneath the installation area to distribute loads safely to foundation elements.
Load distribution techniques spread concentrated loads across multiple structural members – proper distribution prevents overloading individual joists or beams.

Ceiling Height Optimization
Maintaining 7-foot minimum ceiling height while accommodating insulation and vapor barriers requires careful planning, especially in basement installations where existing clearances may be limited. Minimum ceiling height requirements ensure adequate air circulation and user comfort – insufficient height creates claustrophobic conditions that reduce therapeutic benefits.
Box beam construction allows utility concealment without sacrificing ceiling height – exposed utilities reduce clearance and create maintenance access problems. Box beam construction provides necessary clearance while concealing ductwork and utilities that would otherwise reduce headroom.
Insulation thickness affects ceiling height calculations – high-performance insulation systems require additional clearance that must be planned during design. These techniques maximize usable space while meeting code requirements for ceiling height.
Utility Integration and Code Compliance
Seamless integration with existing home systems requires careful planning of electrical, ventilation, and drainage connections while maintaining code compliance for high-temperature applications. Utility integration complexity increases with system sophistication – basic installations require minimal coordination while advanced systems need extensive planning.
Code compliance for sauna installations often exceeds standard residential requirements – specialized applications require additional safety measures and inspection protocols. During utility integration phases, professional appliance removal services can efficiently handle disposal of old equipment being replaced, keeping work areas clear for new installations and preventing workflow interruptions.
Existing system capacity may limit sauna performance – electrical service upgrades and HVAC modifications might be necessary for optimal operation. You’ll coordinate DIY sauna at home ventilation with existing HVAC systems using motorized dampers, install dedicated electrical service with GFCI protection, and integrate drainage systems with existing plumbing.
Electrical Service Upgrades
Most sauna installations require 220V service with dedicated 40-60 amp circuits to handle heater, lighting, ventilation, and control system loads. Electrical load calculations must account for simultaneous operation of all sauna systems – heaters, ventilation, lighting, and controls all contribute to total demand.
GFCI protection at subpanel level provides better reliability than individual circuit protection – ground fault protection is critical in high-humidity environments. You’ll calculate total electrical demand and install GFCI protection at the subpanel level rather than individual circuits for better reliability.
Dedicated service prevents voltage drops that could affect sauna performance – shared circuits often cannot provide stable power for high-demand heating systems. Dedicated electrical service ensures adequate power while preventing interference with existing home electrical systems.
Ventilation System Coordination
Integrating sauna ventilation with existing HVAC systems using motorized dampers prevents conditioned air loss when saunas operate while ensuring adequate fresh air supply. Motorized damper control prevents energy waste by isolating sauna ventilation when not in use – uncontrolled ventilation connections waste heating and cooling energy.
Backdraft damper installation prevents reverse airflow that could introduce contaminants or affect system performance – proper damper selection ensures reliable operation. You’ll install backdraft dampers on exhaust connections to prevent reverse airflow during system shutdown and coordinate ventilation timing with existing system operation to optimize energy efficiency.
System coordination optimizes energy efficiency by timing ventilation operation with existing HVAC schedules – integrated operation reduces total energy consumption.
Drainage and Moisture Management
Installing floor drains connected to existing plumbing systems with trap primers prevents sewer gas infiltration while managing any moisture accumulation. Trap primer installation maintains water seals in floor drains that might otherwise dry out and allow sewer gas infiltration – automatic primers ensure reliable operation.
Floor slope calculations ensure positive drainage toward collection points – improper slopes create standing water that can cause structural problems. You’ll use sloped concrete floors (1/4 inch per foot) beneath sauna structures to direct moisture toward drainage points and integrate with existing plumbing systems without affecting home drainage performance.
Plumbing integration must maintain existing system performance while adding sauna drainage capacity – proper sizing prevents backups and ensures reliable operation.
How Jiffy Junk Supports Your DIY Sauna Project
Building a DIY outdoor sauna or indoor installation generates substantial construction waste and often requires clearing existing spaces of accumulated items before construction can begin. Jiffy Junk’s professional construction debris removal services become invaluable during both preparation and completion phases of your sauna project.
During the preparation phase, their team efficiently clears construction areas of stored items, old furniture, and debris that would complicate your build your own sauna process. Throughout construction, they handle removal of packaging materials, lumber scraps, and construction debris while maintaining organized, safe workspaces.
After completion, Jiffy Junk helps reclaim displaced items and provides environmentally responsible disposal of construction waste through recycling and donation programs. This aligns with the wellness-focused, environmentally conscious approach that drives most DIY outdoor sauna projects.
Their stress-free cleanup service allows you to focus on the precision engineering aspects of your build rather than debris management, ensuring sauna plans stay on schedule while properties remain organized throughout construction.
Ready to start your DIY sauna project? Contact Jiffy Junk today to schedule preparation and construction cleanup services that keep your project running smoothly from start to finish.
Final Thoughts
Building a therapeutic DIY sauna requires understanding complex engineering principles that most builders overlook in favor of simple heat generation. The micro-environment approach reveals how vapor pressure dynamics, electromagnetic field mitigation, and acoustic engineering separate amateur builds from professional wellness spaces. Thermal mass integration and heat recovery systems reduce energy consumption by 40% while creating superior heat distribution that enhances therapeutic effectiveness.
Material science principles guide selection of wood species, fasteners, and hardware that withstand decades of thermal cycling without failure. Advanced wellness integration through chromotherapy, air quality management, and aromatherapy transforms basic hot rooms into sophisticated therapeutic devices. Kit optimization strategies provide middle-ground approaches that deliver professional results with reduced complexity.
Home integration success depends on proper structural analysis, utility coordination, and code compliance that ensures safe installation without compromising existing systems. These engineering approaches create sauna installations that provide therapeutic benefits while maintaining long-term structural integrity and operational efficiency.
Engineering-based construction approaches deliver therapeutic benefits that basic heat generation cannot achieve – precision environmental control creates wellness spaces rather than simple hot rooms. Material science and structural engineering prevent the failures that plague amateur builds – proper selection and installation techniques ensure decades of trouble-free operation.
Integration complexity requires systematic planning but delivers professional results – comprehensive approaches create installations that enhance rather than compromise existing home systems.