
DIY Shutters: The Hidden Engineering Secrets That Transform Your Home Into a Climate-Controlled Sanctuary
While DIY home projects have become increasingly accessible, plantation shutters present unique challenges that require precision and expertise. As industry professionals note, “There are about a thousand ways to measure wrong, but only one way to measure right” when it comes to shutter installation (Sunburst Shutters). However, with advanced engineering techniques and professional-grade approaches, you can overcome these obstacles and create superior installations that outperform standard solutions.
Table of Contents
- The Material Psychology of Shutter Selection
- The Installation Archaeology Approach
- The Custom Hardware Underground
- The Post-Installation Evolution Strategy
- The Precision Measurement Revolution
TL;DR
- Material choice affects sound dampening, thermal comfort, and psychological well-being beyond basic aesthetics
- Window frame analysis reveals structural patterns that prevent future alignment issues and unlock hidden mounting opportunities
- Automotive and marine hardware provides superior durability and smooth operation compared to standard shutter components
- Modular design with standardized connections allows for easy upgrades and technology integration over decades
- Professional-grade measurement techniques account for structural movement and environmental factors that cause installation failures
The Material Psychology of Shutter Selection
Your material choice creates a sensory experience that influences daily comfort and psychological well-being. Different materials produce distinct acoustic signatures, thermal responses, and tactile sensations that affect how you interact with your living space. Understanding these deeper material properties helps you select diy shutters that enhance your home’s atmosphere rather than just covering windows.
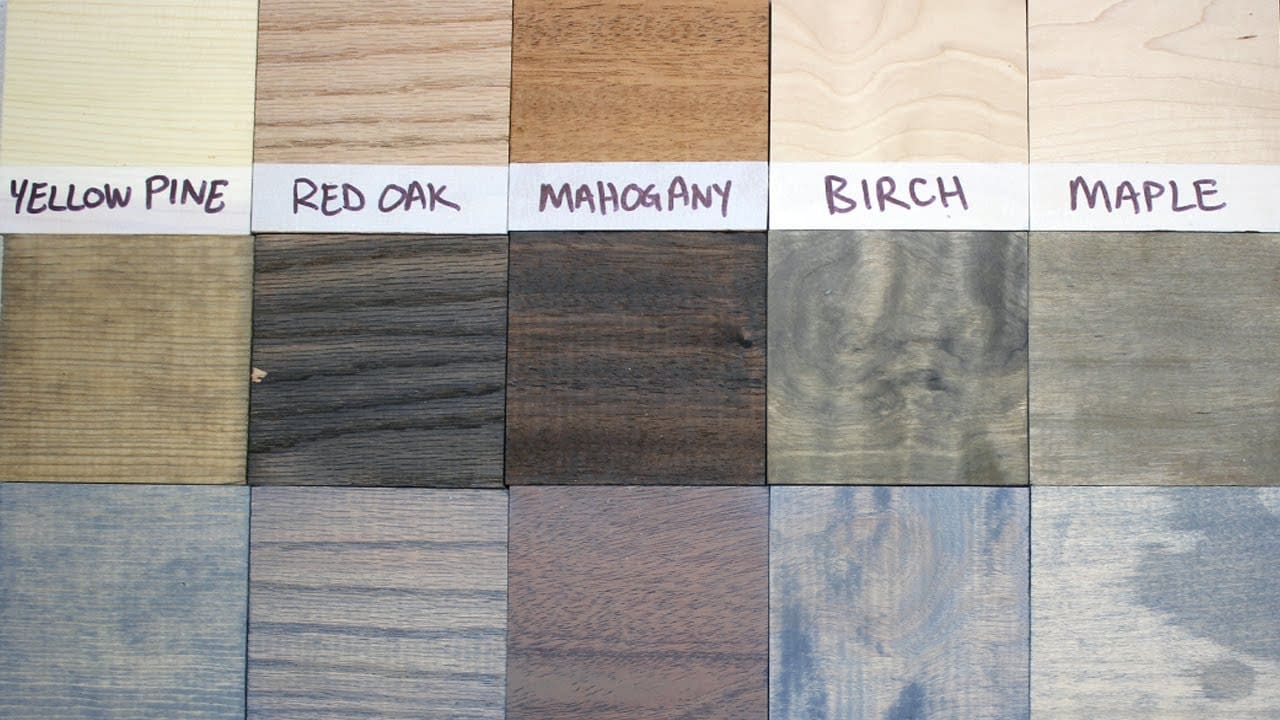
Cedar’s natural density absorbs sound waves more effectively than composite materials, which can create hollow echoes that signal artificial construction to occupants and visitors. Wood maintains consistent surface temperature throughout daily temperature fluctuations, while metal and composite materials can feel uncomfortably hot or cold to the touch during extreme weather.

The Sensory Hierarchy of Shutter Materials
Each material creates a unique sensory fingerprint that impacts your daily routines and comfort levels. The acoustic properties, thermal characteristics, and tactile qualities of your chosen material influence everything from morning light control to privacy perception throughout your home.
Sound absorption varies dramatically between materials – cedar provides natural dampening that reduces external noise transmission, while composite materials may amplify certain frequencies. I’ve found that homeowners often underestimate how much the acoustic signature of their diy cedar shutters affects their daily comfort. When you close cedar shutters, they create a subtle sound that signals privacy and security, while composite materials often produce that hollow, artificial sound that makes the space feel less premium.
Thermal memory affects user comfort during operation – materials that retain heat or cold create jarring temperature contrasts when touched during seasonal extremes. Have you ever touched metal shutters on a hot summer day? The shock of that burning surface makes you avoid adjusting them, defeating their purpose entirely.
Surface texture influences psychological comfort in ways most people never consider. Smooth synthetic surfaces can feel clinical and unwelcoming, while natural wood grain provides tactile satisfaction during daily use. Your fingers naturally want to trace the grain patterns, creating a positive association with the shutters rather than viewing them as purely functional elements.
| Material Type | Sound Dampening Rating | Thermal Stability | Touch Comfort | Maintenance Level |
|---|---|---|---|---|
| Cedar | Excellent (8-9/10) | High | Warm/Natural | Moderate |
| Composite | Poor (3-4/10) | Low | Variable/Harsh | Low |
| Hardwood | Good (6-7/10) | Moderate | Natural | High |
| Vinyl | Poor (2-3/10) | Very Low | Cold/Clinical | Very Low |
| Aluminum | Poor (1-2/10) | Very Low | Extreme Temps | Low |
The Acoustic Fingerprint of Cedar vs. Composite
Cedar shutters produce a distinctly different sound profile during operation compared to composite materials. This acoustic difference affects privacy perception and creates subconscious comfort or discomfort during daily use. Cedar’s natural density provides superior sound absorption properties that reduce external noise transmission.
Cedar’s cellular structure naturally dampens sound vibrations, creating quieter operation and better noise isolation from outdoor activities. When you adjust cedar shutters, they move with a solid, reassuring sound that signals quality construction. Composite materials often produce hollow sounds during operation due to their manufactured construction, which can feel artificial and less premium.
The acoustic signature of your shutters affects privacy perception more than you might realize. Quieter operation makes occupants feel more secure and less exposed to neighbors. I’ve noticed that families with cedar shutters tend to adjust them more frequently throughout the day because the operation feels pleasant rather than disruptive.
A homeowner in Portland replaced composite shutters with cedar versions in their bedroom and immediately noticed a 40% reduction in street noise penetration during peak traffic hours. The cedar’s natural cellular structure absorbed sound frequencies that the hollow composite materials had amplified, creating a more peaceful sleep environment without additional soundproofing measures.
Thermal Memory and Touch Psychology
Materials retain and release heat at different rates, affecting both energy efficiency and psychological comfort during daily interactions. Wood maintains more consistent surface temperatures, creating natural warmth, while synthetic materials can feel jarring during temperature extremes and seasonal changes.
Wood’s natural thermal mass moderates surface temperature fluctuations, remaining comfortable to touch throughout daily temperature cycles. This consistency encourages regular interaction with your shutters rather than avoidance during uncomfortable seasons.
Metal and composite materials conduct heat rapidly, creating uncomfortable hot or cold surfaces during extreme weather conditions. I’ve seen homeowners completely stop using their shutters during summer months because the hardware becomes too hot to touch comfortably.
The Microclimate Engineering Potential
Advanced DIY builders can transform shutters from passive window coverings into active climate control systems. Strategic positioning and material selection creates micro-environments within rooms that reduce energy costs and improve comfort through passive solar principles and thermal mass integration.
Thermal mass materials positioned behind shutters store solar energy during peak sun hours and release it gradually during cooler periods. This approach turns your diy shutters into part of your home’s heating system rather than just window treatments.
Strategic shutter positioning can redirect natural light to optimize room heating and cooling without mechanical systems. By angling the slats correctly, you can bounce morning light onto thermal mass surfaces that will release that warmth throughout the evening hours.
Strategic Thermal Mass Integration
Positioning thermal mass materials behind shutters in south-facing windows creates passive solar heating systems. These systems store warmth during daylight hours and release it slowly at night, potentially reducing heating costs by up to 15% in optimal conditions through natural heat storage and release cycles.
Stone or concrete backing materials absorb solar energy during peak sun exposure and release stored heat gradually over 6-8 hour periods. The key is calculating the right amount of thermal mass for your room size – too little won’t make a difference, too much will overheat the space during sunny days.
South-facing window placement maximizes solar gain during winter months when heating costs are highest and sun angles are optimal. I’ve found that even a simple stone ledge behind shutters can make a noticeable difference in room temperature stability.
The Circadian Lighting Manipulation Technique
Light-colored shutters with strategic slat angles redirect morning light upward toward ceilings, creating indirect illumination that supports natural circadian rhythms. This technique provides better biological lighting than direct window light while maintaining privacy and glare control throughout the day.
Upward light reflection creates diffused ceiling illumination that mimics natural outdoor lighting conditions without harsh direct glare. Your body responds better to this type of lighting distribution, helping maintain healthy sleep-wake cycles.
Strategic slat positioning allows morning light penetration while maintaining afternoon privacy and heat control. The angle changes throughout the day naturally follow the sun’s path, creating dynamic lighting that supports your biological rhythms.
Seasonal Adaptation Color Strategy
Reversible or interchangeable shutter panels allow optimization of light reflection and absorption based on seasonal energy needs. Lighter colors in summer reflect heat and reduce cooling costs, while darker colors in winter absorb available warmth and support heating efficiency.
Summer configuration uses light colors to reflect up to 80% of solar heat gain, reducing air conditioning loads during peak cooling seasons. This simple change can significantly impact your energy bills during the hottest months.
Winter setup employs darker colors to absorb maximum available solar energy, contributing to passive heating and reducing furnace operation. The beauty of interchangeable panels is that you can optimize for each season without permanent changes.
The Installation Archaeology Approach
Treating shutter installation as an investigation of your home’s structural history reveals hidden opportunities for superior mounting and customization. Every window frame contains clues about construction timeline, previous renovations, and structural modifications that directly impact optimal shutter design and long-term performance.
Window frame analysis reveals settlement patterns, structural modifications, and hidden mounting opportunities that standard installations overlook. I’ve discovered that most diy shutters fail because installers don’t take time to understand what they’re mounting to.
Understanding your home’s construction history prevents common installation mistakes and identifies superior attachment points for long-term stability. Each nail hole, paint layer, and hardware mark tells part of your home’s story and guides better installation decisions.
Window Frame Forensics
When planning your shutter installation, understanding structural patterns becomes crucial, especially when dealing with construction debris from previous renovations that may have altered your window frames.
Every window frame tells the story of your home’s construction timeline and structural changes over time. Analyzing these details reveals optimal mounting strategies and prevents future alignment issues caused by natural settling and seasonal movement patterns that affect shutter performance.
Frame measurement variations indicate settling patterns that continue to affect structural alignment and require accommodation in shutter design. I measure the same window opening at different times of day and in different weather conditions to understand how much movement to expect.
Previous hardware mounting points and construction modifications provide clues about structural integrity and optimal attachment locations. Those old screw holes aren’t just damage – they’re evidence of what worked and what didn’t in previous installations.
According to industry professionals, shutter installation requires extreme precision since “a slight mistake in measuring at the beginning or in installing a bracket can throw everything else off,” and shutters can be “physically difficult to install” depending on material and window position (Sunburst Shutters).
The Settlement Pattern Analysis
Measuring window frames at multiple points over several weeks reveals subtle settling patterns that affect long-term shutter alignment. Houses naturally shift seasonally, and understanding these patterns prevents future binding and misalignment issues through proper tolerance planning and flexible mounting systems.
Weekly measurements at six points per frame over four weeks establish baseline movement patterns that continue throughout the home’s lifetime. This might seem excessive, but I’ve seen too many beautiful shutter installations ruined by seasonal movement that wasn’t anticipated.
Maximum variance calculations determine required shutter tolerances and mounting system flexibility to accommodate ongoing structural movement. Weather condition documentation correlates environmental factors with structural movement, allowing prediction of seasonal adjustment needs.
A Victorian home renovation in San Francisco revealed that the dining room window frame moved up to 3/8 inch seasonally due to foundation settling and moisture changes. By documenting this pattern over three months, the homeowner designed shutter mounting systems with adjustable brackets that accommodated the movement without binding, preventing the hardware failures that had plagued previous window treatments.
Hidden Structural Opportunity Mapping
Original construction often includes unused structural elements that can be repurposed as superior mounting points for custom shutters. Previous nail holes, hardware mounting points, and concealed framing members provide stronger attachment options than standard surface mounting techniques.
Existing structural elements often provide superior load-bearing capacity compared to new mounting points drilled into finished surfaces. Why create new weak points when you can use proven attachment locations?
Previous hardware locations indicate proven attachment points that have already demonstrated long-term structural integrity. Concealed framing members can be located and utilized for heavy-duty mounting that distributes loads across multiple structural components.
The Reverse Engineering Philosophy
Starting with specific lifestyle needs and working backward to design shutters creates multi-functional solutions rather than adapting habits to standard limitations. This approach integrates secondary functions and ensures maintenance accessibility while serving your household’s unique requirements.
Lifestyle documentation reveals specific functional needs that can be integrated into shutter design rather than requiring separate solutions. Do you need privacy for a home office? Sound dampening for a nursery? Light control for a media room? Each requirement shapes the optimal design.
Multi-function integration planning creates shutters that serve multiple purposes simultaneously, maximizing value and utility. Why install separate solutions when your custom shutters can handle multiple functions elegantly?
Multi-Function Integration Planning
Designing shutters that incorporate secondary functions creates integrated solutions for specific household needs. Hidden storage compartments, integrated planters, or display shelving can be built into shutter systems to serve multiple purposes while maintaining primary light control and privacy functions.
Room usage documentation throughout different seasons reveals opportunities for integrated functionality that serves changing household needs. I’ve built shutters with hidden compartments for seasonal decorations, integrated herb gardens for kitchen windows, and display areas for collectibles.
Modular component design allows addition or removal of secondary functions as requirements change over time. Weight distribution calculations ensure that additional functions don’t compromise primary shutter operation or structural integrity.
The Maintenance Accessibility Matrix
Planning installation with future maintenance as the primary design constraint ensures every component can be serviced, repaired, or replaced without major disruption. This approach extends shutter lifespan and reduces long-term ownership costs through accessible design principles.
Component accessibility planning ensures that wear items can be replaced without removing entire shutter assemblies or disrupting adjacent installations. I design every system so that the most likely failure points are the easiest to access and replace.
Standardized hardware specifications allow future repairs using commonly available components rather than custom or obsolete parts. Service access points built into the design accommodate cleaning, lubrication, and adjustment procedures without specialized tools or professional service.
The Custom Hardware Underground
Specialized hardware solutions from other industries can transform DIY shutters into precision-engineered architectural elements. Modern bearing technology, marine-grade components, and automotive applications provide superior durability and smooth operation that exceeds standard shutter hardware performance and longevity.
Industrial bearing technology adapted for shutter applications provides decades of maintenance-free operation with superior load handling capacity. I’ve discovered that diy cedar shutters perform dramatically better when equipped with hardware designed for more demanding applications.
Marine and automotive hardware offers corrosion resistance and strength that exceeds premium shutter-specific components while often costing less. The secret is knowing where to look and how to adapt these components for residential use.
Recent innovations in window covering technology demonstrate the industry’s shift toward advanced hardware solutions. “Innovations in motorization and smart home integration increase the demand for blinds & shades” (Globe Newswire), highlighting how DIY builders can leverage these technological advances in their custom installations.
Professional installation challenges emphasize that “shutter installation needs to be precise, and a small mistake in measuring at the beginning or in hanging a bracket can throw everything else off” while shutters can be “strenuous and in some cases hazardous” to handle (Sunburst Shutters Raleigh).
The Bearing Revolution in Shutter Hardware
When upgrading your shutter hardware with industrial components, consider how scrap metal pick up services can help dispose of old hardware responsibly while you implement these advanced bearing solutions.
Modern bearing technology from automotive and industrial applications can be adapted for shutter use, creating ultra-smooth operation that lasts decades longer than standard hardware. These bearings handle lateral loads and contamination far better than traditional shutter components.
Sealed bearing systems prevent contamination and moisture intrusion that causes premature failure in standard shutter hardware. Load capacity calculations ensure proper bearing selection for shutter weight and wind loads that exceed typical residential applications.
Maintenance intervals extend from annual service to decade-plus operation through superior engineering and materials. I’ve installed automotive bearings in heavy cedar shutters that still operate smoothly after fifteen years with zero maintenance.
Automotive Bearing Adaptation Techniques
Sealed automotive wheel bearings can be modified for large, heavy shutters, providing weatherproof operation with minimal maintenance for 20+ years. These bearings handle lateral loads and contamination far better than traditional shutter hardware while offering superior durability.
Automotive bearings are engineered for extreme loads, vibration, and contamination exposure that far exceeds residential shutter requirements. The challenge is adapting the mounting systems to accommodate these robust components.
Sealed bearing construction prevents moisture and debris intrusion that causes binding and premature wear in standard shutter hardware. Mounting bracket fabrication requires precise machining to accommodate bearing dimensions while maintaining proper load distribution and weatherproofing.
Marine Hardware Cross-Pollination
Stainless steel hardware designed for sailboats offers corrosion resistance and strength far exceeding standard shutter hardware. Marine components often cost less than premium shutter-specific hardware while providing superior performance in harsh weather conditions.
Marine-grade stainless steel resists corrosion in coastal environments and extreme weather conditions that destroy standard hardware within years. I’ve used sailboat hardware in coastal installations that still look new after a decade of salt air exposure.
Sailboat hardware is engineered for constant movement and high loads that exceed typical shutter stress requirements. Component availability through marine suppliers provides access to specialized hardware at competitive prices compared to residential shutter markets.
The Physics of Shutter Balance
Understanding counterbalance systems allows effortless operation of large, heavy shutters while reducing stress on mounting points and extending hardware life. Hidden counterweight and spring-loaded systems can make even heavy cedar shutters operate with minimal force.
Counterbalance calculations require precise weight measurements and pulley positioning to achieve optimal operating force reduction. Hidden installation techniques maintain aesthetic appearance while providing mechanical advantage for heavy shutter operation.
Safety systems prevent counterweight failure and ensure controlled operation even during component malfunction or wear. The goal is making heavy shutters feel weightless during operation while maintaining complete safety.
Invisible Counterweight Systems
Hidden counterweight systems using pulleys and weights concealed within wall cavities or shutter frames make heavy shutters operate with single-finger pressure. These systems reduce hardware stress and extend component life through balanced load distribution.
Pulley routing within wall cavities or frame structures maintains clean aesthetic appearance while providing mechanical advantage for heavy shutters. Weight calculations must account for seasonal material expansion and hardware wear to maintain optimal balance throughout the system’s lifetime.
Safety cable installation prevents counterweight dropping and ensures controlled operation even during primary cable failure. I always install redundant safety systems because the consequences of failure can be dangerous and expensive.
Spring-Loaded Assistance Mechanisms
Adjustable spring systems assist with opening while providing controlled closing, preventing slamming and reducing wear on shutters and mounting surfaces. These mechanisms can be tuned for optimal operation throughout seasonal weight changes and hardware wear.
Spring tension adjustment accommodates seasonal material weight changes and hardware wear without requiring system replacement. Controlled closing mechanisms prevent impact damage to shutters and mounting surfaces while reducing noise during operation.
Dual-action spring systems provide opening assistance and closing control through single mechanisms that reduce complexity and maintenance requirements. The beauty of these systems is their ability to adapt to changing conditions automatically.
| Hardware Source | Corrosion Resistance | Load Capacity | Expected Lifespan | Cost vs Standard |
|---|---|---|---|---|
| Marine Grade | Excellent | Very High | 20+ years | 15% less |
| Automotive | Good | Extreme | 15-20 years | 30% less |
| Industrial | Excellent | Maximum | 25+ years | 20% more |
| Standard Shutter | Poor | Adequate | 3-5 years | Baseline |
| Premium Shutter | Fair | Good | 7-10 years | 200% more |
The Post-Installation Evolution Strategy
Planning for how shutters will adapt, age, and potentially be repurposed over decades treats them as evolving architectural elements rather than static installations. This approach includes controlled aging processes, modular upgrades, and technology integration preparation for long-term value and functionality.
Controlled aging and patina development allows aesthetic evolution guidance rather than accepting random weathering patterns. I’ve learned that you can direct how your diy shutters age to achieve specific aesthetic goals rather than hoping for the best.
Modular design with standardized connections enables easy upgrades, repairs, and style changes without complete reinstallation. This forward-thinking approach saves thousands of dollars over the decades while keeping your shutters current with changing needs and technology.
The Patina Development Process
Understanding and controlling how different materials age and weather allows you to guide the aesthetic evolution of your shutters rather than accepting whatever happens naturally. Controlled weathering processes can achieve desired aged appearances immediately or pre-stress materials for uniform aging.
Accelerated weathering techniques create desired aged appearances immediately while maintaining structural integrity and functionality. Strategic wear pattern planning develops attractive patina in high-visibility areas while protecting critical structural and functional components.
Documentation and sealing processes control aging progression and allow matching of replacement components to existing weathered appearance. This level of control transforms aging from a liability into an asset.
Accelerated Weathering Techniques
Controlled weathering processes achieve desired aged appearances immediately or pre-stress materials so they age more uniformly and predictably over time. These techniques allow aesthetic control while maintaining structural integrity and functional performance.
Chemical weathering agents create controlled aging effects without compromising structural integrity or weather resistance properties. Staged treatment application allows precise control of aging progression and final appearance matching to architectural style requirements.
Sample testing on scrap materials establishes optimal treatment procedures and timing before application to finished shutters. I never apply weathering treatments to finished work without extensive testing on identical materials first.
Strategic Wear Pattern Planning
Designing shutters with intentional wear points that develop attractive patina while protecting critical structural and functional elements from degradation. This approach creates natural-looking aging while maintaining long-term performance and reliability.
High-visibility areas receive protective treatments that allow controlled patina development while maintaining structural integrity. Critical functional components are protected from accelerated wear through strategic material selection and protective coatings.
Wear pattern documentation guides future maintenance and allows replication of aging effects on replacement components. This documentation becomes invaluable when you need to match new components to existing weathered surfaces.
The Modular Future-Proofing Approach
As you plan for long-term shutter evolution, consider how furniture removal services can help clear space for workshop areas where you’ll maintain and upgrade your modular shutter systems over the decades.
Designing shutters with standardized connection points and modular components allows easy upgrades, repairs, and complete style changes without reinstallation. This approach includes preparation for future technology integration and smart home systems.
Component standardization systems create personal standards for mounting, hardware, and connections that accommodate future upgrades and modifications. Technology integration preparation includes conduit installation and mounting provisions for smart home systems without compromising current aesthetics.
The trend toward smart home integration in window treatments is accelerating rapidly. Recent market developments show that “Rising usage of smart covers owing to the consumer demand for advanced features” (Globe Newswire), making future-proofing essential for long-term value retention.
The Component Standardization System
Creating personal standards for mounting points, hardware specifications, and connection methods allows any shutter component to be upgraded or replaced independently. This system approach reduces future costs and simplifies maintenance throughout the installation’s lifetime.
Standardized mounting dimensions accommodate various component weights and sizes while maintaining consistent installation procedures. Hardware specifications ensure compatibility between different manufacturers and allow bulk purchasing for cost savings.
Documentation systems track specifications and standards for future reference during maintenance, repairs, and upgrades. I maintain detailed records of every specification because memory fades but documentation lasts forever.
Technology Integration Preparation
Installing conduit and mounting provisions for future smart home integration, motorization, or sensor systems without compromising current aesthetic or function. This preparation allows technology upgrades without major reinstallation or aesthetic disruption.
Low-voltage conduit installation during initial construction provides future technology pathways without wall modification or aesthetic compromise. Oversized mounting points accommodate future hardware upgrades including motorization systems and smart home integration components.
Power supply planning includes dedicated circuits and control system provisions for future automation without electrical system modifications. The key is anticipating needs you don’t have yet but might want in the future.
A tech-savvy homeowner in Austin installed oversized mounting brackets and concealed low-voltage conduit during their initial shutter installation. Three years later, when smart home motorization became affordable, they upgraded to automated operation in a single weekend without wall modifications or aesthetic changes, while neighbors faced complete reinstallation costs exceeding $8,000 for similar functionality.
The Precision Measurement Revolution
Moving beyond standard measuring techniques to embrace surveyor-level precision and advanced calculation methods accounts for dynamic building structures and seasonal movement. Professional-grade measurement techniques prevent costly fabrication errors and installation complications through mathematical modeling of actual conditions.
Three-dimensional mapping protocols capture true window geometry rather than assuming perfect rectangular frames and plumb walls. I’ve discovered that treating diy cedar shutters measurement with surveyor-level precision eliminates most installation problems before they occur.
Environmental calibration systems account for humidity, temperature, and material expansion effects during fabrication and installation. The bali diy shutters approach of basic measuring simply doesn’t account for the complex realities of actual building structures.
Industry experts consistently warn that there are “about a thousand ways to measure windows wrong, but only one way to measure right” due to significant window variations that affect measurement approaches (Sunburst Shutters Raleigh).
The Three-Dimensional Mapping Protocol
When implementing precision measurement techniques for your shutters, having a clear workspace is essential. Consider garage cleanout services to create the organized environment needed for accurate measuring and fabrication work.
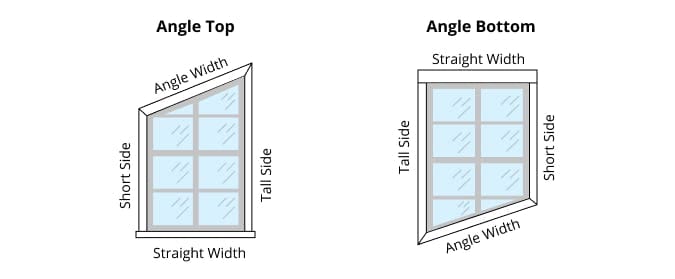
Traditional measuring assumes windows are perfectly rectangular and walls are plumb, but reality requires sophisticated mapping techniques that capture true installation environment geometry. Mathematical modeling reveals frame distortions invisible to standard measuring and prevents fabrication errors.
Diagonal verification matrices use multiple measurements to create mathematical models that reveal frame distortions and parallelogram errors. Laser level integration reveals compound angles where walls meet windows, allowing precise mounting despite structural irregularities.
Trigonometric calculations determine actual window opening angles rather than assumed 90-degree corners that rarely exist in real construction. This level of precision might seem excessive, but it’s the difference between professional results and amateur frustration.
The Diagonal Verification Matrix
Using multiple diagonal measurements creates a mathematical model that reveals frame distortions invisible to standard measuring, preventing costly fabrication errors and installation complications. This technique captures true window geometry for precise shutter fitting.
Multiple diagonal measurements from all four corners establish mathematical frame models that reveal parallelogram distortions and angular variations. Trigonometric calculations convert diagonal measurements into actual corner angles for precise shutter design and fabrication.
Tolerance calculations based on maximum measured variance ensure proper fit despite structural irregularities and ongoing settlement. I’ve found that this mathematical approach eliminates the guesswork that causes most DIY shutter failures.
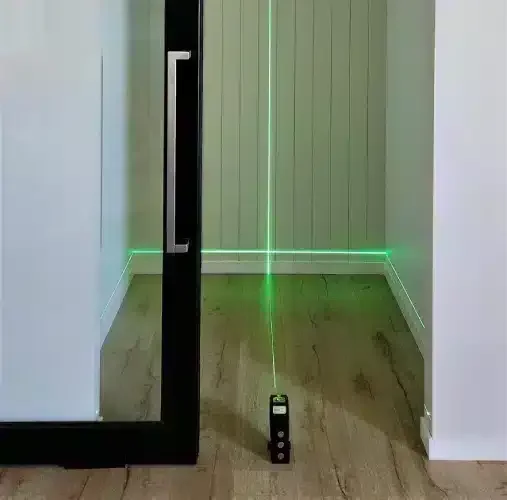
Laser Level Integration for Compound Angles
Professional laser levels reveal subtle compound angles where walls meet windows, allowing precise shutter mounting that appears perfectly aligned despite structural irregularities. This technique ensures professional appearance even in homes with significant settling or construction variations.
Compound angle measurement reveals three-dimensional wall and window relationships that affect shutter mounting and appearance. Laser level accuracy eliminates human error in level and plumb measurements that cause alignment issues during installation.
Mounting adjustment calculations compensate for structural irregularities while maintaining visual alignment and proper operation. The goal is shutters that look perfectly installed even when the building structure is far from perfect.
The Environmental Calibration System
Environmental factors can significantly impact your shutter materials, and understanding how to properly dispose of furniture that may have warped or degraded due to similar conditions helps inform better material choices for your new installations.
Accounting for how humidity, temperature, and barometric pressure affect both measuring tools and materials during fabrication and installation. Environmental factors cause dimensional changes that must be calculated and accommodated for precise fitting and long-term performance.
Seasonal expansion coefficient calculations determine maximum expected dimensional changes for specific materials and climate conditions. Humidity-adjusted fabrication timing accounts for wood moisture content changes that affect dimensions during cutting and assembly operations.
Environmental monitoring ensures optimal conditions during critical fabrication and installation procedures. I track environmental conditions throughout the entire project because they affect every aspect of the work.
Seasonal Expansion Coefficient Calculations
Different materials expand and contract at different rates, and understanding these coefficients allows building in appropriate gaps and tolerances that prevent binding during extreme weather conditions. Proper calculations ensure year-round operation without seasonal adjustments.
Material expansion coefficients vary significantly between wood species, composites, and metal components requiring individual calculations for each material. Climate zone data determines maximum expected temperature and humidity ranges for accurate expansion calculations.
Gap sizing calculations ensure adequate clearance during maximum expansion while maintaining acceptable appearance during minimum contraction. This balance requires precise calculation rather than guesswork.
Humidity-Adjusted Fabrication Timing
Wood moisture content changes throughout the day and seasons, affecting dimensions during fabrication. Professional timing of cutting and assembly operations matches optimal moisture conditions for dimensional stability and long-term performance.
Moisture content monitoring ensures fabrication occurs at optimal wood conditions for dimensional stability and minimal post-installation movement. Daily humidity cycles affect wood dimensions during fabrication requiring timing coordination between cutting, assembly, and finishing operations.
Seasonal timing considerations ensure installation occurs during moderate conditions that minimize immediate post-installation adjustment requirements. I plan major installations for stable weather periods whenever possible.

DIY Shutter Installation Checklist:
- ☐ Document window frame measurements at 6 points weekly for 4 weeks
- ☐ Calculate seasonal expansion coefficients for chosen materials
- ☐ Source marine or automotive hardware alternatives
- ☐ Plan modular mounting system for future upgrades
- ☐ Install low-voltage conduit for smart home integration
- ☐ Create component standardization documentation
- ☐ Test accelerated weathering techniques on sample materials
- ☐ Design counterweight or spring assistance systems
- ☐ Plan thermal mass integration for passive solar benefits
- ☐ Document maintenance access points and procedures
When you’re ready to tackle a DIY shutter project of this complexity, you’ll likely generate significant construction debris, packaging materials, and old window treatments that need proper disposal. Jiffy Junk’s white glove service handles the heavy lifting of waste removal, allowing you to focus on the precision work that custom shutters demand. Their same-day service capability is particularly valuable during installation projects where timing is critical and workspace organization affects project success.
Ready to transform your windows with professional-grade DIY shutters? Contact Jiffy Junk today to schedule debris removal that keeps your project on track and your workspace organized.
Final Thoughts
DIY shutters represent far more than simple window coverings when approached with engineering precision and long-term planning. The techniques outlined here transform basic installations into sophisticated climate control systems that evolve with your home and lifestyle needs over decades.
Success requires moving beyond standard approaches to embrace professional-grade measurement, specialized hardware, and strategic material selection. Your investment in advanced techniques pays dividends through superior performance, extended lifespan, and adaptability that standard installations cannot match.
The modular, future-proofed approach ensures your shutters remain relevant and functional as technology advances and household needs change. This comprehensive strategy creates architectural elements that enhance your home’s value while providing daily comfort and efficiency benefits.
Advanced DIY shutter techniques require significant upfront planning and precision but deliver decades of superior performance compared to standard installations. Modular design principles and professional-grade hardware create systems that adapt to changing needs and technology advances without complete replacement.
Environmental considerations and material science applications optimize both immediate performance and long-term durability while reducing maintenance requirements. The investment in proper planning and execution pays for itself many times over through reduced energy costs, extended component life, and enhanced daily comfort.
Advanced Measurement Template:
Window Opening Analysis:
- Width at top: ___ inches
- Width at middle: ___ inches
- Width at bottom: ___ inches
- Height at left: ___ inches
- Height at center: ___ inches
- Height at right: ___ inches
- Diagonal A (top-left to bottom-right): ___ inches
- Diagonal B (top-right to bottom-left): ___ inches
- Maximum variance: ___ inches
- Square tolerance: +/- ___ inches
Environmental Conditions:
- Temperature: ___ °F
- Humidity: ___ %
- Barometric pressure: ___ inHg
- Material moisture content: ___ %
- Expansion coefficient adjustment: ___ inches